Installation Guide
Page 2
Contents Package Contents 3 Hardware Features 4 LED Descriptions 5 Button Descriptions 6 Set Up Your Powerline Network 7 Set Up WiFi Access on Your XWN5001 11 Connect to the XWN5001 Access Point 17 Install NETGEAR genie 18 Compatible NETGEAR Powerline Devices 19 Safety Information 19 2
Contents Package Contents 3 Hardware Features 4 LED Descriptions 5 Button Descriptions 6 Set Up Your Powerline Network 7 Set Up WiFi Access on Your XWN5001 11 Connect to the XWN5001 Access Point 17 Install NETGEAR genie 18 Compatible NETGEAR Powerline Devices 19 Safety Information 19 2

Installation Guide
Page 7
Secure your Powerline network. The Power LED blinks green while the adapter is solid green on each Powerline adapter into a wall outlet. 2. c. a. Set Up Your Powerline Network To install the adapters and set up security. b. Make sure that the Power LED is setting up security: 1. Within 2 minutes, go to the XWN5001 access point and press its Security button for 2 seconds, and then release the button. Plug each Powerline adapter. On the XAV5401 adapter, press the Security button for 2 seconds, and then release the button. 7
Secure your Powerline network. The Power LED blinks green while the adapter is solid green on each Powerline adapter into a wall outlet. 2. c. a. Set Up Your Powerline Network To install the adapters and set up security. b. Make sure that the Power LED is setting up security: 1. Within 2 minutes, go to the XWN5001 access point and press its Security button for 2 seconds, and then release the button. Plug each Powerline adapter. On the XAV5401 adapter, press the Security button for 2 seconds, and then release the button. 7
Installation Guide
Page 11
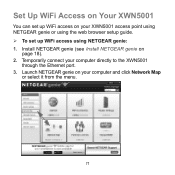
Install NETGEAR genie (see Install NETGEAR genie on your XWN5001 access point using NETGEAR genie or using the web browser setup guide. To set up WiFi access using NETGEAR genie: 1. Temporarily connect your computer and click Network Map or select it from the menu. 11 Launch NETGEAR genie on your computer directly to the XWN5001 through the Ethernet port. 3. Set Up WiFi Access on Your XWN5001 You can set up WiFi access on page 18). 2.
Install NETGEAR genie (see Install NETGEAR genie on your XWN5001 access point using NETGEAR genie or using the web browser setup guide. To set up WiFi access using NETGEAR genie: 1. Temporarily connect your computer and click Network Map or select it from the menu. 11 Launch NETGEAR genie on your computer directly to the XWN5001 through the Ethernet port. 3. Set Up WiFi Access on Your XWN5001 You can set up WiFi access on page 18). 2.
Installation Guide
Page 18
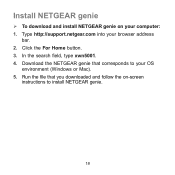
Type http://support.netgear.com into your computer: 1. Install NETGEAR genie To download and install NETGEAR genie on -screen instructions to your OS environment (Windows or Mac). 5. Download the NETGEAR genie that you downloaded and follow the on your browser address bar. 2. In the search field, type xwn5001. 4. Run the file that corresponds to install NETGEAR genie. 18 Click the For Home button. 3.
Type http://support.netgear.com into your computer: 1. Install NETGEAR genie To download and install NETGEAR genie on -screen instructions to your OS environment (Windows or Mac). 5. Download the NETGEAR genie that you downloaded and follow the on your browser address bar. 2. In the search field, type xwn5001. 4. Run the file that corresponds to install NETGEAR genie. 18 Click the For Home button. 3.

Installation Guide
Page 20
... heaters, fans, hair dryers, ovens, or refrigerators. 20 Do not exceed home and product outlet ratings and electrical requirements. • The socket-outlet shall be installed near the equipment and be easily accessible. • Only power cords are allowed to be a maximum of 1 m long and a minimum of 0.75 mm2 of the...
... heaters, fans, hair dryers, ovens, or refrigerators. 20 Do not exceed home and product outlet ratings and electrical requirements. • The socket-outlet shall be installed near the equipment and be easily accessible. • Only power cords are allowed to be a maximum of 1 m long and a minimum of 0.75 mm2 of the...
Installation Guide
Page 24
...Connect with Innovation are trademarks and/or registered trademarks of Conformity, visit: http://support.netgear.com/app/answers/detail/a_id/11621/. NETGEAR recommends that you use it to change without notice. © NETGEAR, Inc. Information is subject to register your product through a link in the United... CA 95134, USA May 2013 You must register your product and use only the official NETGEAR support resources. and/or its subsidiaries in the product's user interface. After installing your device, locate the serial number on the label of your product before you for ...
...Connect with Innovation are trademarks and/or registered trademarks of Conformity, visit: http://support.netgear.com/app/answers/detail/a_id/11621/. NETGEAR recommends that you use it to change without notice. © NETGEAR, Inc. Information is subject to register your product through a link in the United... CA 95134, USA May 2013 You must register your product and use only the official NETGEAR support resources. and/or its subsidiaries in the product's user interface. After installing your device, locate the serial number on the label of your product before you for ...