Installation Guide
Page 2
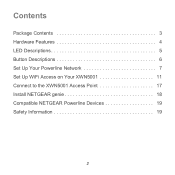
Contents Package Contents 3 Hardware Features 4 LED Descriptions 5 Button Descriptions 6 Set Up Your Powerline Network 7 Set Up WiFi Access on Your XWN5001 11 Connect to the XWN5001 Access Point 17 Install NETGEAR genie 18 Compatible NETGEAR Powerline Devices 19 Safety Information 19 2
Contents Package Contents 3 Hardware Features 4 LED Descriptions 5 Button Descriptions 6 Set Up Your Powerline Network 7 Set Up WiFi Access on Your XWN5001 11 Connect to the XWN5001 Access Point 17 Install NETGEAR genie 18 Compatible NETGEAR Powerline Devices 19 Safety Information 19 2
Installation Guide
Page 3
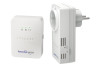
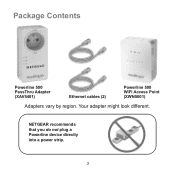
NETGEAR recommends that you do not plug a Powerline device directly into a power strip. 3 Package Contents Powerline 500 PassThru Adapter (XAV5401) Ethernet cables (2) Powerline 500 WiFi Access Point (XWN5001) Adapters vary by region. Your adapter might look different.
NETGEAR recommends that you do not plug a Powerline device directly into a power strip. 3 Package Contents Powerline 500 PassThru Adapter (XAV5401) Ethernet cables (2) Powerline 500 WiFi Access Point (XWN5001) Adapters vary by region. Your adapter might look different.
Installation Guide
Page 4
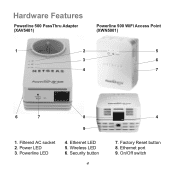
Filtered AC socket 2. Wireless LED 6. Factory Reset button 8. Powerline LED 4. Ethernet LED 5. Security button 4 4 7. On/Off switch Ethernet port 9. Hardware Features Powerline 500 PassThru Adapter (XAV5401) Powerline 500 WiFi Access Point (XWN5001) 1 2 5 3 6 4 7 6 7 8 9 1. Power LED 3.
Filtered AC socket 2. Wireless LED 6. Factory Reset button 8. Powerline LED 4. Ethernet LED 5. Security button 4 4 7. On/Off switch Ethernet port 9. Hardware Features Powerline 500 PassThru Adapter (XAV5401) Powerline 500 WiFi Access Point (XWN5001) 1 2 5 3 6 4 7 6 7 8 9 1. Power LED 3.

Installation Guide
Page 5
LED Descriptions The LEDs indicate the status of your Powerline adapters. • When you pick the electrical outlet with the fastest link rate: • Green: Link rate > 80 Mbps (fast) • Amber: Link rate > 50 ... LED lights and turns green when you connect a powered-on . lights and turns green when the wireless • The Powerline LED lights when the adapter detects at least one other compatible Powerline device. lights and If the Ethernet port is on Ethernet device to the adapter's Ethernet port. The Pick A Plug features...
LED Descriptions The LEDs indicate the status of your Powerline adapters. • When you pick the electrical outlet with the fastest link rate: • Green: Link rate > 80 Mbps (fast) • Amber: Link rate > 50 ... LED lights and turns green when you connect a powered-on . lights and turns green when the wireless • The Powerline LED lights when the adapter detects at least one other compatible Powerline device. lights and If the Ethernet port is on Ethernet device to the adapter's Ethernet port. The Pick A Plug features...

Installation Guide
Page 6
Button Descriptions The buttons on and off. • Security button. To return your wireless device to the XWN5001 WiFi access point. 6 Use the On/Off switch to its default factory settings, press the Factory Reset button for 2 seconds, and then release it. • Power On/Off switch. The Security button has two functions: • Secure the Powerline network. • Automatically connect your Powerline adapter to turn the device on your Powerline adapters let you do the following: • Factory Reset button.
Button Descriptions The buttons on and off. • Security button. To return your wireless device to the XWN5001 WiFi access point. 6 Use the On/Off switch to its default factory settings, press the Factory Reset button for 2 seconds, and then release it. • Power On/Off switch. The Security button has two functions: • Secure the Powerline network. • Automatically connect your Powerline adapter to turn the device on your Powerline adapters let you do the following: • Factory Reset button.

Installation Guide
Page 7
Set Up Your Powerline Network To install the adapters and set up security. The Power LED blinks green while the adapter is solid green on each Powerline adapter into a wall outlet. 2. Within 2 minutes, go to the XWN5001 access point and press its Security button for 2 seconds, and then release the button. Plug each Powerline adapter. Make sure that the Power LED is setting up security: 1. b. Secure your Powerline network. On the XAV5401 adapter, press the Security button for 2 seconds, and then release the button. 7 a. c.
Set Up Your Powerline Network To install the adapters and set up security. The Power LED blinks green while the adapter is solid green on each Powerline adapter into a wall outlet. 2. Within 2 minutes, go to the XWN5001 access point and press its Security button for 2 seconds, and then release the button. Plug each Powerline adapter. Make sure that the Power LED is setting up security: 1. b. Secure your Powerline network. On the XAV5401 adapter, press the Security button for 2 seconds, and then release the button. 7 a. c.
Installation Guide
Page 8
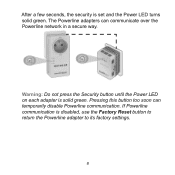
After a few seconds, the security is solid green. Pressing this button too soon can communicate over the Powerline network in a secure way. The Powerline adapters can temporarily disable Powerline communication. Warning: Do not press the Security button until the Power LED on each adapter is set and the Power LED turns solid green. If Powerline communication is disabled, use the Factory Reset button to return the Powerline adapter to its factory settings. 8
After a few seconds, the security is solid green. Pressing this button too soon can communicate over the Powerline network in a secure way. The Powerline adapters can temporarily disable Powerline communication. Warning: Do not press the Security button until the Power LED on each adapter is set and the Power LED turns solid green. If Powerline communication is disabled, use the Factory Reset button to return the Powerline adapter to its factory settings. 8
Installation Guide
Page 12
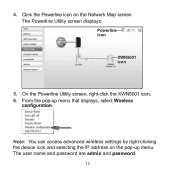
From the pop-up menu. Click the Powerline icon on the pop-up menu that displays, select Wireless configuration. On the Powerline Utility screen, right-click the XWN5001 icon. 6. Note: You can access advanced wireless settings by right-clicking the device icon and selecting the IP address on the Network Map screen. The Powerline Utility screen displays: Powerline icon XWN5001 icon 5. 4. The user name and password are admin and password. 12
From the pop-up menu. Click the Powerline icon on the pop-up menu that displays, select Wireless configuration. On the Powerline Utility screen, right-click the XWN5001 icon. 6. Note: You can access advanced wireless settings by right-clicking the device icon and selecting the IP address on the Network Map screen. The Powerline Utility screen displays: Powerline icon XWN5001 icon 5. 4. The user name and password are admin and password. 12
Installation Guide
Page 19
For a complete list of HomePlug AV-certified devices, visit www.homeplug.org/certified_products. Compatible NETGEAR Powerline Devices Your Powerline devices can share a Powerline network with these compatible NETGEAR devices: XAVB1301, XAVB1401, XAVB2101, XAVB2602, XAVNB2001, XAVB5601, XAVB5101, XAVB5201, XAVB5602, XAUB2511, XAVB5004, XAVB1004, XAVB5401, XWNB5201, and XWNB1601. Safety Information • For national approvals (approval schemes ...
For a complete list of HomePlug AV-certified devices, visit www.homeplug.org/certified_products. Compatible NETGEAR Powerline Devices Your Powerline devices can share a Powerline network with these compatible NETGEAR devices: XAVB1301, XAVB1401, XAVB2101, XAVB2602, XAVNB2001, XAVB5601, XAVB5101, XAVB5201, XAVB5602, XAUB2511, XAVB5004, XAVB1004, XAVB5401, XWNB5201, and XWNB1601. Safety Information • For national approvals (approval schemes ...