Installation Guide
Page 2
... NETGEAR, the NETGEAR logo, and Connect with Innovation are trademarks and/or registered trademarks of your product and use NETGEAR telephone support. Phone (US only): 1-888-NETGEAR Phone (Other Countries): Visit http://support.netgear.com/general/contact/default.aspx. All rights reserved. Information is subject to register your product through the NETGEAR website. NETGEAR recommends that you can use it to change...
... NETGEAR, the NETGEAR logo, and Connect with Innovation are trademarks and/or registered trademarks of your product and use NETGEAR telephone support. Phone (US only): 1-888-NETGEAR Phone (Other Countries): Visit http://support.netgear.com/general/contact/default.aspx. All rights reserved. Information is subject to register your product through the NETGEAR website. NETGEAR recommends that you can use it to change...
Installation Guide
Page 3
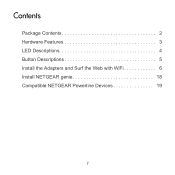
Contents Package Contents 2 Hardware Features 3 LED Descriptions 4 Button Descriptions 5 Install the Adapters and Surf the Web with WiFi 6 Install NETGEAR genie 18 Compatible NETGEAR Powerline Devices 19 1
Contents Package Contents 2 Hardware Features 3 LED Descriptions 4 Button Descriptions 5 Install the Adapters and Surf the Web with WiFi 6 Install NETGEAR genie 18 Compatible NETGEAR Powerline Devices 19 1

Installation Guide
Page 4
Package Contents XWN5001 XAV5201 Ethernet cables (2) NETGEAR recommends that you do not plug a Powerline device directly into a power strip. 2
Package Contents XWN5001 XAV5201 Ethernet cables (2) NETGEAR recommends that you do not plug a Powerline device directly into a power strip. 2

Installation Guide
Page 5
Hardware Features Powerline 500 WiFi Access Point (XWN5001) Powerline 500 Adapter (XAV5201) Power Powerline Wireless LED LED LED Power LED Powerline LED Ethernet LED Security button Factory Reset button On/Off switch Ethernet LED Ethernet port 3
Hardware Features Powerline 500 WiFi Access Point (XWN5001) Powerline 500 Adapter (XAV5201) Power Powerline Wireless LED LED LED Power LED Powerline LED Ethernet LED Security button Factory Reset button On/Off switch Ethernet LED Ethernet port 3

Installation Guide
Page 6
... wireless • The Powerline LED lights when the Powerline device detects at least one other compatible Powerline device. LED Descriptions The LEDs indicate the status of your Powerline devices. • When you plug in the Powerline device, the Power LED lights and turns green. • The Ethernet LED lights and turns green when you pick the electrical outlet with the fastest link rate. - Amber: Link rate > 50 and < 80 Mbps (Medium) - The Pick A Plug feature lets you connect a powered...
... wireless • The Powerline LED lights when the Powerline device detects at least one other compatible Powerline device. LED Descriptions The LEDs indicate the status of your Powerline devices. • When you plug in the Powerline device, the Power LED lights and turns green. • The Ethernet LED lights and turns green when you pick the electrical outlet with the fastest link rate. - Amber: Link rate > 50 and < 80 Mbps (Medium) - The Pick A Plug feature lets you connect a powered...

Installation Guide
Page 7
Button Descriptions The buttons on and off. • Security button: The Security button has two functions: - Automatically connect your Powerline device to the XWN5001 WiFi access point. 5 Secure the Powerline network. - Press the Factory Reset button for 2 seconds, and then release it. • Power On/Off switch: Use the On/Off switch to turn the device on your Powerline devices let you do the following: • Factory Reset button: Use the Factory Reset button to return your wireless client to its default factory settings.
Button Descriptions The buttons on and off. • Security button: The Security button has two functions: - Automatically connect your Powerline device to the XWN5001 WiFi access point. 5 Secure the Powerline network. - Press the Factory Reset button for 2 seconds, and then release it. • Power On/Off switch: Use the On/Off switch to turn the device on your Powerline devices let you do the following: • Factory Reset button: Use the Factory Reset button to return your wireless client to its default factory settings.
Installation Guide
Page 8
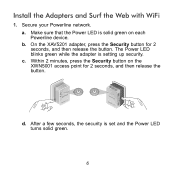
Install the Adapters and Surf the Web with WiFi 1. On the XAV5201 adapter, press the Security button for 2 seconds, and then release the button. Within 2 minutes, press the Security button on each Powerline device. a. b. d. Make sure that the Power LED is solid green on the XWN5001 access point for 2 seconds, and then release the button. The Power LED blinks green while the adapter is set and the Power LED turns solid green. 6 After a few seconds, the security is setting up security. c. Secure your Powerline network.
Install the Adapters and Surf the Web with WiFi 1. On the XAV5201 adapter, press the Security button for 2 seconds, and then release the button. Within 2 minutes, press the Security button on each Powerline device. a. b. d. Make sure that the Power LED is solid green on the XWN5001 access point for 2 seconds, and then release the button. The Power LED blinks green while the adapter is set and the Power LED turns solid green. 6 After a few seconds, the security is setting up security. c. Secure your Powerline network.

Installation Guide
Page 9
Plug the XAV5201 into a wall outlet near your router or gateway. 3. The Powerline devices can communicate over the Powerline network in a secure way. 2. Connect the XAV5201 through the LAN port with an Ethernet cable. 7
Plug the XAV5201 into a wall outlet near your router or gateway. 3. The Powerline devices can communicate over the Powerline network in a secure way. 2. Connect the XAV5201 through the LAN port with an Ethernet cable. 7

Installation Guide
Page 10
If you want to share Internet access across your home, make sure to connect the XAV5201 to your Internet gateway with an Ethernet cable. 8
If you want to share Internet access across your home, make sure to connect the XAV5201 to your Internet gateway with an Ethernet cable. 8
Installation Guide
Page 11
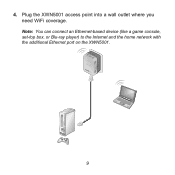
Note: You can connect an Ethernet-based device (like a game console, set-top box, or Blu-ray player) to the Internet and the home network with the additional Ethernet port on the XWN5001. 9 4. Plug the XWN5001 access point into a wall outlet where you need WiFi coverage.
Note: You can connect an Ethernet-based device (like a game console, set-top box, or Blu-ray player) to the Internet and the home network with the additional Ethernet port on the XWN5001. 9 4. Plug the XWN5001 access point into a wall outlet where you need WiFi coverage.
Installation Guide
Page 12
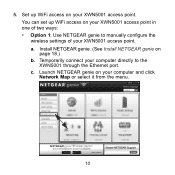
5. You can set up WiFi access on your XWN5001 access point in one of two ways: • Option 1: Use NETGEAR genie to the XWN5001 through the Ethernet port. a. c. Install NETGEAR genie. (See Install NETGEAR genie on your computer and click Network Map or select it from the menu. 10 Launch NETGEAR genie on your XWN5001 access point. Temporarily connect your computer directly to manually configure the wireless settings of your XWN5001 access point. Set up WiFi access on page 18.) b.
5. You can set up WiFi access on your XWN5001 access point in one of two ways: • Option 1: Use NETGEAR genie to the XWN5001 through the Ethernet port. a. c. Install NETGEAR genie. (See Install NETGEAR genie on your computer and click Network Map or select it from the menu. 10 Launch NETGEAR genie on your XWN5001 access point. Temporarily connect your computer directly to manually configure the wireless settings of your XWN5001 access point. Set up WiFi access on page 18.) b.
Installation Guide
Page 14
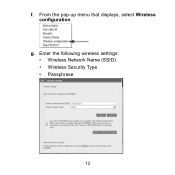
From the pop-up menu that displays, select Wireless configuration. g. Enter the following wireless settings: • Wireless Network Name (SSID) • Wireless Security Type • Passphrase 12 f.
From the pop-up menu that displays, select Wireless configuration. g. Enter the following wireless settings: • Wireless Network Name (SSID) • Wireless Security Type • Passphrase 12 f.

Installation Guide
Page 15
... If you want to clone your existing wireless network, enter the same wireless settings that your router or gateway uses. Creating a new wireless network lets you have a second network in your house, your wireless client (laptop, tablet, or smartphone) switches from the XWN5001. The login and password are finished with the wireless settings, disconnect the Ethernet cable from one network (router or gateway) to save your changes.
... If you want to clone your existing wireless network, enter the same wireless settings that your router or gateway uses. Creating a new wireless network lets you have a second network in your house, your wireless client (laptop, tablet, or smartphone) switches from the XWN5001. The login and password are finished with the wireless settings, disconnect the Ethernet cable from one network (router or gateway) to save your changes.
Installation Guide
Page 16
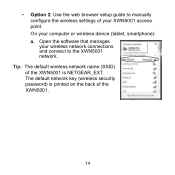
• Option 2: Use the web browser setup guide to the XWN5001 network. Open the software that manages your wireless network connections and connect to manually configure the wireless settings of the XWN5001. 14 Tip: The default wireless network name (SSID) of the XWN5001 is NETGEAR_EXT. The default network key (wireless security password) is printed on the back of your computer or wireless device (tablet, smartphone): a. On your XWN5001 access point.
• Option 2: Use the web browser setup guide to the XWN5001 network. Open the software that manages your wireless network connections and connect to manually configure the wireless settings of the XWN5001. 14 Tip: The default wireless network name (SSID) of the XWN5001 is NETGEAR_EXT. The default network key (wireless security password) is printed on the back of your computer or wireless device (tablet, smartphone): a. On your XWN5001 access point.
Installation Guide
Page 17
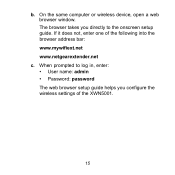
If it does not, enter one of the XWN5001. 15 When prompted to log in, enter: • User name: admin • Password: password The web browser setup guide helps you directly to the onscreen setup guide. The browser takes you configure the wireless settings of the following into the browser address bar: www.mywifiext.net www.netgearextender.net c. b. On the same computer or wireless device, open a web browser window.
If it does not, enter one of the XWN5001. 15 When prompted to log in, enter: • User name: admin • Password: password The web browser setup guide helps you directly to the onscreen setup guide. The browser takes you configure the wireless settings of the following into the browser address bar: www.mywifiext.net www.netgearextender.net c. b. On the same computer or wireless device, open a web browser window.
Installation Guide
Page 19
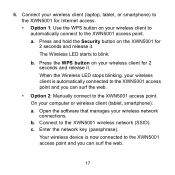
... wireless client (tablet, smartphone): a. Enter the network key (passphrase). a. The Wireless LED starts to the XWN5001 wireless network (SSID). On your wireless network connections. Your wireless device is automatically connected to the XWN5001 access point and you can surf the web. • Option 2: Manually connect to the XWN5001 access point and you can surf the web. 17 b. When the Wireless LED stops blinking, your wireless client is now connected...
... wireless client (tablet, smartphone): a. Enter the network key (passphrase). a. The Wireless LED starts to the XWN5001 wireless network (SSID). On your wireless network connections. Your wireless device is automatically connected to the XWN5001 access point and you can surf the web. • Option 2: Manually connect to the XWN5001 access point and you can surf the web. 17 b. When the Wireless LED stops blinking, your wireless client is now connected...
Installation Guide
Page 20
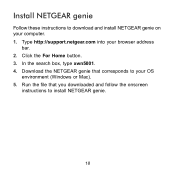
In the search box, type xwn5001. 4. Click the For Home button. 3. Type http://support.netgear.com into your computer. 1. Download the NETGEAR genie that you downloaded and follow the onscreen instructions to install NETGEAR genie. 18 Install NETGEAR genie Follow these instructions to download and install NETGEAR genie on your browser address bar. 2. Run the file that corresponds to your OS environment (Windows or Mac). 5.
In the search box, type xwn5001. 4. Click the For Home button. 3. Type http://support.netgear.com into your computer. 1. Download the NETGEAR genie that you downloaded and follow the onscreen instructions to install NETGEAR genie. 18 Install NETGEAR genie Follow these instructions to download and install NETGEAR genie on your browser address bar. 2. Run the file that corresponds to your OS environment (Windows or Mac). 5.
Installation Guide
Page 22
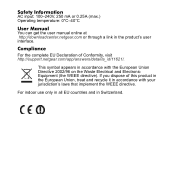
... of Conformity, visit http://support.netgear.com/app/answers/detail/a_id/11621/. Safety Information AC input: 100-240V, 250 mA or 0.25A (max.) Operating temperature: 0°C-40°C User Manual You can get the user manual online at http://downloadcenter.netgear.com or through a link in Switzerland. For indoor use only in all EU countries and...
... of Conformity, visit http://support.netgear.com/app/answers/detail/a_id/11621/. Safety Information AC input: 100-240V, 250 mA or 0.25A (max.) Operating temperature: 0°C-40°C User Manual You can get the user manual online at http://downloadcenter.netgear.com or through a link in Switzerland. For indoor use only in all EU countries and...
Product Data Sheet
Page 1
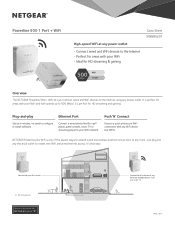
..., no need to WiFi devices & any power outlet. Push 'N' Connect Ensures a quick and secure WiFi connection with Existing modem or router Connect to configure or install software. Plug-and-play Set up to 500 Mbps†, it's perfect for HD streaming & gaming Data Sheet XWNB5201 Overview The NETGEAR Powerline 500 + WiFi lets you connect wired and WiFi devices to create new WiFi and wired Internet access. Ethernet Port Connect a wired device like...
..., no need to WiFi devices & any power outlet. Push 'N' Connect Ensures a quick and secure WiFi connection with Existing modem or router Connect to configure or install software. Plug-and-play Set up to 500 Mbps†, it's perfect for HD streaming & gaming Data Sheet XWNB5201 Overview The NETGEAR Powerline 500 + WiFi lets you connect wired and WiFi devices to create new WiFi and wired Internet access. Ethernet Port Connect a wired device like...
Product Data Sheet
Page 2
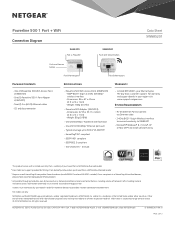
.... Powerline 500 1 Port + WiFi Connection Diagram XAV5201 Pick-a-Plug LED XWN5001 Push-and-Secure button Data Sheet XWNB5201 Push-and-Secure button Fast Ethernet port Fast Ethernet port Package Contents • One (1) Powerline 500 WiFi Access Point (XWN5001) • One (1) Powerline 500 1 Port Adapter (XAV5201) • Two (2) 2m (6.5ft) Ethernet cables • CD and documentation Specifications • Powerline 500 WiFi Access Point (XWN5001) - IEEE® 802.11 b/g/n 2.4 GHz 300 Mbps† wireless interface - NETGEAR...
.... Powerline 500 1 Port + WiFi Connection Diagram XAV5201 Pick-a-Plug LED XWN5001 Push-and-Secure button Data Sheet XWNB5201 Push-and-Secure button Fast Ethernet port Fast Ethernet port Package Contents • One (1) Powerline 500 WiFi Access Point (XWN5001) • One (1) Powerline 500 1 Port Adapter (XAV5201) • Two (2) 2m (6.5ft) Ethernet cables • CD and documentation Specifications • Powerline 500 WiFi Access Point (XWN5001) - IEEE® 802.11 b/g/n 2.4 GHz 300 Mbps† wireless interface - NETGEAR...