WNR1000v2 Setup Manual
Page 8
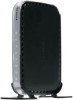
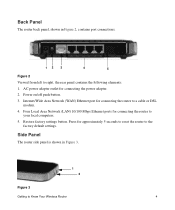
Power on/off push-button. 3. Restore factory settings button. Four Local Area Network (LAN) 10/100 Mbps Ethernet ports for connecting the router to a cable or DSL modem. 4. Side Panel The router side panel is shown in Figure 2, contains port connections. 12 3 4 5 Figure 2 Viewed from left to Know Your Wireless Router 4 Internet/Wide Area Network (WAN) Ethernet...
Power on/off push-button. 3. Restore factory settings button. Four Local Area Network (LAN) 10/100 Mbps Ethernet ports for connecting the router to a cable or DSL modem. 4. Side Panel The router side panel is shown in Figure 2, contains port connections. 12 3 4 5 Figure 2 Viewed from left to Know Your Wireless Router 4 Internet/Wide Area Network (WAN) Ethernet...

WNR1000v2 Setup Manual
Page 9
..., the operating distance or range of your network from the other four ports that connect to Know Your Wireless Router 5 1. For best results, place your wireless network. WPS button - Turns the Wireless network on the physical placement of the router is enabled, the Wireless LED on the front of your router: Getting to the wired computer(s) on page 3. 2.
..., the operating distance or range of your network from the other four ports that connect to Know Your Wireless Router 5 1. For best results, place your wireless network. WPS button - Turns the Wireless network on the physical placement of the router is enabled, the Wireless LED on the front of your router: Getting to the wired computer(s) on page 3. 2.
WNR1000v2 Setup Manual
Page 19
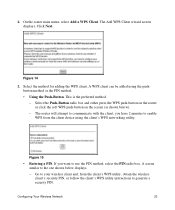
3. You might need to go to Configure Your Wireless Network" on the wireless router. Power 2. Push 'N' Connect 3. The WPS button/light will take several minutes for your router to establish a connection with your computer and your Internet provider. See "Using Push 'N' Connect (WPS) to the Internet Explorer Tools menu, Internet Options, Connections tab ...
3. You might need to go to Configure Your Wireless Network" on the wireless router. Power 2. Push 'N' Connect 3. The WPS button/light will take several minutes for your router to establish a connection with your computer and your Internet provider. See "Using Push 'N' Connect (WPS) to the Internet Explorer Tools menu, Internet Options, Connections tab ...
WNR1000v2 Setup Manual
Page 20
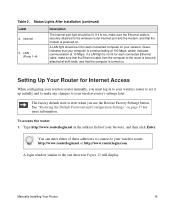
... the address field of these addresses to connect to the wireless router Internet port and the modem, and that the computer is not, make sure that your wireless router manually, you use the Restore Factory Settings button. LAN (Ports 1-4) Description The Internet port light should ...be lit. Green indicates that the Ethernet cable from the computer to your wireless router: http://www.routerlogin.net or http://...
... the address field of these addresses to connect to the wireless router Internet port and the modem, and that the computer is not, make sure that your wireless router manually, you use the Restore Factory Settings button. LAN (Ports 1-4) Description The Internet port light should ...be lit. Green indicates that the Ethernet cable from the computer to your wireless router: http://www.routerlogin.net or http://...
WNR1000v2 Setup Manual
Page 27
... utility. : Figure 15 • Entering a PIN. Select the Push-Button radio box and either press the WPS push-button on the router or click the soft WPS push-button on the screen (as shown below displays. - This is the preferred method. - A screen similar to your wireless client and, from the client device using the pushbutton...
... utility. : Figure 15 • Entering a PIN. Select the Push-Button radio box and either press the WPS push-button on the router or click the soft WPS push-button on the screen (as shown below displays. - This is the preferred method. - A screen similar to your wireless client and, from the client device using the pushbutton...

WNR1000v2 User Manual
Page 7
...Revision History ...xiii Chapter 1 Configuring Basic Connectivity Using the Setup Manual 1-1 Logging In To Your Wireless Router 1-2 Selecting a Language for Your Screen Display 1-5 Configuring Your Internet Settings Using the Setup Wizard...Wireless Security 2-1 Recording Basic Wireless Settings Setup Information 2-5 Changing Wireless Security Settings 2-6 Viewing Basic Wireless Settings 2-6 Configuring WEP Wireless Security 2-8 Configuring WPA-PSK and WPA2-PSK Wireless Security 2-10 Viewing Advanced Wireless Settings 2-11 Using Push 'N' Connect (Wi-Fi Protected Setup 2-13 Push Button...
...Revision History ...xiii Chapter 1 Configuring Basic Connectivity Using the Setup Manual 1-1 Logging In To Your Wireless Router 1-2 Selecting a Language for Your Screen Display 1-5 Configuring Your Internet Settings Using the Setup Wizard...Wireless Security 2-1 Recording Basic Wireless Settings Setup Information 2-5 Changing Wireless Security Settings 2-6 Viewing Basic Wireless Settings 2-6 Configuring WEP Wireless Security 2-8 Configuring WPA-PSK and WPA2-PSK Wireless Security 2-10 Viewing Advanced Wireless Settings 2-11 Using Push 'N' Connect (Wi-Fi Protected Setup 2-13 Push Button...
WNR1000v2 User Manual
Page 12
Wireless-N 150 Router WNR1000v2 User Manual Danger: This is written for the product model. • Links to PDF versions of this manual includes the following: • Buttons, and at http://www.netgear.com/support. How to access the full NETGEAR, Inc. Note: Product updates are available on the NETGEAR, Inc. xii v1.0, September 2009 Double-click a link in...
Wireless-N 150 Router WNR1000v2 User Manual Danger: This is written for the product model. • Links to PDF versions of this manual includes the following: • Buttons, and at http://www.netgear.com/support. How to access the full NETGEAR, Inc. Note: Product updates are available on the NETGEAR, Inc. xii v1.0, September 2009 Double-click a link in...

WNR1000v2 User Manual
Page 32
... the broadcast of a push button. Wi-Fi Protected Setup provides easy setup by MAC Address" on page 2-22. For more information, see "Viewing Advanced Wireless Settings" on page 2-13. 2-4 Safeguarding Your Network v1.0, September 2009 Older wireless adapters and devices might disable this . You can restrict access to the WNR1000v2 router. For more information, see...
... the broadcast of a push button. Wi-Fi Protected Setup provides easy setup by MAC Address" on page 2-22. For more information, see "Viewing Advanced Wireless Settings" on page 2-13. 2-4 Safeguarding Your Network v1.0, September 2009 Older wireless adapters and devices might disable this . You can restrict access to the WNR1000v2 router. For more information, see...
WNR1000v2 User Manual
Page 41
... Setup) If your client device. WPS automatically configures the network name (SSID) and wireless security settings for more information, see the NETGEAR Wireless Router Setup Manual. Note: NETGEAR's Push 'N' Connect feature is not supported by WPS. Press the button on the rear of the WNR1000v2 router for the symbol on page 2-17. Look for over 5 seconds. When you...
... Setup) If your client device. WPS automatically configures the network name (SSID) and wireless security settings for more information, see the NETGEAR Wireless Router Setup Manual. Note: NETGEAR's Push 'N' Connect feature is not supported by WPS. Press the button on the rear of the WNR1000v2 router for the symbol on page 2-17. Look for over 5 seconds. When you...
WNR1000v2 User Manual
Page 42
....0, September 2009 Safeguarding Your Network Click the button in the main menu, and click Next. 3. Figure 2-6 4. Log in "Logging In To Your Wireless Router" on when one of these • The router and the client establish a wireless connection. • The 2-minute window period expires for establishing a WPS connection. The WNR1000v2 router's green conditions occurs: light ceases blinking...
....0, September 2009 Safeguarding Your Network Click the button in the main menu, and click Next. 3. Figure 2-6 4. Log in "Logging In To Your Wireless Router" on when one of these • The router and the client establish a wireless connection. • The 2-minute window period expires for establishing a WPS connection. The WNR1000v2 router's green conditions occurs: light ceases blinking...

WNR1000v2 User Manual
Page 43
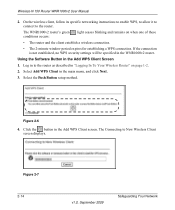
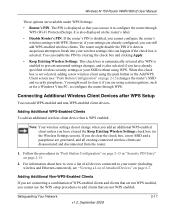
... a PIN: using the router's security PIN or using the wireless client's security PIN. Obtain your router's security PIN from the rear panel of these • The router and the client establish a wireless connection. • The 2-minute window period expires for establishing a WPS connection. Select Add WPS Client in the WNR1000v2 router. While the button light is not established...
... a PIN: using the router's security PIN or using the wireless client's security PIN. Obtain your router's security PIN from the rear panel of these • The router and the client establish a wireless connection. • The 2-minute window period expires for establishing a WPS connection. Select Add WPS Client in the WNR1000v2 router. While the button light is not established...
WNR1000v2 User Manual
Page 45
Wireless-N 150 Router WNR1000v2 User Manual These options are connecting a combination of Attached Devices" on page 2-15. 2. It is displayed so that are not WPS enabled, you cannot use it to configure the router through WPS (Wi-Fi Protected Setup). When ...-WPS-Enabled Clients If you have already specified wireless security settings or your router (including wireless and Ethernet-connected), see "Push Button Configuration" on the router's label. • Disable Router's PIN. However, if your wireless settings; The router might need to your SSID without using certain ...
Wireless-N 150 Router WNR1000v2 User Manual These options are connecting a combination of Attached Devices" on page 2-15. 2. It is displayed so that are not WPS enabled, you cannot use it to configure the router through WPS (Wi-Fi Protected Setup). When ...-WPS-Enabled Clients If you have already specified wireless security settings or your router (including wireless and Ethernet-connected), see "Push Button Configuration" on the router's label. • Disable Router's PIN. However, if your wireless settings; The router might need to your SSID without using certain ...

WNR1000v2 User Manual
Page 47
... address; Safeguarding Your Network v1.0, September 2009 2-19 The Wireless Card Access Setup screen opens and displays a list of that computer to the router. Click Add to add a wireless device to display the Wireless Card Access List. Figure 2-12 4. Tip: You can ..., you can manually enter a name and the MAC address of the wireless device. The computer should then appear in the Available Wireless Cards list, you can select the radio button of currently active wireless cards and their Ethernet MAC addresses. Wireless-N 150 Router WNR1000v2 User Manual 2.
... address; Safeguarding Your Network v1.0, September 2009 2-19 The Wireless Card Access Setup screen opens and displays a list of that computer to the router. Click Add to add a wireless device to display the Wireless Card Access List. Figure 2-12 4. Tip: You can ..., you can manually enter a name and the MAC address of the wireless device. The computer should then appear in the Available Wireless Cards list, you can select the radio button of currently active wireless cards and their Ethernet MAC addresses. Wireless-N 150 Router WNR1000v2 User Manual 2.
WNR1000v2 User Manual
Page 54
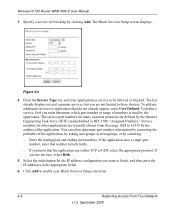
...the application, by asking user groups or newsgroups, or by the Internet Engineering Task Force (IETF) and published in the appropriate fields. 6. Select the radio button for other applications are not sure, select Both. 5. From the Service Type list, select the application or service to enable your Block Services Setup selections... displays several common services, but you are typically chosen from the range 1024 to block, and then enter the IP addresses in RFC1700, "Assigned Numbers." Wireless-N 150 Router WNR1000v2 User Manual 3. Enter the starting port and ending port numbers.
...the application, by asking user groups or newsgroups, or by the Internet Engineering Task Force (IETF) and published in the appropriate fields. 6. Select the radio button for other applications are not sure, select Both. 5. From the Service Type list, select the application or service to enable your Block Services Setup selections... displays several common services, but you are typically chosen from the range 1024 to block, and then enter the IP addresses in RFC1700, "Assigned Numbers." Wireless-N 150 Router WNR1000v2 User Manual 3. Enter the starting port and ending port numbers.
WNR1000v2 User Manual
Page 57
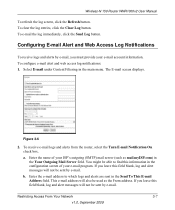
...log notifications: 1. This e-mail address will not be sent by e-mail. Figure 3-6 2. To receive e-mail logs and alerts from the router, select the Turn E-mail Notification On check box. If you leave this information in the configuration screen of your ISP's outgoing (SMTP)...v1.0, September 2009 The E-mail screen displays. Wireless-N 150 Router WNR1000v2 User Manual To refresh the log screen, click the Refresh button. To clear the log entries, click the Clear Log button. To e-mail the log immediately, click the Send Log button. Enter the name of your e-mail account ...
...log notifications: 1. This e-mail address will not be sent by e-mail. Figure 3-6 2. To receive e-mail logs and alerts from the router, select the Turn E-mail Notification On check box. If you leave this information in the configuration screen of your ISP's outgoing (SMTP)...v1.0, September 2009 The E-mail screen displays. Wireless-N 150 Router WNR1000v2 User Manual To refresh the log screen, click the Refresh button. To clear the log entries, click the Clear Log button. To e-mail the log immediately, click the Send Log button. Enter the name of your e-mail account ...
WNR1000v2 User Manual
Page 62
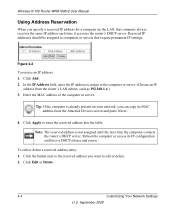
...entry: 1. Reboot the computer or access its MAC address from the router's LAN subnet, such as 192.168.1.x.) 3. Reserved IP addresses should be assigned to enter the reserved address into the table. Click the button next to the reserved address you want to the computer or server. ...(Choose an IP address from the Attached Devices screen and paste it accesses the router's DHCP server. Wireless-N 150 Router WNR1000v2 User Manual Using Address Reservation When you specify ...
...entry: 1. Reboot the computer or access its MAC address from the router's LAN subnet, such as 192.168.1.x.) 3. Reserved IP addresses should be assigned to enter the reserved address into the table. Click the button next to the reserved address you want to the computer or server. ...(Choose an IP address from the Attached Devices screen and paste it accesses the router's DHCP server. Wireless-N 150 Router WNR1000v2 User Manual Using Address Reservation When you specify ...
WNR1000v2 User Manual
Page 66
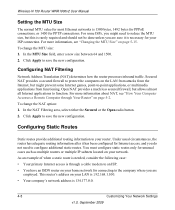
..., select either the Secured or the Open radio button. 2. You must configure static routes only for connecting to an ISP. • You have an ISDN router on your home network for unusual cases such as multiple routers or multiple IP subnets located on page 5-2. Configuring... Accesses a Remote Computer through a cable modem to the company where you might need to function. To change the MTU size: 1. Wireless-N 150 Router WNR1000v2 User Manual Setting the MTU Size The normal MTU value for most Ethernet networks is 134.177.0.0. 4-8 Customizing Your Network Settings v1.0, ...
..., select either the Secured or the Open radio button. 2. You must configure static routes only for connecting to an ISP. • You have an ISDN router on your home network for unusual cases such as multiple routers or multiple IP subnets located on page 5-2. Configuring... Accesses a Remote Computer through a cable modem to the company where you might need to function. To change the MTU size: 1. Wireless-N 150 Router WNR1000v2 User Manual Setting the MTU Size The normal MTU value for most Ethernet networks is 134.177.0.0. 4-8 Customizing Your Network Settings v1.0, ...
WNR1000v2 User Manual
Page 76
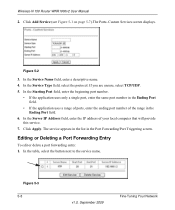
... service. 7. Click Apply. The service appears in the list in the Ending Port field. 6. In the Service Name field, enter a descriptive name. 4. Wireless-N 150 Router WNR1000v2 User Manual 2. In the Service Type field, select the protocol. If you are unsure, select TCP/UDP. 5. In the Server IP Address field, enter ... delete a port forwarding entry: 1. Click Add Service (see Figure 5-1 on page 5-7).The Ports-Custom Services screen displays. In the table, select the button next to the service name. Figure 5-3 5-8 v1.0, September 2009 Fine-Tuning Your Network Figure 5-2 3.
... service. 7. Click Apply. The service appears in the list in the Ending Port field. 6. In the Service Name field, enter a descriptive name. 4. Wireless-N 150 Router WNR1000v2 User Manual 2. In the Service Type field, select the protocol. If you are unsure, select TCP/UDP. 5. In the Server IP Address field, enter ... delete a port forwarding entry: 1. Click Add Service (see Figure 5-1 on page 5-7).The Ports-Custom Services screen displays. In the table, select the button next to the service name. Figure 5-3 5-8 v1.0, September 2009 Fine-Tuning Your Network Figure 5-2 3.
WNR1000v2 User Manual
Page 78
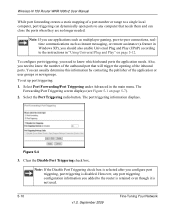
... Port Triggering radio button. Note: If the Disable Port Triggering check box is selected after you need to the instructions in the main menu. To configure port triggering, you added to any port triggering configuration information you need to know which inbound ports the application needs. Figure 5-4 3. Wireless-N 150 Router WNR1000v2 User Manual While...
... Port Triggering radio button. Note: If the Disable Port Triggering check box is selected after you need to the instructions in the main menu. To configure port triggering, you added to any port triggering configuration information you need to know which inbound ports the application needs. Figure 5-4 3. Wireless-N 150 Router WNR1000v2 User Manual While...
WNR1000v2 User Manual
Page 91
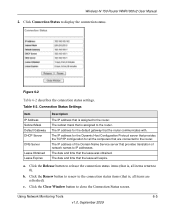
... that provides the TCP/IP configuration for the default gateway that is , all items are connected to the router. The date and time that is assigned to the router. c. Wireless-N 150 Router WNR1000v2 User Manual 2. Click the Renew button to renew to IP addresses. The IP address of network names to the connection status items (that...
... that provides the TCP/IP configuration for the default gateway that is , all items are connected to the router. The date and time that is assigned to the router. c. Wireless-N 150 Router WNR1000v2 User Manual 2. Click the Renew button to renew to IP addresses. The IP address of network names to the connection status items (that...


