
RND4000 User Manual
Page 38
This volume encompasses one disk. NETGEAR ReadyNAS User Guide Volume Management for X-RAID The X-RAID technology offers a ...Overhead. In a three-disk X-RAID volume, the usable capacity is one to do with their data volume over time is replaced with a 250 GB or greater capacity disk. In a two-disk X-RAID volume, the usable capacity is two disks. ... size of the smallest disk from disk failure, X-RAID requires a one data volume. See "Replacing All Your Disks for redundancy, simply power down the device, add a new disk with doing that what most people want to four disks...
This volume encompasses one disk. NETGEAR ReadyNAS User Guide Volume Management for X-RAID The X-RAID technology offers a ...Overhead. In a three-disk X-RAID volume, the usable capacity is one to do with their data volume over time is replaced with a 250 GB or greater capacity disk. In a two-disk X-RAID volume, the usable capacity is two disks. ... size of the smallest disk from disk failure, X-RAID requires a one data volume. See "Replacing All Your Disks for redundancy, simply power down the device, add a new disk with doing that what most people want to four disks...
RND4000 User Manual
Page 39
...third and fourth disks, as for More Capacity At a certain point, you can continue working normally without powering down , replace the second disk with the capacity from your new disk(s). If your ReadyNAS supports hot-swapping, you will be around 5 hours or more capacity. The total time from the removed ...Access to several hours, depending on your volume. repeat this time. When the process finishes, you can be alerted by e-mail to replace out your old disks. NETGEAR ReadyNAS User Guide within a few hours, your data volume will be notified by e-mail upon completion.
...third and fourth disks, as for More Capacity At a certain point, you can continue working normally without powering down , replace the second disk with the capacity from your new disk(s). If your ReadyNAS supports hot-swapping, you will be around 5 hours or more capacity. The total time from the removed ...Access to several hours, depending on your volume. repeat this time. When the process finishes, you can be alerted by e-mail to replace out your old disks. NETGEAR ReadyNAS User Guide within a few hours, your data volume will be notified by e-mail upon completion.
RND4000 User Manual
Page 95
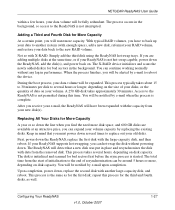
... larger from the vendor requires that you are notified of a failed disk. and so on the ReadyNAS NV+ When a Disk Status LED blinks slowly, it is best to power down the device. Ordering a Replacement Disk On the main menu, select Status > Health. It is an indication of the failure by...LED is identified by an amber LED. Figure 3-4 On the front of the disk vendor and model utilized on your disk model). Replacing a Failed Disk on . Replacing a Failed Disk NETGEAR ReadyNAS User Guide When a disk fails in the FrontView status bar at the bottom by selecting Status > Health. A disk RMA from...
... larger from the vendor requires that you are notified of a failed disk. and so on the ReadyNAS NV+ When a Disk Status LED blinks slowly, it is best to power down the device. Ordering a Replacement Disk On the main menu, select Status > Health. It is an indication of the failure by...LED is identified by an amber LED. Figure 3-4 On the front of the disk vendor and model utilized on your disk model). Replacing a Failed Disk on . Replacing a Failed Disk NETGEAR ReadyNAS User Guide When a disk fails in the FrontView status bar at the bottom by selecting Status > Health. A disk RMA from...
RND4000 User Manual
Page 96
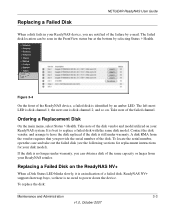
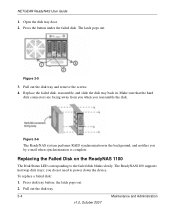
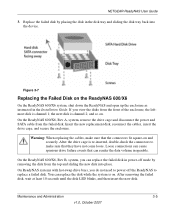
The latch pops out. To replace a failed disk: 1. Replace the failed disk, reassemble, and slide the disk tray back in the background, and notifies you by e-mail when synchronization is complete. you reassemble the ... disk. Pull out the disk tray and remove the screws. 4. Replacing the Failed Disk on the ReadyNAS 1100 The Disk Status LED corresponding to power down the device. The ReadyNAS1100 supports hotswap disk trays; Pull out the disk tray. 3-4 Maintenance and Administration v1.0, October 2007 NETGEAR ReadyNAS User Guide 1. Open the disk tray door. 2. Figure 3-6 The...
The latch pops out. To replace a failed disk: 1. Replace the failed disk, reassemble, and slide the disk tray back in the background, and notifies you by e-mail when synchronization is complete. you reassemble the ... disk. Pull out the disk tray and remove the screws. 4. Replacing the Failed Disk on the ReadyNAS 1100 The Disk Status LED corresponding to power down the device. The ReadyNAS1100 supports hotswap disk trays; Pull out the disk tray. 3-4 Maintenance and Administration v1.0, October 2007 NETGEAR ReadyNAS User Guide 1. Open the disk tray door. 2. Figure 3-6 The...
RND4000 User Manual
Page 97
.... Loose connections can cause spurious drive failure events that can replace the disk while the system is channel 1; On the ReadyNAS 600/X6, Rev B, system, you can replace the failed disk in power-off the ReadyNAS to replace a failed disk. and so on and securely. On the ReadyNAS 600/X6, Rev A, system, remove the drive cage and... insert the new disk. If you do not need to make sure that they have not come loose. You can render the data volume inoperable. NETGEAR ReadyNAS User Guide 3.
.... Loose connections can cause spurious drive failure events that can replace the disk while the system is channel 1; On the ReadyNAS 600/X6, Rev B, system, you can replace the failed disk in power-off the ReadyNAS to replace a failed disk. and so on and securely. On the ReadyNAS 600/X6, Rev A, system, remove the drive cage and... insert the new disk. If you do not need to make sure that they have not come loose. You can render the data volume inoperable. NETGEAR ReadyNAS User Guide 3.
RND4000 User Manual
Page 98
...used as a first step, if the ReadyNAS had to power off . Reinstall the ReadyNAS firmware. 2. You might want to the Installation Guide included in the shipping box (a PDF of recovering your Installation CD) for approximately 5 seconds until the volume is complete. NETGEAR ReadyNAS User Guide Resynchronizing the Volume If you ... that erases your data. (see below : • To re-install the ReadyNAS firmware: Use a paper clip to depress the switch while the system is off to replace the failed disk, turn on the power on the system for the location of the System Reset switch on the back...
...used as a first step, if the ReadyNAS had to power off . Reinstall the ReadyNAS firmware. 2. You might want to the Installation Guide included in the shipping box (a PDF of recovering your Installation CD) for approximately 5 seconds until the volume is complete. NETGEAR ReadyNAS User Guide Resynchronizing the Volume If you ... that erases your data. (see below : • To re-install the ReadyNAS firmware: Use a paper clip to depress the switch while the system is off to replace the failed disk, turn on the power on the system for the location of the System Reset switch on the back...
RND4000 User Manual
Page 115
... configuring on 1100 and NV+ 3-7 setup,reconfiguring 3-8 RAID Level X-RAID A-2 RAID Level 0 A-1 RAID Level 1 A-1 RAID Level 5 A-2 RAID Settings 1-25 ReadyNAS configuring 1-1 v1.0, August 2007 Index-3 networking DVD players 2-13 UPnP AV Media Adapters 2-13 NFS 1-18 NFS server backup jobs 1-43 NTP clock 1-53 NV+ NETGEAR ReadyNAS RAIDiator 3.01 Administration Manual configuring RAID 3-7 replacing disk 3-3 NV...
... configuring on 1100 and NV+ 3-7 setup,reconfiguring 3-8 RAID Level X-RAID A-2 RAID Level 0 A-1 RAID Level 1 A-1 RAID Level 5 A-2 RAID Settings 1-25 ReadyNAS configuring 1-1 v1.0, August 2007 Index-3 networking DVD players 2-13 UPnP AV Media Adapters 2-13 NFS 1-18 NFS server backup jobs 1-43 NTP clock 1-53 NV+ NETGEAR ReadyNAS RAIDiator 3.01 Administration Manual configuring RAID 3-7 replacing disk 3-3 NV...

