
Hardware Manual
Page 6
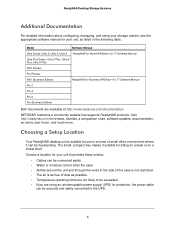
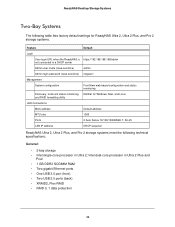
... software manual for your unit that supports ReadyNAS products. The small, compact size makes it can be freestanding. Choosing a Setup Location Your ReadyNAS desktop unit is suitable for use in the side of the case is not restricted. • The air is as free of dust as listed in the following table. Visit http://readynas.com for reviews, tutorials, a comparison chart, software updates, documentation, an active user...
... software manual for your unit that supports ReadyNAS products. The small, compact size makes it can be freestanding. Choosing a Setup Location Your ReadyNAS desktop unit is suitable for use in the side of the case is not restricted. • The air is as free of dust as listed in the following table. Visit http://readynas.com for reviews, tutorials, a comparison chart, software updates, documentation, an active user...
Hardware Manual
Page 7
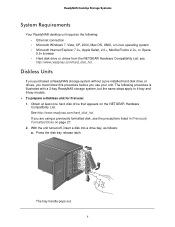
... models. To prepare a diskless unit for first use your unit. See http://www.readynas.com/hard_disk_hcl. The following : • Ethernet connection • Microsoft Windows 7, Vista, XP, 2000, Mac OS, UNIX, or Linux operating system • Microsoft Internet Explorer 7.0+, Apple Safari, 2.0+, Mozilla Firefox 2.0+, or Opera 9.5+ browser • Hard disk drive or drives from the NETGEAR Hardware Compatibility List; see the precautions listed in Previously Formatted Disks on the NETGEAR Hardware Compatibility List...
... models. To prepare a diskless unit for first use your unit. See http://www.readynas.com/hard_disk_hcl. The following : • Ethernet connection • Microsoft Windows 7, Vista, XP, 2000, Mac OS, UNIX, or Linux operating system • Microsoft Internet Explorer 7.0+, Apple Safari, 2.0+, Mozilla Firefox 2.0+, or Opera 9.5+ browser • Hard disk drive or drives from the NETGEAR Hardware Compatibility List; see the precautions listed in Previously Formatted Disks on the NETGEAR Hardware Compatibility List...
Hardware Manual
Page 8
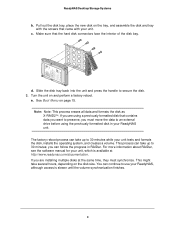
... take up to secure the disk. 3. See Boot Menu on and perform a factory reboot. If you must synchronize. This might take up to use your unit. ReadyNAS Desktop Storage Systems b. Pull out the disk tray, place the new disk on the disk size. Note: Note: This process erases all data and formats the disk as X-RAID2TM. If you are installing multiple disks at http://www.readynas.com/documentation. This process can...
... take up to secure the disk. 3. See Boot Menu on and perform a factory reboot. If you must synchronize. This might take up to use your unit. ReadyNAS Desktop Storage Systems b. Pull out the disk tray, place the new disk on the disk size. Note: Note: This process erases all data and formats the disk as X-RAID2TM. If you are installing multiple disks at http://www.readynas.com/documentation. This process can...
Hardware Manual
Page 13
.... A disk is empty. Disk activity LED The disk activity LED has these ports. If the unit is operating at http://www.readynas.com/documentation. 13 Indicator Description Power button and LED Press this button to force shutdown. • Using FrontView. Powered off Disk LEDs (1, 2) Each disk bay has an LED associated with it on the ReadyNAS. Rear panel Ethernet ports Two LED status indicators are active. One LED indicates port activity. The other LED indicates connection speed as follows: • Green. Booting • Blue...
.... A disk is empty. Disk activity LED The disk activity LED has these ports. If the unit is operating at http://www.readynas.com/documentation. 13 Indicator Description Power button and LED Press this button to force shutdown. • Using FrontView. Powered off Disk LEDs (1, 2) Each disk bay has an LED associated with it on the ReadyNAS. Rear panel Ethernet ports Two LED status indicators are active. One LED indicates port activity. The other LED indicates connection speed as follows: • Green. Booting • Blue...
Hardware Manual
Page 14
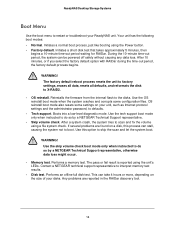
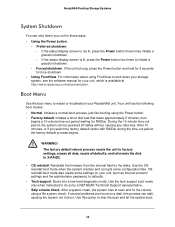
... booting using a file system check. Any problems are found on your ReadyNAS unit. The pass or fail result is reported using the unit's LEDs. This can be powered off safely without causing any data loss. Your unit has the following boot modes: • Normal. Reinstalls the firmware from the internal flash to restart or troubleshoot your unit, such as Internet protocol settings and the administrator password, to boot. ReadyNAS Desktop Storage Systems Boot...
... booting using a file system check. Any problems are found on your ReadyNAS unit. The pass or fail result is reported using the unit's LEDs. This can be powered off safely without causing any data loss. Your unit has the following boot modes: • Normal. Reinstalls the firmware from the internal flash to restart or troubleshoot your unit, such as Internet protocol settings and the administrator password, to boot. ReadyNAS Desktop Storage Systems Boot...
Hardware Manual
Page 15
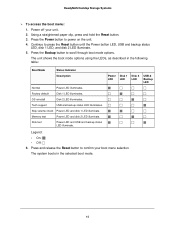
... the Backup button to confirm your unit. 2. OS reinstall Disk 2 LED illuminates. Using a straightened paper clip, press and hold the Reset button. 3. The unit shows the boot mode options using the LEDs, as described in the selected boot mode. 15 Tech support USB and backup status LED illuminates. Disk test Power LED and USB and backup status LED illuminate. Power LED Disk 1 LED Disk 2 LED USB & Backup LED Legend: • On: • Off: 6. Memory test Power LED and disk 2 LED illuminate. ReadyNAS Desktop Storage Systems To access...
... the Backup button to confirm your unit. 2. OS reinstall Disk 2 LED illuminates. Using a straightened paper clip, press and hold the Reset button. 3. The unit shows the boot mode options using the LEDs, as described in the selected boot mode. 15 Tech support USB and backup status LED illuminates. Disk test Power LED and USB and backup status LED illuminate. Power LED Disk 1 LED Disk 2 LED USB & Backup LED Legend: • On: • Off: 6. Memory test Power LED and disk 2 LED illuminate. ReadyNAS Desktop Storage Systems To access...
Hardware Manual
Page 21
... a 10-minute time-out period waiting for your unit, which is available at http://www.readynas.com/documentation. OS reinstall boot mode also resets some configuration files. If several problems are found on your unit, such as Internet protocol settings and the administrator password, to do so by a NETGEAR Technical Support representative. • Skip volume check. Reinstalls the firmware from the internal flash to boot. Use this process can...
... a 10-minute time-out period waiting for your unit, which is available at http://www.readynas.com/documentation. OS reinstall boot mode also resets some configuration files. If several problems are found on your unit, such as Internet protocol settings and the administrator password, to do so by a NETGEAR Technical Support representative. • Skip volume check. Reinstalls the firmware from the internal flash to boot. Use this process can...

Hardware Manual
Page 22
... screen shows the boot mode you need, press and release Reset button to do so by a NETGEAR Technical Support representative, otherwise data loss might occur. • Memory test. The status display screen shows the current boot mode option. 6. The pass or fail result is reported on the size of your disks. Continue to scroll through the boot mode options. ReadyNAS Desktop Storage Systems WARNING! Use the skip volume check boot mode only when instructed...
... screen shows the boot mode you need, press and release Reset button to do so by a NETGEAR Technical Support representative, otherwise data loss might occur. • Memory test. The status display screen shows the current boot mode option. 6. The pass or fail result is reported on the size of your disks. Continue to scroll through the boot mode options. ReadyNAS Desktop Storage Systems WARNING! Use the skip volume check boot mode only when instructed...
Hardware Manual
Page 24
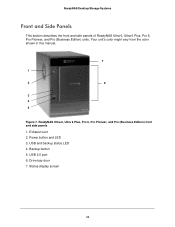
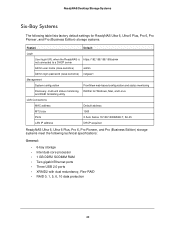
ReadyNAS Ultra 6, Ultra 6 Plus, Pro 6, Pro Pioneer, and Pro (Business Edition) front and side panels 1. USB and backup status LED 4. Exhaust vent 2. USB 2.0 port 6. ReadyNAS Desktop Storage Systems Front and Side Panels This section describes the front and side panels of ReadyNAS Ultra 6, Ultra 6 Plus, Pro 6, Pro Pioneer, and Pro (Business Edition) units. Power button and LED 3. Backup button 5. Drive bay door 7. Your unit's color might vary from the color shown in this manual. 7 1 2 6 3 4 5 Figure 7. Status display screen 24
ReadyNAS Ultra 6, Ultra 6 Plus, Pro 6, Pro Pioneer, and Pro (Business Edition) front and side panels 1. USB and backup status LED 4. Exhaust vent 2. USB 2.0 port 6. ReadyNAS Desktop Storage Systems Front and Side Panels This section describes the front and side panels of ReadyNAS Ultra 6, Ultra 6 Plus, Pro 6, Pro Pioneer, and Pro (Business Edition) units. Power button and LED 3. Backup button 5. Drive bay door 7. Your unit's color might vary from the color shown in this manual. 7 1 2 6 3 4 5 Figure 7. Status display screen 24
Hardware Manual
Page 27
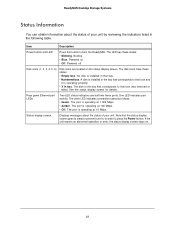
... the status of your unit. Item Description Power button and LED Press this button to that bay. • Numbered box. Booting • Blue. One LED indicates port activity. The other LED indicates connection speed as follows: • Green. The port is operating at 100 Mbps. • Off. Status display screen Displays messages about the status of your unit by reviewing the indicators listed in that icon was removed or failed.
... the status of your unit. Item Description Power button and LED Press this button to that bay. • Numbered box. Booting • Blue. One LED indicates port activity. The other LED indicates connection speed as follows: • Green. The port is operating at 100 Mbps. • Off. Status display screen Displays messages about the status of your unit by reviewing the indicators listed in that icon was removed or failed.
Hardware Manual
Page 28
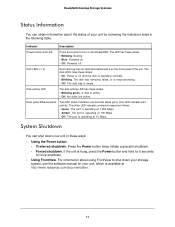
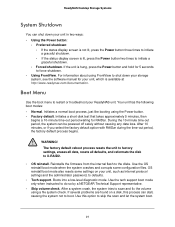
.... During the 10-minute time-out period, the system can be powered off safely without causing any data loss. WARNING! OS reinstall boot mode also resets some configuration files. The factory default reboot process resets the unit to factory settings, erases all data, resets all defaults, and reformats the disk to initiate a graceful shutdown. • Forced shutdown. ReadyNAS Desktop Storage Systems System Shutdown You can shut down your storage system, see the software manual for your unit...
.... During the 10-minute time-out period, the system can be powered off safely without causing any data loss. WARNING! OS reinstall boot mode also resets some configuration files. The factory default reboot process resets the unit to factory settings, erases all data, resets all defaults, and reformats the disk to initiate a graceful shutdown. • Forced shutdown. ReadyNAS Desktop Storage Systems System Shutdown You can shut down your storage system, see the software manual for your unit...

Hardware Manual
Page 29
Use the skip volume check boot mode only when instructed to scroll through the boot mode options. The pass or fail result is reported on the size of your disks. Power off your boot menu selection. Press the Backup button to do so by a NETGEAR Technical Support representative, otherwise data loss might occur. • Memory test. Continue to confirm your unit. 2. The status display screen shows the current boot mode option. 6. Performs...
Use the skip volume check boot mode only when instructed to scroll through the boot mode options. The pass or fail result is reported on the size of your disks. Power off your boot menu selection. Press the Backup button to do so by a NETGEAR Technical Support representative, otherwise data loss might occur. • Memory test. Continue to confirm your unit. 2. The status display screen shows the current boot mode option. 6. Performs...
Hardware Manual
Page 32
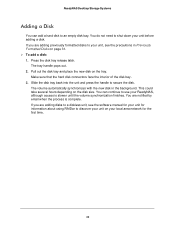
.... ReadyNAS Desktop Storage Systems Adding a Disk You can continue to use your ReadyNAS, although access is complete. You can add a hard disk to an empty disk bay. The volume automatically synchronizes with the new disk in Previously Formatted Disks on your unit before adding a disk. If you are adding previously formatted disks to your unit, see the software manual for your unit for information about using RAIDar to shut down your local area network for...
.... ReadyNAS Desktop Storage Systems Adding a Disk You can continue to use your ReadyNAS, although access is complete. You can add a hard disk to an empty disk bay. The volume automatically synchronizes with the new disk in Previously Formatted Disks on your unit before adding a disk. If you are adding previously formatted disks to your unit, see the software manual for your unit for information about using RAIDar to shut down your local area network for...
Hardware Manual
Page 33
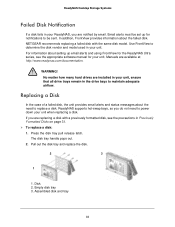
... formatted disk, see the appropriate software manual for your unit. Manuals are installed in your ReadyNAS, you are replacing a disk with the same disk model. Use FrontView to replace a disk. If you do not need to determine the disk vendor and model used in your unit when replacing a disk. Empty disk tray 3. Assembled disk and tray 33 Press the disk tray pull release latch. ReadyNAS supports hot-swap bays, so you are notified by email...
... formatted disk, see the appropriate software manual for your unit. Manuals are installed in your ReadyNAS, you are replacing a disk with the same disk model. Use FrontView to replace a disk. If you do not need to determine the disk vendor and model used in your unit when replacing a disk. Empty disk tray 3. Assembled disk and tray 33 Press the disk tray pull release latch. ReadyNAS supports hot-swap bays, so you are notified by email...
Hardware Manual
Page 36
... table lists factory default settings for ReadyNAS Ultra 2, Ultra 2 Plus, and Pro 2 storage systems. Feature Default Login User login URL when the ReadyNAS is https://192.168.168.168/admin not connected to a DHCP server Admin user name (case-sensitive) admin Admin login password (case-sensitive) netgear1 Management System configuration FrontView web-based configuration and status monitoring Discovery, multi-unit status monitoring, RAIDar for Windows, Mac, and Linux and RAID formatting utility LAN Connections MAC address Default address MTU size 1500 Ports 2 Auto Sense...
... table lists factory default settings for ReadyNAS Ultra 2, Ultra 2 Plus, and Pro 2 storage systems. Feature Default Login User login URL when the ReadyNAS is https://192.168.168.168/admin not connected to a DHCP server Admin user name (case-sensitive) admin Admin login password (case-sensitive) netgear1 Management System configuration FrontView web-based configuration and status monitoring Discovery, multi-unit status monitoring, RAIDar for Windows, Mac, and Linux and RAID formatting utility LAN Connections MAC address Default address MTU size 1500 Ports 2 Auto Sense...

Hardware Manual
Page 38
...table lists factory default settings for ReadyNAS Ultra 4, Ultra 4 Plus, Pro 4 NVX Pioneer, and NVX (Business Edition) storage systems. Feature Default Login User login URL when the ReadyNAS is https://192.168.168.168/admin not connected to a DHCP server Admin user name (case-sensitive) admin Admin login password (case-sensitive) netgear1 Management System configuration FrontView Web-based configuration and status monitoring Discovery, multi-unit status monitoring, RAIDar for Windows, Mac, and Linux and RAID formatting utility LAN Connections MAC address Default address MTU size...
...table lists factory default settings for ReadyNAS Ultra 4, Ultra 4 Plus, Pro 4 NVX Pioneer, and NVX (Business Edition) storage systems. Feature Default Login User login URL when the ReadyNAS is https://192.168.168.168/admin not connected to a DHCP server Admin user name (case-sensitive) admin Admin login password (case-sensitive) netgear1 Management System configuration FrontView Web-based configuration and status monitoring Discovery, multi-unit status monitoring, RAIDar for Windows, Mac, and Linux and RAID formatting utility LAN Connections MAC address Default address MTU size...
Hardware Manual
Page 40
... lists factory default settings for ReadyNAS Ultra 6, Ultra 6 Plus, Pro 6, Pro Pioneer, and Pro (Business Edition) storage systems. Feature Default Login User login URL when the ReadyNAS is https://192.168.168.168/admin not connected to a DHCP server Admin user name (case-sensitive) admin Admin login password (case-sensitive) netgear1 Management System configuration FrontView web-based configuration and status monitoring Discovery, multi-unit status monitoring, RAIDar for Windows, Mac, and Linux and RAID formatting utility LAN Connections MAC address Default address MTU size...
... lists factory default settings for ReadyNAS Ultra 6, Ultra 6 Plus, Pro 6, Pro Pioneer, and Pro (Business Edition) storage systems. Feature Default Login User login URL when the ReadyNAS is https://192.168.168.168/admin not connected to a DHCP server Admin user name (case-sensitive) admin Admin login password (case-sensitive) netgear1 Management System configuration FrontView web-based configuration and status monitoring Discovery, multi-unit status monitoring, RAIDar for Windows, Mac, and Linux and RAID formatting utility LAN Connections MAC address Default address MTU size...
Hardware Manual
Page 46
... disk failure 33 disk, adding 32 disk, failure 33 disk, replacing 33 diskless units 7 disks, previously formatted 31 disks, supported 30 drive bay NVX (Business Edition) 18 NVX Pioneer 18 Pro (Business Edition) 25 Pro 2 11 Pro 4 18 Pro 6 25 Pro Pioneer 25 Ultra 2 11 Ultra 2 Plus 11 Ultra 4 18 Ultra 4 Plus 18 Ultra 6 25 Ultra 6 Plus 25 E electrical safety 42 electrostatic discharge 43 email alerts 33 ESD 43 F factory default settings...
... disk failure 33 disk, adding 32 disk, failure 33 disk, replacing 33 diskless units 7 disks, previously formatted 31 disks, supported 30 drive bay NVX (Business Edition) 18 NVX Pioneer 18 Pro (Business Edition) 25 Pro 2 11 Pro 4 18 Pro 6 25 Pro Pioneer 25 Ultra 2 11 Ultra 2 Plus 11 Ultra 4 18 Ultra 4 Plus 18 Ultra 6 25 Ultra 6 Plus 25 E electrical safety 42 electrostatic discharge 43 email alerts 33 ESD 43 F factory default settings...
Installation Guide
Page 1
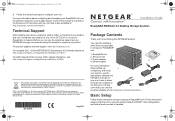
.... Links to these instructions to register your unit. Basic Setup Follow these manuals are also available at http://readynas.com/documentation. Follow the wizard's prompts to change without notice. Technical Support After installing your device, locate the serial number on the Resource CD that 4 came with the laws of NETGEAR, Inc. Power adapter 2 4. You need the following items from your package to set up , 1 configuring, and using the factory default X-RAID2TM disk configuration...
.... Links to these instructions to register your unit. Basic Setup Follow these manuals are also available at http://readynas.com/documentation. Follow the wizard's prompts to change without notice. Technical Support After installing your device, locate the serial number on the Resource CD that 4 came with the laws of NETGEAR, Inc. Power adapter 2 4. You need the following items from your package to set up , 1 configuring, and using the factory default X-RAID2TM disk configuration...
Installation Guide
Page 2
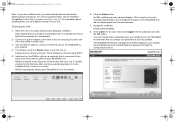
... about installing disks, see the Hardware Compatibility List at http://readynas.com/start up your unit: 1. The ReadyNAS FrontView management interface displays in a location that provides adequate ventilation. RAIDar automatically detects your browser. You can produce considerable heat. Use an Ethernet cable to connect an Ethernet port on the ReadyNAS to start . NETGEAR recommends that came with your unit. The IP address is located on the network. 6. RAIDar is retrieved using DHCP...
... about installing disks, see the Hardware Compatibility List at http://readynas.com/start up your unit: 1. The ReadyNAS FrontView management interface displays in a location that provides adequate ventilation. RAIDar automatically detects your browser. You can produce considerable heat. Use an Ethernet cable to connect an Ethernet port on the ReadyNAS to start . NETGEAR recommends that came with your unit. The IP address is located on the network. 6. RAIDar is retrieved using DHCP...


