
Hardware Manual
Page 16
... volume check. Use the skip volume check boot mode only when instructed to do so by a NETGEAR Technical Support representative, otherwise data loss might occur. • Memory test. Contact a NETGEAR technical support representative to the disks. Use the OS reinstall boot mode when the system crashes and corrupts...default option with RAIDar during the time-out period, the factory default process begins. Performs an offline full disk test. ReadyNAS Duo v2 and NV+ v2 Boot Menu Use the boot menu to restart or troubleshoot your unit, such as Internet protocol settings and the administrator...
... volume check. Use the skip volume check boot mode only when instructed to do so by a NETGEAR Technical Support representative, otherwise data loss might occur. • Memory test. Contact a NETGEAR technical support representative to the disks. Use the OS reinstall boot mode when the system crashes and corrupts...default option with RAIDar during the time-out period, the factory default process begins. Performs an offline full disk test. ReadyNAS Duo v2 and NV+ v2 Boot Menu Use the boot menu to restart or troubleshoot your unit, such as Internet protocol settings and the administrator...
Hardware Manual
Page 17
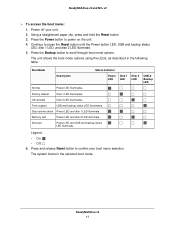
... Disk 2 LED illuminates. Tech support USB and backup status LED illuminates. Skip volume check Power LED and disk 1 LED illuminate. Memory test Power LED and disk 2 LED illuminate. Disk test Power LED and USB and backup status LED illuminate. Power off your boot menu..., press and hold the Reset button. 3. The unit shows the boot mode options using the LEDs, as described in the selected boot mode. ReadyNAS Duo v2 17 ReadyNAS Duo v2 and NV+ v2 To access the boot menu: 1. Continue to confirm your unit. 2.
... Disk 2 LED illuminates. Tech support USB and backup status LED illuminates. Skip volume check Power LED and disk 1 LED illuminate. Memory test Power LED and disk 2 LED illuminate. Disk test Power LED and USB and backup status LED illuminate. Power off your boot menu..., press and hold the Reset button. 3. The unit shows the boot mode options using the LEDs, as described in the selected boot mode. ReadyNAS Duo v2 17 ReadyNAS Duo v2 and NV+ v2 To access the boot menu: 1. Continue to confirm your unit. 2.

Hardware Manual
Page 24
...also resets some configuration files. Use the skip volume check boot mode only when instructed to do so by a NETGEAR Technical Support representative, otherwise data loss might occur. • Memory test. The pass or fail result is reported using the Power button. • Factory default. Use the ... 24 ReadyNAS Duo v2 and NV+ v2 Boot Menu Use the boot menu to restart or troubleshoot your unit, such as Internet protocol settings and the administrator password, to defaults. • Tech support. Use the tech support boot mode only when instructed to interpret memory test results. • ...
...also resets some configuration files. Use the skip volume check boot mode only when instructed to do so by a NETGEAR Technical Support representative, otherwise data loss might occur. • Memory test. The pass or fail result is reported using the Power button. • Factory default. Use the ... 24 ReadyNAS Duo v2 and NV+ v2 Boot Menu Use the boot menu to restart or troubleshoot your unit, such as Internet protocol settings and the administrator password, to defaults. • Tech support. Use the tech support boot mode only when instructed to interpret memory test results. • ...

Hardware Manual
Page 36
...location. 2. DISPOSE OF USED BATTERIES ACCORDING TO THEIR INSTRUCTIONS. 3. Instead, use mats designed to equipment within the same building. ReadyNAS Duo v2 and NV+ v2 Safety Warnings 1. Connect the units and their associated LAN connections only to decrease static electrical discharge as the main board ...or memory modules. If an electrical accident occurs, you can easily damage any electrical components or circuit boards they come into...
...location. 2. DISPOSE OF USED BATTERIES ACCORDING TO THEIR INSTRUCTIONS. 3. Instead, use mats designed to equipment within the same building. ReadyNAS Duo v2 and NV+ v2 Safety Warnings 1. Connect the units and their associated LAN connections only to decrease static electrical discharge as the main board ...or memory modules. If an electrical accident occurs, you can easily damage any electrical components or circuit boards they come into...

Hardware Manual
Page 37
Electrostatic Discharge (ESD) Precautions Electrostatic discharge (ESD) is generated by the manufacturer. do not touch its components, peripheral chips, memory modules, or contacts. • When handling chips or modules, avoid touching their pins. • Put the main board and peripherals... provides excellent conductivity between the power supply, the case, the mounting fasteners and the main board. Defaults and Technical Specifications 37 ReadyNAS Duo v2 and NV+ v2 • Replace the on the main board, using only new fuses that are generally sufficient to neutralize this difference, ...
Electrostatic Discharge (ESD) Precautions Electrostatic discharge (ESD) is generated by the manufacturer. do not touch its components, peripheral chips, memory modules, or contacts. • When handling chips or modules, avoid touching their pins. • Put the main board and peripherals... provides excellent conductivity between the power supply, the case, the mounting fasteners and the main board. Defaults and Technical Specifications 37 ReadyNAS Duo v2 and NV+ v2 • Replace the on the main board, using only new fuses that are generally sufficient to neutralize this difference, ...