RND4000 User Manual
Page 7
.../X6 3-5 Resynchronizing the Volume 3-6 Resetting Your System (System Switch 3-6 Configuring RAID on the ReadyNAS 1100 and NV 3-7 Backing Up the ReadyNAS to a USB Drive 3-9 ReadyNAS1100 Backup 3-10 ReadyNAS NV+ Backup 3-10 Removing the System Module from the ReadyNAS 1100 3-11 Changing User Passwords 3-11 Appendix A RAID Levels Simplified RAID Level 0 ...A-1 RAID Level 1 ...A-1 RAID Level 5 ...A-2 RAID Level...
.../X6 3-5 Resynchronizing the Volume 3-6 Resetting Your System (System Switch 3-6 Configuring RAID on the ReadyNAS 1100 and NV 3-7 Backing Up the ReadyNAS to a USB Drive 3-9 ReadyNAS1100 Backup 3-10 ReadyNAS NV+ Backup 3-10 Removing the System Module from the ReadyNAS 1100 3-11 Changing User Passwords 3-11 Appendix A RAID Levels Simplified RAID Level 0 ...A-1 RAID Level 1 ...A-1 RAID Level 5 ...A-2 RAID Level...
RND4000 User Manual
Page 13
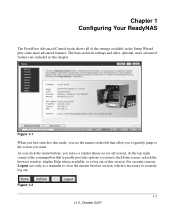
.... Figure 1-2 1-1 v1.0, October 2007 At the top right corner is necessary to the screen you to quickly jump to securely log out. ,. NETGEAR ReadyNAS NV+ [X-RAID] Figure 1-1 When you first switch to this mode, you notice a similar theme across all of this chapter. As you click the ... the browser window, display Help where available, or to log out of the settings available in this session. Chapter 1 Configuring Your ReadyNAS The FrontView Advanced Control mode shows all screens. The basic network settings and other, optional, more advanced features are included in the Setup...
.... Figure 1-2 1-1 v1.0, October 2007 At the top right corner is necessary to the screen you to quickly jump to securely log out. ,. NETGEAR ReadyNAS NV+ [X-RAID] Figure 1-1 When you first switch to this mode, you notice a similar theme across all of this chapter. As you click the ... the browser window, display Help where available, or to log out of the settings available in this session. Chapter 1 Configuring Your ReadyNAS The FrontView Advanced Control mode shows all screens. The basic network settings and other, optional, more advanced features are included in the Setup...
RND4000 User Manual
Page 76
..., and backup jobs scheduled during the power off or reboot the ReadyNAS device. For more information. 1-64 v1.0, October 2007 Configuring Your ReadyNAS NETGEAR ReadyNAS User Guide and time. (The Power ON option is available on the ReadyNAS NV through an add-on package.)1 The Power ON option does not ...to the Release Notes for RAIDiator 3 on the NETGEAR Support site for more information about NUT, see http://www.networkupstools.org. Please refer to another NAS check box and enter the IP Address in the volume. As an option, the ReadyNAS can take several minutes to a PC running ...
..., and backup jobs scheduled during the power off or reboot the ReadyNAS device. For more information. 1-64 v1.0, October 2007 Configuring Your ReadyNAS NETGEAR ReadyNAS User Guide and time. (The Power ON option is available on the ReadyNAS NV through an add-on package.)1 The Power ON option does not ...to the Release Notes for RAIDiator 3 on the NETGEAR Support site for more information about NUT, see http://www.networkupstools.org. Please refer to another NAS check box and enter the IP Address in the volume. As an option, the ReadyNAS can take several minutes to a PC running ...
RND4000 User Manual
Page 95
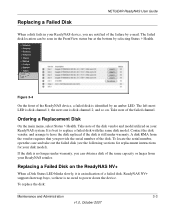
...On the front of a failed disk. and so on the ReadyNAS NV+ When a Disk Status LED blinks slowly, it is an indication of the ReadyNAS device, a failed disk is still under warranty, you can be seen in your ReadyNAS retailer. Ordering a Replacement Disk On the main menu, select .... If the disk is no longer under warranty. ReadyNAS NV+ supports hotswap bays, so there is no need to power down the device. To replace the disk: Maintenance and Administration 3-3 v1.0, October 2007 Replacing a Failed Disk NETGEAR ReadyNAS User Guide When a disk fails in the FrontView...
...On the front of a failed disk. and so on the ReadyNAS NV+ When a Disk Status LED blinks slowly, it is an indication of the ReadyNAS device, a failed disk is still under warranty, you can be seen in your ReadyNAS retailer. Ordering a Replacement Disk On the main menu, select .... If the disk is no longer under warranty. ReadyNAS NV+ supports hotswap bays, so there is no need to power down the device. To replace the disk: Maintenance and Administration 3-3 v1.0, October 2007 Replacing a Failed Disk NETGEAR ReadyNAS User Guide When a disk fails in the FrontView...
RND4000 User Manual
Page 99
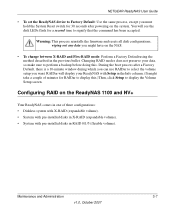
During the boot process after powering on the NAS. • To change between X-RAID and Flex-RAID mode: Perform a ...Info column. (It might have on the system. Maintenance and Administration 3-7 v1.0, October 2007 NETGEAR ReadyNAS User Guide • To set the ReadyNAS device to Factory Default: Use the same process, except you must hold the System Reset switch... for a second time to signify that the command has been accepted. Configuring RAID on the ReadyNAS 1100 and NV+ Your ReadyNAS comes in one of minutes for RAIDar to display this . RAIDar will see the disk LEDs flash...
During the boot process after powering on the NAS. • To change between X-RAID and Flex-RAID mode: Perform a ...Info column. (It might have on the system. Maintenance and Administration 3-7 v1.0, October 2007 NETGEAR ReadyNAS User Guide • To set the ReadyNAS device to Factory Default: Use the same process, except you must hold the System Reset switch... for a second time to signify that the command has been accepted. Configuring RAID on the ReadyNAS 1100 and NV+ Your ReadyNAS comes in one of minutes for RAIDar to display this . RAIDar will see the disk LEDs flash...
RND4000 User Manual
Page 100
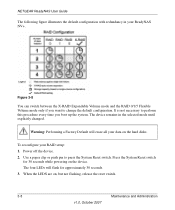
It is not necessary to perform this procedure every time you want to press the System Reset switch. NETGEAR ReadyNAS User Guide The following figure illustrates the default configuration with redundancy in the selected mode until explicitly changed. Figure 3-8 You can switch ... RAID setup: 1. Power off the device. 2. Warning: Performing a Factory Default will flash for 30 seconds while powering on the device. To reconfigure your ReadyNAS NV+. When the LEDS are on the hard disks. The four LEDs will erase all your data on , but not flashing, release the reset switch. 3-8...
It is not necessary to perform this procedure every time you want to press the System Reset switch. NETGEAR ReadyNAS User Guide The following figure illustrates the default configuration with redundancy in the selected mode until explicitly changed. Figure 3-8 You can switch ... RAID setup: 1. Power off the device. 2. Warning: Performing a Factory Default will flash for 30 seconds while powering on the device. To reconfigure your ReadyNAS NV+. When the LEDS are on the hard disks. The four LEDs will erase all your data on , but not flashing, release the reset switch. 3-8...
RND4000 User Manual
Page 102
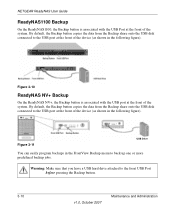
Figure 3-10 ReadyNAS NV+ Backup On the ReadyNAS NV+, the Backup button is associated with the USB port at the front of the system. By default, the Backup button copies the data from the ...Backup share onto the USB disk connected to the USB port at the front of the device (as shown in the following figure). NETGEAR ReadyNAS User...
Figure 3-10 ReadyNAS NV+ Backup On the ReadyNAS NV+, the Backup button is associated with the USB port at the front of the system. By default, the Backup button copies the data from the ...Backup share onto the USB disk connected to the USB port at the front of the device (as shown in the following figure). NETGEAR ReadyNAS User...

RND4000 User Manual
Page 114
... Media Streaming Server 1-21 home share accounts/preference, creating 1-11 user 1-11 Hostname 1-5 default 1-5 setting 1-5 hot spare 1-25 HP OpenView 1-54 Hpertext Transfer Protocol. See DLNA. See HTTP. NETGEAR ReadyNAS RAIDiator 3.01 Administration Manual D Default Gateway 1-5 Deleting a Volume Flex-RAID 1-...F Factory Default Settings 1-62 Factory Default settings how to 3-7 failed disk ordering replacement disks 3-3 replacing on 600/X6 3-5 replacing on NV+ 3-3 replacing on1100 3-4 replacing, how to 3-3 FAT32 1-33 File Transfer Protocol. See FTP. HTTP 1-18 HTTPS with SSL encryption...
... Media Streaming Server 1-21 home share accounts/preference, creating 1-11 user 1-11 Hostname 1-5 default 1-5 setting 1-5 hot spare 1-25 HP OpenView 1-54 Hpertext Transfer Protocol. See DLNA. See HTTP. NETGEAR ReadyNAS RAIDiator 3.01 Administration Manual D Default Gateway 1-5 Deleting a Volume Flex-RAID 1-...F Factory Default Settings 1-62 Factory Default settings how to 3-7 failed disk ordering replacement disks 3-3 replacing on 600/X6 3-5 replacing on NV+ 3-3 replacing on1100 3-4 replacing, how to 3-3 FAT32 1-33 File Transfer Protocol. See FTP. HTTP 1-18 HTTPS with SSL encryption...
RND4000 User Manual
Page 115
... NFS. networking DVD players 2-13 UPnP AV Media Adapters 2-13 NFS 1-18 NFS server backup jobs 1-43 NTP clock 1-53 NV+ NETGEAR ReadyNAS RAIDiator 3.01 Administration Manual configuring RAID 3-7 replacing disk 3-3 NV+ backup USB 3-10 O Organization Unit. setting 1-3 static, setting 1-3 iTunes Streaming Server 1-20 J jumbo frames performance settings 1-4 L Language settings 1-59 Unicode 1-60 Linux/Unix accessing...
... NFS. networking DVD players 2-13 UPnP AV Media Adapters 2-13 NFS 1-18 NFS server backup jobs 1-43 NTP clock 1-53 NV+ NETGEAR ReadyNAS RAIDiator 3.01 Administration Manual configuring RAID 3-7 replacing disk 3-3 NV+ backup USB 3-10 O Organization Unit. setting 1-3 static, setting 1-3 iTunes Streaming Server 1-20 J jumbo frames performance settings 1-4 L Language settings 1-59 Unicode 1-60 Linux/Unix accessing...
RND4000 User Manual
Page 117
...of 1-64 performance, adding 1-58 USB 1-33 backing up to 3-9 flash device 1-33 formats, EXT3 1-33 formats, FAT32 1-33 NV+ backup 3-10 shares 1-41 storage 1-31 USB storage partitions 1-32 user accounts, creating 1-11 security mode 1-11 security options 1-9... 1-3 support enabling 1-4 Volume Management 1-21 X-RAID 1-22 Flex-RAID 1-22 X-RAID 1-26 VPN setting WINS server 1-6 W Web browser accessing shares 2-8 Windows accessing shares 2-1 WINS 1-6 workgroup changing default 1-11 NETGEAR ReadyNAS RAIDiator 3.01 Administration Manual name 1-11 setup 1-11 X X-RAID 1-22 adding a second disk 1-26 adding ...
...of 1-64 performance, adding 1-58 USB 1-33 backing up to 3-9 flash device 1-33 formats, EXT3 1-33 formats, FAT32 1-33 NV+ backup 3-10 shares 1-41 storage 1-31 USB storage partitions 1-32 user accounts, creating 1-11 security mode 1-11 security options 1-9... 1-3 support enabling 1-4 Volume Management 1-21 X-RAID 1-22 Flex-RAID 1-22 X-RAID 1-26 VPN setting WINS server 1-6 W Web browser accessing shares 2-8 Windows accessing shares 2-1 WINS 1-6 workgroup changing default 1-11 NETGEAR ReadyNAS RAIDiator 3.01 Administration Manual name 1-11 setup 1-11 X X-RAID 1-22 adding a second disk 1-26 adding ...
RND4000 Setup Manual
Page 6
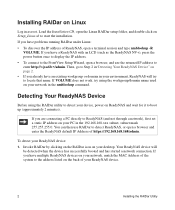
...when the device has successfully booted and has started a network connection. Invoke RAIDar by clicking on the RAIDar icon on your network in as the ReadyNAS NV+), press the power button once to display the IP address. • To connect to the FrontView Setup Wizard, open a browser, and use ...RAIDar to the address listed on the back of ReadyNAS, open the Linux RAIDar setup folder, and double-click on Setup_Linux.sh to locate that name. To detect your desktop. If you are connecting a...
...when the device has successfully booted and has started a network connection. Invoke RAIDar by clicking on the RAIDar icon on your network in as the ReadyNAS NV+), press the power button once to display the IP address. • To connect to the FrontView Setup Wizard, open a browser, and use ...RAIDar to the address listed on the back of ReadyNAS, open the Linux RAIDar setup folder, and double-click on Setup_Linux.sh to locate that name. To detect your desktop. If you are connecting a...


