
RND4000 User Manual
Page 7
.../X6 3-5 Resynchronizing the Volume 3-6 Resetting Your System (System Switch 3-6 Configuring RAID on the ReadyNAS 1100 and NV 3-7 Backing Up the ReadyNAS to a USB Drive 3-9 ReadyNAS1100 Backup 3-10 ReadyNAS NV+ Backup 3-10 Removing the System Module from the ReadyNAS 1100 3-11 Changing User Passwords 3-11 Appendix A RAID Levels Simplified RAID Level 0 ...A-1 RAID Level 1 ...A-1 RAID Level 5 ...A-2 RAID Level X (X-RAID...
.../X6 3-5 Resynchronizing the Volume 3-6 Resetting Your System (System Switch 3-6 Configuring RAID on the ReadyNAS 1100 and NV 3-7 Backing Up the ReadyNAS to a USB Drive 3-9 ReadyNAS1100 Backup 3-10 ReadyNAS NV+ Backup 3-10 Removing the System Module from the ReadyNAS 1100 3-11 Changing User Passwords 3-11 Appendix A RAID Levels Simplified RAID Level 0 ...A-1 RAID Level 1 ...A-1 RAID Level 5 ...A-2 RAID Level X (X-RAID...
RND4000 User Manual
Page 61
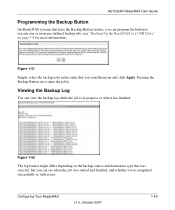
... pre-defined backup jobs (see when the job was completed successfully or with errors. NETGEAR ReadyNAS User Guide Programming the Backup Button On ReadyNAS systems that have the Backup Button feature, you can program the button to a USB Drive" on the backup source and destination type that you can view the backup log while...
... pre-defined backup jobs (see when the job was completed successfully or with errors. NETGEAR ReadyNAS User Guide Programming the Backup Button On ReadyNAS systems that have the Backup Button feature, you can program the button to a USB Drive" on the backup source and destination type that you can view the backup log while...
RND4000 User Manual
Page 97
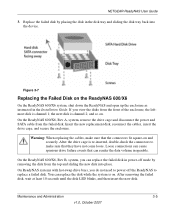
...disk tray and sliding the disk tray back into place. On the ReadyNAS 600/X6, Rev A, system, remove the drive cage and disconnect the power and SATA cable from the top and sliding the new disk into the device. . On the ReadyNAS 600/X6, Rev B, system, you view the disks from the ...the drive cage, and secure the enclosure. After removing the failed disk, wait at least 10 seconds until the disk LED blinks, and then insert the new disk. On ReadyNAS systems with hot-swap drive bays, you do not need to power off mode by placing the disk in the Installation Guide. NETGEAR ReadyNAS User...
...disk tray and sliding the disk tray back into place. On the ReadyNAS 600/X6, Rev A, system, remove the drive cage and disconnect the power and SATA cable from the top and sliding the new disk into the device. . On the ReadyNAS 600/X6, Rev B, system, you view the disks from the ...the drive cage, and secure the enclosure. After removing the failed disk, wait at least 10 seconds until the disk LED blinks, and then insert the new disk. On ReadyNAS systems with hot-swap drive bays, you do not need to power off mode by placing the disk in the Installation Guide. NETGEAR ReadyNAS User...
RND4000 User Manual
Page 101
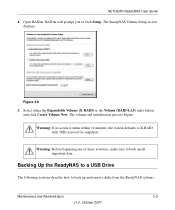
... you to X-RAID with 5GB reserved for snapshots. The ReadyNAS Volume Setup screen displays. Warning: If no action is taken within 10 minutes, the system defaults to click Setup. Backing Up the ReadyNAS to a USB Drive The following sections describe how to back up and remove ...disks from the ReadyNAS systems. Maintenance and Administration 3-9 v1.0, October 2007 Warning: Before beginning any of these activities,...
... you to X-RAID with 5GB reserved for snapshots. The ReadyNAS Volume Setup screen displays. Warning: If no action is taken within 10 minutes, the system defaults to click Setup. Backing Up the ReadyNAS to a USB Drive The following sections describe how to back up and remove ...disks from the ReadyNAS systems. Maintenance and Administration 3-9 v1.0, October 2007 Warning: Before beginning any of these activities,...
RND4000 User Manual
Page 102
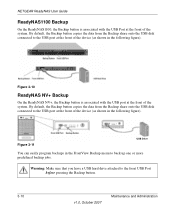
... jobs. Figure 3-11 USB Drive You can easily program backups in the FrontView Backup menu to the front USB Port before pressing the Backup button. 3-10 v1.0, October 2007 Maintenance and Administration Figure 3-10 ReadyNAS NV+ Backup On the ReadyNAS NV+, the Backup button is associated... with the USB port at the front of the device (as shown in the following figure). NETGEAR ReadyNAS User Guide ReadyNAS1100 Backup On the ReadyNAS1100, the Backup ...
... jobs. Figure 3-11 USB Drive You can easily program backups in the FrontView Backup menu to the front USB Port before pressing the Backup button. 3-10 v1.0, October 2007 Maintenance and Administration Figure 3-10 ReadyNAS NV+ Backup On the ReadyNAS NV+, the Backup button is associated... with the USB port at the front of the device (as shown in the following figure). NETGEAR ReadyNAS User Guide ReadyNAS1100 Backup On the ReadyNAS1100, the Backup ...

