
RND4000 User Manual
Page 9
... the failed disk in "Replacing a Failed Disk." • If you step-by-step through the FrontView Setup Wizard and quickly prepares the ReadyNAS for an explanation of both. • "Changing User Passwords" covers users other than administrators can access FrontView...hostname, workgroup, or password. The ReadyNAS Setup Manual takes you need help in the FrontView Advanced Control mode. ix v1.0, October 2007 About This Manual Congratulations on your network. Chapter 2, "Accessing Shares from NETGEAR, Inc. The NETGEAR® ReadyNAS User Guide explains each of the available...
... the failed disk in "Replacing a Failed Disk." • If you step-by-step through the FrontView Setup Wizard and quickly prepares the ReadyNAS for an explanation of both. • "Changing User Passwords" covers users other than administrators can access FrontView...hostname, workgroup, or password. The ReadyNAS Setup Manual takes you need help in the FrontView Advanced Control mode. ix v1.0, October 2007 About This Manual Congratulations on your network. Chapter 2, "Accessing Shares from NETGEAR, Inc. The NETGEAR® ReadyNAS User Guide explains each of the available...
RND4000 User Manual
Page 13
...Setup Wizard plus some more advanced features are included in this mode, you see the menus on the left that typically provides options to return to the Home screen, refresh the browser window, display Help where available, or to securely log out. ,. As you click the menu buttons, you want. NETGEAR ReadyNAS NV...+ [X-RAID] Figure 1-1 When you first switch to the screen you notice a similar theme across all of this session. Chapter 1 Configuring Your ReadyNAS The FrontView Advanced Control mode shows all screens. The ...
...Setup Wizard plus some more advanced features are included in this mode, you see the menus on the left that typically provides options to return to the Home screen, refresh the browser window, display Help where available, or to securely log out. ,. As you click the menu buttons, you want. NETGEAR ReadyNAS NV...+ [X-RAID] Figure 1-1 When you first switch to the screen you notice a similar theme across all of this session. Chapter 1 Configuring Your ReadyNAS The FrontView Advanced Control mode shows all screens. The ...
RND4000 User Manual
Page 14
... then navigate to your Network settings by selecting Network from a DHCP server option to automatically set the IP address and network mask. NETGEAR ReadyNAS User Guide Toward the bottom left which, which clicked, links you to... can simply specify the Use values from the main menu. Figure 1-4 1-2 v1.0, October 2007 Configuring Your ReadyNAS Figure 1-3 Move the mouse pointer over the status light to display device information, or click a status light...Ethernet tab to switch back and forth between the Setup Wizard mode and the Advanced Control mode. In most networks where a DHCP...
... then navigate to your Network settings by selecting Network from a DHCP server option to automatically set the IP address and network mask. NETGEAR ReadyNAS User Guide Toward the bottom left which, which clicked, links you to... can simply specify the Use values from the main menu. Figure 1-4 1-2 v1.0, October 2007 Configuring Your ReadyNAS Figure 1-3 Move the mouse pointer over the status light to display device information, or click a status light...Ethernet tab to switch back and forth between the Setup Wizard mode and the Advanced Control mode. In most networks where a DHCP...

RND4000 User Manual
Page 32
NETGEAR ReadyNAS User Guide Figure 1-23 • SlimServer provides music streaming to the popular Squeezebox music players from the ReadyNAS. The ReadyNAS comes with a reserved media share that share to stream media files straight from Slim Devices. Simply copy your files reside. 1-20 v1.0, October 2007 Configuring Your ReadyNAS... If you wish, you can click the http setup link for more detailed configuration...can click the http setup link for more detailed configuration options. • iTunes Streaming Server enables iTunes clients ...
NETGEAR ReadyNAS User Guide Figure 1-23 • SlimServer provides music streaming to the popular Squeezebox music players from the ReadyNAS. The ReadyNAS comes with a reserved media share that share to stream media files straight from Slim Devices. Simply copy your files reside. 1-20 v1.0, October 2007 Configuring Your ReadyNAS... If you wish, you can click the http setup link for more detailed configuration...can click the http setup link for more detailed configuration options. • iTunes Streaming Server enables iTunes clients ...
RND4000 User Manual
Page 99
... X-RAID (expandable volume). • System with Setup in the Info column. (It might have on the ReadyNAS 1100 and NV+ Your ReadyNAS comes in one of minutes for RAIDar to display this . NETGEAR ReadyNAS User Guide • To set the ReadyNAS device to Factory Default: Use the same process,....0, October 2007 Warning: This process reinstalls the firmware and resets all disk configurations, wiping out any data you want. Configuring RAID on the NAS. • To change between X-RAID and Flex-RAID mode: Perform a Factory Default using the method described in RAID 0/1/5 (flexible volume)....
... X-RAID (expandable volume). • System with Setup in the Info column. (It might have on the ReadyNAS 1100 and NV+ Your ReadyNAS comes in one of minutes for RAIDar to display this . NETGEAR ReadyNAS User Guide • To set the ReadyNAS device to Factory Default: Use the same process,....0, October 2007 Warning: This process reinstalls the firmware and resets all disk configurations, wiping out any data you want. Configuring RAID on the NAS. • To change between X-RAID and Flex-RAID mode: Perform a Factory Default using the method described in RAID 0/1/5 (flexible volume)....
RND4000 User Manual
Page 100
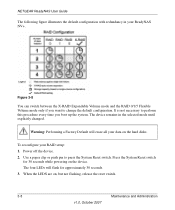
... every time you want to press the System Reset switch. The device remains in your RAID setup: 1. To reconfigure your ReadyNAS NV+. The four LEDs will erase all your data on the device. Power off the device. 2. NETGEAR ReadyNAS User Guide The following figure illustrates the default configuration with redundancy in the selected mode until...
... every time you want to press the System Reset switch. The device remains in your RAID setup: 1. To reconfigure your ReadyNAS NV+. The four LEDs will erase all your data on the device. Power off the device. 2. NETGEAR ReadyNAS User Guide The following figure illustrates the default configuration with redundancy in the selected mode until...
RND4000 User Manual
Page 101
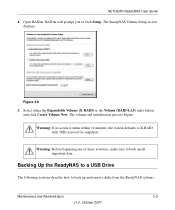
NETGEAR ReadyNAS User Guide 4. Open RAIDar. Figure 3-9 5. Warning: Before beginning any of these activities, make sure to click Setup. RAIDar will prompt you to back up and remove disks from the ReadyNAS systems. Maintenance and Administration 3-9 v1.0, October 2007 Backing Up the ReadyNAS to a USB Drive The...for snapshots. Warning: If no action is taken within 10 minutes, the system defaults to back up all important data. The ReadyNAS Volume Setup screen displays. Select either the Expandable Volume (X-RAID) or the Volume (RAID 0,1,5) radio button and click Create Volume Now....
NETGEAR ReadyNAS User Guide 4. Open RAIDar. Figure 3-9 5. Warning: Before beginning any of these activities, make sure to click Setup. RAIDar will prompt you to back up and remove disks from the ReadyNAS systems. Maintenance and Administration 3-9 v1.0, October 2007 Backing Up the ReadyNAS to a USB Drive The...for snapshots. Warning: If no action is taken within 10 minutes, the system defaults to back up all important data. The ReadyNAS Volume Setup screen displays. Select either the Expandable Volume (X-RAID) or the Volume (RAID 0,1,5) radio button and click Create Volume Now....
RND4000 User Manual
Page 115
... IPP 1-51 R RAID configuring on 1100 and NV+ 3-7 setup,reconfiguring 3-8 RAID Level X-RAID A-2 RAID Level 0 A-1 RAID Level 1 A-1 RAID Level 5 A-2 RAID Settings 1-25 ReadyNAS configuring 1-1 v1.0, August 2007 Index-3 networking DVD players 2-13 UPnP AV Media Adapters 2-13 NFS 1-18 NFS server backup jobs 1-43 NTP clock 1-53 NV+ NETGEAR ReadyNAS RAIDiator 3.01 Administration Manual configuring RAID 3-7 replacing...
... IPP 1-51 R RAID configuring on 1100 and NV+ 3-7 setup,reconfiguring 3-8 RAID Level X-RAID A-2 RAID Level 0 A-1 RAID Level 1 A-1 RAID Level 5 A-2 RAID Settings 1-25 ReadyNAS configuring 1-1 v1.0, August 2007 Index-3 networking DVD players 2-13 UPnP AV Media Adapters 2-13 NFS 1-18 NFS server backup jobs 1-43 NTP clock 1-53 NV+ NETGEAR ReadyNAS RAIDiator 3.01 Administration Manual configuring RAID 3-7 replacing...
RND4000 User Manual
Page 116
NETGEAR ReadyNAS RAIDiator 3.01 Administration Manual health 3-1 updating 1-60 viewing Logs 3-2 replacement disks ordering 3-3 replacing disks increasing capacity 1-27 resetting system system switch 3-6 resynchronizing volume 3-6 Rsync 1-18 accessing shares 2-12 server, backup jobs 1-44 S security mode domain 1-12 share 1-10 user 1-11 security options 1-8 domain 1-9 share 1-8, 1-9 user 1-9 Setup Wizard 1-2 share security mode 1-10 security options...
NETGEAR ReadyNAS RAIDiator 3.01 Administration Manual health 3-1 updating 1-60 viewing Logs 3-2 replacement disks ordering 3-3 replacing disks increasing capacity 1-27 resetting system system switch 3-6 resynchronizing volume 3-6 Rsync 1-18 accessing shares 2-12 server, backup jobs 1-44 S security mode domain 1-12 share 1-10 user 1-11 security options 1-8 domain 1-9 share 1-8, 1-9 user 1-9 Setup Wizard 1-2 share security mode 1-10 security options...
RND4000 User Manual
Page 117
... 1-64 performance, adding 1-58 USB 1-33 backing up to 3-9 flash device 1-33 formats, EXT3 1-33 formats, FAT32 1-33 NV+ backup 3-10 shares 1-41 storage 1-31 USB storage partitions 1-32 user accounts, creating 1-11 security mode 1-11 security options 1-9...1-4 Volume Management 1-21 X-RAID 1-22 Flex-RAID 1-22 X-RAID 1-26 VPN setting WINS server 1-6 W Web browser accessing shares 2-8 Windows accessing shares 2-1 WINS 1-6 workgroup changing default 1-11 NETGEAR ReadyNAS RAIDiator 3.01 Administration Manual name 1-11 setup 1-11 X X-RAID 1-22 adding a second disk 1-26 adding more disks 1-27 RAID Level...
... 1-64 performance, adding 1-58 USB 1-33 backing up to 3-9 flash device 1-33 formats, EXT3 1-33 formats, FAT32 1-33 NV+ backup 3-10 shares 1-41 storage 1-31 USB storage partitions 1-32 user accounts, creating 1-11 security mode 1-11 security options 1-9...1-4 Volume Management 1-21 X-RAID 1-22 Flex-RAID 1-22 X-RAID 1-26 VPN setting WINS server 1-6 W Web browser accessing shares 2-8 Windows accessing shares 2-1 WINS 1-6 workgroup changing default 1-11 NETGEAR ReadyNAS RAIDiator 3.01 Administration Manual name 1-11 setup 1-11 X X-RAID 1-22 adding a second disk 1-26 adding more disks 1-27 RAID Level...
RND4000 Setup Manual
Page 3
... Installing the RAIDar Utility Installing RAIDar on Windows 1-1 Installing RAIDar on MAC OS X 1-1 Installing RAIDar on Linux 1-2 Detecting Your ReadyNAS Device 1-2 Using the FrontView Setup Wizard Setting the Clock ...1-8 Configuring Alert Contacts 1-8 Configuring Networking 1-9 Ethernet Settings ...1-9 Global Settings ...1-10 Setting Up Security ...1-11 Administration Password 1-11 Security Mode ...1-12 Setting ...
... Installing the RAIDar Utility Installing RAIDar on Windows 1-1 Installing RAIDar on MAC OS X 1-1 Installing RAIDar on Linux 1-2 Detecting Your ReadyNAS Device 1-2 Using the FrontView Setup Wizard Setting the Clock ...1-8 Configuring Alert Contacts 1-8 Configuring Networking 1-9 Ethernet Settings ...1-9 Global Settings ...1-10 Setting Up Security ...1-11 Administration Password 1-11 Security Mode ...1-12 Setting ...
RND4000 Setup Manual
Page 5
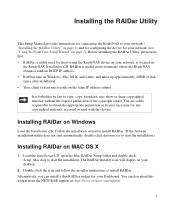
...ReadyNAS Installation CD. You can install a thin RAIDar widget for discovering the ReadyNAS device on your network (see "Using the FrontView Setup... Wizard" on the same IP address subnet. Installing RAIDar on your Dashboard. Load the Installation CD, open the Mac RAIDar Setup... folder and double-click Setup_Mac.dmg to install RAIDar. Installing the RAIDar Utility This Setup Manual provides instructions for connecting the ReadyNAS... It is useful in environments where the ReadyNAS obtains a random DHCP IP address. •...
...ReadyNAS Installation CD. You can install a thin RAIDar widget for discovering the ReadyNAS device on your network (see "Using the FrontView Setup... Wizard" on the same IP address subnet. Installing RAIDar on your Dashboard. Load the Installation CD, open the Mac RAIDar Setup... folder and double-click Setup_Mac.dmg to install RAIDar. Installing the RAIDar Utility This Setup Manual provides instructions for connecting the ReadyNAS... It is useful in environments where the ReadyNAS obtains a random DHCP IP address. •...
RND4000 Setup Manual
Page 6
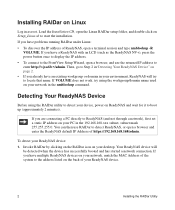
... RAIDar under Linux: • To discover the IP address of your device, power on ReadyNAS and wait for it to ReadyNAS (and not through a network), first set a static IP address on your PC in as the ReadyNAS NV+), press the power button once to display the IP address. • To connect to... of the system to the address listed on the back of ReadyNAS, open a browser, and use RAIDar to detect ReadyNAS, or open the Linux RAIDar setup folder, and double-click on Setup_Linux.sh to locate that name. Detecting Your ReadyNAS Device Before using the workgroup/domain name used on your network ...
... RAIDar under Linux: • To discover the IP address of your device, power on ReadyNAS and wait for it to ReadyNAS (and not through a network), first set a static IP address on your PC in as the ReadyNAS NV+), press the power button once to display the IP address. • To connect to... of the system to the address listed on the back of ReadyNAS, open a browser, and use RAIDar to detect ReadyNAS, or open the Linux RAIDar setup folder, and double-click on Setup_Linux.sh to locate that name. Detecting Your ReadyNAS Device Before using the workgroup/domain name used on your network ...

RND4000 Setup Manual
Page 8
The ReadyNAS is granted to obtain its IP address via DHCP. You can do this by configuring your client to anyone by default, but this can be changed on the same IP address subnet as the ReadyNAS device. Even if your client has a static IP address, make sure it is on the security setup page through the Setup Wizard. If your network does not have existing DHCP service, the ReadyNAS device will assure that you will get an IP address. 4 Installing the RAIDar Utility Access to the backup share is configured for anonymous guest access unless otherwise specified.
The ReadyNAS is granted to obtain its IP address via DHCP. You can do this by configuring your client to anyone by default, but this can be changed on the same IP address subnet as the ReadyNAS device. Even if your client has a static IP address, make sure it is on the security setup page through the Setup Wizard. If your network does not have existing DHCP service, the ReadyNAS device will assure that you will get an IP address. 4 Installing the RAIDar Utility Access to the backup share is configured for anonymous guest access unless otherwise specified.

RND4000 Setup Manual
Page 9
..., as well as a link to enter the User Name and Password of the administrative user for the Setup Wizard. To connect to fit most typical environments. The ReadyNAS Home screen will display. The login screen will display. 5 The user name is admin and the password... is on your first ReadyNAS installation. Click Setup in the FrontView Setup Wizard are pre-selected to the FrontView Setup Wizard: 1. Using the FrontView Setup Wizard Most options in RAIDar. In a typical FrontView Setup Wizard process, you go through the wizard if this is ...
..., as well as a link to enter the User Name and Password of the administrative user for the Setup Wizard. To connect to fit most typical environments. The ReadyNAS Home screen will display. The login screen will display. 5 The user name is admin and the password... is on your first ReadyNAS installation. Click Setup in the FrontView Setup Wizard are pre-selected to the FrontView Setup Wizard: 1. Using the FrontView Setup Wizard Most options in RAIDar. In a typical FrontView Setup Wizard process, you go through the wizard if this is ...
RND4000 Setup Manual
Page 10
The Setup Wizard screen will notice the command bar in the lower left corner to start the Setup Wizard. Click Setup Wizard in the upper right corner and the navigation and status bar at the bottom. 6 Using the FrontView Setup Wizard Figure 5 As you traverse through the setup screens, you will display. Figure 4 3.
The Setup Wizard screen will notice the command bar in the lower left corner to start the Setup Wizard. Click Setup Wizard in the upper right corner and the navigation and status bar at the bottom. 6 Using the FrontView Setup Wizard Figure 5 As you traverse through the setup screens, you will display. Figure 4 3.
RND4000 Setup Manual
Page 11
...on other LED behavior. Figure 8 Using the FrontView Setup Wizard 7 If a screen has multiple tabs, clicking Next will allow you enter the Advanced Control Mode. The amber LED indicates a warning or a failure condition. (See the ReadyNAS User Guide for information on the left provides the ...option to switch between Setup Wizard and Advanced Control modes. Be aware of the following conventions: • Click Next to accept...
...on other LED behavior. Figure 8 Using the FrontView Setup Wizard 7 If a screen has multiple tabs, clicking Next will allow you enter the Advanced Control Mode. The amber LED indicates a warning or a failure condition. (See the ReadyNAS User Guide for information on the left provides the ...option to switch between Setup Wizard and Advanced Control modes. Be aware of the following conventions: • Click Next to accept...
RND4000 Setup Manual
Page 12
...enter your contact name(s) where you wish to access the Alert screen. You can set your ReadyNAS clock: 1. Click Next to set appropriately to synchronize the ReadyNAS time with a local or public NTP server, select the Synchronize clock with... radio box. Enter one or more email address that you ... screen, click Next. Click Apply. 4. Configuring Alert Contacts On the Alerts screen, you will display. Figure 9 2. If you can change the NTP server addresses (or you want alert messages sent. The clock must be set up to use as the system alert contact. 8 Using the FrontView...
...enter your contact name(s) where you wish to access the Alert screen. You can set your ReadyNAS clock: 1. Click Next to set appropriately to synchronize the ReadyNAS time with a local or public NTP server, select the Synchronize clock with... radio box. Enter one or more email address that you ... screen, click Next. Click Apply. 4. Configuring Alert Contacts On the Alerts screen, you will display. Figure 9 2. If you can change the NTP server addresses (or you want alert messages sent. The clock must be set up to use as the system alert contact. 8 Using the FrontView...

RND4000 Setup Manual
Page 13
...Ethernet settings: 1. Email alerts are done with the Setup Wizard. If you of system status, various warnings, and fatal system errors Figure 10 2. This method is working . Verify that alert messaging is covered in the ReadyNAS User Guide. Otherwise, specify a static address. ...Some network firewalls prevent unknown message transfer agents (MTAs) (such as those used . Click Next to specify a remote SMTP server in a network environment where DHCP service is the case...
...Ethernet settings: 1. Email alerts are done with the Setup Wizard. If you of system status, various warnings, and fatal system errors Figure 10 2. This method is working . Verify that alert messaging is covered in the ReadyNAS User Guide. Otherwise, specify a static address. ...Some network firewalls prevent unknown message transfer agents (MTAs) (such as those used . Click Next to specify a remote SMTP server in a network environment where DHCP service is the case...

RND4000 Setup Manual
Page 14
... be aware that the browser will lose connection to advertise the ReadyNAS on the settings from your DHCP server. If you selected the Static option, manually enter the information in the field provided 10 Using the FrontView Setup Wizard Global Settings The Global Settings screen allows you to access ... selected the DHCP option in the Ethernet tab, the gateway and domain name server fields will appear in the RAIDar scan list. 2. If your network. This is also the name that you wish to the ReadyNAS device after the IP address has been changed. Enter a hostname that will ...
... be aware that the browser will lose connection to advertise the ReadyNAS on the settings from your DHCP server. If you selected the Static option, manually enter the information in the field provided 10 Using the FrontView Setup Wizard Global Settings The Global Settings screen allows you to access ... selected the DHCP option in the Ethernet tab, the gateway and domain name server fields will appear in the RAIDar scan list. 2. If your network. This is also the name that you wish to the ReadyNAS device after the IP address has been changed. Enter a hostname that will ...