RND4000 User Manual
Page 7
.../X6 3-5 Resynchronizing the Volume 3-6 Resetting Your System (System Switch 3-6 Configuring RAID on the ReadyNAS 1100 and NV 3-7 Backing Up the ReadyNAS to a USB Drive 3-9 ReadyNAS1100 Backup 3-10 ReadyNAS NV+ Backup 3-10 Removing the System Module from the ReadyNAS 1100 3-11 Changing User Passwords 3-11 Appendix A RAID Levels Simplified RAID Level 0 ...A-1 RAID Level 1 ...A-1 RAID Level 5 ...A-2 RAID Level...
.../X6 3-5 Resynchronizing the Volume 3-6 Resetting Your System (System Switch 3-6 Configuring RAID on the ReadyNAS 1100 and NV 3-7 Backing Up the ReadyNAS to a USB Drive 3-9 ReadyNAS1100 Backup 3-10 ReadyNAS NV+ Backup 3-10 Removing the System Module from the ReadyNAS 1100 3-11 Changing User Passwords 3-11 Appendix A RAID Levels Simplified RAID Level 0 ...A-1 RAID Level 1 ...A-1 RAID Level 5 ...A-2 RAID Level...
RND4000 User Manual
Page 13
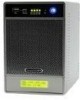
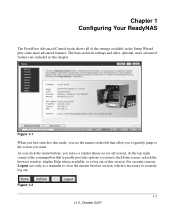
The basic network settings and other, optional, more advanced features are included in the Setup Wizard plus some more advanced features. Figure 1-2 1-1 v1.0, October 2007 NETGEAR ReadyNAS NV+ [X-RAID] Figure 1-1 When you first switch to this mode, you to quickly jump to securely log out. ,. For security reasons, Logout acts only as a reminder ... buttons, you want. At the top right corner is necessary to the screen you notice a similar theme across all of this chapter. Chapter 1 Configuring Your ReadyNAS The FrontView Advanced Control mode shows all screens.
The basic network settings and other, optional, more advanced features are included in the Setup Wizard plus some more advanced features. Figure 1-2 1-1 v1.0, October 2007 NETGEAR ReadyNAS NV+ [X-RAID] Figure 1-1 When you first switch to this mode, you to quickly jump to securely log out. ,. For security reasons, Logout acts only as a reminder ... buttons, you want. At the top right corner is necessary to the screen you notice a similar theme across all of this chapter. Chapter 1 Configuring Your ReadyNAS The FrontView Advanced Control mode shows all screens.
RND4000 User Manual
Page 76
...quota check on package.)1 The Power ON option does not appear if the ReadyNAS hardware does not support this device is available on the ReadyNAS NV through an add-on the next boot. As an option, the ReadyNAS can take several minutes to several hours depending on the size of your volume...NAS check box and enter the IP Address in the volume. Both these options unless you have the option of files in the Remote IP field. UPS Configuration If this feature. This is useful when a UPS is shared by multiple ReadyNAS units, even though only one ReadyNAS is detected on the NETGEAR...
...quota check on package.)1 The Power ON option does not appear if the ReadyNAS hardware does not support this device is available on the ReadyNAS NV through an add-on the next boot. As an option, the ReadyNAS can take several minutes to several hours depending on the size of your volume...NAS check box and enter the IP Address in the volume. Both these options unless you have the option of files in the Remote IP field. UPS Configuration If this feature. This is useful when a UPS is shared by multiple ReadyNAS units, even though only one ReadyNAS is detected on the NETGEAR...
RND4000 User Manual
Page 95
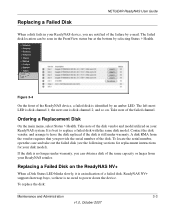
... the same disk model. The left most LED is still under warranty, you can be seen in your ReadyNAS device, you provide the serial number of the disk. Replacing a Failed Disk on the ReadyNAS NV+ When a Disk Status LED blinks slowly, it is disk channel 2; The failed disk location can obtain a disk of.... the next one is an indication of a failed disk. Take note of the failed channel. If the disk is identified by e-mail. Replacing a Failed Disk NETGEAR ReadyNAS User Guide When a disk fails in the FrontView status bar at the bottom by selecting Status > Health.
... the same disk model. The left most LED is still under warranty, you can be seen in your ReadyNAS device, you provide the serial number of the disk. Replacing a Failed Disk on the ReadyNAS NV+ When a Disk Status LED blinks slowly, it is disk channel 2; The failed disk location can obtain a disk of.... the next one is an indication of a failed disk. Take note of the failed channel. If the disk is identified by e-mail. Replacing a Failed Disk NETGEAR ReadyNAS User Guide When a disk fails in the FrontView status bar at the bottom by selecting Status > Health.
RND4000 User Manual
Page 99
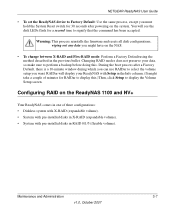
... the Info column. (It might have on the system. Configuring RAID on the ReadyNAS 1100 and NV+ Your ReadyNAS comes in one of minutes for 30 seconds after powering on the NAS. • To change between X-RAID and Flex-RAID mode: Perform a Factory ...Default using the method described in RAID 0/1/5 (flexible volume). Maintenance and Administration 3-7 v1.0, October 2007 NETGEAR ReadyNAS User Guide • To set the ReadyNAS...
... the Info column. (It might have on the system. Configuring RAID on the ReadyNAS 1100 and NV+ Your ReadyNAS comes in one of minutes for 30 seconds after powering on the NAS. • To change between X-RAID and Flex-RAID mode: Perform a Factory ...Default using the method described in RAID 0/1/5 (flexible volume). Maintenance and Administration 3-7 v1.0, October 2007 NETGEAR ReadyNAS User Guide • To set the ReadyNAS...
RND4000 User Manual
Page 100
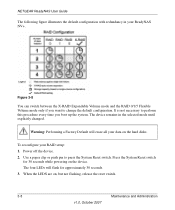
... flash for 30 seconds while powering on the device. When the LEDS are on the hard disks. The device remains in your ReadyNAS NV+. Press the System Reset switch for approximately 30 seconds. 3. It is not necessary to perform this procedure every time you want ... the system. To reconfigure your data on , but not flashing, release the reset switch. 3-8 Maintenance and Administration v1.0, October 2007 NETGEAR ReadyNAS User Guide The following figure illustrates the default configuration with redundancy in the selected mode until explicitly changed. Use a paper clip or push...
... flash for 30 seconds while powering on the device. When the LEDS are on the hard disks. The device remains in your ReadyNAS NV+. Press the System Reset switch for approximately 30 seconds. 3. It is not necessary to perform this procedure every time you want ... the system. To reconfigure your data on , but not flashing, release the reset switch. 3-8 Maintenance and Administration v1.0, October 2007 NETGEAR ReadyNAS User Guide The following figure illustrates the default configuration with redundancy in the selected mode until explicitly changed. Use a paper clip or push...
RND4000 User Manual
Page 102
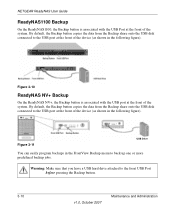
Figure 3-10 ReadyNAS NV+ Backup On the ReadyNAS NV+, the Backup button is associated with the USB port at the front of the system. By default, the Backup button copies the data from the ... the USB port at the front of the device (as shown in the FrontView Backup menu to back up one or more predefined backup jobs. NETGEAR ReadyNAS User Guide ReadyNAS1100 Backup On the ReadyNAS1100, the Backup button is associated with the USB Port at the front of the system. Warning: Make sure...
Figure 3-10 ReadyNAS NV+ Backup On the ReadyNAS NV+, the Backup button is associated with the USB port at the front of the system. By default, the Backup button copies the data from the ... the USB port at the front of the device (as shown in the FrontView Backup menu to back up one or more predefined backup jobs. NETGEAR ReadyNAS User Guide ReadyNAS1100 Backup On the ReadyNAS1100, the Backup button is associated with the USB Port at the front of the system. Warning: Make sure...

RND4000 User Manual
Page 114
... settings how to 3-7 failed disk ordering replacement disks 3-3 replacing on 600/X6 3-5 replacing on NV+ 3-3 replacing on1100 3-4 replacing, how to 3-3 FAT32 1-33 File Transfer Protocol. See FTP. NETGEAR ReadyNAS RAIDiator 3.01 Administration Manual D Default Gateway 1-5 Deleting a Volume Flex-RAID 1-23 DHCP 1-7... shares 2-11 G group accounts, setting up 1-13 groups accounts, creating 1-11 managing 1-13 H health status of ReadyNAS 3-1 Home Media Streaming Server 1-21 home share accounts/preference, creating 1-11 user 1-11 Hostname 1-5 default 1-5 setting 1-5 hot spare 1-25 HP OpenView 1-...
... settings how to 3-7 failed disk ordering replacement disks 3-3 replacing on 600/X6 3-5 replacing on NV+ 3-3 replacing on1100 3-4 replacing, how to 3-3 FAT32 1-33 File Transfer Protocol. See FTP. NETGEAR ReadyNAS RAIDiator 3.01 Administration Manual D Default Gateway 1-5 Deleting a Volume Flex-RAID 1-23 DHCP 1-7... shares 2-11 G group accounts, setting up 1-13 groups accounts, creating 1-11 managing 1-13 H health status of ReadyNAS 3-1 Home Media Streaming Server 1-21 home share accounts/preference, creating 1-11 user 1-11 Hostname 1-5 default 1-5 setting 1-5 hot spare 1-25 HP OpenView 1-...
RND4000 User Manual
Page 115
See OU. setting 1-3 static, setting 1-3 iTunes Streaming Server 1-20 J jumbo frames performance settings 1-4 L Language settings 1-59 Unicode 1-60 Linux/Unix accessing shares 2-7 Logs 3-2 M MAC address host name use 1-5 MAC...RAID configuring on 1100 and NV+ 3-7 setup,reconfiguring 3-8 RAID Level X-RAID A-2 RAID Level 0 A-1 RAID Level 1 A-1 RAID Level 5 A-2 RAID Settings 1-25 ReadyNAS configuring 1-1 v1.0, August 2007 Index-3 networking DVD players 2-13 UPnP AV Media Adapters 2-13 NFS 1-18 NFS server backup jobs 1-43 NTP clock 1-53 NV+ NETGEAR ReadyNAS RAIDiator 3.01 Administration Manual ...
See OU. setting 1-3 static, setting 1-3 iTunes Streaming Server 1-20 J jumbo frames performance settings 1-4 L Language settings 1-59 Unicode 1-60 Linux/Unix accessing shares 2-7 Logs 3-2 M MAC address host name use 1-5 MAC...RAID configuring on 1100 and NV+ 3-7 setup,reconfiguring 3-8 RAID Level X-RAID A-2 RAID Level 0 A-1 RAID Level 1 A-1 RAID Level 5 A-2 RAID Settings 1-25 ReadyNAS configuring 1-1 v1.0, August 2007 Index-3 networking DVD players 2-13 UPnP AV Media Adapters 2-13 NFS 1-18 NFS server backup jobs 1-43 NTP clock 1-53 NV+ NETGEAR ReadyNAS RAIDiator 3.01 Administration Manual ...
RND4000 User Manual
Page 117
...of 1-64 performance, adding 1-58 USB 1-33 backing up to 3-9 flash device 1-33 formats, EXT3 1-33 formats, FAT32 1-33 NV+ backup 3-10 shares 1-41 storage 1-31 USB storage partitions 1-32 user accounts, creating 1-11 security mode 1-11 security options 1-9... 1-3 support enabling 1-4 Volume Management 1-21 X-RAID 1-22 Flex-RAID 1-22 X-RAID 1-26 VPN setting WINS server 1-6 W Web browser accessing shares 2-8 Windows accessing shares 2-1 WINS 1-6 workgroup changing default 1-11 NETGEAR ReadyNAS RAIDiator 3.01 Administration Manual name 1-11 setup 1-11 X X-RAID 1-22 adding a second disk 1-26 adding ...
...of 1-64 performance, adding 1-58 USB 1-33 backing up to 3-9 flash device 1-33 formats, EXT3 1-33 formats, FAT32 1-33 NV+ backup 3-10 shares 1-41 storage 1-31 USB storage partitions 1-32 user accounts, creating 1-11 security mode 1-11 security options 1-9... 1-3 support enabling 1-4 Volume Management 1-21 X-RAID 1-22 Flex-RAID 1-22 X-RAID 1-26 VPN setting WINS server 1-6 W Web browser accessing shares 2-8 Windows accessing shares 2-1 WINS 1-6 workgroup changing default 1-11 NETGEAR ReadyNAS RAIDiator 3.01 Administration Manual name 1-11 setup 1-11 X X-RAID 1-22 adding a second disk 1-26 adding ...
RND4000 Setup Manual
Page 6
...address listed on the back of your desktop. Invoke RAIDar by clicking on the RAIDar icon on your ReadyNAS device. 2 Installing the RAIDar Utility Installing RAIDar on Linux Log in as the ReadyNAS NV+), press the power button once to display the IP address. • To connect to the FrontView ...Setup Wizard, open a browser, and use RAIDar to detect ReadyNAS, or open a browser and enter the ReadyNAS default IP Address of https://192.168.168...
...address listed on the back of your desktop. Invoke RAIDar by clicking on the RAIDar icon on your ReadyNAS device. 2 Installing the RAIDar Utility Installing RAIDar on Linux Log in as the ReadyNAS NV+), press the power button once to display the IP address. • To connect to the FrontView ...Setup Wizard, open a browser, and use RAIDar to detect ReadyNAS, or open a browser and enter the ReadyNAS default IP Address of https://192.168.168...


