
PS121v1 User Manual
Page 3
... USB Port ...2-5 Diagnostic/Reset Push Button 2-6 How to Restore the Factory Default Settings 2-6 How to Generate a Diagnostic Printout 2-6 Chapter 3 Setup Verify Printer and Network Readiness 3-1 Observe these Precautions 3-1 Overview of PS121 Print Server Setup 3-2 PS121 Default Factory Settings 3-2 First, Connect the Print Server and Printer to Your Network 3-3 Now, Install and Configure the PS121 Software 3-4 Finally, Set Up Each Computer to Use the PS121 3-6 Chapter 4 Troubleshooting Basic Functioning ...4-1 The mini print server has no power 4-1 No lights are lit on the mini...
... USB Port ...2-5 Diagnostic/Reset Push Button 2-6 How to Restore the Factory Default Settings 2-6 How to Generate a Diagnostic Printout 2-6 Chapter 3 Setup Verify Printer and Network Readiness 3-1 Observe these Precautions 3-1 Overview of PS121 Print Server Setup 3-2 PS121 Default Factory Settings 3-2 First, Connect the Print Server and Printer to Your Network 3-3 Now, Install and Configure the PS121 Software 3-4 Finally, Set Up Each Computer to Use the PS121 3-6 Chapter 4 Troubleshooting Basic Functioning ...4-1 The mini print server has no power 4-1 No lights are lit on the mini...

PS121v1 User Manual
Page 7
... Ethernet port for Microsoft Windows. • Easy Installation. The Web-based interface provides an easy method of configuration in detail how to your operating system. • Compact Size. Introduction 2-1 This manual describes in TCP/IP networks regardless of utility programs are fast and easy to simplify setup. A number of your LAN and operating system support for connection to set up to be used even where space is packed with NETGEAR Print Server configuration software...
... Ethernet port for Microsoft Windows. • Easy Installation. The Web-based interface provides an easy method of configuration in detail how to your operating system. • Compact Size. Introduction 2-1 This manual describes in TCP/IP networks regardless of utility programs are fast and easy to simplify setup. A number of your LAN and operating system support for connection to set up to be used even where space is packed with NETGEAR Print Server configuration software...
PS121v1 User Manual
Page 8
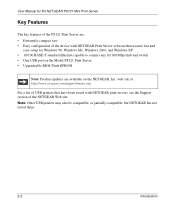
... NETGEAR PS121 Mini Print Server Key Features The key features of the PS121 Print Server are available on the NETGEAR, Inc. User Manual for Windows 98, Windows Me, Windows 2000, and Windows XP • 10/100 BASE-T standard Ethernet capable to connect any 10/100 Mbps hub and switch • One USB port on the Model PS121 Print Server • Upgradeable BIOS Flash EPROM Note: Product updates are : • Extremely compact size • Easy configuration of the device with NETGEAR Print Server software...
... NETGEAR PS121 Mini Print Server Key Features The key features of the PS121 Print Server are available on the NETGEAR, Inc. User Manual for Windows 98, Windows Me, Windows 2000, and Windows XP • 10/100 BASE-T standard Ethernet capable to connect any 10/100 Mbps hub and switch • One USB port on the Model PS121 Print Server • Upgradeable BIOS Flash EPROM Note: Product updates are : • Extremely compact size • Easy configuration of the device with NETGEAR Print Server software...

PS121v1 User Manual
Page 9
..., in the Box? PC Networking Tutorial • Warranty & Registration card • Support information card If any of purchase. User Manual for repair. To qualify for the NETGEAR PS121 Mini Print Server (201-10011-01) • NETGEAR PS121 Mini Print Server Resource CD , including: - Introduction 2-3 User Manual for the NETGEAR PS121 Mini Print Server Figure 2-1: PS121 Package Contents The product package should contain the following items: • PS121 Print Server • AC Power adapter • USB cable • Installation Guide for product updates and product...
..., in the Box? PC Networking Tutorial • Warranty & Registration card • Support information card If any of purchase. User Manual for repair. To qualify for the NETGEAR PS121 Mini Print Server (201-10011-01) • NETGEAR PS121 Mini Print Server Resource CD , including: - Introduction 2-3 User Manual for the NETGEAR PS121 Mini Print Server Figure 2-1: PS121 Package Contents The product package should contain the following items: • PS121 Print Server • AC Power adapter • USB cable • Installation Guide for product updates and product...

PS121v1 User Manual
Page 11
If your printer uses a parallel connector, you should use one of the Model PS121 Mini Print Server is a standard USB connector. Figure 2-4: Not Compatible with Centronics Parallel Printer Ports Introduction 2-5 User Manual for the NETGEAR PS121 Mini Print Server The USB Port The USB port of the other NETGEAR Print Servers such as the Model PS101 Mini Print Server. PS121 USB Port Figure 2-3: Print Server USB Port Note: The Model PS121 Mini Print Server does not support printers using parallel connectors.
If your printer uses a parallel connector, you should use one of the Model PS121 Mini Print Server is a standard USB connector. Figure 2-4: Not Compatible with Centronics Parallel Printer Ports Introduction 2-5 User Manual for the NETGEAR PS121 Mini Print Server The USB Port The USB port of the other NETGEAR Print Servers such as the Model PS101 Mini Print Server. PS121 USB Port Figure 2-3: Print Server USB Port Note: The Model PS121 Mini Print Server does not support printers using parallel connectors.
PS121v1 User Manual
Page 12
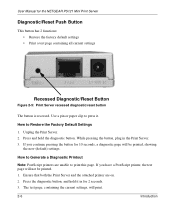
... printed, showing the new (default) settings. If you continue pressing the button for the NETGEAR PS121 Mini Print Server Diagnostic/Reset Push Button This button has 2 functions: • Restore the factory default settings • Print a test page containing all current settings Recessed Diagnostic/Reset Button Figure 2-5: Print Server recessed diagnostic/reset button The button is recessed. User Manual for 10 seconds, a diagnostic page will print. 2-6 Introduction Press and hold it . Unplug the Print Server. 2. How to Restore the Factory Default Settings 1.
... printed, showing the new (default) settings. If you continue pressing the button for the NETGEAR PS121 Mini Print Server Diagnostic/Reset Push Button This button has 2 functions: • Restore the factory default settings • Print a test page containing all current settings Recessed Diagnostic/Reset Button Figure 2-5: Print Server recessed diagnostic/reset button The button is recessed. User Manual for 10 seconds, a diagnostic page will print. 2-6 Introduction Press and hold it . Unplug the Print Server. 2. How to Restore the Factory Default Settings 1.

PS121v1 User Manual
Page 13
... power supply. Exposure to water poses an electric-shock hazard. Use only a slightly dampened cloth for cleaning. Verify Printer and Network Readiness Assure that it to the PS121. Chapter 3 Setup This chapter describes how to install your NETGEAR PS121 Mini Print Server and set up the printer you should use one Windows 98SE, Me, 2000, or XP PC. • You have your printer driver software handy. If your printer uses a parallel connector, you will use...
... power supply. Exposure to water poses an electric-shock hazard. Use only a slightly dampened cloth for cleaning. Verify Printer and Network Readiness Assure that it to the PS121. Chapter 3 Setup This chapter describes how to install your NETGEAR PS121 Mini Print Server and set up the printer you should use one Windows 98SE, Me, 2000, or XP PC. • You have your printer driver software handy. If your printer uses a parallel connector, you will use...

PS121v1 User Manual
Page 14
... Static IP for the NETGEAR PS121 Mini Print Server Overview of PS121 Print Server Setup Before you share a printer with the Factory Default Restore button on the rear panel as the TCP/IP addresses and networking protocols in "How to Restore the Factory Default Settings" on your PS121, the default factory settings are shown below. Next, install the PS121 software from the NETGEAR PS121 Mini Print Server Resource CD and set up the PS121 on page 2-6. User Manual for Regular Operation Before you begin, gather your NETGEAR PS121 Mini Print Server...
... Static IP for the NETGEAR PS121 Mini Print Server Overview of PS121 Print Server Setup Before you share a printer with the Factory Default Restore button on the rear panel as the TCP/IP addresses and networking protocols in "How to Restore the Factory Default Settings" on your PS121, the default factory settings are shown below. Next, install the PS121 software from the NETGEAR PS121 Mini Print Server Resource CD and set up the PS121 on page 2-6. User Manual for Regular Operation Before you begin, gather your NETGEAR PS121 Mini Print Server...
PS121v1 User Manual
Page 17
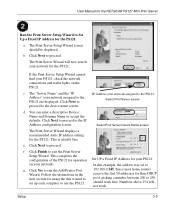
... PS121. Numbers above 254 will now search your PS121. Setup 3-5 d. The Print Server Wizard displays a recommended static IP address setting for the PS121. In this wizard to set to run the Add Printer Port Wizard. b. Click Yes to 192.168.0.245. You can enter a descriptive Device Name and Domain Name or accept the defaults. The Print Server Setup Wizard screen should work . Click Next to proceed. User Manual for the NETGEAR PS121 Mini Print Server Run the Print Server Setup...
... PS121. Numbers above 254 will now search your PS121. Setup 3-5 d. The Print Server Wizard displays a recommended static IP address setting for the PS121. In this wizard to set to run the Add Printer Port Wizard. b. Click Yes to 192.168.0.245. You can enter a descriptive Device Name and Domain Name or accept the defaults. The Print Server Setup Wizard screen should work . Click Next to proceed. User Manual for the NETGEAR PS121 Mini Print Server Run the Print Server Setup...

PS121v1 User Manual
Page 18
... the NETGEAR Add Printer Wizard. Take note of the printer model number listed. Also, be sure that your printer is recognized on your network, use the Print Server Setup Wizard to check your TCP/IP configuration and make sure that both the PS121 and the connected printer are secure. 3-6 Setup Warning: Print manager software from Epson and from the Windows Start menu NETGEAR Print Server program group, you have set up the PS121 in this by using the NETGEAR Add Printer Port Wizard. Printer Select Window (Add Port...
... the NETGEAR Add Printer Wizard. Take note of the printer model number listed. Also, be sure that your printer is recognized on your network, use the Print Server Setup Wizard to check your TCP/IP configuration and make sure that both the PS121 and the connected printer are secure. 3-6 Setup Warning: Print manager software from Epson and from the Windows Start menu NETGEAR Print Server program group, you have set up the PS121 in this by using the NETGEAR Add Printer Port Wizard. Printer Select Window (Add Port...

PS121v1 User Manual
Page 19
User Manual for the printer port. If you added Setup 3-7 Use the NETGEAR PS121 Mini Print Server Resource CD to run the Add Printer Port Wizard to set up the correct printer driver for the NETGEAR PS121 Mini Print Server Set up each PC on you network that you want to use with the PS121. b. c. Click Next to proceed to the Select Printer screen. If prompted, print a test page to select it from the list. a. Click Next to proceed to the Port/Printer name...
User Manual for the printer port. If you added Setup 3-7 Use the NETGEAR PS121 Mini Print Server Resource CD to run the Add Printer Port Wizard to set up the correct printer driver for the NETGEAR PS121 Mini Print Server Set up each PC on you network that you want to use with the PS121. b. c. Click Next to proceed to the Select Printer screen. If prompted, print a test page to select it from the list. a. Click Next to proceed to the Port/Printer name...

PS121v1 User Manual
Page 24
... of the mini print server. See "Printer Port Screen" on . • Wrong network configuration - on the same subnet. Use this button. Make sure the Status LED is not known. Checking the Current Status of the Printer You can click the Print Test Page button to the PS121. Restoring the Default Configuration This section explains how to restore the factory default configuration settings to print the print server status page. User Manual for a description of the printer remotely from the Web configuration screen...
... of the mini print server. See "Printer Port Screen" on . • Wrong network configuration - on the same subnet. Use this button. Make sure the Status LED is not known. Checking the Current Status of the Printer You can click the Print Test Page button to the PS121. Restoring the Default Configuration This section explains how to restore the factory default configuration settings to print the print server status page. User Manual for a description of the printer remotely from the Web configuration screen...

PS121v1 User Manual
Page 25
... the NETGEAR PS121 Mini Print Server. Appendix A Technical Specifications This appendix provides technical specifications for the Print Server Width Height Depth Weight Operating Temperature Operating Humidity Electromagnetic Emissions Compliance Safety Agency Approvals, Power Adapter IEEE 802.3u, 100BASE-TX, Fast Ethernet IEEE 802.3i 10BASE-T CSMA/CD NetBEUI, and TCP/IP protocols 10/100 Mbps differential Manchester encoded 10BASE-T/100BASE-TX network port (RJ-45) USB printer port...
... the NETGEAR PS121 Mini Print Server. Appendix A Technical Specifications This appendix provides technical specifications for the Print Server Width Height Depth Weight Operating Temperature Operating Humidity Electromagnetic Emissions Compliance Safety Agency Approvals, Power Adapter IEEE 802.3u, 100BASE-TX, Fast Ethernet IEEE 802.3i 10BASE-T CSMA/CD NetBEUI, and TCP/IP protocols 10/100 Mbps differential Manchester encoded 10BASE-T/100BASE-TX network port (RJ-45) USB printer port...
PS121v2 Reference Manual
Page 5
... 1 Getting Started What Is in the Box ...1-2 Hardware Description ...1-3 LED Indicators ...1-3 USB Port ...1-4 Diagnostic/Reset Push Button 1-4 Observe These Precautions 1-5 Chapter 2 Installation and Setup Preparing for Installation 2-1 Overview ...2-2 Multi-Function Printers 2-2 Standard Printing Operations 2-2 Installation ...2-3 Install the Print Server and Set up One PC 2-3 Reserve the Print Server's IP Address on Your Router 2-5 Set Up Each Additional PC to Use the PS121v2 2-5 Installation for TCP/IP LPR Printing 2-6 Connect the Print Server 2-6 Adding a Printer with Windows...
... 1 Getting Started What Is in the Box ...1-2 Hardware Description ...1-3 LED Indicators ...1-3 USB Port ...1-4 Diagnostic/Reset Push Button 1-4 Observe These Precautions 1-5 Chapter 2 Installation and Setup Preparing for Installation 2-1 Overview ...2-2 Multi-Function Printers 2-2 Standard Printing Operations 2-2 Installation ...2-3 Install the Print Server and Set up One PC 2-3 Reserve the Print Server's IP Address on Your Router 2-5 Set Up Each Additional PC to Use the PS121v2 2-5 Installation for TCP/IP LPR Printing 2-6 Connect the Print Server 2-6 Adding a Printer with Windows...
PS121v2 Reference Manual
Page 6
...the Printer Port Status 3-4 Viewing and Updating Settings with the Smart Wizard 3-5 Viewing or Updating Settings with Your Web Browser 3-6 Changing the Password 3-8 Chapter 4 Troubleshooting Basic Functioning ...4-1 The print server has no power 4-1 No lights are lit on the print server 4-2 Printing Errors ...4-2 The printer is printing "garbage" characters 4-2 Windows error message appears when printing 4-2 The print server is not found 4-2 Nothing is printing ...4-2 Checking the Current Status of the Printer 4-3 Appendix A Default Configuration Settings and Technical Specifications...
...the Printer Port Status 3-4 Viewing and Updating Settings with the Smart Wizard 3-5 Viewing or Updating Settings with Your Web Browser 3-6 Changing the Password 3-8 Chapter 4 Troubleshooting Basic Functioning ...4-1 The print server has no power 4-1 No lights are lit on the print server 4-2 Printing Errors ...4-2 The printer is printing "garbage" characters 4-2 Windows error message appears when printing 4-2 The print server is not found 4-2 Nothing is printing ...4-2 Checking the Current Status of the Printer 4-3 Appendix A Default Configuration Settings and Technical Specifications...

PS121v2 Reference Manual
Page 7
..., CDs, URL names User input • Formats. This manual uses the following paragraphs: • Typographical Conventions. Warning: Ignoring this manual is used to highlight information of note may result in this type of importance or special interest. Tip: This format is intended for the USB Multifunction Print Server according to install, configure and troubleshoot the NETGEAR® PS121v2 USB Multifunction Print Server. The information in a malfunction...
..., CDs, URL names User input • Formats. This manual uses the following paragraphs: • Typographical Conventions. Warning: Ignoring this manual is used to highlight information of note may result in this type of importance or special interest. Tip: This format is intended for the USB Multifunction Print Server according to install, configure and troubleshoot the NETGEAR® PS121v2 USB Multifunction Print Server. The information in a malfunction...

PS121v2 Reference Manual
Page 14
... current settings Figure 1-4 Recessed Diagnostic/Reset Button The button is a standard USB connector. Figure 1-3 PS121 USB 2.0 Port Note: The USB Multifunction Print Server does not support printers using parallel connectors. Use a pin or paper clip to press it. 1-4 v2.0, April 2007 Getting Started If your printer uses a parallel connector, you should use one of the PS121v2 USB Multifunction Print Server is recessed. NETGEAR USB Multifunction Printer Server PS121v2 User Manual USB Port The USB port of the other NETGEAR Print Servers such as the Model PS101 Mini Print Server.
... current settings Figure 1-4 Recessed Diagnostic/Reset Button The button is a standard USB connector. Figure 1-3 PS121 USB 2.0 Port Note: The USB Multifunction Print Server does not support printers using parallel connectors. Use a pin or paper clip to press it. 1-4 v2.0, April 2007 Getting Started If your printer uses a parallel connector, you should use one of the PS121v2 USB Multifunction Print Server is recessed. NETGEAR USB Multifunction Printer Server PS121v2 User Manual USB Port The USB port of the other NETGEAR Print Servers such as the Model PS101 Mini Print Server.

PS121v2 Reference Manual
Page 15
... set a Static IP address in until the ACT and ERROR LEDs flash alternately. Getting Started 1-5 v2.0, April 2007 NETGEAR USB Multifunction Printer Server PS121v2 User Manual To Restore the Factory Default Settings Note: The factory default setting for the Print Server IP Address is properly shielded and does not pose a tripping hazard. • Unplug the print server from its power source before cleaning. The test page, containing the current settings, will not be printed. 1. During installation you have a PostScript printer, the test...
... set a Static IP address in until the ACT and ERROR LEDs flash alternately. Getting Started 1-5 v2.0, April 2007 NETGEAR USB Multifunction Printer Server PS121v2 User Manual To Restore the Factory Default Settings Note: The factory default setting for the Print Server IP Address is properly shielded and does not pose a tripping hazard. • Unplug the print server from its power source before cleaning. The test page, containing the current settings, will not be printed. 1. During installation you have a PostScript printer, the test...

PS121v2 Reference Manual
Page 26
Click OK to close this screen. 7. Figure 2-11 For Protocol, select LPR, and then enter PS121v2 as the Queue Name in the LPR Settings. The Configure Standard TCP/IP Port Monitor screen opens. 6. The wizard detects the driver, and then displays the Install the printer driver screen: Figure 2-12 2-10 v2.0, April 2007 Installation and Setup Configure the TCP/IP Port Monitor. When the Additional Port Information required screen appears, click Next. Select Custom, and then click Settings. NETGEAR USB Multifunction Printer Server PS121v2 User Manual 5.
Click OK to close this screen. 7. Figure 2-11 For Protocol, select LPR, and then enter PS121v2 as the Queue Name in the LPR Settings. The Configure Standard TCP/IP Port Monitor screen opens. 6. The wizard detects the driver, and then displays the Install the printer driver screen: Figure 2-12 2-10 v2.0, April 2007 Installation and Setup Configure the TCP/IP Port Monitor. When the Additional Port Information required screen appears, click Next. Select Custom, and then click Settings. NETGEAR USB Multifunction Printer Server PS121v2 User Manual 5.
PS121v2 Reference Manual
Page 46
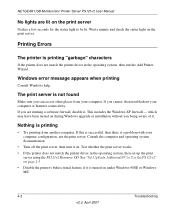
... Windows 98SE or Windows ME. 4-2 Troubleshooting v2.0, April 2007 If you can access other places from another computer. See "Set Up Each Additional PC to be lit. NETGEAR USB Multifunction Printer Server PS121v2 User Manual No lights are running a software firewall, disable it. If this is successful, then there is printing • Try printing from your computer. Nothing is a problem with your computer or Internet connectivity. Test whether the print server works...
... Windows 98SE or Windows ME. 4-2 Troubleshooting v2.0, April 2007 If you can access other places from another computer. See "Set Up Each Additional PC to be lit. NETGEAR USB Multifunction Printer Server PS121v2 User Manual No lights are running a software firewall, disable it. If this is successful, then there is printing • Try printing from your computer. Nothing is a problem with your computer or Internet connectivity. Test whether the print server works...


