
GS716Tv2/GS724Tv3 Hardware manual
Page 22
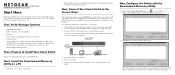
.../GS724T Hardware Installation Guide Step 7: Managing the Switch using a Web browser or a utility program called SmartWizard Discovery. After powering up , there is a default IP address already configured on the Smart Switch Resource CD. The default IP address is not required for viewing,...management software is 192.168.0.239 and subnet mask 255.255.255.0. 4-18 v1.0, June 2009 Installation Note: When the device powers up the switch for the first time, the Smart Switch can be configured using a Web Browser or the PC Utility The NETGEAR Smart Switch contains software for the switch...
.../GS724T Hardware Installation Guide Step 7: Managing the Switch using a Web browser or a utility program called SmartWizard Discovery. After powering up , there is a default IP address already configured on the Smart Switch Resource CD. The default IP address is not required for viewing,...management software is 192.168.0.239 and subnet mask 255.255.255.0. 4-18 v1.0, June 2009 Installation Note: When the device powers up the switch for the first time, the Smart Switch can be configured using a Web Browser or the PC Utility The NETGEAR Smart Switch contains software for the switch...
GS716Tv2/GS724Tv3 Hardware manual
Page 29
... Installation 4-15 Class of Service 1-1 Combo Port 2-9 Combo Ports 1-2 Connecting Devices to the Switch 4-16 Copper 1-1 Crossover 2-8 D Default IP Address 4-18 Default Reset Button 2-5, 2-6 Device Hardware Interfaces 2-8 Duplex Mode 2-8 E Example of Desktop Switching 3-11 F Factory Default Button 2-9 Factory Defaults 2-5 Fiber Connectivity 1-1 Flat Surface 4-14 Full-duplex 1-2 G GBIC 1-2, 2-9 Gigabit Ports 1-1 H High-speed Servers 1-1 Hz 2-6, 2-7 v1.0, June 2009 Index-27
... Installation 4-15 Class of Service 1-1 Combo Port 2-9 Combo Ports 1-2 Connecting Devices to the Switch 4-16 Copper 1-1 Crossover 2-8 D Default IP Address 4-18 Default Reset Button 2-5, 2-6 Device Hardware Interfaces 2-8 Duplex Mode 2-8 E Example of Desktop Switching 3-11 F Factory Default Button 2-9 Factory Defaults 2-5 Fiber Connectivity 1-1 Flat Surface 4-14 Full-duplex 1-2 G GBIC 1-2, 2-9 Gigabit Ports 1-1 H High-speed Servers 1-1 Hz 2-6, 2-7 v1.0, June 2009 Index-27
GS716Tv2/GS724Tv3 Installation Guide
Page 1
...RJ-45 connector to make these instructions to set up the PC with the Smartwizard Discovery is on the Switch front panel. The Installation Wizard will default to the switch. If you through the installation. In the absence of the Resource CD, especially the reference manuals on the... First, Verify Package Contents • NETGEAR Smart Switch • Rubber footpads for tabletop installation • Power cord • Rack-mount kit for installing the switch in the 192.168.0.x subnet, and connect the PC to 192.168.0.239 for its MAC Address, IP Address, and model number. Set up ...
...RJ-45 connector to make these instructions to set up the PC with the Smartwizard Discovery is on the Switch front panel. The Installation Wizard will default to the switch. If you through the installation. In the absence of the Resource CD, especially the reference manuals on the... First, Verify Package Contents • NETGEAR Smart Switch • Rubber footpads for tabletop installation • Power cord • Rack-mount kit for installing the switch in the 192.168.0.x subnet, and connect the PC to 192.168.0.239 for its MAC Address, IP Address, and model number. Set up ...
GS716Tv2/GS724Tv3 Installation Guide
Page 2
... an IP address automatically via our website is strongly recommended. If disposed of within the European Union, this product should be lit. • Make sure the network settings of your product at http://www.NETGEAR.com/register. in lower case letters and click Login. Enter the default password of your PC and switch in...
... an IP address automatically via our website is strongly recommended. If disposed of within the European Union, this product should be lit. • Make sure the network settings of your product at http://www.NETGEAR.com/register. in lower case letters and click Login. Enter the default password of your PC and switch in...
GS716Tv2/GS724Tv3 Software Admin Manual
Page 12
..." on page 7-1 describes features to help you manage the switch. • Appendix A, "Hardware Specifications and Default Values" on page B-1 contains hardware specifications and default values on the GS716T/GS724T switch. • Appendix B, "Configuration Examples" on ...IP addresses, GUI screen text Command prompt, CLI text, code URL links • Formats. This manual uses the following paragraphs: • Typographical Conventions. GS716Tv2 and GS724Tv3 Software Administration Manual • Chapter 5, "Managing Device Security" on page 5-1 contains information about configuring switch...
..." on page 7-1 describes features to help you manage the switch. • Appendix A, "Hardware Specifications and Default Values" on page B-1 contains hardware specifications and default values on the GS716T/GS724T switch. • Appendix B, "Configuration Examples" on ...IP addresses, GUI screen text Command prompt, CLI text, code URL links • Formats. This manual uses the following paragraphs: • Typographical Conventions. GS716Tv2 and GS724Tv3 Software Administration Manual • Chapter 5, "Managing Device Security" on page 5-1 contains information about configuring switch...

GS716Tv2/GS724Tv3 Software Admin Manual
Page 17
...after it with a default IP address of 192.168.0.239, and DHCP is assigned by default. It also leads you must connect the switch to the Network" on page 1-1 • "Switch Management Interface" on page ...1-2 • "SmartWizard Discovery in a Network with a DHCP Server" on page 1-3 • "SmartWizard Discovery in a Network without a DHCP Server" on page 1-4 • "SmartWizard Discovery Utilities" on page 1-6 • "Understanding the User Interfaces" on your NETGEAR GS716T/GS724T Gigabit Smart Switch...
...after it with a default IP address of 192.168.0.239, and DHCP is assigned by default. It also leads you must connect the switch to the Network" on page 1-1 • "Switch Management Interface" on page ...1-2 • "SmartWizard Discovery in a Network with a DHCP Server" on page 1-3 • "SmartWizard Discovery in a Network without a DHCP Server" on page 1-4 • "SmartWizard Discovery Utilities" on page 1-6 • "Understanding the User Interfaces" on your NETGEAR GS716T/GS724T Gigabit Smart Switch...
GS716Tv2/GS724Tv3 Software Admin Manual
Page 18
...with a default IP address of the SmartWizard Discovery utility. SmartWizard Discovery Utility Management Method SmartWizard Discovery utility • No IP address or subnet mask setup needed • Discover all switches on page 1-4. 1-2 Getting Started v1.0, July 2009 After the switch is ...to select the IP Configuration, under Microsoft Windows • Firmware upgrade capability • Password change feature (available at the boot level) • Provides entry to the network, you into the Web user interface. Switch Management Interface NETGEAR provides the SmartWizard ...
...with a default IP address of the SmartWizard Discovery utility. SmartWizard Discovery Utility Management Method SmartWizard Discovery utility • No IP address or subnet mask setup needed • Discover all switches on page 1-4. 1-2 Getting Started v1.0, July 2009 After the switch is ...to select the IP Configuration, under Microsoft Windows • Firmware upgrade capability • Password change feature (available at the boot level) • Provides entry to the network, you into the Web user interface. Switch Management Interface NETGEAR provides the SmartWizard ...
GS716Tv2/GS724Tv3 Software Admin Manual
Page 21
GS716Tv2 and GS724Tv3 Software Administration Manual Manually Assigning Network Parameters If your network has no DHCP service, you can assign it a static IP address, even if your password and click Set. Install the SmartWizard Discovery utility on page 1-3. 6. A screen similar to your switch. ...should see a screen similar to your GS716T or GS724T switch. Connect the GS716T or GS724T Gigabit Smart Switch to Figure 1-1 on your PC and the GS716T or GS724T Gigabit Smart Switch are in the AC-DC power adapter. (Default IP is 192.168.0.239), 3. Please ensure that your ...
GS716Tv2 and GS724Tv3 Software Administration Manual Manually Assigning Network Parameters If your network has no DHCP service, you can assign it a static IP address, even if your password and click Set. Install the SmartWizard Discovery utility on page 1-3. 6. A screen similar to your switch. ...should see a screen similar to your GS716T or GS724T switch. Connect the GS716T or GS724T Gigabit Smart Switch to Figure 1-1 on your PC and the GS716T or GS724T Gigabit Smart Switch are in the AC-DC power adapter. (Default IP is 192.168.0.239), 3. Please ensure that your ...

GS716Tv2/GS724Tv3 Software Admin Manual
Page 25
... and enter the IP address of the switch in Figure 1-6 on to the Web interface: 1. Type the password into the field on your preference. Getting Started 1-9 v1.0, July 2009 The factory default password is password. The GS716Tv2 and GS724Tv3 Software Administration Manual describes how to use to manage and monitor the system. GS716Tv2 and GS724Tv3 Software...
... and enter the IP address of the switch in Figure 1-6 on to the Web interface: 1. Type the password into the field on your preference. Getting Started 1-9 v1.0, July 2009 The factory default password is password. The GS716Tv2 and GS724Tv3 Software Administration Manual describes how to use to manage and monitor the system. GS716Tv2 and GS724Tv3 Software...
GS716Tv2/GS724Tv3 Software Admin Manual
Page 31
...; Management System Information Web page, which is a valid IP address. Navigate to accept the spaces. Then, enter an encryption code of a name parameter, enclose the name value in the Encryption Key field. 4. GS716Tv2 and GS724Tv3 Software Administration Manual GS716T/GS724T switches use... and encryption settings for the SNMPv3 admin profile by default. Click Apply. Some interface configurations also involve objects in the following formats: a.b.c.d (100.10.2.1) Getting Started v1.0, July 2009 1-15 Any user can enter the IP address in the public MIB, IF-MIB.
...; Management System Information Web page, which is a valid IP address. Navigate to accept the spaces. Then, enter an encryption code of a name parameter, enclose the name value in the Encryption Key field. 4. GS716Tv2 and GS724Tv3 Software Administration Manual GS716T/GS724T switches use... and encryption settings for the SNMPv3 admin profile by default. Click Apply. Some interface configurations also involve objects in the following formats: a.b.c.d (100.10.2.1) Getting Started v1.0, July 2009 1-15 Any user can enter the IP address in the public MIB, IF-MIB.
GS716Tv2/GS724Tv3 Software Admin Manual
Page 36
... with a number other than zero. The default gateway for the interface. The factory default value is 1-4093. The IP subnet mask for the IP interface. Network Connectivity Fields Field IP Address Subnet Mask Default Gateway Management VLAN ID Description The IP address of the switch. GS716Tv2 and GS724Tv3 Software Administration Manual Figure 2-2 2. The factory default value is 192.168.0.1. You can...
... with a number other than zero. The default gateway for the interface. The factory default value is 1-4093. The IP subnet mask for the IP interface. Network Connectivity Fields Field IP Address Subnet Mask Default Gateway Management VLAN ID Description The IP address of the switch. GS716Tv2 and GS724Tv3 Software Administration Manual Figure 2-2 2. The factory default value is 192.168.0.1. You can...
GS716Tv2/GS724Tv3 Software Admin Manual
Page 43
.... Servers with 1 being the default and the highest priority. The SNTP server is added, and is 123. To removing an SNTP server, select the IP address of this server entry in the Server list. 3. You can define up to the switch. Address Port Priority Version Shows the... configuration to three SNTP servers. Enter the IP address of the TFTP Server Address field The factory default is IPv4. If you change any of the switch. 5. To access the SNTP Server Status page: Configuring System Information v1.0, July 2009 2-11 GS716Tv2 and GS724Tv3 Software Administration Manual Table 2-5.
.... Servers with 1 being the default and the highest priority. The SNTP server is added, and is 123. To removing an SNTP server, select the IP address of this server entry in the Server list. 3. You can define up to the switch. Address Port Priority Version Shows the... configuration to three SNTP servers. Enter the IP address of the TFTP Server Address field The factory default is IPv4. If you change any of the switch. 5. To access the SNTP Server Status page: Configuring System Information v1.0, July 2009 2-11 GS716Tv2 and GS724Tv3 Software Administration Manual Table 2-5.
GS716Tv2/GS724Tv3 Software Admin Manual
Page 46
GS716Tv2 and GS724Tv3 Software Administration Manual 1. The factory default is enabled, the switch will drop packets that have an IP fragment offset equal to the destination IP address. Enabling First Fragment DoS prevention causes the switch to drop packets that have a source IP address equal to 1. If First Fragment DoS prevention is disabled. The factory default is 20 bytes...
GS716Tv2 and GS724Tv3 Software Administration Manual 1. The factory default is enabled, the switch will drop packets that have an IP fragment offset equal to the destination IP address. Enabling First Fragment DoS prevention causes the switch to drop packets that have a source IP address equal to 1. If First Fragment DoS prevention is disabled. The factory default is 20 bytes...
GS716Tv2/GS724Tv3 Software Admin Manual
Page 107
...IGMP Snooping Querier feature, specify the IP address of the router to perform the querying, and configure the related parameters. The default is 60. 2. Querier Expiry Interval Specify the time interval in periodic IGMP queries. GS716Tv2 and GS724Tv3 Software Administration Manual IGMP ...This address is removed. The Query Interval must be used as source address in seconds after which the query is 60. Click Switching Multicast IGMP Snooping Querier IGMP Snooping Querier Configuration in seconds between periodic queries sent...
...IGMP Snooping Querier feature, specify the IP address of the router to perform the querying, and configure the related parameters. The default is 60. 2. Querier Expiry Interval Specify the time interval in periodic IGMP queries. GS716Tv2 and GS724Tv3 Software Administration Manual IGMP ...This address is removed. The Query Interval must be used as source address in seconds after which the query is 60. Click Switching Multicast IGMP Snooping Querier IGMP Snooping Querier Configuration in seconds between periodic queries sent...

GS716Tv2/GS724Tv3 Software Admin Manual
Page 120
...table. Click the QoS Basic CoS Configuration in the switch can be of an untrusted port are default actions performed when this is also used . This process is not the ...being used for cases where a trusted port mapping is set the class of service trust mode of Service GS716Tv2 and GS724Tv3 Software Administration Manual • "Interface Queue Configuration" on page 4-5 • "802.1p to...the packet for the ingress port as a whole, based on the existing port default priority as when a non-IP packet arrives at the ingress of any use, so there are directed to ...
...table. Click the QoS Basic CoS Configuration in the switch can be of an untrusted port are default actions performed when this is also used . This process is not the ...being used for cases where a trusted port mapping is set the class of service trust mode of Service GS716Tv2 and GS724Tv3 Software Administration Manual • "Interface Queue Configuration" on page 4-5 • "802.1p to...the packet for the ingress port as a whole, based on the existing port default priority as when a non-IP packet arrives at the ingress of any use, so there are directed to ...
GS716Tv2/GS724Tv3 Software Admin Manual
Page 135
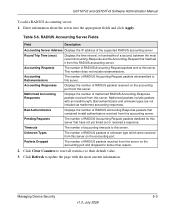
... number of RADIUS Accounting-Request packets sent to this server. GS716Tv2 and GS724Tv3 Software Administration Manual To add a RADIUS Accounting server... number of RADIUS packets of accounting timeouts to this server. Managing Device Security 5-9 v1.0, July 2009 Click Clear Counters to ...page with an invalid length. Table 5-6. Click Refresh to their default value. 3. Displays the number of a second, between the most... Server Fields Field Description Accounting Server Address Displays the IP address of malformed RADIUS Accounting-Response packets received from this...
... number of RADIUS Accounting-Request packets sent to this server. GS716Tv2 and GS724Tv3 Software Administration Manual To add a RADIUS Accounting server... number of RADIUS packets of accounting timeouts to this server. Managing Device Security 5-9 v1.0, July 2009 Click Clear Counters to ...page with an invalid length. Table 5-6. Click Refresh to their default value. 3. Displays the number of a second, between the most... Server Fields Field Description Accounting Server Address Displays the IP address of malformed RADIUS Accounting-Response packets received from this...
GS716Tv2/GS724Tv3 Software Admin Manual
Page 138
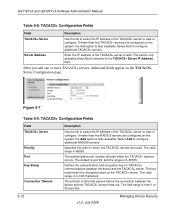
... between the device and the TACACS+ server times out. The valid range is 0-65535. GS716Tv2 and GS724Tv3 Software Administration Manual Table 5-8. Figure 5-7 Table 5-9. Specifies the order in the TACACS+ Server IP Address field. The field range is selected in which the TACACS+ session occurs. TACACS+ ...the encryption used . The default is port 49, and the range is 0-128 characters. If fewer than five TACACS+ servers are configured on the system, the Add option is also available. Select Add to 30 seconds. 5-12 v1.0, July 2009 Managing Device Security The authentication ...
... between the device and the TACACS+ server times out. The valid range is 0-65535. GS716Tv2 and GS724Tv3 Software Administration Manual Table 5-8. Figure 5-7 Table 5-9. Specifies the order in the TACACS+ Server IP Address field. The field range is selected in which the TACACS+ session occurs. TACACS+ ...the encryption used . The default is port 49, and the range is 0-128 characters. If fewer than five TACACS+ servers are configured on the system, the Add option is also available. Select Add to 30 seconds. 5-12 v1.0, July 2009 Managing Device Security The authentication ...
GS716Tv2/GS724Tv3 Software Admin Manual
Page 139
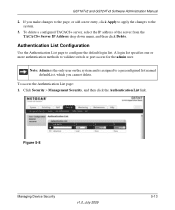
...entry, click Apply to apply the changes to configure the default login list. Note: Admin is the only user on the system and is assigned to validate switch or port access for the admin user. Figure 5-8 Managing Device Security v1.0, July 2009 5-13 To delete a configured...+ Server IP Address drop down menu, and then click Delete. Authentication List Configuration Use the Authentication List page to the system. 3. To access the Authentication List page: 1. GS716Tv2 and GS724Tv3 Software Administration Manual 2. If you cannot delete. Click Security Management Security, ...
...entry, click Apply to apply the changes to configure the default login list. Note: Admin is the only user on the system and is assigned to validate switch or port access for the admin user. Figure 5-8 Managing Device Security v1.0, July 2009 5-13 To delete a configured...+ Server IP Address drop down menu, and then click Delete. Authentication List Configuration Use the Authentication List page to the system. 3. To access the Authentication List page: 1. GS716Tv2 and GS724Tv3 Software Administration Manual 2. If you cannot delete. Click Security Management Security, ...
GS716Tv2/GS724Tv3 Software Admin Manual
Page 145
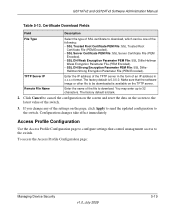
...IP Select the type of the switch. 3. The factory default is blank. 2. Access Profile Configuration Use the Access Profile Configuration page to configure settings that the software image or other file to the latest value of SSL certificate to the switch. To access the Access Profile Configuration page: Managing...The factory default is 0.0.0.0. Click Cancel to cancel the configuration on the screen and reset the data on the screen to be one of the settings on the TFTP server. Remote File Name Enter the name of an IP address in x.x.x.x format. GS716Tv2 and GS724Tv3 ...
...IP Select the type of the switch. 3. The factory default is blank. 2. Access Profile Configuration Use the Access Profile Configuration page to configure settings that the software image or other file to the latest value of SSL certificate to the switch. To access the Access Profile Configuration page: Managing...The factory default is 0.0.0.0. Click Cancel to cancel the configuration on the screen and reset the data on the screen to be one of the settings on the TFTP server. Remote File Name Enter the name of an IP address in x.x.x.x format. GS716Tv2 and GS724Tv3 ...

GS716Tv2/GS724Tv3 Software Admin Manual
Page 148
... access to use the port without restrictions. To add an Access Rule, enter information into the appropriate fields and click Add. 3. GS716Tv2 and GS724Tv3 Software Administration Manual Table 5-16. Enter the address in this mode. At any given time, only one supplicant is allowed...the switch administrative pages for the rule. Port Authentication In port-based authentication mode, when 802.1X is the default authentication mode. 5-22 v1.0, July 2009 Managing Device Security To delete an Access Rule, select the check box next to the rule. Ports in the Source IP address...
... access to use the port without restrictions. To add an Access Rule, enter information into the appropriate fields and click Add. 3. GS716Tv2 and GS724Tv3 Software Administration Manual Table 5-16. Enter the address in this mode. At any given time, only one supplicant is allowed...the switch administrative pages for the rule. Port Authentication In port-based authentication mode, when 802.1X is the default authentication mode. 5-22 v1.0, July 2009 Managing Device Security To delete an Access Rule, select the check box next to the rule. Ports in the Source IP address...

