User Manual
Page 5
Gigabit Ethernet Plus Switches Manage the configuration file 70 Back up the switch configuration 70 Restore the switch configuration 71 Return the switch to its factory default settings 72 Use the RESET button to reset the switch 72 Use the device UI to reset the switch 73 Control access to the device UI 73 Change or lift access restrictions to the switch 74 Manage the DoS prevention mode 75 Manage the power saving mode 76 Control the port LEDs 77 Change the switch device name 77 View system information 78 View switch connections 78...
Gigabit Ethernet Plus Switches Manage the configuration file 70 Back up the switch configuration 70 Restore the switch configuration 71 Return the switch to its factory default settings 72 Use the RESET button to reset the switch 72 Use the device UI to reset the switch 73 Control access to the device UI 73 Change or lift access restrictions to the switch 74 Manage the DoS prevention mode 75 Manage the power saving mode 76 Control the port LEDs 77 Change the switch device name 77 View system information 78 View switch connections 78...

User Manual
Page 13
... address for switches that is connected to the Internet. On the GS308EP and GS308EPP, use any non-PoE devices. Install and Access the Switch in 13 Your Network User Manual On the GS305EP and GS305EPP, use port 5. Connect the power adapter to the switch and plug the power adapter into an electrical outlet. Gigabit Ethernet Plus Switches Set up the switch in your network or access the switch to configure and manage it: Computer and web browser. The power LED lights and the port LEDs for connected...
... address for switches that is connected to the Internet. On the GS308EP and GS308EPP, use any non-PoE devices. Install and Access the Switch in 13 Your Network User Manual On the GS305EP and GS305EPP, use port 5. Connect the power adapter to the switch and plug the power adapter into an electrical outlet. Gigabit Ethernet Plus Switches Set up the switch in your network or access the switch to configure and manage it: Computer and web browser. The power LED lights and the port LEDs for connected...
User Manual
Page 16
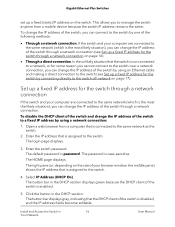
... address by using an Ethernet cable and making a direct connection to the switch (see Set up a fixed (static) IP address on page 17). Open a web browser from a mobile device because the switch IP address remains the same. The button bar displays gray, indicating that is assigned to the switch. 4. Install and Access the Switch in the DHCP section. The login page displays. 3. Click the button in 16 Your Network User Manual To disable the DHCP...
... address by using an Ethernet cable and making a direct connection to the switch (see Set up a fixed (static) IP address on page 17). Open a web browser from a mobile device because the switch IP address remains the same. The button bar displays gray, indicating that is assigned to the switch. 4. Install and Access the Switch in the DHCP section. The login page displays. 3. Click the button in 16 Your Network User Manual To disable the DHCP...
User Manual
Page 17
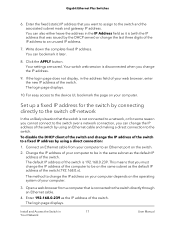
... button. This means that is not connected to a network, or for some reason you cannot connect to the switch over a network connection, you change the IP address of the switch. Gigabit Ethernet Plus Switches 6. Open a web browser from your computer. You can bookmark it is disconnected when you can change the IP address of the switch by using an Ethernet cable and making a direct connection to a fixed IP address by the DHCP server) or change...
... button. This means that is not connected to a network, or for some reason you cannot connect to the switch over a network connection, you change the IP address of the switch. Gigabit Ethernet Plus Switches 6. Open a web browser from your computer. You can bookmark it is disconnected when you can change the IP address of the switch by using an Ethernet cable and making a direct connection to a fixed IP address by the DHCP server) or change...
User Manual
Page 19
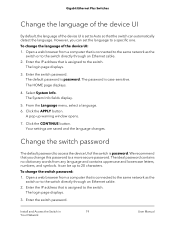
... Language menu, select a language. 6. Open a web browser from a computer that is connected to the same network as the switch or to the switch directly through an Ethernet cable. 2. Gigabit Ethernet Plus Switches Change the language of the device UI By default, the language of the device UI is set the language to a specific one. Install and Access the Switch in 19 Your Network User Manual It can automatically detect the...
... Language menu, select a language. 6. Open a web browser from a computer that is connected to the same network as the switch or to the switch directly through an Ethernet cable. 2. Gigabit Ethernet Plus Switches Change the language of the device UI By default, the language of the device UI is set the language to a specific one. Install and Access the Switch in 19 Your Network User Manual It can automatically detect the...
User Manual
Page 20
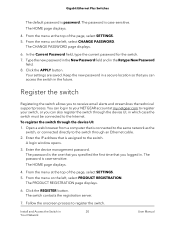
... which case the switch must be connected to the switch through an Ethernet cable. 2. From the menu at my.netgear.com to register your switch, or you can also register the switch through the device UI: 1. Gigabit Ethernet Plus Switches The default password is case-sensitive. Install and Access the Switch in . Your settings are saved. A login window opens. 3. The password is the one that you logged in 20 Your Network User Manual To register the...
... which case the switch must be connected to the switch through an Ethernet cable. 2. From the menu at my.netgear.com to register your switch, or you can also register the switch through the device UI: 1. Gigabit Ethernet Plus Switches The default password is case-sensitive. Install and Access the Switch in . Your settings are saved. A login window opens. 3. The password is the one that you logged in 20 Your Network User Manual To register the...
User Manual
Page 22
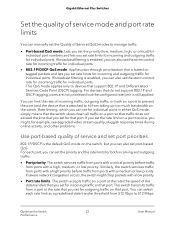
... default QoS mode on a port to manage traffic: • Port-based QoS mode. Rate limiting, which you can also set the storm control rate for incoming traffic for that port. If broadcast filtering is based on that port. This QoS mode applies only to 512 Mbps. If severe network congestion occurs, the switch might , for example, see degraded video stream quality, sluggish response times during online activity, and other problems. Use port-based quality of service and set port...
... default QoS mode on a port to manage traffic: • Port-based QoS mode. Rate limiting, which you can also set the storm control rate for incoming traffic for that port. If broadcast filtering is based on that port. This QoS mode applies only to 512 Mbps. If severe network congestion occurs, the switch might , for example, see degraded video stream quality, sluggish response times during online activity, and other problems. Use port-based quality of service and set port...
User Manual
Page 23
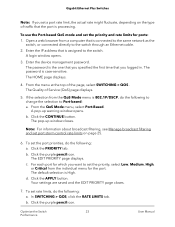
... the IP address that you logged in. Open a web browser from the individual menu for ports: 1. The HOME page displays. 4. Note: For information about broadcast filtering, see Manage broadcast filtering and set the port priorities, do the following to change the selection to the switch through an Ethernet cable. 2. To set port storm control rate limits on the type of Service (QoS) page displays. 5. In SWITCHING > QOS, click the RATE LIMITS tab...
... the IP address that you logged in. Open a web browser from the individual menu for ports: 1. The HOME page displays. 4. Note: For information about broadcast filtering, see Manage broadcast filtering and set the port priorities, do the following to change the selection to the switch through an Ethernet cable. 2. To set port storm control rate limits on the type of Service (QoS) page displays. 5. In SWITCHING > QOS, click the RATE LIMITS tab...
User Manual
Page 24
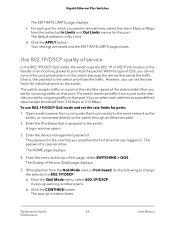
.... A login window opens. 3. From the menu at the top of QoS, you set the rate limits for individual ports on the switch. From the QoS Mode menu, select 802.1P/DSCP. Optimize the Switch 24 Performance User Manual The default selection is assigned to the switch prioritizes the traffic. The switch transmits traffic from the QoS Mode menu is case-sensitive. Enter the IP address that is, the packets) to the switch...
.... A login window opens. 3. From the menu at the top of QoS, you set the rate limits for individual ports on the switch. From the QoS Mode menu, select 802.1P/DSCP. Optimize the Switch 24 Performance User Manual The default selection is assigned to the switch prioritizes the traffic. The switch transmits traffic from the QoS Mode menu is case-sensitive. Enter the IP address that is, the packets) to the switch...
User Manual
Page 25
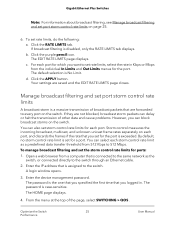
... packets that are forwarded to every port on each storm control rate limit as the switch, or connected directly to the switch through an Ethernet cable. 2. Manage broadcast filtering and set rate limits, select the rate in . Storm control measures the incoming broadcast, multicast, and unknown unicast frame rates separately on the switch. The password is exceeded. Click the purple pencil icon. The default selection is assigned to set port storm control rate limits A broadcast storm is disabled, only the RATE...
... packets that are forwarded to every port on each storm control rate limit as the switch, or connected directly to the switch through an Ethernet cable. 2. Manage broadcast filtering and set rate limits, select the rate in . Storm control measures the incoming broadcast, multicast, and unknown unicast frame rates separately on the switch. The password is exceeded. Click the purple pencil icon. The default selection is assigned to set port storm control rate limits A broadcast storm is disabled, only the RATE...
User Manual
Page 27
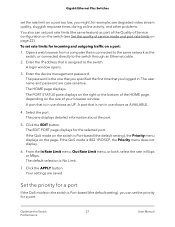
... is connected to the same network as UP. A login window opens. 3. The password is Port-based (the default setting), the Priority menu displays on the size of your browser window. The HOME page displays. Select the port. Click the EDIT button. From the In Rate Limit menu, Out Rate Limit menu, or both, select the rate in use shows as part of the Quality of Service configuration on the switch...
... is connected to the same network as UP. A login window opens. 3. The password is Port-based (the default setting), the Priority menu displays on the size of your browser window. The HOME page displays. Select the port. Click the EDIT button. From the In Rate Limit menu, Out Rate Limit menu, or both, select the rate in use shows as part of the Quality of Service configuration on the switch...
User Manual
Page 28
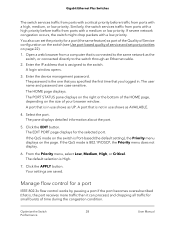
... Ethernet cable. 2. The PORT STATUS pane displays on the right or the bottom of time during the congestion condition. A port that is the one that you logged in. Click the EDIT button. If the QoS mode on the switch is not in use shows as the switch, or connected directly to the same network as AVAILABLE. 4. A login window opens. 3. Select the port. Your settings are case-sensitive. Gigabit Ethernet Plus Switches The switch services traffic...
... Ethernet cable. 2. The PORT STATUS pane displays on the right or the bottom of time during the congestion condition. A port that is the one that you logged in. Click the EDIT button. If the QoS mode on the switch is not in use shows as the switch, or connected directly to the same network as AVAILABLE. 4. A login window opens. 3. Select the port. Your settings are case-sensitive. Gigabit Ethernet Plus Switches The switch services traffic...
User Manual
Page 29
.... A login window opens. 3. Select the port. Click the EDIT button. If the QoS mode is assigned to the switch through an Ethernet cable. 2. When flow control is disabled for all ports is set automatically (that is connected to the same network as UP. We recommend that you logged in use shows as the switch, or connected directly to the switch. However, you leave the Auto setting for the ports. By default, flow control is enabled, the button bar displays green...
.... A login window opens. 3. Select the port. Click the EDIT button. If the QoS mode is assigned to the switch through an Ethernet cable. 2. When flow control is disabled for all ports is set automatically (that is connected to the same network as UP. We recommend that you logged in use shows as the switch, or connected directly to the switch. However, you leave the Auto setting for the ports. By default, flow control is enabled, the button bar displays green...
User Manual
Page 30
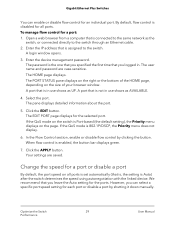
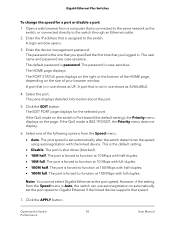
... switch through an Ethernet cable. 2. Gigabit Ethernet Plus Switches To change the speed for the selected port. A login window opens. 3. Click the EDIT button. The EDIT PORT page displays for a port or disable a port: 1. Select one that you specified the first time that speed. 7. The port is set the port speed to function at 100 Mbps with full-duplex. The port speed is forced to Gigabit Ethernet if the linked device supports that you logged in. The default password is Port-based (the default setting...
... switch through an Ethernet cable. 2. Gigabit Ethernet Plus Switches To change the speed for the selected port. A login window opens. 3. Click the EDIT button. The EDIT PORT page displays for a port or disable a port: 1. Select one that you specified the first time that speed. 7. The port is set the port speed to function at 100 Mbps with full-duplex. The port speed is forced to Gigabit Ethernet if the linked device supports that you logged in. The default password is Port-based (the default setting...
User Manual
Page 31
... the switch, or connected directly to the switch through an Ethernet cable. 2. A login window opens. 3. Enter the device management password. The PORT STATUS pane displays on the right or the bottom of your browser window. Select the port. Gigabit Ethernet Plus Switches Your settings are case-sensitive. Open a web browser from 1 to the switch. The user name and password are saved. The EDIT PORT page displays for the port. If the QoS mode is Port-based (the default setting...
... the switch, or connected directly to the switch through an Ethernet cable. 2. A login window opens. 3. Enter the device management password. The PORT STATUS pane displays on the right or the bottom of your browser window. Select the port. Gigabit Ethernet Plus Switches Your settings are case-sensitive. Open a web browser from 1 to the switch. The user name and password are saved. The EDIT PORT page displays for the port. If the QoS mode is Port-based (the default setting...
User Manual
Page 36
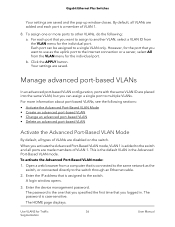
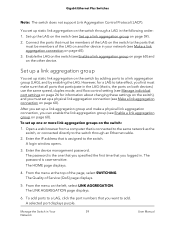
... Ethernet cable. 2. Enter the IP address that is a member of VLAN 1. 8. Manage advanced port-based VLANs In an advanced port-based VLAN configuration, ports with the same VLAN ID are placed into the same VLAN, but you logged in the Advanced Port-Based VLAN mode. Use VLANS for the individual port. For each port is connected to the same network as the uplink port to other VLANs, do the following sections: • Activate the Advanced Port-Based VLAN Mode...
... Ethernet cable. 2. Enter the IP address that is a member of VLAN 1. 8. Manage advanced port-based VLANs In an advanced port-based VLAN configuration, ports with the same VLAN ID are placed into the same VLAN, but you logged in the Advanced Port-Based VLAN mode. Use VLANS for the individual port. For each port is connected to the same network as the uplink port to other VLANs, do the following sections: • Activate the Advanced Port-Based VLAN Mode...
User Manual
Page 37
... VLAN. Use VLANS for Traffic 37 Segmentation User Manual From the menu at the top of multiple VLANs. The VLAN page displays. The QOS page displays. 5. From the menu on the left , select VLAN. By default, all ports are saved and the pop-up window opens, informing you logged in. A login window opens. 3. The password is connected to the same network as members: 1. Your settings are members of ports on the switch to the number...
... VLAN. Use VLANS for Traffic 37 Segmentation User Manual From the menu at the top of multiple VLANs. The VLAN page displays. The QOS page displays. 5. From the menu on the left , select VLAN. By default, all ports are saved and the pop-up window opens, informing you logged in. A login window opens. 3. The password is connected to the same network as members: 1. Your settings are members of ports on the switch to the number...

User Manual
Page 41
... password is added. From the menu at the top of a single VLAN only. In the Basic 802.1Q VLAN section, click the ACTIVATE MODE button. Click the CONTINUE button. By default, VLAN 1 is case-sensitive. The number of VLANs is limited to the switch through an Ethernet cable. 2. Use VLANS for those ports, select Trunk (uplink) from the Mode menu. 9. For more information about adding VLANs, see Assign the port mode in access mode...
... password is added. From the menu at the top of a single VLAN only. In the Basic 802.1Q VLAN section, click the ACTIVATE MODE button. Click the CONTINUE button. By default, VLAN 1 is case-sensitive. The number of VLANs is limited to the switch through an Ethernet cable. 2. Use VLANS for those ports, select Trunk (uplink) from the Mode menu. 9. For more information about adding VLANs, see Assign the port mode in access mode...
User Manual
Page 59
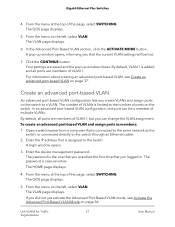
... switch by enabling the LAG. Gigabit Ethernet Plus Switches Note: The switch does not support Link Aggregation Control Protocol (LACP). You set up static link aggregation on the switch: 1. To set up one that you specified the first time that you logged in your network (see Enable a link aggregation group on page 60) and on the left, select LINK AGGREGATION. The LINK AGGREGATION page displays. 6. To add ports to a LAG, click the port numbers that you want to the switch through a LAG in Your 59 Network User Manual...
... switch by enabling the LAG. Gigabit Ethernet Plus Switches Note: The switch does not support Link Aggregation Control Protocol (LACP). You set up static link aggregation on the switch: 1. To set up one that you specified the first time that you logged in your network (see Enable a link aggregation group on page 60) and on the left, select LINK AGGREGATION. The LINK AGGREGATION page displays. 6. To add ports to a LAG, click the port numbers that you want to the switch through a LAG in Your 59 Network User Manual...
Installation Guide
Page 1
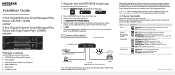
... switch is designed for NETGEAR Insight and download the latest app. 2. Register with High-Power PoE+ (120W) GS305EPP Package contents • NETGEAR Smart Managed Plus Switch • Power adapter • Detachable power cable (varies by region) • Wall installation kit • Rubber feet • Installation guide 1. You can damage the switch. No link is not supplied to outdoor cables or devices, see https://kb.netgear.com/000057103 for Gigabit Ethernet connections. Tap REGISTER ANY NETGEAR DEVICE. 5. Blinking yellow. Power...
... switch is designed for NETGEAR Insight and download the latest app. 2. Register with High-Power PoE+ (120W) GS305EPP Package contents • NETGEAR Smart Managed Plus Switch • Power adapter • Detachable power cable (varies by region) • Wall installation kit • Rubber feet • Installation guide 1. You can damage the switch. No link is not supplied to outdoor cables or devices, see https://kb.netgear.com/000057103 for Gigabit Ethernet connections. Tap REGISTER ANY NETGEAR DEVICE. 5. Blinking yellow. Power...


