EN516 Installation Guide
Page 2
... der zutreffenden Vorschriften hängt von der Benutzung geschirmter Kabel ab. © 2000 by the application of EN 55 022 Class B (CISPR 22). NETGEAR does not assume any liability that the Bay Networks NETGEAR Model EN516 Ethernet Hub is shielded against harmful interference when the equipment is likely to cause harmful interference, in a commercial environment...
... der zutreffenden Vorschriften hängt von der Benutzung geschirmter Kabel ab. © 2000 by the application of EN 55 022 Class B (CISPR 22). NETGEAR does not assume any liability that the Bay Networks NETGEAR Model EN516 Ethernet Hub is shielded against harmful interference when the equipment is likely to cause harmful interference, in a commercial environment...
EN516 Installation Guide
Page 3
... equipment such as Mosaic or Netscape are aimed at the universal resource locator (URL) http:// www.NETGEAR.com. Compliance with post-installation questions or problems, contact your NETGEAR system or with the applicable regulations is dependent upon the use of shielded cables. iii Federal Of&#... Home Page that are required. Certificate of the Manufacturer/Importer It is hereby certified that the NETGEAR Model EN516 Ethernet Hub has been suppressed in accordance with the conditions set by the Voluntary Control Council for Interference by Data Processing Equipment and...
... equipment such as Mosaic or Netscape are aimed at the universal resource locator (URL) http:// www.NETGEAR.com. Compliance with post-installation questions or problems, contact your NETGEAR system or with the applicable regulations is dependent upon the use of shielded cables. iii Federal Of&#... Home Page that are required. Certificate of the Manufacturer/Importer It is hereby certified that the NETGEAR Model EN516 Ethernet Hub has been suppressed in accordance with the conditions set by the Voluntary Control Council for Interference by Data Processing Equipment and...
EN516 Installation Guide
Page 7
... an RJ-45 port on the Model EN516 hub .....3-5 Cascading multiple hubs in a hierarchical star through the RJ-45 ports ..3-6 Cascading multiple hubs daisy-chain style through the RJ-45 ports .......3-7 Cascading hubs through the BNC port 3-8 Cascading hubs through twisted pair cable B-2 Figure B-2. Straight-through the AUI port 3-9 Connecting multiple NETGEAR products 3-10 Figure B-1. Crossover twisted...
... an RJ-45 port on the Model EN516 hub .....3-5 Cascading multiple hubs in a hierarchical star through the RJ-45 ports ..3-6 Cascading multiple hubs daisy-chain style through the RJ-45 ports .......3-7 Cascading hubs through the BNC port 3-8 Cascading hubs through twisted pair cable B-2 Figure B-2. Straight-through the AUI port 3-9 Connecting multiple NETGEAR products 3-10 Figure B-1. Crossover twisted...
EN516 Installation Guide
Page 11
... includes physical configuration guidelines for small businesses, home offices, and low-density workgroups of the NETGEAR™ Model EN516 Ethernet Hub. This guide describes how to an existing Ethernet segment or external transceiver, or for network expansion • Normal/Uplink push button for individuals who have ...
... includes physical configuration guidelines for small businesses, home offices, and low-density workgroups of the NETGEAR™ Model EN516 Ethernet Hub. This guide describes how to an existing Ethernet segment or external transceiver, or for network expansion • Normal/Uplink push button for individuals who have ...
EN516 Installation Guide
Page 12
...Guide for the Model EN516 Ethernet Hub • Built-in 100-240 V switching power supply, eliminating the need for bulky wall transformers • Thirty-eight front panel light emitting diode (LED) indicators, providing real-time status of the individual ports and overall hub status •... polarity detection for recognizing and correcting incorrect polarity on the receive pair • Ability to expand the network size by connecting multiple hubs together using twisted pair or coaxial cabling • Compact design, enabling easy tabletop or rack-mounting installation • Limited fi...
...Guide for the Model EN516 Ethernet Hub • Built-in 100-240 V switching power supply, eliminating the need for bulky wall transformers • Thirty-eight front panel light emitting diode (LED) indicators, providing real-time status of the individual ports and overall hub status •... polarity detection for recognizing and correcting incorrect polarity on the receive pair • Ability to expand the network size by connecting multiple hubs together using twisted pair or coaxial cabling • Compact design, enabling easy tabletop or rack-mounting installation • Limited fi...
EN516 Installation Guide
Page 13
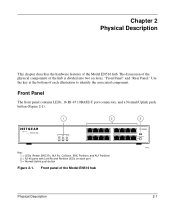
...The front panel contains LEDs, 16 RJ-45 10BASE-T port connectors, and a Normal/Uplink push button (Figure 2-1). 1 2 16 PORT 10BASE-T Ethernet Hub BNC AUI Power Rx Rx Collision Partition Partition 1 Link/Rx Partition 9 Link/Rx Partition Key: 1 = LEDs (Power, BNC Rx, AUI Rx...to identify the associated component. The discussion of the physical components of the Model EN516 hub 3 MODELEN516 8 Normal/Uplink 16 7432 Physical Description 2-1 Use the key at the bottom of the Model EN516 hub. Chapter 2 Physical Description This chapter describes the hardware features of each ...
...The front panel contains LEDs, 16 RJ-45 10BASE-T port connectors, and a Normal/Uplink push button (Figure 2-1). 1 2 16 PORT 10BASE-T Ethernet Hub BNC AUI Power Rx Rx Collision Partition Partition 1 Link/Rx Partition 9 Link/Rx Partition Key: 1 = LEDs (Power, BNC Rx, AUI Rx...to identify the associated component. The discussion of the physical components of the Model EN516 hub 3 MODELEN516 8 Normal/Uplink 16 7432 Physical Description 2-1 Use the key at the bottom of the Model EN516 hub. Chapter 2 Physical Description This chapter describes the hardware features of each ...
EN516 Installation Guide
Page 14
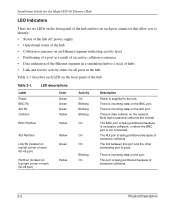
Installation Guide for all ports in a standalone hub or a stack of hubs • Link and receive activity status for the Model EN516 Ethernet Hub LED Indicators There are six LEDs on the front panel of the hub and two on each port connector that occasional collisions are normal. There ...activity level • Partitioning of a port as a result of excessive collision occurrence • Data utilization of the Ethernet segment in the hub Table 2-1 describes each RJ-45 port) Yellow Green Yellow Activity On Blinking Blinking Blinking On On On Blinking On Description Power is incoming...
Installation Guide for all ports in a standalone hub or a stack of hubs • Link and receive activity status for the Model EN516 Ethernet Hub LED Indicators There are six LEDs on the front panel of the hub and two on each port connector that occasional collisions are normal. There ...activity level • Partitioning of a port as a result of excessive collision occurrence • Data utilization of the Ethernet segment in the hub Table 2-1 describes each RJ-45 port) Yellow Green Yellow Activity On Blinking Blinking Blinking On On On Blinking On Description Power is incoming...
EN516 Installation Guide
Page 15
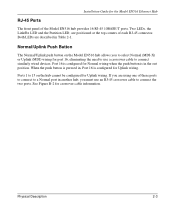
... the need to use an RJ-45 crossover cable to select Normal (MDI-X) or Uplink (MDI) wiring for Uplink wiring. See Figure B-2 for the Model EN516 Ethernet Hub RJ-45 Ports The front panel of each RJ-45 connector. Physical Description 2-3 When the push button is in Table 2-1. Ports 1 to 15 on... the Model EN516 hub allows you must use a crossover cable to a Normal port in , Port 16 is configured for Normal wiring when the push button is pressed...
... the need to use an RJ-45 crossover cable to select Normal (MDI-X) or Uplink (MDI) wiring for Uplink wiring. See Figure B-2 for the Model EN516 Ethernet Hub RJ-45 Ports The front panel of each RJ-45 connector. Physical Description 2-3 When the push button is in Table 2-1. Ports 1 to 15 on... the Model EN516 hub allows you must use a crossover cable to a Normal port in , Port 16 is configured for Normal wiring when the push button is pressed...
EN516 Installation Guide
Page 16
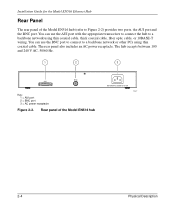
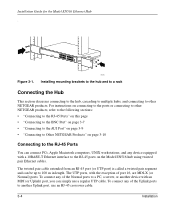
.../60 Hz. 1 2 3 BNC AUI Key: 1 = AUI port 2 = BNC port 3 = AC power receptacle Figure 2-2. Rear panel of the Model EN516 hub (refer to a backbone network using thin coaxial cable. Installation Guide for the Model EN516 Ethernet Hub Rear Panel The rear panel of the Model EN516 hub 100-240 VAC 50-60 Hz 0.15A 7147 2-4 Physical Description
.../60 Hz. 1 2 3 BNC AUI Key: 1 = AUI port 2 = BNC port 3 = AC power receptacle Figure 2-2. Rear panel of the Model EN516 hub (refer to a backbone network using thin coaxial cable. Installation Guide for the Model EN516 Ethernet Hub Rear Panel The rear panel of the Model EN516 hub 100-240 VAC 50-60 Hz 0.15A 7147 2-4 Physical Description
EN516 Installation Guide
Page 17
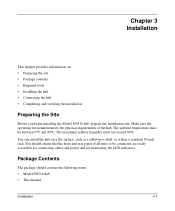
... • Package contents • Required tools • Installing the hub • Connecting the hub • Completing and verifying the installation Preparing the Site Before you begin installing the Model EN516 hub, prepare the installation site. The maximum relative humidity must be connected ... the LED indicators. Package Contents The package should ensure that the front and rear panel of the hub. You should contain the following items: • Model EN516 hub • This manual Installation 3-1 Chapter 3 Installation This chapter provides information on a flat ...
... • Package contents • Required tools • Installing the hub • Connecting the hub • Completing and verifying the installation Preparing the Site Before you begin installing the Model EN516 hub, prepare the installation site. The maximum relative humidity must be connected ... the LED indicators. Package Contents The package should ensure that the front and rear panel of the hub. You should contain the following items: • Model EN516 hub • This manual Installation 3-1 Chapter 3 Installation This chapter provides information on a flat ...
EN516 Installation Guide
Page 18
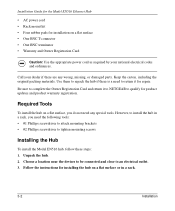
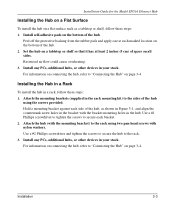
...• #1 Phillips screwdriver to attach mounting brackets • #2 Phillips screwdriver to tighten mounting screws Installing the Hub To install the Model EN516 hub, follow these steps: 1. However, to install the hub in a rack. 3-2 Installation Be sure to qualify for repair. Choose a location near the devices to be... tools. Use them to an electrical outlet. 3. Unpack the hub. 2. Follow the instructions for installing the hub on a flat surface or in a rack, you do not need to return it to NETGEAR to complete the Owner Registration Card and return it for product ...
...• #1 Phillips screwdriver to attach mounting brackets • #2 Phillips screwdriver to tighten mounting screws Installing the Hub To install the Model EN516 hub, follow these steps: 1. However, to install the hub in a rack. 3-2 Installation Be sure to qualify for repair. Choose a location near the devices to be... tools. Use them to an electrical outlet. 3. Unpack the hub. 2. Follow the instructions for installing the hub on a flat surface or in a rack, you do not need to return it to NETGEAR to complete the Owner Registration Card and return it for product ...
EN516 Installation Guide
Page 19
... overheating. 3. Use a #2 Phillips screwdriver and tighten the screws to secure the hub to secure each bracket. 2. Use a #1 Phillips screwdriver to tighten the screws to the rack. 3. Installation Guide for the Model EN516 Ethernet Hub Installing the Hub on a Flat Surface To install the hub on a flat least 2 inches (5 cm) of space on all sides...
... overheating. 3. Use a #2 Phillips screwdriver and tighten the screws to secure the hub to secure each bracket. 2. Use a #1 Phillips screwdriver to tighten the screws to the rack. 3. Installation Guide for the Model EN516 Ethernet Hub Installing the Hub on a Flat Surface To install the hub on a flat least 2 inches (5 cm) of space on all sides...
EN516 Installation Guide
Page 20
For instructions on connecting to the ports or connecting to other NETGEAR products. The UTP ports, with an MDI (or Uplink) port, you can simply use an RJ-45 crossover cable. 3-4 Installation Installation Guide for the Model EN516 Ethernet Hub . The twisted pair cable extended from an RJ-45 port (or UTP port) is...
For instructions on connecting to the ports or connecting to other NETGEAR products. The UTP ports, with an MDI (or Uplink) port, you can simply use an RJ-45 crossover cable. 3-4 Installation Installation Guide for the Model EN516 Ethernet Hub . The twisted pair cable extended from an RJ-45 port (or UTP port) is...
EN516 Installation Guide
Page 21
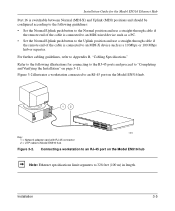
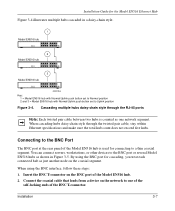
...connected to an MDI-X device such as a 10 Mbps or 100 Mbps hub or repeater. For further cabling guidelines, refer to 328 feet (100 m) in length. Installation Guide for the Model EN516 Ethernet Hub Port 16 is switchable between Normal (MDI-X) and Uplink (MDI) positions and..."Completing and Verifying the Installation" on page 3-11. Connecting a workstation to an RJ-45 port on the Model EN516 hub. 12 Key: 1 = Network adapter card with RJ-45 connector 2 = UTP cable to Model EN516 hub Power Data Collision 1 Link RX 9 Link RX 8 Normal/Uplink 16 34FA Figure 3-2. Installation 3-5 Figure ...
...connected to an MDI-X device such as a 10 Mbps or 100 Mbps hub or repeater. For further cabling guidelines, refer to 328 feet (100 m) in length. Installation Guide for the Model EN516 Ethernet Hub Port 16 is switchable between Normal (MDI-X) and Uplink (MDI) positions and..."Completing and Verifying the Installation" on page 3-11. Connecting a workstation to an RJ-45 port on the Model EN516 hub. 12 Key: 1 = Network adapter card with RJ-45 connector 2 = UTP cable to Model EN516 hub Power Data Collision 1 Link RX 9 Link RX 8 Normal/Uplink 16 34FA Figure 3-2. Installation 3-5 Figure ...
EN516 Installation Guide
Page 22
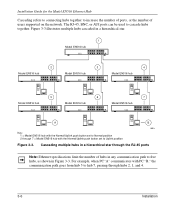
... hubs cascaded in a hierarchical star. 1 Model EN516 hub 2 Model EN516 hub 3 Model EN516 hub 4 Model EN516 hub 5 Model EN516 hub 6 Model EN516 hub 7 Model EN516 hub A B 30EA Key: 1 = Model EN516 hub with the Normal/Uplink push button set to Uplink position Figure 3-3. For example, when PC "A" communicates with the Normal/Uplink push button set to Normal position 2 through 7 = Model EN516 hub with PC "B," the communication path goes from hub 5 to hub...
... hubs cascaded in a hierarchical star. 1 Model EN516 hub 2 Model EN516 hub 3 Model EN516 hub 4 Model EN516 hub 5 Model EN516 hub 6 Model EN516 hub 7 Model EN516 hub A B 30EA Key: 1 = Model EN516 hub with the Normal/Uplink push button set to Uplink position Figure 3-3. For example, when PC "A" communicates with the Normal/Uplink push button set to Normal position 2 through 7 = Model EN516 hub with PC "B," the communication path goes from hub 5 to hub...
EN516 Installation Guide
Page 23
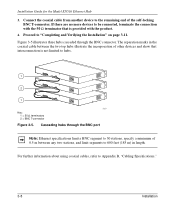
... used for cascading, you treat each connected hub as shown in a daisy-chain style. 1 Model EN516 hub 2 Model EN516 hub 3 Model EN516 hub 000029EA Key: 1 = Model EN516 hub with Normal/Uplink push button set to Normal position 2 and 3 = Model EN516 hub with Normal/Uplink push button set to the BNC port or several Model EN516 hubs as just another node on the network...
... used for cascading, you treat each connected hub as shown in a daisy-chain style. 1 Model EN516 hub 2 Model EN516 hub 3 Model EN516 hub 000029EA Key: 1 = Model EN516 hub with Normal/Uplink push button set to Normal position 2 and 3 = Model EN516 hub with Normal/Uplink push button set to the BNC port or several Model EN516 hubs as just another node on the network...
EN516 Installation Guide
Page 24
...is provided with the product. 4. If there are no more devices to the remaining end of other devices and show that is not limited to hubs. 1 2 1 7217 Key: 1 = 50 Ω terminators 2 = BNC T-connector Figure 3-5. For further information about using coaxial cables, ...refer to "Completing and Verifying the Installation" on page 3-11. Installation Guide for the Model EN516 Ethernet Hub 3. Proceed to Appendix B, "Cabling Specifications." 3-8 Installation Figure 3-5 illustrates three hubs cascaded through the BNC port Note: Ethernet specifications limit a BNC segment to ...
...is provided with the product. 4. If there are no more devices to the remaining end of other devices and show that is not limited to hubs. 1 2 1 7217 Key: 1 = 50 Ω terminators 2 = BNC T-connector Figure 3-5. For further information about using coaxial cables, ...refer to "Completing and Verifying the Installation" on page 3-11. Installation Guide for the Model EN516 Ethernet Hub 3. Proceed to Appendix B, "Cabling Specifications." 3-8 Installation Figure 3-5 illustrates three hubs cascaded through the BNC port Note: Ethernet specifications limit a BNC segment to ...

EN516 Installation Guide
Page 25
...the port is normally used for connecting a thick coaxial segment. Installation Guide for the Model EN516 Ethernet Hub Connecting to the AUI Port The AUI port at the rear panel of the Model EN516 hub is automatically partitioned. 3. With the right type of network media, including 10BASE-T ...twisted pair, thin coaxial, thick coaxial, and 10BASE-FL fiber optic cables. 2. Cascading hubs through an AUI transceiver cable. When using the...
...the port is normally used for connecting a thick coaxial segment. Installation Guide for the Model EN516 Ethernet Hub Connecting to the AUI Port The AUI port at the rear panel of the Model EN516 hub is automatically partitioned. 3. With the right type of network media, including 10BASE-T ...twisted pair, thin coaxial, thick coaxial, and 10BASE-FL fiber optic cables. 2. Cascading hubs through an AUI transceiver cable. When using the...
EN516 Installation Guide
Page 26
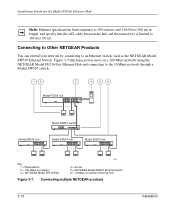
... the transceiver is limited to the 10 Mbps network through a Model SW507 switch. 12 3 4 56 Model FE516 hub Model SW507 switch Model EN516 hub Model EN516 hub Model EN516 hub Key: 1 = Workstations 2 = 100 Mbps connection 3 = NETGEAR Model FE516 Fast 7228 4 = Server 5 = NETGEAR Model SW507 Ethernet switch 6 = 10 Mbps connection Ethernet hub Figure 3-7. Connecting to Other NETGEAR Products You can extend your network by connecting to an...
... the transceiver is limited to the 10 Mbps network through a Model SW507 switch. 12 3 4 56 Model FE516 hub Model SW507 switch Model EN516 hub Model EN516 hub Model EN516 hub Key: 1 = Workstations 2 = 100 Mbps connection 3 = NETGEAR Model FE516 Fast 7228 4 = Server 5 = NETGEAR Model SW507 Ethernet switch 6 = 10 Mbps connection Ethernet hub Figure 3-7. Connecting to Other NETGEAR Products You can extend your network by connecting to an...
EN516 Installation Guide
Page 27
... the power outlet on . Installation 3-11 Installation Guide for the Model EN516 Ethernet Hub Completing and Verifying the Installation To complete the installation, connect the power cord first to the power entry receptacle on the hub rear panel and then to the hub, the following conditions should exist: • Green Power LED on...
... the power outlet on . Installation 3-11 Installation Guide for the Model EN516 Ethernet Hub Completing and Verifying the Installation To complete the installation, connect the power cord first to the power entry receptacle on the hub rear panel and then to the hub, the following conditions should exist: • Green Power LED on...

