EN516 Installation Guide
Page 2
... vorschriftsmäßige Betreiben einiger Geräte (z.B. © 2000 by the application of EN 55 022 Class B (CISPR 22). NETGEAR does not assume any liability that may cause harmful interference to certify that the Bay Networks NETGEAR Model EN516 Ethernet Hub is shielded against harmful interference when the equipment is declared by...
... vorschriftsmäßige Betreiben einiger Geräte (z.B. © 2000 by the application of EN 55 022 Class B (CISPR 22). NETGEAR does not assume any liability that may cause harmful interference to certify that the Bay Networks NETGEAR Model EN516 Ethernet Hub is shielded against harmful interference when the equipment is declared by...
EN516 Installation Guide
Page 3
...the responsibility of the user to procure the appropriate cables. Customer Support For assistance with installing and configuring your NETGEAR system or with the conditions set by Data Processing Equipment and Electronic Office Machines that are required. To ...-298 Switzerland: 00800-0638-4327 (00800-0-NETGEAR) United Kingdom: 020-7216-0014 United States: 1-888-NETGEAR All Other Countries: +1 801-236-8499 World Wide Web NETGEAR maintains a World Wide Web Home Page that the NETGEAR Model EN516 Ethernet Hub has been suppressed in accordance with post-installation...
...the responsibility of the user to procure the appropriate cables. Customer Support For assistance with installing and configuring your NETGEAR system or with the conditions set by Data Processing Equipment and Electronic Office Machines that are required. To ...-298 Switzerland: 00800-0638-4327 (00800-0-NETGEAR) United Kingdom: 020-7216-0014 United States: 1-888-NETGEAR All Other Countries: +1 801-236-8499 World Wide Web NETGEAR maintains a World Wide Web Home Page that the NETGEAR Model EN516 Ethernet Hub has been suppressed in accordance with post-installation...
EN516 Installation Guide
Page 5
... ...2-2 RJ-45 Ports ...2-3 Normal/Uplink Push Button 2-3 Rear Panel ...2-4 Chapter 3 Installation Preparing the Site ...3-1 Package Contents ...3-1 Required Tools ...3-2 Installing the Hub ...3-2 Installing the Hub on a Flat Surface 3-3 Installing the Hub in a Rack 3-3 Connecting the Hub ...3-4 Connecting to the RJ-45 Ports 3-4 Connecting to the BNC Port 3-7 Connecting to the AUI Port 3-9 Connecting to Other...
... ...2-2 RJ-45 Ports ...2-3 Normal/Uplink Push Button 2-3 Rear Panel ...2-4 Chapter 3 Installation Preparing the Site ...3-1 Package Contents ...3-1 Required Tools ...3-2 Installing the Hub ...3-2 Installing the Hub on a Flat Surface 3-3 Installing the Hub in a Rack 3-3 Connecting the Hub ...3-4 Connecting to the RJ-45 Ports 3-4 Connecting to the BNC Port 3-7 Connecting to the AUI Port 3-9 Connecting to Other...
EN516 Installation Guide
Page 6
... for the RJ-45 Ports 4-2 Partition LED for the BNC Port 4-2 Partition LED for the AUI Port 4-3 Installation ...4-3 Cabling ...4-3 Network Interface Cards 4-4 Configuration ...4-4 Hub Integrity ...4-4 Appendix A Technical Specifications General Specifications A-1 Appendix B Cabling Specifications Cable Specifications ...B-1 Twisted Pair Cables ...B-2 50 Ω Coaxial...
... for the RJ-45 Ports 4-2 Partition LED for the BNC Port 4-2 Partition LED for the AUI Port 4-3 Installation ...4-3 Cabling ...4-3 Network Interface Cards 4-4 Configuration ...4-4 Hub Integrity ...4-4 Appendix A Technical Specifications General Specifications A-1 Appendix B Cabling Specifications Cable Specifications ...B-1 Twisted Pair Cables ...B-2 50 Ω Coaxial...
EN516 Installation Guide
Page 7
... of the Model EN516 hub 2-1 Figure 2-2. Figure 3-5. Figure C-4. RJ-45 connector C-1 AUI connector pin assignments C-2 BNC connector C-3 50 Ω terminator and BNC T-connector C-4 Figures vii Front panel of the Model EN516 hub 2-4 Figure 3-1. Figure C-2. Crossover twisted pair cable B-2 Figure C-1. Figure 3-3. Figure 3-6. Figure 3-7. Straight-through the AUI port 3-9 Connecting multiple NETGEAR products 3-10 Figure...
... of the Model EN516 hub 2-1 Figure 2-2. Figure 3-5. Figure C-4. RJ-45 connector C-1 AUI connector pin assignments C-2 BNC connector C-3 50 Ω terminator and BNC T-connector C-4 Figures vii Front panel of the Model EN516 hub 2-4 Figure 3-1. Figure C-2. Crossover twisted pair cable B-2 Figure C-1. Figure 3-3. Figure 3-6. Figure 3-7. Straight-through the AUI port 3-9 Connecting multiple NETGEAR products 3-10 Figure...
EN516 Installation Guide
Page 11
... specifications Features Featuring a compact design, the Model EN516 hub offers all the features of the NETGEAR™ Model EN516 Ethernet Hub. Chapter 1 Introduction Congratulations on your purchase of a standard equipment rack-mount hub at a significantly lower cost. These features include: ... (UTP) wiring • Attachment unit interface (AUI) or coaxial BNC backbone support for connecting to install and use the hub and includes physical configuration guidelines for individuals who have the following background and experience: • Working knowledge of Ethernet...
... specifications Features Featuring a compact design, the Model EN516 hub offers all the features of the NETGEAR™ Model EN516 Ethernet Hub. Chapter 1 Introduction Congratulations on your purchase of a standard equipment rack-mount hub at a significantly lower cost. These features include: ... (UTP) wiring • Attachment unit interface (AUI) or coaxial BNC backbone support for connecting to install and use the hub and includes physical configuration guidelines for individuals who have the following background and experience: • Working knowledge of Ethernet...
EN516 Installation Guide
Page 12
... emitting diode (LED) indicators, providing real-time status of the individual ports and overall hub status • Plug-and-play with no software to configure • Hub functions such as packet retiming, collision detection, preamble regeneration, and fragment extension • ...polarity detection for recognizing and correcting incorrect polarity on the receive pair • Ability to expand the network size by connecting multiple hubs together using twisted pair or coaxial cabling • Compact design, enabling easy tabletop or rack-mounting installation • Limited fi...
... emitting diode (LED) indicators, providing real-time status of the individual ports and overall hub status • Plug-and-play with no software to configure • Hub functions such as packet retiming, collision detection, preamble regeneration, and fragment extension • ...polarity detection for recognizing and correcting incorrect polarity on the receive pair • Ability to expand the network size by connecting multiple hubs together using twisted pair or coaxial cabling • Compact design, enabling easy tabletop or rack-mounting installation • Limited fi...
EN516 Installation Guide
Page 13
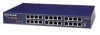
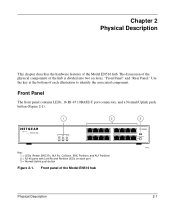
... The front panel contains LEDs, 16 RJ-45 10BASE-T port connectors, and a Normal/Uplink push button (Figure 2-1). 1 2 16 PORT 10BASE-T Ethernet Hub BNC AUI Power Rx Rx Collision Partition Partition 1 Link/Rx Partition 9 Link/Rx Partition Key: 1 = LEDs (Power, BNC Rx, AUI Rx, Collision...associated component. Chapter 2 Physical Description This chapter describes the hardware features of the Model EN516 hub 3 MODELEN516 8 Normal/Uplink 16 7432 Physical Description 2-1 Use the key at the bottom of the hub is divided into two sections, "Front Panel" and "Rear Panel." Front panel of ...
... The front panel contains LEDs, 16 RJ-45 10BASE-T port connectors, and a Normal/Uplink push button (Figure 2-1). 1 2 16 PORT 10BASE-T Ethernet Hub BNC AUI Power Rx Rx Collision Partition Partition 1 Link/Rx Partition 9 Link/Rx Partition Key: 1 = LEDs (Power, BNC Rx, AUI Rx, Collision...associated component. Chapter 2 Physical Description This chapter describes the hardware features of the Model EN516 hub 3 MODELEN516 8 Normal/Uplink 16 7432 Physical Description 2-1 Use the key at the bottom of the hub is divided into two sections, "Front Panel" and "Rear Panel." Front panel of ...
EN516 Installation Guide
Page 14
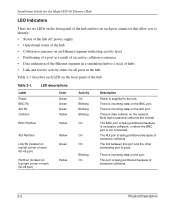
... The link between this port and the other connecting port is incoming data on the AUI port. There is being partitioned because of the hub. There is being partitioned because of excessive collisions. The port is data collision on the BNC port. Table 2-1. Label Power BNC Rx ...the port. The AUI port is being partitioned because of each port connector that occasional collisions are six LEDs on the front panel of the hub and two on an Ethernet segment indicating activity level • Partitioning of a port as a result of excessive collision occurrence • Data ...
... The link between this port and the other connecting port is incoming data on the AUI port. There is being partitioned because of the hub. There is being partitioned because of excessive collisions. The port is data collision on the BNC port. Table 2-1. Label Power BNC Rx ...the port. The AUI port is being partitioned because of each port connector that occasional collisions are six LEDs on the front panel of the hub and two on an Ethernet segment indicating activity level • Partitioning of a port as a result of excessive collision occurrence • Data ...
EN516 Installation Guide
Page 15
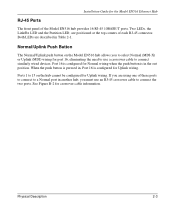
... LED and the Partition LED, are described in Table 2-1. If you are using one of the Model EN516 hub provides 16 RJ-45 10BASE-T ports. Normal/Uplink Push Button The Normal/Uplink push button on the hub cannot be configured for Uplink wiring. Installation Guide for the Model EN516 Ethernet... Normal (MDI-X) or Uplink (MDI) wiring for port 16, eliminating the need to use an RJ-45 crossover cable to 15 on the Model EN516 hub allows you must use a crossover cable to connect similarly wired devices. When the push button is pressed in, Port 16 is in the out position.
... LED and the Partition LED, are described in Table 2-1. If you are using one of the Model EN516 hub provides 16 RJ-45 10BASE-T ports. Normal/Uplink Push Button The Normal/Uplink push button on the hub cannot be configured for Uplink wiring. Installation Guide for the Model EN516 Ethernet... Normal (MDI-X) or Uplink (MDI) wiring for port 16, eliminating the need to use an RJ-45 crossover cable to 15 on the Model EN516 hub allows you must use a crossover cable to connect similarly wired devices. When the push button is pressed in, Port 16 is in the out position.
EN516 Installation Guide
Page 16
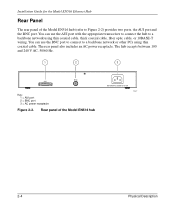
... to Figure 2-2) provides two ports, the AUI port and the BNC port. You can use the AUI port with the appropriate transceiver to connect the hub to a backbone network or other PCs using thin coaxial cable, thick coaxial cable, fiber optic cable, or 10BASE-T wiring. You can use ...the BNC port to connect to a backbone network using thin coaxial cable. The hub accepts between 100 and 240 V AC, 50/60 Hz. 1 2 3 BNC AUI Key: 1 = AUI port 2 = BNC port 3 = AC power receptacle Figure 2-2. The rear panel also...
... to Figure 2-2) provides two ports, the AUI port and the BNC port. You can use the AUI port with the appropriate transceiver to connect the hub to a backbone network or other PCs using thin coaxial cable, thick coaxial cable, fiber optic cable, or 10BASE-T wiring. You can use ...the BNC port to connect to a backbone network using thin coaxial cable. The hub accepts between 100 and 240 V AC, 50/60 Hz. 1 2 3 BNC AUI Key: 1 = AUI port 2 = BNC port 3 = AC power receptacle Figure 2-2. The rear panel also...
EN516 Installation Guide
Page 17
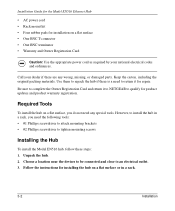
...units to be between 0°C and 40°C. You can install the hub on : • Preparing the site • Package contents • Required tools • Installing the hub • Connecting the hub • Completing and verifying the installation Preparing the Site Before you begin ...installing the Model EN516 hub, prepare the installation site. You should contain the following items: • Model EN516 hub • This manual Installation 3-1 The maximum relative humidity must be connected are easily ...
...units to be between 0°C and 40°C. You can install the hub on : • Preparing the site • Package contents • Required tools • Installing the hub • Connecting the hub • Completing and verifying the installation Preparing the Site Before you begin ...installing the Model EN516 hub, prepare the installation site. You should contain the following items: • Model EN516 hub • This manual Installation 3-1 The maximum relative humidity must be connected are easily ...
EN516 Installation Guide
Page 18
Choose a location near the devices to be connected and close to complete the Owner Registration Card and return it for installing the hub on a flat surface or in a rack, you do not need the following tools: • #1 Phillips screwdriver to attach mounting brackets ...original packing materials. However, to install the hub in a rack. 3-2 Installation Use them to repack the hub if there is a need to return it to NETGEAR to tighten mounting screws Installing the Hub To install the Model EN516 hub, follow these steps: 1. Unpack the hub. 2. Follow the instructions for repair. Be ...
Choose a location near the devices to be connected and close to complete the Owner Registration Card and return it for installing the hub on a flat surface or in a rack, you do not need the following tools: • #1 Phillips screwdriver to attach mounting brackets ...original packing materials. However, to install the hub in a rack. 3-2 Installation Use them to repack the hub if there is a need to return it to NETGEAR to tighten mounting screws Installing the Hub To install the Model EN516 hub, follow these steps: 1. Unpack the hub. 2. Follow the instructions for repair. Be ...
EN516 Installation Guide
Page 19
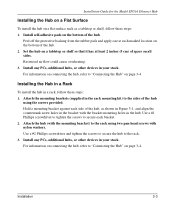
...the rack. 3. For information on connecting the hub, refer to "Connecting the Hub" on page 3-4. Installation Guide for the Model EN516 Ethernet Hub Installing the Hub on a Flat Surface To install the hub on a flat each marked location on the bottom of the hub. 2. Install self-adhesive pads on all ...shelf so that it has at least 2 inches (5 cm) of space on the bottom of the hub, as a tabletop or shelf, follow these steps: 1. Installing the Hub in a Rack To install the hub in your stack. Use a #1 Phillips screwdriver to tighten the screws to the rack using the screws ...
...the rack. 3. For information on connecting the hub, refer to "Connecting the Hub" on page 3-4. Installation Guide for the Model EN516 Ethernet Hub Installing the Hub on a Flat Surface To install the hub on a flat each marked location on the bottom of the hub. 2. Install self-adhesive pads on all ...shelf so that it has at least 2 inches (5 cm) of space on the bottom of the hub, as a tabletop or shelf, follow these steps: 1. Installing the Hub in a Rack To install the hub in your stack. Use a #1 Phillips screwdriver to tighten the screws to the rack using the screws ...
EN516 Installation Guide
Page 20
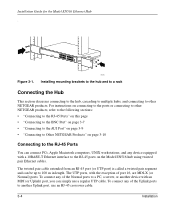
... RX 9 Link RX 8 Normal/Uplink 16 Figure 3-1. 7171 Installing mounting brackets to the hub and to a rack Connecting the Hub This section discusses connecting to the hub, cascading to multiple hubs, and connecting to other NETGEAR products, refer to the following sections: • "Connecting to the RJ-45 Ports" ... computers, UNIX workstations, and any device equipped with an MDI (or Uplink) port, you can be up to other NETGEAR products. For instructions on the Model EN516 hub using twisted pair Ethernet cables. The UTP ports, with the exception of the Normal ports to a PC, a server,...
... RX 9 Link RX 8 Normal/Uplink 16 Figure 3-1. 7171 Installing mounting brackets to the hub and to a rack Connecting the Hub This section discusses connecting to the hub, cascading to multiple hubs, and connecting to other NETGEAR products, refer to the following sections: • "Connecting to the RJ-45 Ports" ... computers, UNIX workstations, and any device equipped with an MDI (or Uplink) port, you can be up to other NETGEAR products. For instructions on the Model EN516 hub using twisted pair Ethernet cables. The UTP ports, with the exception of the Normal ports to a PC, a server,...
EN516 Installation Guide
Page 21
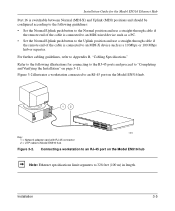
... and proceed to "Completing and Verifying the Installation" on page 3-11. Figure 3-2 illustrates a workstation connected to an RJ-45 port on the Model EN516 hub Note: Ethernet specifications limit segments to 328 feet (100 m) in length. Installation Guide for the Model EN516 Ethernet... Hub Port 16 is connected to an MDI-X device such as a 10 Mbps or 100 Mbps hub or repeater. For further cabling guidelines, refer to Model EN516 hub Power Data Collision 1 Link RX 9 Link RX 8 Normal/Uplink 16 34FA ...
... and proceed to "Completing and Verifying the Installation" on page 3-11. Figure 3-2 illustrates a workstation connected to an RJ-45 port on the Model EN516 hub Note: Ethernet specifications limit segments to 328 feet (100 m) in length. Installation Guide for the Model EN516 Ethernet... Hub Port 16 is connected to an MDI-X device such as a 10 Mbps or 100 Mbps hub or repeater. For further cabling guidelines, refer to Model EN516 hub Power Data Collision 1 Link RX 9 Link RX 8 Normal/Uplink 16 34FA ...
EN516 Installation Guide
Page 22
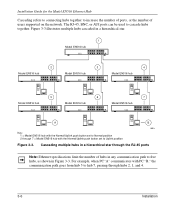
...specifications limit the number of users supported on the network. Installation Guide for the Model EN516 Ethernet Hub Cascading refers to connecting hubs together to cascade hubs together. The RJ-45, BNC, or AUI ports can be used to increase the number of ports, or... the number of hubs in any communication path to five hubs, as shown in a hierarchical star. 1 Model EN516 hub 2 Model EN516 hub 3 Model EN516 hub 4 Model EN516 hub 5 Model EN516 hub 6 Model EN516 hub 7 Model EN516 hub A B 30EA Key: 1 = Model EN516 hub with the Normal/Uplink push button set...
...specifications limit the number of users supported on the network. Installation Guide for the Model EN516 Ethernet Hub Cascading refers to connecting hubs together to cascade hubs together. The RJ-45, BNC, or AUI ports can be used to increase the number of ports, or... the number of hubs in any communication path to five hubs, as shown in a hierarchical star. 1 Model EN516 hub 2 Model EN516 hub 3 Model EN516 hub 4 Model EN516 hub 5 Model EN516 hub 6 Model EN516 hub 7 Model EN516 hub A B 30EA Key: 1 = Model EN516 hub with the Normal/Uplink push button set...
EN516 Installation Guide
Page 23
...BNC port of the Model EN516 hub is counted as shown in a daisy-chain style. 1 Model EN516 hub 2 Model EN516 hub 3 Model EN516 hub 000029EA Key: 1 = Model EN516 hub with Normal/Uplink push button set to Normal position 2 and 3 = Model EN516 hub with Normal/Uplink push button set... to Uplink position Figure 3-4. Cascading multiple hubs daisy-chain style through the twisted...
...BNC port of the Model EN516 hub is counted as shown in a daisy-chain style. 1 Model EN516 hub 2 Model EN516 hub 3 Model EN516 hub 000029EA Key: 1 = Model EN516 hub with Normal/Uplink push button set to Normal position 2 and 3 = Model EN516 hub with Normal/Uplink push button set... to Uplink position Figure 3-4. Cascading multiple hubs daisy-chain style through the twisted...
EN516 Installation Guide
Page 24
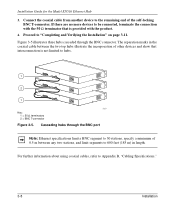
...cations limit a BNC segment to 30 stations, specify a minimum of 0.5 m between the two top hubs illustrate the incorporation of the self-locking BNC T-connector. Cascading hubs through the BNC connector. For further information about using coaxial cables, refer to 600 feet (185 m)... The separation marks in length. Connect the coaxial cable from another device to hubs. 1 2 1 7217 Key: 1 = 50 Ω terminators 2 = BNC T-connector Figure 3-5. Installation Guide for the Model EN516 Ethernet Hub 3. Proceed to be connected, terminate the connection with the 50 Ω terminator...
...cations limit a BNC segment to 30 stations, specify a minimum of 0.5 m between the two top hubs illustrate the incorporation of the self-locking BNC T-connector. Cascading hubs through the BNC connector. For further information about using coaxial cables, refer to 600 feet (185 m)... The separation marks in length. Connect the coaxial cable from another device to hubs. 1 2 1 7217 Key: 1 = 50 Ω terminators 2 = BNC T-connector Figure 3-5. Installation Guide for the Model EN516 Ethernet Hub 3. Proceed to be connected, terminate the connection with the 50 Ω terminator...

EN516 Installation Guide
Page 25
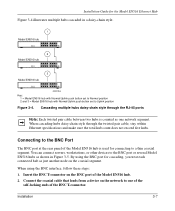
...is not disabled, the port is normally used for connecting a thick coaxial segment. Proceed to "Completing and Verifying the Installation" on the hub to an external coaxial transceiver through the AUI port Installation 3-9 Refer to Figure 3-6 and follow these steps: 1. When using the AUI port..., refer to your transceiver documentation for information about disabling the SQE test function. Cascading hubs through an AUI transceiver cable. Installation Guide for the Model EN516 Ethernet Hub Connecting to the AUI Port The AUI port at the rear panel of the Model EN516...
...is not disabled, the port is normally used for connecting a thick coaxial segment. Proceed to "Completing and Verifying the Installation" on the hub to an external coaxial transceiver through the AUI port Installation 3-9 Refer to Figure 3-6 and follow these steps: 1. When using the AUI port..., refer to your transceiver documentation for information about disabling the SQE test function. Cascading hubs through an AUI transceiver cable. Installation Guide for the Model EN516 Ethernet Hub Connecting to the AUI Port The AUI port at the rear panel of the Model EN516...
