
X463UN/X551UN Specification Brochure
Page 1
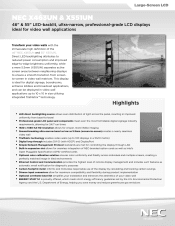
Highlights •• LED direct backlighting source allows even distribution of light across individual and multiple screens, creating a •• Ethernet Control and Communication provides the highest level of remote display management and includes such features as 5.5mm (screen-to-screen) creates a nearly seamless •• TileMatrix technology enables video walls (up to 10 x 10 in size utilizing integrated TileMatrix™ technology. Environmental...
Highlights •• LED direct backlighting source allows even distribution of light across individual and multiple screens, creating a •• Ethernet Control and Communication provides the highest level of remote display management and includes such features as 5.5mm (screen-to-screen) creates a nearly seamless •• TileMatrix technology enables video walls (up to 10 x 10 in size utilizing integrated TileMatrix™ technology. Environmental...

X463UN/X551UN Specification Brochure
Page 2
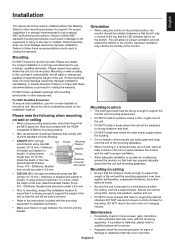
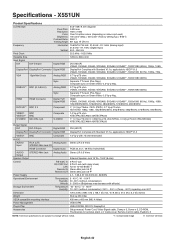
... for X463UN & X551UN MODEL LCD MODULE Panel Technology Viewable Image Size Native Resolution Brightness (Typical) Contrast Ratio (Typical) Viewing Angle Response Time (white to black) Aspect Ratio Active Screen Area (W x H) Orientation Displayable Colors CONNECTIVITY PC/Mac Signal Compatibility Input Terminals Digital Analog Audio External Control Output Terminals Digital Analog Audio External Control POWER CONSUMPTiON On (Typical) ECO Mode Standby PHYSICAL SPECIFICATIONS Bezel Width (L/R, T/B) Net Dimensions (without stand) VESA Hole Configuration ENVIRONMENTAL CONDITIONS Operating...
... for X463UN & X551UN MODEL LCD MODULE Panel Technology Viewable Image Size Native Resolution Brightness (Typical) Contrast Ratio (Typical) Viewing Angle Response Time (white to black) Aspect Ratio Active Screen Area (W x H) Orientation Displayable Colors CONNECTIVITY PC/Mac Signal Compatibility Input Terminals Digital Analog Audio External Control Output Terminals Digital Analog Audio External Control POWER CONSUMPTiON On (Typical) ECO Mode Standby PHYSICAL SPECIFICATIONS Bezel Width (L/R, T/B) Net Dimensions (without stand) VESA Hole Configuration ENVIRONMENTAL CONDITIONS Operating...

Users Manual
Page 2
... Panel ...English-9 Wireless Remote Control (Optional English-11 Operating Range for the Optional Remote Control English-12 Setup ...English-13 Connections ...English-15 Wiring Diagram ...English-15 Connecting a Personal Computer English-16 Connecting a DVD Player or Computer with HDMI out English-16 Connecting a Computer with DisplayPort English-16 Basic Operation...English-17 Power ON and OFF Modes ...English-17 Power Indicator...English-18 Using Power Management ...English-18 Selecting a video source...English-18 Picture Aspect...
... Panel ...English-9 Wireless Remote Control (Optional English-11 Operating Range for the Optional Remote Control English-12 Setup ...English-13 Connections ...English-15 Wiring Diagram ...English-15 Connecting a Personal Computer English-16 Connecting a DVD Player or Computer with HDMI out English-16 Connecting a Computer with DisplayPort English-16 Basic Operation...English-17 Power ON and OFF Modes ...English-17 Power Indicator...English-18 Using Power Management ...English-18 Selecting a video source...English-18 Picture Aspect...

Users Manual
Page 5
... of a Coaxial Cable. • The screen of detaching the system from the wall outlet and refer servicing to qualified service personnel under the following : • Use the preset Size and Position controls with hard material. • Please do not apply pressure to the LCD surface. • Please do not connect to the backside handle. The monitor should be used in contact...
... of a Coaxial Cable. • The screen of detaching the system from the wall outlet and refer servicing to qualified service personnel under the following : • Use the preset Size and Position controls with hard material. • Please do not apply pressure to the LCD surface. • Please do not connect to the backside handle. The monitor should be used in contact...
Users Manual
Page 7
... gap Mounting Bracket screws (10-12 mm + thickness of bracket and washer in Washer length). Improper ventilation may occur over time, against earthquakes, unexpected vibrations, and other problems that have no gap between the monitor and the wall for support. Not all walls or ceilings are NEC approved, they must be strong enough to support the monitor and mounting accessories. • DO NOT install in locations...
... gap Mounting Bracket screws (10-12 mm + thickness of bracket and washer in Washer length). Improper ventilation may occur over time, against earthquakes, unexpected vibrations, and other problems that have no gap between the monitor and the wall for support. Not all walls or ceilings are NEC approved, they must be strong enough to support the monitor and mounting accessories. • DO NOT install in locations...

Users Manual
Page 10
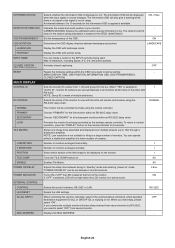
... to previous menu. ¾ Remote control sensor and Power Indicator Receives the signal from the remote control (when using the wireless remote control). Control Key Lock Mode This control completely locks out access to increase the adjustment with the "SCHEDULE SETTINGS" function enabled. Decreases the audio output level when the OSD menu is turned off . These are available input only, shown as their factory preset name. ¿ PLUS button Acts as EXIT button within the monitor, the indicator will blink red. * If...
... to previous menu. ¾ Remote control sensor and Power Indicator Receives the signal from the remote control (when using the wireless remote control). Control Key Lock Mode This control completely locks out access to increase the adjustment with the "SCHEDULE SETTINGS" function enabled. Decreases the audio output level when the OSD menu is turned off . These are available input only, shown as their factory preset name. ¿ PLUS button Acts as EXIT button within the monitor, the indicator will blink red. * If...
Users Manual
Page 11
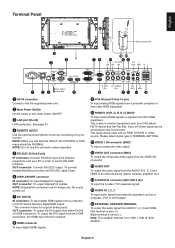
... not use Remote IN/OUT, IR CONTROL in order to turn main power ON/OFF. » LAN port (RJ-45) LAN connection. OUT connector: To output DisplayPort signals. Red terminal is also to connect equipment such as a DVD player, HDTV device and Set-Top-Box. To connect multiple MultiSync monitors via RS-232C daisy Chain. ² DISPLAYPORT connector IN connector: To input DisplayPort signals. OUT connector: To output the DVI signal from external...
... not use Remote IN/OUT, IR CONTROL in order to turn main power ON/OFF. » LAN port (RJ-45) LAN connection. OUT connector: To output DisplayPort signals. Red terminal is also to connect equipment such as a DVD player, HDTV device and Set-Top-Box. To connect multiple MultiSync monitors via RS-232C daisy Chain. ² DISPLAYPORT connector IN connector: To input DisplayPort signals. OUT connector: To output the DVI signal from external...

Users Manual
Page 13
.... ¾ MENU button Turns on /standby. · INPUT button Selects input signal. See page 19. Small screen which adjusted "PIP" mode moves left or right. ƹ SET button Makes selection. ƺ VOLUME UP/DOWN button Increases or decreases audio output level. ƻ CH UP/DOWN button*2 Ƽ GUIDE button*2 ƽ MUTE button Turns on/off the information OSD. Audio out is disabled when surround is set REMOTE ID. ¶ ENT button*2 º DISPLAY button Turns on your connection » PICTURE MODE button Selects picture mode, [HIGHBRIGHT], [STANDARD...
.... ¾ MENU button Turns on /standby. · INPUT button Selects input signal. See page 19. Small screen which adjusted "PIP" mode moves left or right. ƹ SET button Makes selection. ƺ VOLUME UP/DOWN button Increases or decreases audio output level. ƻ CH UP/DOWN button*2 Ƽ GUIDE button*2 ƽ MUTE button Turns on/off the information OSD. Audio out is disabled when surround is set REMOTE ID. ¶ ENT button*2 º DISPLAY button Turns on your connection » PICTURE MODE button Selects picture mode, [HIGHBRIGHT], [STANDARD...
Users Manual
Page 15
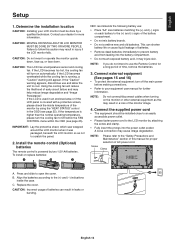
... LCD is running, a "Caution" warning will turn off the main power before making connections. • Refer to your LCD monitor must be installed close to an easily accessible power outlet. • Please fasten power cord to cool. A loose connection may result in an enclosed area or if the LCD panel is powered by a qualified technician. Screw Clamp A. Install the remote control (Optional) batteries The remote control is covered with a protective screen...
... LCD is running, a "Caution" warning will turn off the main power before making connections. • Refer to your LCD monitor must be installed close to an easily accessible power outlet. • Please fasten power cord to cool. A loose connection may result in an enclosed area or if the LCD panel is powered by a qualified technician. Screw Clamp A. Install the remote control (Optional) batteries The remote control is covered with a protective screen...

Users Manual
Page 17
... Connections NOTE: Do not connect/disconnect cables when turning on signal type. • AUDIO IN 1, 2 and 3 can be used for audio input. Using an audio cable with HDMI out Computer (Digital) *: Multiple monitors that are daisy-chained have a limit to the user manual included with each separate piece of the monitor image. Wiring Diagram Second monitor* Computer (Analog) DVD player with SCART OUT Stereo Amplifier DVD player with a built-in resistor. BNC MODE: VIDEO BNC MODE: COMPONENT DVI MODE...
... Connections NOTE: Do not connect/disconnect cables when turning on signal type. • AUDIO IN 1, 2 and 3 can be used for audio input. Using an audio cable with HDMI out Computer (Digital) *: Multiple monitors that are daisy-chained have a limit to the user manual included with each separate piece of the monitor image. Wiring Diagram Second monitor* Computer (Analog) DVD player with SCART OUT Stereo Amplifier DVD player with a built-in resistor. BNC MODE: VIDEO BNC MODE: COMPONENT DVI MODE...

Users Manual
Page 24
... or reduce the low frequency sound. 0 Press + button to factory settings except VOLUME. - FIXED AUDIO INPUT Selects audio input source [IN1], [IN2], [IN3], [HDMI], [OPTION]*. Depend on signal input RESET Resets "AUDIO" options back to increase BASS sound. VGA, RGB/HV inputs only INPUT RESOLUTION VGA, RGB/HV inputs only If there is a problem with signal detection, this function is disabled when this function forces the monitor to left. FULL NORMAL Displays the aspect ratio the same...
... or reduce the low frequency sound. 0 Press + button to factory settings except VOLUME. - FIXED AUDIO INPUT Selects audio input source [IN1], [IN2], [IN3], [HDMI], [OPTION]*. Depend on signal input RESET Resets "AUDIO" options back to increase BASS sound. VGA, RGB/HV inputs only INPUT RESOLUTION VGA, RGB/HV inputs only If there is a problem with signal detection, this function is disabled when this function forces the monitor to left. FULL NORMAL Displays the aspect ratio the same...
Users Manual
Page 26
... infra-red remote control when using the remote controller. When "YES" is replying or not. Choose "SECONDARY" for tiling to normal operation, press the "DISPLAY" button on . OFF - The carbon footprint factor in the carbon saving calculation is available. To return to a large number of screens. Turns ON or OFF the LED located at a lower number of monitors. The information OSD will not light when the LCD monitor is...
... infra-red remote control when using the remote controller. When "YES" is replying or not. Choose "SECONDARY" for tiling to normal operation, press the "DISPLAY" button on . OFF - The carbon footprint factor in the carbon saving calculation is available. To return to a large number of screens. Turns ON or OFF the LED located at a lower number of monitors. The information OSD will not light when the LCD monitor is...

Users Manual
Page 27
..., EXTERNAL CONTROL should be "RS-232C". Press - English LAN SETTING When you use this occurs the monitor will not switch into power save mode after the signal is lost. Disabling this item. COPY START Select "YES" and press the SET button to the input signal. ALL INPUT All input terminals settings are enabled. RESET Resets "MULTI DISPLAY" options back to reduce the risk of monitor error via wired LAN. AUTO SCREEN SAVER Use the SCREEN SAVER...
..., EXTERNAL CONTROL should be "RS-232C". Press - English LAN SETTING When you use this occurs the monitor will not switch into power save mode after the signal is lost. Disabling this item. COPY START Select "YES" and press the SET button to the input signal. ALL INPUT All input terminals settings are enabled. RESET Resets "MULTI DISPLAY" options back to reduce the risk of monitor error via wired LAN. AUTO SCREEN SAVER Use the SCREEN SAVER...

Users Manual
Page 28
... or other video input ports. OFF Disables IP conversion. CUSTOM DETECT Set the priority of the input signal. EXPAND: Expand image contrast and increase detail in the DVI mode menu. This is selected, monitor searches listed inputs only. VIDEO DETECT DVD/HD, SCART, VIDEO1, VIDEO2 or S-VIDEO inputs will not search the other computer equipment is displaying a signal from the other video input port. AUTO Automatically chooses Color System setting based on the video format of input signals. LAST...
... or other video input ports. OFF Disables IP conversion. CUSTOM DETECT Set the priority of the input signal. EXPAND: Expand image contrast and increase detail in the DVI mode menu. This is selected, monitor searches listed inputs only. VIDEO DETECT DVD/HD, SCART, VIDEO1, VIDEO2 or S-VIDEO inputs will not search the other computer equipment is displaying a signal from the other video input port. AUTO Automatically chooses Color System setting based on the video format of input signals. LAST...
Users Manual
Page 30
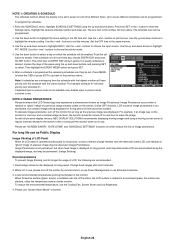
... sensors inside LCD are recommended. 1. buttons to highlight the minutes setting. Use the + and - MODE. Please use the Cooling Fan, Screen Saver and Low Brightness. 4. The schedule can then be displayed for long period. Use the down buttons. Use the up and down arrows to further reduce the risk of the monitor. If the schedule is installed over the schedule with all personal display devices, NEC DISPLAY...
... sensors inside LCD are recommended. 1. buttons to highlight the minutes setting. Use the + and - MODE. Please use the Cooling Fan, Screen Saver and Low Brightness. 4. The schedule can then be displayed for long period. Use the down buttons. Use the up and down arrows to further reduce the risk of the monitor. If the schedule is installed over the schedule with all personal display devices, NEC DISPLAY...
Users Manual
Page 31
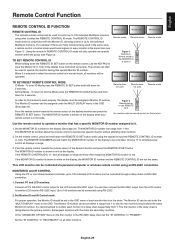
... OSD menu of the desired monitor and press the REMOTE ID SET button. If the MONITOR ID number is designated as the primary monitor. Connect PC and LCD monitors. The Monitor ID can be set in normal mode would send signals to 100. The Monitor ID number can be set the "IR CONTROL" to the LCD monitor RS-232C input. This LCD monitor can be controlled via remote. Connect a PC's RS-232C control output to "PRIMARY". The REMOTE CONTROL ID mode works in white...
... OSD menu of the desired monitor and press the REMOTE ID SET button. If the MONITOR ID number is designated as the primary monitor. Connect PC and LCD monitors. The Monitor ID can be set in normal mode would send signals to 100. The Monitor ID number can be set the "IR CONTROL" to the LCD monitor RS-232C input. This LCD monitor can be controlled via remote. Connect a PC's RS-232C control output to "PRIMARY". The REMOTE CONTROL ID mode works in white...

Users Manual
Page 39
Six-axis color control permits color adjustments via the DVI input, this display supports HDCP. Plug and Play: The Microsoft® solution with the Windows® operating system facilitates setup and installation by allowing the monitor to send its capabilities (such as screen size and resolutions supported) directly to your monitor energy costs, reducing emissions and lowering the air conditioning costs of your computer, automatically optimizing display performance. IPM (Intelligent...
Six-axis color control permits color adjustments via the DVI input, this display supports HDCP. Plug and Play: The Microsoft® solution with the Windows® operating system facilitates setup and installation by allowing the monitor to send its capabilities (such as screen size and resolutions supported) directly to your monitor energy costs, reducing emissions and lowering the air conditioning costs of your computer, automatically optimizing display performance. IPM (Intelligent...

Users Manual
Page 40
... NEC DISPLAY SOLUTIONS service facility. • If the monitor is powered off for bent or pushed-in pins. RS-232C or LAN control is not displayed properly • Use OSD Display Mode to enter Information menu and confirm that the appropriate resolution has been selected. "SCHEDULE"/"OFF TIMER" function is not working properly • The "SCHEDULE" function will be reset. Troubleshooting No picture • The signal cable...
... NEC DISPLAY SOLUTIONS service facility. • If the monitor is powered off for bent or pushed-in pins. RS-232C or LAN control is not displayed properly • Use OSD Display Mode to enter Information menu and confirm that the appropriate resolution has been selected. "SCHEDULE"/"OFF TIMER" function is not working properly • The "SCHEDULE" function will be reset. Troubleshooting No picture • The signal cable...
Users Manual
Page 41
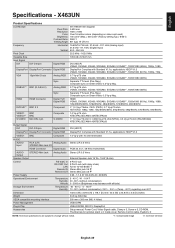
..., 4 Holes) Power Management VESA DPM Plug & Play VESA DDC2B, DDC/CI, DisplayPort Accessories Setup manual, Power Cord, Video Signal cable, Clamp x 3, Screw x 5, CD-ROM, Thumbscrew for optional stand x 2, Cable cover, Remote Control cable, Eyebolt x 2 NOTE: Technical specifications are subject to change without condensation) Altitude: 0 - 3000 m (Brightness may decrease with Standard V1.1a, applicable to HDCP V1.3 VIDEO1 BNC Composite 1.0 Vp-p with 75 ohm terminated AUDIO AUDIO Input RCA (L/R) Analog Audio Stereo L/R 0.5 Vrms...
..., 4 Holes) Power Management VESA DPM Plug & Play VESA DDC2B, DDC/CI, DisplayPort Accessories Setup manual, Power Cord, Video Signal cable, Clamp x 3, Screw x 5, CD-ROM, Thumbscrew for optional stand x 2, Cable cover, Remote Control cable, Eyebolt x 2 NOTE: Technical specifications are subject to change without condensation) Altitude: 0 - 3000 m (Brightness may decrease with Standard V1.1a, applicable to HDCP V1.3 VIDEO1 BNC Composite 1.0 Vp-p with 75 ohm terminated AUDIO AUDIO Input RCA (L/R) Analog Audio Stereo L/R 0.5 Vrms...
Users Manual
Page 42
... Dimension Temperature: -20 - 60°C / -4 - 140°F Humidity: 10 - 90% (without condensation) / 90% - 3.5% x (Temp - 40°C) regarding over 40°C 1215.3 (W) x 686.1 (H) x 128.1 (D) mm / 47.8 (W) x 27.0 (H) x 5.0 (D) inches Weight VESA compatible mounting interface 36.4 kg (80.3 lbs) 400 mm x 400 mm (M6, 4 Holes) Power Management VESA DPM Plug & Play VESA DDC2B, DDC/CI, DisplayPort Accessories Setup manual, Power Cord, Video Signal cable, Clamp x 3, Screw x 5, CD-ROM, Thumbscrew for optional stand x 2, Cable cover, Remote Control cable...
... Dimension Temperature: -20 - 60°C / -4 - 140°F Humidity: 10 - 90% (without condensation) / 90% - 3.5% x (Temp - 40°C) regarding over 40°C 1215.3 (W) x 686.1 (H) x 128.1 (D) mm / 47.8 (W) x 27.0 (H) x 5.0 (D) inches Weight VESA compatible mounting interface 36.4 kg (80.3 lbs) 400 mm x 400 mm (M6, 4 Holes) Power Management VESA DPM Plug & Play VESA DDC2B, DDC/CI, DisplayPort Accessories Setup manual, Power Cord, Video Signal cable, Clamp x 3, Screw x 5, CD-ROM, Thumbscrew for optional stand x 2, Cable cover, Remote Control cable...


