NP115 : RS232 codes- Projectors
Page 2
... using the USB port on the projector A USB cable is required. 2. LAN connection using the serial port on the projector A LAN cable is required Status of connection methods are required. 3-2. Serial connection using a wireless LAN unit A wireless LAN unit is required. 3-4. LAN connection 3-1. LAN connection using the LAN port on the projector A serial cable is required. 3. LAN connection using a wireless LAN card A wireless LAN card is required. 3-3.LAN connection using a wired LAN card A wired LAN card and LAN cable are available for sending and receiving control commands...
... using the USB port on the projector A USB cable is required. 2. LAN connection using the serial port on the projector A LAN cable is required Status of connection methods are required. 3-2. Serial connection using a wireless LAN unit A wireless LAN unit is required. 3-4. LAN connection 3-1. LAN connection using the LAN port on the projector A serial cable is required. 3. LAN connection using a wireless LAN card A wireless LAN card is required. 3-3.LAN connection using a wired LAN card A wired LAN card and LAN cable are available for sending and receiving control commands...
NP115 : RS232 codes- Projectors
Page 34
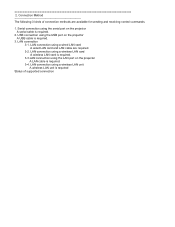
... 1FH 00H MUTE ALL OFF 37 25H 00H R 38 26H 00H G 39 27H 00H B 40 28H 00H OSD MUTE 41 29H 00H PICTURE 42 2AH 00H WHITE BAL 43 2BH 00H IMAGE 44 2CH 00H TEST Setting not possible. Invalid values specified. REMOTE KEY CODE Function: This command sends remote control key codes of projector. This current model does not support this function.
... 1FH 00H MUTE ALL OFF 37 25H 00H R 38 26H 00H G 39 27H 00H B 40 28H 00H OSD MUTE 41 29H 00H PICTURE 42 2AH 00H WHITE BAL 43 2BH 00H IMAGE 44 2CH 00H TEST Setting not possible. Invalid values specified. REMOTE KEY CODE Function: This command sends remote control key codes of projector. This current model does not support this function.
NP115 : PC Control Connectors and Cables for all projectors and plasmas
Page 1
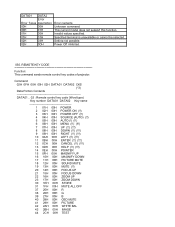
... screen. • Communication from a PC using the NEC Image Express Utility to send images to the projector for presentations as well as basic projector control, projector lamp and error status or asset management. (These functions can purchase a MAC or Sun type keyboard/mouse cable (mini-DIN 8P) at both ends of the cable if desired Models with models that end using the NEC Geometric Correction Tool for adjusting a projector to display an image...
... screen. • Communication from a PC using the NEC Image Express Utility to send images to the projector for presentations as well as basic projector control, projector lamp and error status or asset management. (These functions can purchase a MAC or Sun type keyboard/mouse cable (mini-DIN 8P) at both ends of the cable if desired Models with models that end using the NEC Geometric Correction Tool for adjusting a projector to display an image...

NP4100 : brochure
Page 1
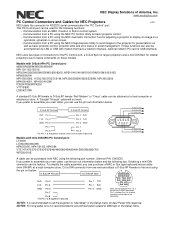
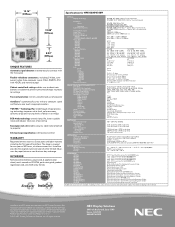
... effects of dust, helping to cover projection distances between 2.6 - 283 feet. ° Dual or single lamp operation. Professional Installation Projectors NP Installation Series NP4100/NP4100W installation and large venue digital projectors Powerful installation projector equipped to take on the installation requirements. Series Features and Benefits EXTENDED USE OPERATION COMPLETE LINE OF (5) BAYONET STYLE LENSES POWERED VERTICAL AND HORIZONTAL LENS SHIFT POWER ZOOM AND FOCUS DUAL/SINGLE LAMP OPERATION BUILT-IN LAN CONNECTION FOR CONTROL COMPREHENSIVE INPUT PANEL DUST-RESISTANT DESIGN...
... effects of dust, helping to cover projection distances between 2.6 - 283 feet. ° Dual or single lamp operation. Professional Installation Projectors NP Installation Series NP4100/NP4100W installation and large venue digital projectors Powerful installation projector equipped to take on the installation requirements. Series Features and Benefits EXTENDED USE OPERATION COMPLETE LINE OF (5) BAYONET STYLE LENSES POWERED VERTICAL AND HORIZONTAL LENS SHIFT POWER ZOOM AND FOCUS DUAL/SINGLE LAMP OPERATION BUILT-IN LAN CONNECTION FOR CONTROL COMPREHENSIVE INPUT PANEL DUST-RESISTANT DESIGN...
NP4100 : brochure
Page 2
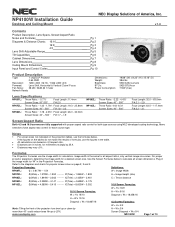
... their respective holders. IN THE BOX Remote control, batteries, power cord, 6-segment color wheel, user's manual on CD-ROM, quick start guide, product registration card, anti-theft screw for lens SIGNAL COMPATIBILITY/CONNECTIVITY Scan Rate Supported Video Standards SD/HD Video Signal Compatibility PC Signal Compatibility Macintosh Compatibility Input/Output Terminals RGB 1 (analog) RGB2 (analog) RGB3 (digital) Video 1 Video 2 Video 3 Audio Audio Out Monitor Out Audio External Control Sync Compatibility Networking Screen Trigger USB Horizontal 15 - 90 kHz / Vertical...
... their respective holders. IN THE BOX Remote control, batteries, power cord, 6-segment color wheel, user's manual on CD-ROM, quick start guide, product registration card, anti-theft screw for lens SIGNAL COMPATIBILITY/CONNECTIVITY Scan Rate Supported Video Standards SD/HD Video Signal Compatibility PC Signal Compatibility Macintosh Compatibility Input/Output Terminals RGB 1 (analog) RGB2 (analog) RGB3 (digital) Video 1 Video 2 Video 3 Audio Audio Out Monitor Out Audio External Control Sync Compatibility Networking Screen Trigger USB Horizontal 15 - 90 kHz / Vertical...
NP4100W : installation guide
Page 1
... sources using NEC developed scaling technology. v 1.0 Contents Product Description, Lens Specs, Screen/Aspect Ratio Notes and Formulas Diagrams & Distance Charts; 16:10 16:9 4:3 Lens Shift Adjustable Range Tilt Capabilities Cabinet Dimensions Lens Dimensions Ceiling Mount Dimensions Input Panel and Control Codes Pg 1 Pg 2 Pg 3 ___ Pg 4 Pg 5 Pg 6 Pg 7 Pg 8 Pg 9 Pg 10 Product Description Type: 1 chip DLP Projector 0.65 DMD Resolution: 1280 x 800 (16:10) / 1066 x 800 (4:3) Powered: Lens Shift, Horizontal & Vertical /Zoom/ Focus Fan...
... sources using NEC developed scaling technology. v 1.0 Contents Product Description, Lens Specs, Screen/Aspect Ratio Notes and Formulas Diagrams & Distance Charts; 16:10 16:9 4:3 Lens Shift Adjustable Range Tilt Capabilities Cabinet Dimensions Lens Dimensions Ceiling Mount Dimensions Input Panel and Control Codes Pg 1 Pg 2 Pg 3 ___ Pg 4 Pg 5 Pg 6 Pg 7 Pg 8 Pg 9 Pg 10 Product Description Type: 1 chip DLP Projector 0.65 DMD Resolution: 1280 x 800 (16:10) / 1066 x 800 (4:3) Powered: Lens Shift, Horizontal & Vertical /Zoom/ Focus Fan...
NP4100 : user's manual
Page 13
......7 Lens Controls...7 OSD Controls and Status LEDS 8 TERMINAL PANEL FEATURES ...10 PART NAMES OF THE REMOTE CONTROL 12 Battery Installation...14 Operating Range for Wireless Remote Control 15 Remote Control Precautions ...15 Using the Remote Control in Wired Operation 16 2. INSTALLATION AND CONNECTIONS 17 SETTING UP THE SCREEN AND THE PROJECTOR 17 SELECTING A LOCATION...18 INSTALLING OR REMOVING THE OPTIONAL LENS 19 Removing the Existing Lens From the Projector 19 Installing the New Lens ...21 Installing the New Lens Using the anti-theft screw 21 THROW DISTANCE AND SCREEN SIZE...
......7 Lens Controls...7 OSD Controls and Status LEDS 8 TERMINAL PANEL FEATURES ...10 PART NAMES OF THE REMOTE CONTROL 12 Battery Installation...14 Operating Range for Wireless Remote Control 15 Remote Control Precautions ...15 Using the Remote Control in Wired Operation 16 2. INSTALLATION AND CONNECTIONS 17 SETTING UP THE SCREEN AND THE PROJECTOR 17 SELECTING A LOCATION...18 INSTALLING OR REMOVING THE OPTIONAL LENS 19 Removing the Existing Lens From the Projector 19 Installing the New Lens ...21 Installing the New Lens Using the anti-theft screw 21 THROW DISTANCE AND SCREEN SIZE...

NP4100 : user's manual
Page 15
...Cabinet ...107 Cleaning the Lens ...107 Cleaning the Filters ...108 REPLACING CONSUMABLE PARTS 110 Replacing the Filters ...110 Replacing the Lamps ...112 Resetting the Lamp Hours Counter 114 7. SPECIFICATIONS...124 PROJECTOR SPECIFICATIONS...124 Optical Specifications ...124 Electrical Specifications...125 Mechanical Specifications...126 Environmental Considerations 126 Regulations ...126 CABINET DIMENSIONS ...127 PIN ASSIGNMENTS OF MINI D-SUB 15 PIN INPUT CONNECTOR 128 COMPATIBLE INPUT SIGNAL LIST 129 PC CONTROL CODES AND CABLE CONNECTIONS 131 SCREEN TRIGGER ...133 OPERATION USING HTTP...
...Cabinet ...107 Cleaning the Lens ...107 Cleaning the Filters ...108 REPLACING CONSUMABLE PARTS 110 Replacing the Filters ...110 Replacing the Lamps ...112 Resetting the Lamp Hours Counter 114 7. SPECIFICATIONS...124 PROJECTOR SPECIFICATIONS...124 Optical Specifications ...124 Electrical Specifications...125 Mechanical Specifications...126 Environmental Considerations 126 Regulations ...126 CABINET DIMENSIONS ...127 PIN ASSIGNMENTS OF MINI D-SUB 15 PIN INPUT CONNECTOR 128 COMPATIBLE INPUT SIGNAL LIST 129 PC CONTROL CODES AND CABLE CONNECTIONS 131 SCREEN TRIGGER ...133 OPERATION USING HTTP...

NP4100 : user's manual
Page 17
... feature allows the projector to be turned off center screen installations. Preventing unauthorized use the POWER (ON/STANDBY) button on the projector and starting to help prevent unauthorized access, adjustments and theft deterrence. Auto Start eliminates the need to project from off (even when projecting an image) using Direct Power Off, be removed immediately after turning on the remote control or projector cabinet. 1. Powered zoom and focus provide quick and easy adjustment. Note: Before using a power strip equipped with bayonet...
... feature allows the projector to be turned off center screen installations. Preventing unauthorized use the POWER (ON/STANDBY) button on the projector and starting to help prevent unauthorized access, adjustments and theft deterrence. Auto Start eliminates the need to project from off (even when projecting an image) using Direct Power Off, be removed immediately after turning on the remote control or projector cabinet. 1. Powered zoom and focus provide quick and easy adjustment. Note: Before using a power strip equipped with bayonet...
NP4100 : user's manual
Page 18
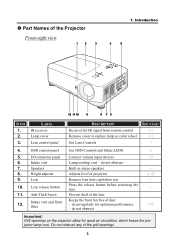
... Controls and Status LEDS 5. Intake vent Lamp cooling vent - Do not obstruct any of the Projector Front-right view 1. Part Names of the grill openings. 3 clean regularly for IR signal from remote control Remove cover to replace lamp or color wheel See Lens Controls SEE PAGE: 12 112 7 4. Introduction ITEM 1. 2. 3. Lens release button Press the release button before use 10. Anti-Theft Screw Prevent theft of projector 9. I/O connector panel Connect various input devices 6. Lens Remove lens hole cap before removing the lens 11. Height adjuster Adjusts...
... Controls and Status LEDS 5. Intake vent Lamp cooling vent - Do not obstruct any of the Projector Front-right view 1. Part Names of the grill openings. 3 clean regularly for IR signal from remote control Remove cover to replace lamp or color wheel See Lens Controls SEE PAGE: 12 112 7 4. Introduction ITEM 1. 2. 3. Lens release button Press the release button before use 10. Anti-Theft Screw Prevent theft of projector 9. I/O connector panel Connect various input devices 6. Lens Remove lens hole cap before removing the lens 11. Height adjuster Adjusts...

NP4100 : user's manual
Page 26
.../Pr) COMPUTER 2 IN 17. (R/Cr, G/Y, B/Cb, H, V) 18. LAN 21. SERVICE 1. jector is shared with S-Video input. This audio jack is powered off (see notes below) Connect a commercially available S-video cable from a video device 35 Turn on start up of the 133 projector. For service personnel only. - VIDEO IN 16. COMPUTER 1 IN 19. The screen retracts when the pro- Note: To use this jack for anything other than intended...
.../Pr) COMPUTER 2 IN 17. (R/Cr, G/Y, B/Cb, H, V) 18. LAN 21. SERVICE 1. jector is shared with S-Video input. This audio jack is powered off (see notes below) Connect a commercially available S-video cable from a video device 35 Turn on start up of the 133 projector. For service personnel only. - VIDEO IN 16. COMPUTER 1 IN 19. The screen retracts when the pro- Note: To use this jack for anything other than intended...
NP4100 : user's manual
Page 53
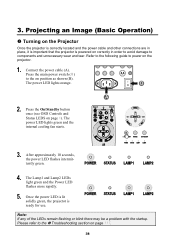
Projecting an Image (Basic Operation) Turning on the Projector Once the projector is correctly located and the power cable and other connections are in place, it is important that the projector is ready for use. The power LED lights orange. 3. Press the main power switch ( I ) to the Troubleshooting section on position as shown (B). B A 2. Please refer to the on page 117. 38 Connect the power cable (A). Press the On/Standby button once (see OSD Controls and 3 Status LEDS on...
Projecting an Image (Basic Operation) Turning on the Projector Once the projector is correctly located and the power cable and other connections are in place, it is important that the projector is ready for use. The power LED lights orange. 3. Press the main power switch ( I ) to the Troubleshooting section on position as shown (B). B A 2. Please refer to the on page 117. 38 Connect the power cable (A). Press the On/Standby button once (see OSD Controls and 3 Status LEDS on...

NP4100 : user's manual
Page 63
... seconds of adjustments and settings and return to turn off the AC power supply when the projector is powered on , use a power strip equipped with a switch and a breaker. • Do not turn off the projector. 48 3. Press the Main Power switch to the off position (O) to default. Doing so can cause loss of making adjustment or setting changes and closing the menu. Press the On/Standby button once. The cooling fans keep operating for...
... seconds of adjustments and settings and return to turn off the AC power supply when the projector is powered on , use a power strip equipped with a switch and a breaker. • Do not turn off the projector. 48 3. Press the Main Power switch to the off position (O) to default. Doing so can cause loss of making adjustment or setting changes and closing the menu. Press the On/Standby button once. The cooling fans keep operating for...

NP4100 : user's manual
Page 80
...PAL60/SECAM S-Video WXGA Mode Source Display Auto/NTSC3.58/NTSC4.43/PAL/PAL-M/PAL-N/PAL60/SECAM NP4100: Off/On NP4100W: Off/ On Off/ On Control ID 1-254 Filter Message Lamp 1 Life Remaining, Lamp 2 Life Remaining Lamp 1 Hours Used, Lamp 2 Hours Used Off/100[H]/200[H]/500[H]/1000[H] Filter Hours Used Input Terminal Source Name Horizontal Frequency Vertical Frequency Video Type Sync Type Sync Polarity Scan Type IP Address, Subnet Mask, Gateway, MAC Address Product, Serial Number, Firmware, Data Current Signal, All Data, Clear Lamp 1 Hours, Clear Lamp 2 Hours, Clear Filter Hours 65 5.
...PAL60/SECAM S-Video WXGA Mode Source Display Auto/NTSC3.58/NTSC4.43/PAL/PAL-M/PAL-N/PAL60/SECAM NP4100: Off/On NP4100W: Off/ On Off/ On Control ID 1-254 Filter Message Lamp 1 Life Remaining, Lamp 2 Life Remaining Lamp 1 Hours Used, Lamp 2 Hours Used Off/100[H]/200[H]/500[H]/1000[H] Filter Hours Used Input Terminal Source Name Horizontal Frequency Vertical Frequency Video Type Sync Type Sync Polarity Scan Type IP Address, Subnet Mask, Gateway, MAC Address Product, Serial Number, Firmware, Data Current Signal, All Data, Clear Lamp 1 Hours, Clear Lamp 2 Hours, Clear Filter Hours 65 5.

NP4100 : user's manual
Page 83
... functions with a description and the default setting. Adjust the Hue value using ◄or► to factory settings. 68 Adjust the Contrast value using ◄or► from the Adjust menu. Using On-Screen Display Adjust Menu Descriptions and Functions The Adjust menu contains overall projector settings for Picture will change depending on page 76. 5. ITEM Preset Detail Setting Contrast Brightness Sharpness Color Hue Reset DESCRIPTION Select a set of preset values using ◄or► to...
... functions with a description and the default setting. Adjust the Hue value using ◄or► to factory settings. 68 Adjust the Contrast value using ◄or► from the Adjust menu. Using On-Screen Display Adjust Menu Descriptions and Functions The Adjust menu contains overall projector settings for Picture will change depending on page 76. 5. ITEM Preset Detail Setting Contrast Brightness Sharpness Color Hue Reset DESCRIPTION Select a set of preset values using ◄or► to...

NP4100 : user's manual
Page 110
... turn off the power (AC) to have the projector display a message when the air Filter Message filter needs servicing. WXGA Mode Select WXGA mode (see page 99). Range: Off, 100[H], 200[H], 500[H], 1000[H] (see page 100). Auto Power On (AC) Auto Power On (AC) enables the projector to start automatically when the power cable is connected to an active power outlet and the main power switch is on to the projector by using the POWER button (or put in the standby mode...
... turn off the power (AC) to have the projector display a message when the air Filter Message filter needs servicing. WXGA Mode Select WXGA mode (see page 99). Range: Off, 100[H], 200[H], 500[H], 1000[H] (see page 100). Auto Power On (AC) Auto Power On (AC) enables the projector to start automatically when the power cable is connected to an active power outlet and the main power switch is on to the projector by using the POWER button (or put in the standby mode...
NP4100 : user's manual
Page 132
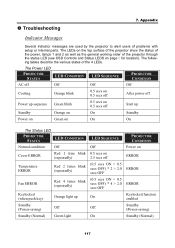
... Indicator Messages Several indicator messages are used by the projector to alert users of problems with setup or internal parts. The Power LED PROJECTOR STATUS LED CONDITION LED SEQUENCE PROJECTOR CONDITION AC off Off Off Off Cooling Orange blink 0.5 secs on 0.5 secs off After power off Power up sequence Green blink 0.5 secs on 0.5 secs off Start up Standby Orange on On Standby Power on Green on On On The Status LED PROJECTOR STATUS LED CONDITION Normal condition Off Cover ERROR Red 1 time blink (repeatedly) Temperature ERROR Red 2 times blink (repeatedly) Fan...
... Indicator Messages Several indicator messages are used by the projector to alert users of problems with setup or internal parts. The Power LED PROJECTOR STATUS LED CONDITION LED SEQUENCE PROJECTOR CONDITION AC off Off Off Off Cooling Orange blink 0.5 secs on 0.5 secs off After power off Power up sequence Green blink 0.5 secs on 0.5 secs off Start up Standby Orange on On Standby Power on Green on On On The Status LED PROJECTOR STATUS LED CONDITION Normal condition Off Cover ERROR Red 1 time blink (repeatedly) Temperature ERROR Red 2 times blink (repeatedly) Fan...
NP4100 : user's manual
Page 135
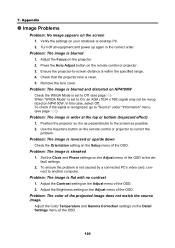
... Contrast setting on the Adjust menu of the projected image does not match the source image. Problem: The color of the OSD. 2. Adjust the Color Temperature and Gamma Correction settings on NP4100W. Verify the settings on the projector. 2. Turn off all equipment and power up again in the correct order. Adjust the Focus on your notebook or desktop PC. 2. Problem: The image is blurred and distorted on NP4100W Check the WXGA Mode is set to On, an XGA...
... Contrast setting on the Adjust menu of the projected image does not match the source image. Problem: The color of the OSD. 2. Adjust the Color Temperature and Gamma Correction settings on NP4100W. Verify the settings on the projector. 2. Turn off all equipment and power up again in the correct order. Adjust the Focus on your notebook or desktop PC. 2. Problem: The image is blurred and distorted on NP4100W Check the WXGA Mode is set to On, an XGA...

NP4100 : user's manual
Page 155
.... Input source's resolution and frequency are correctly adjusted on PC and changed it to the ON position. Still unchanged even though you press the AUTO ADJUST button. Lamp Hours Used (lamp operation hours) was cleared after lamp replacement. Audio cable is fully inserted into the input connector A message appears on a computer signal. 9. Lamp cover is too dark. Still no image even though you carry out [Reset] in the projector's menu. Image is installed correctly. Parts of your dealer or service personnel, check...
.... Input source's resolution and frequency are correctly adjusted on PC and changed it to the ON position. Still unchanged even though you press the AUTO ADJUST button. Lamp Hours Used (lamp operation hours) was cleared after lamp replacement. Audio cable is fully inserted into the input connector A message appears on a computer signal. 9. Lamp cover is too dark. Still no image even though you carry out [Reset] in the projector's menu. Image is installed correctly. Parts of your dealer or service personnel, check...

NP4100 : user's manual
Page 156
... connected equipment STATUS Indicator: Steady light Orange Green Flashing light [ ] cycles Remote control model number: 141 No obstacles between the sensor of 10 seconds. Batteries are new and are not reversed in detail. Control Panel Lock is not turned on or is not used Projector Installation environment Model number: Screen size: inch Serial No: Screen type: White matte Beads Polarization Date of purchase: Wide angle High contrast Lamp operating time (hours): Lamp Mode: Normal Eco Throw distance: feet/inch/m Information on input signal: Orientation: Ceiling...
... connected equipment STATUS Indicator: Steady light Orange Green Flashing light [ ] cycles Remote control model number: 141 No obstacles between the sensor of 10 seconds. Batteries are new and are not reversed in detail. Control Panel Lock is not turned on or is not used Projector Installation environment Model number: Screen size: inch Serial No: Screen type: White matte Beads Polarization Date of purchase: Wide angle High contrast Lamp operating time (hours): Lamp Mode: Normal Eco Throw distance: feet/inch/m Information on input signal: Orientation: Ceiling...


