

NP115 : RS232 codes- Projectors
Page 2
.... 3. Connection Method The following 3 kinds of supported connection USB connection using the LAN port on the projector A LAN cable is required. 2. LAN connection using a wireless LAN card A wireless LAN card is required. 3-3.LAN connection using the USB port on the projector A serial cable is required. 3-4. 2. LAN connection using the serial port on the projector A USB cable is required Status of connection methods are required. 3-2. Serial connection using a wired LAN card A wired LAN card and LAN cable are available for sending and receiving control commands. 1.
.... 3. Connection Method The following 3 kinds of supported connection USB connection using the LAN port on the projector A LAN cable is required. 2. LAN connection using a wireless LAN card A wireless LAN card is required. 3-3.LAN connection using the USB port on the projector A serial cable is required. 3-4. 2. LAN connection using the serial port on the projector A USB cable is required Status of connection methods are required. 3-2. Serial connection using a wired LAN card A wired LAN card and LAN cable are available for sending and receiving control commands. 1.
NP115 : RS232 codes- Projectors
Page 34
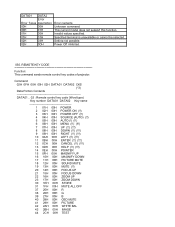
... 29H 00H PICTURE 42 2AH 00H WHITE BAL 43 2BH 00H IMAGE 44 2CH 00H TEST Power Off inhibited. 050. This current model does not support this function. DATA01 DATA2 Error Error Types description 00H 00H 00H 01H 01H 00H 01H 01H 02H 03H 02H 0DH Error contents Unknown command. Invalid values specified. REMOTE KEY CODE Function: This command sends remote control key codes of projector. Specified...
... 29H 00H PICTURE 42 2AH 00H WHITE BAL 43 2BH 00H IMAGE 44 2CH 00H TEST Power Off inhibited. 050. This current model does not support this function. DATA01 DATA2 Error Error Types description 00H 00H 00H 01H 01H 00H 01H 01H 02H 03H 02H 0DH Error contents Unknown command. Invalid values specified. REMOTE KEY CODE Function: This command sends remote control key codes of projector. Specified...
NP115 : PC Control Connectors and Cables for all projectors and plasmas
Page 1
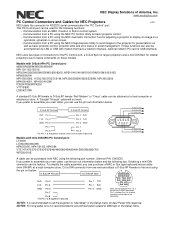
... NEC Image Express Utility to send images to "Idle Mode" in the Setup menu. NOTE1: It is recommended to set the projector to the projector for presentations as well as basic projector control, projector lamp and error status or asset management. (These functions can also be used for RS232C serial communication the "PC Control" port. www.necdisplay.com PC Control Connectors and Cables for NEC Projectors v4.0 NEC labels the connector for the following part number. (Service...
... NEC Image Express Utility to send images to "Idle Mode" in the Setup menu. NOTE1: It is recommended to set the projector to the projector for presentations as well as basic projector control, projector lamp and error status or asset management. (These functions can also be used for RS232C serial communication the "PC Control" port. www.necdisplay.com PC Control Connectors and Cables for NEC Projectors v4.0 NEC labels the connector for the following part number. (Service...

NP4100 : brochure
Page 1
... can be rotated freely (360°) in order to point up or down period if the power is removed by unplugging the power cord or when the power strip is switched off. Lamp temperature is preinstalled. Series Features and Benefits EXTENDED USE OPERATION COMPLETE LINE OF (5) BAYONET STYLE LENSES POWERED VERTICAL AND HORIZONTAL LENS SHIFT POWER ZOOM AND FOCUS DUAL/SINGLE LAMP OPERATION BUILT-IN LAN CONNECTION FOR CONTROL COMPREHENSIVE INPUT PANEL DUST...
... can be rotated freely (360°) in order to point up or down period if the power is removed by unplugging the power cord or when the power strip is switched off. Lamp temperature is preinstalled. Series Features and Benefits EXTENDED USE OPERATION COMPLETE LINE OF (5) BAYONET STYLE LENSES POWERED VERTICAL AND HORIZONTAL LENS SHIFT POWER ZOOM AND FOCUS DUAL/SINGLE LAMP OPERATION BUILT-IN LAN CONNECTION FOR CONTROL COMPREHENSIVE INPUT PANEL DUST...
NP4100 : brochure
Page 2
... year of InstaCare. IN THE BOX Remote control, batteries, power cord, 6-segment color wheel, user's manual on CD-ROM, quick start guide, product registration card, anti-theft screw for lens SIGNAL COMPATIBILITY/CONNECTIVITY Scan Rate Supported Video Standards SD/HD Video Signal Compatibility PC Signal Compatibility Macintosh Compatibility Input/Output Terminals RGB 1 (analog) RGB2 (analog) RGB3 (digital) Video 1 Video 2 Video 3 Audio Audio Out Monitor Out Audio External Control Sync Compatibility Networking Screen Trigger USB Horizontal 15 - 90 kHz / Vertical 50...
... year of InstaCare. IN THE BOX Remote control, batteries, power cord, 6-segment color wheel, user's manual on CD-ROM, quick start guide, product registration card, anti-theft screw for lens SIGNAL COMPATIBILITY/CONNECTIVITY Scan Rate Supported Video Standards SD/HD Video Signal Compatibility PC Signal Compatibility Macintosh Compatibility Input/Output Terminals RGB 1 (analog) RGB2 (analog) RGB3 (digital) Video 1 Video 2 Video 3 Audio Audio Out Monitor Out Audio External Control Sync Compatibility Networking Screen Trigger USB Horizontal 15 - 90 kHz / Vertical 50...
NP4100W : installation guide
Page 1
.... v 1.0 Contents Product Description, Lens Specs, Screen/Aspect Ratio Notes and Formulas Diagrams & Distance Charts; 16:10 16:9 4:3 Lens Shift Adjustable Range Tilt Capabilities Cabinet Dimensions Lens Dimensions Ceiling Mount Dimensions Input Panel and Control Codes Pg 1 Pg 2 Pg 3 ___ Pg 4 Pg 5 Pg 6 Pg 7 Pg 8 Pg 9 Pg 10 Product Description Type: 1 chip DLP Projector 0.65 DMD Resolution: 1280 x 800 (16:10) / 1066 x 800 (4:3) Powered: Lens Shift, Horizontal & Vertical /Zoom/ Focus Fan Noise: 38 dB...
.... v 1.0 Contents Product Description, Lens Specs, Screen/Aspect Ratio Notes and Formulas Diagrams & Distance Charts; 16:10 16:9 4:3 Lens Shift Adjustable Range Tilt Capabilities Cabinet Dimensions Lens Dimensions Ceiling Mount Dimensions Input Panel and Control Codes Pg 1 Pg 2 Pg 3 ___ Pg 4 Pg 5 Pg 6 Pg 7 Pg 8 Pg 9 Pg 10 Product Description Type: 1 chip DLP Projector 0.65 DMD Resolution: 1280 x 800 (16:10) / 1066 x 800 (4:3) Powered: Lens Shift, Horizontal & Vertical /Zoom/ Focus Fan Noise: 38 dB...
NP4100 : user's manual
Page 13
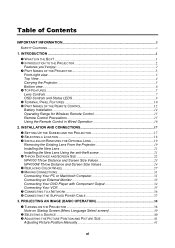
... A NETWORK ...36 CONNECTING THE SUPPLIED POWER CABLE 37 3. INTRODUCTION ...1 WHAT'S IN THE BOX? ...1 INTRODUCTION TO THE PROJECTOR 2 Features you'll enjoy:...2 PART NAMES OF THE PROJECTOR 3 Front-right view ...3 Top View...4 Carrying the Projector...5 Bottom view...6 TOP FEATURES...7 Lens Controls...7 OSD Controls and Status LEDS 8 TERMINAL PANEL FEATURES ...10 PART NAMES OF THE REMOTE CONTROL 12 Battery Installation...14 Operating Range for Wireless Remote Control 15 Remote Control Precautions ...15 Using the Remote Control in Wired Operation 16 2. PROJECTING AN IMAGE (BASIC OPERATION...
... A NETWORK ...36 CONNECTING THE SUPPLIED POWER CABLE 37 3. INTRODUCTION ...1 WHAT'S IN THE BOX? ...1 INTRODUCTION TO THE PROJECTOR 2 Features you'll enjoy:...2 PART NAMES OF THE PROJECTOR 3 Front-right view ...3 Top View...4 Carrying the Projector...5 Bottom view...6 TOP FEATURES...7 Lens Controls...7 OSD Controls and Status LEDS 8 TERMINAL PANEL FEATURES ...10 PART NAMES OF THE REMOTE CONTROL 12 Battery Installation...14 Operating Range for Wireless Remote Control 15 Remote Control Precautions ...15 Using the Remote Control in Wired Operation 16 2. PROJECTING AN IMAGE (BASIC OPERATION...

NP4100 : user's manual
Page 15
... INPUT SIGNAL LIST 129 PC CONTROL CODES AND CABLE CONNECTIONS 131 SCREEN TRIGGER ...133 OPERATION USING HTTP BROWSER 134 Overview ...134 Preparation Before Use...134 Handling of the Address for Troubleshooting...119 IMAGE PROBLEMS ...120 Lamp Problems...121 Remote Control Problems...121 Audio Problems ...122 HAVING THE PROJECTOR SERVICED 123 8. Table of the HTTP Server 137 15 PIN GPIO CONTROL ...139 9. MAINTENANCE...107 CLEANING THE PROJECTOR ...107 Cleaning the Cabinet ...107 Cleaning the Lens ...107 Cleaning the Filters ...108 REPLACING CONSUMABLE PARTS 110 Replacing...
... INPUT SIGNAL LIST 129 PC CONTROL CODES AND CABLE CONNECTIONS 131 SCREEN TRIGGER ...133 OPERATION USING HTTP BROWSER 134 Overview ...134 Preparation Before Use...134 Handling of the Address for Troubleshooting...119 IMAGE PROBLEMS ...120 Lamp Problems...121 Remote Control Problems...121 Audio Problems ...122 HAVING THE PROJECTOR SERVICED 123 8. Table of the HTTP Server 137 15 PIN GPIO CONTROL ...139 9. MAINTENANCE...107 CLEANING THE PROJECTOR ...107 Cleaning the Cabinet ...107 Cleaning the Lens ...107 Cleaning the Filters ...108 REPLACING CONSUMABLE PARTS 110 Replacing...

NP4100 : user's manual
Page 17
... display an image. Also, the power cable can be sure to the Projector Features you'll enjoy: DLP projector with high resolution Native WXGA support (NP4100W only) A WXGA (1280 x 800) resolution provides wide screen display with redundancy. Introduction Introduction to allow at least 20 minutes immediately after turning off center screen installations. Powered zoom and focus provide quick and easy adjustment. Note: Before using a power strip equipped with bayonet mount Five types of system control interfaces This projector supports input signals...
... display an image. Also, the power cable can be sure to the Projector Features you'll enjoy: DLP projector with high resolution Native WXGA support (NP4100W only) A WXGA (1280 x 800) resolution provides wide screen display with redundancy. Introduction Introduction to allow at least 20 minutes immediately after turning off center screen installations. Powered zoom and focus provide quick and easy adjustment. Note: Before using a power strip equipped with bayonet mount Five types of system control interfaces This projector supports input signals...
NP4100 : user's manual
Page 18
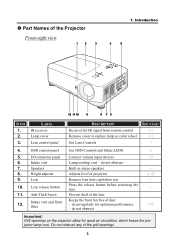
... Projector Front-right view 1. clean regularly for IR signal from remote control Remove cover to replace lamp or color wheel See Lens Controls SEE PAGE: 12 112 7 4. I/O connector panel Connect various input devices 6. Speakers Built-in stereo speakers 8. Anti-Theft Screw Prevent theft of dust - do not obstruct 7. OSD control panel See OSD Controls and Status LEDS 5. do not obstruct 8 10 - - 6, 45 - - - 108 Important: Grill openings on the projector allow for good air circulation, which keeps the projector lamp...
... Projector Front-right view 1. clean regularly for IR signal from remote control Remove cover to replace lamp or color wheel See Lens Controls SEE PAGE: 12 112 7 4. I/O connector panel Connect various input devices 6. Speakers Built-in stereo speakers 8. Anti-Theft Screw Prevent theft of dust - do not obstruct 7. OSD control panel See OSD Controls and Status LEDS 5. do not obstruct 8 10 - - 6, 45 - - - 108 Important: Grill openings on the projector allow for good air circulation, which keeps the projector lamp...

NP4100 : user's manual
Page 26
... (R/Cr, G/Y, B/Cb, H, V) 18. Connect a composite video cable (not sup- Introduction DESCRIPTION SEE PAGE: When connected to the remote control. 11 Connect a LAN cable (not supplied) from a computer 103 Connect the USB cable (not supplied) from a computer. S-VIDEO 12. Screen controllers are supplied and supported by screen manufacturers. The screen retracts when the pro- ploys automatically on /off the projector 38, 48 Connect the supplied power cable 37 Connect RCA audio cables (not supplied) from the input device - ITEM LABEL 10. POWER SWITCH 13.
... (R/Cr, G/Y, B/Cb, H, V) 18. Connect a composite video cable (not sup- Introduction DESCRIPTION SEE PAGE: When connected to the remote control. 11 Connect a LAN cable (not supplied) from a computer 103 Connect the USB cable (not supplied) from a computer. S-VIDEO 12. Screen controllers are supplied and supported by screen manufacturers. The screen retracts when the pro- ploys automatically on /off the projector 38, 48 Connect the supplied power cable 37 Connect RCA audio cables (not supplied) from the input device - ITEM LABEL 10. POWER SWITCH 13.
NP4100 : user's manual
Page 53
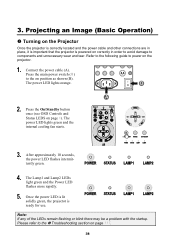
... the Troubleshooting section on correctly in place, it is important that the projector is ready for use. The power LED lights orange. Projecting an Image (Basic Operation) Turning on the Projector Once the projector is correctly located and the power cable and other connections are in order to avoid damage to the on the projector. 1. Press the On/Standby button once (see OSD Controls and 3 Status LEDS on page 8). The Lamp1 and Lamp2 LEDs light green...
... the Troubleshooting section on correctly in place, it is important that the projector is ready for use. The power LED lights orange. Projecting an Image (Basic Operation) Turning on the Projector Once the projector is correctly located and the power cable and other connections are in order to avoid damage to the on the projector. 1. Press the On/Standby button once (see OSD Controls and 3 Status LEDS on page 8). The Lamp1 and Lamp2 LEDs light green...

NP4100 : user's manual
Page 63
... the power cable. The projector enters Standby mode and the power LED lights orange. 4. The OSD displays the message shown on . Press the On/Standby button once. The cooling fans stop operating when the projector turns off the projector. 48 Press the Main Power switch to the off position (O) to verify power off the AC power supply within 10 seconds of adjustments and settings and return to the projector. Press the On/Standby button again or Enter on , use a power...
... the power cable. The projector enters Standby mode and the power LED lights orange. 4. The OSD displays the message shown on . Press the On/Standby button once. The cooling fans stop operating when the projector turns off the projector. 48 Press the Main Power switch to the off position (O) to verify power off the AC power supply within 10 seconds of adjustments and settings and return to the projector. Press the On/Standby button again or Enter on , use a power...

NP4100 : user's manual
Page 80
...-N/PAL60/SECAM S-Video WXGA Mode Source Display Auto/NTSC3.58/NTSC4.43/PAL/PAL-M/PAL-N/PAL60/SECAM NP4100: Off/On NP4100W: Off/ On Off/ On Control ID 1-254 Filter Message Lamp 1 Life Remaining, Lamp 2 Life Remaining Lamp 1 Hours Used, Lamp 2 Hours Used Off/100[H]/200[H]/500[H]/1000[H] Filter Hours Used Input Terminal Source Name Horizontal Frequency Vertical Frequency Video Type Sync Type Sync Polarity Scan Type IP Address, Subnet Mask, Gateway, MAC Address Product, Serial Number, Firmware, Data Current Signal, All Data, Clear Lamp 1 Hours, Clear Lamp 2 Hours, Clear Filter Hours 65
...-N/PAL60/SECAM S-Video WXGA Mode Source Display Auto/NTSC3.58/NTSC4.43/PAL/PAL-M/PAL-N/PAL60/SECAM NP4100: Off/On NP4100W: Off/ On Off/ On Control ID 1-254 Filter Message Lamp 1 Life Remaining, Lamp 2 Life Remaining Lamp 1 Hours Used, Lamp 2 Hours Used Off/100[H]/200[H]/500[H]/1000[H] Filter Hours Used Input Terminal Source Name Horizontal Frequency Vertical Frequency Video Type Sync Type Sync Polarity Scan Type IP Address, Subnet Mask, Gateway, MAC Address Product, Serial Number, Firmware, Data Current Signal, All Data, Clear Lamp 1 Hours, Clear Lamp 2 Hours, Clear Filter Hours 65

NP4100 : user's manual
Page 83
...-Screen Display Adjust Menu Descriptions and Functions The Adjust menu contains overall projector settings for Picture will change depending on page 76. The following table lists all functions with a description and the default setting. Adjust the Contrast value using ◄or► to sharpen or blur the borders between light and dark areas of preset values using ◄or► to increase or decrease color input to alter picture settings...
...-Screen Display Adjust Menu Descriptions and Functions The Adjust menu contains overall projector settings for Picture will change depending on page 76. The following table lists all functions with a description and the default setting. Adjust the Contrast value using ◄or► to sharpen or blur the borders between light and dark areas of preset values using ◄or► to increase or decrease color input to alter picture settings...

NP4100 : user's manual
Page 110
... POWER button (or put in the standby mode) and the power cable is disconnected, Auto Power On (AC) will be displayed on to use the POWER (ON/STANDBY) button on . Note: When the projector is off the power (AC) to be activated after power (AC) is applied. 5. Range: On or Off (see page 99). Using On-Screen Display ITEM DESCRIPTION Select the default Color System to have the projector display a message when the air Filter Message filter needs servicing. Set...
... POWER button (or put in the standby mode) and the power cable is disconnected, Auto Power On (AC) will be displayed on to use the POWER (ON/STANDBY) button on . Note: When the projector is off the power (AC) to be activated after power (AC) is applied. 5. Range: On or Off (see page 99). Using On-Screen Display ITEM DESCRIPTION Select the default Color System to have the projector display a message when the air Filter Message filter needs servicing. Set...
NP4100 : user's manual
Page 132
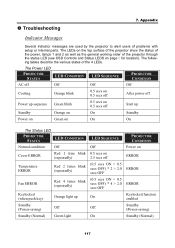
... LED CONDITION Normal condition Off Cover ERROR Red 1 time blink (repeatedly) Temperature ERROR Red 2 times blink (repeatedly) Fan ERROR Keylocked (when push key) Standby (Power-saving) Standby (Normal) Red 4 times blink (repeatedly) Orange light up Off Green light LED SEQUENCE Off 0.5 secs on 2.5 secs off (0.5 secs ON > 0.5 secs OFF) * 2 > 2.0 secs OFF (0.5 secs ON > 0.5 secs OFF) * 4 > 2.0 secs OFF On Off On PROJECTOR CONDITION Power on page 8 for location). Troubleshooting 7. Appendix Indicator Messages Several indicator messages are used by the projector to alert users...
... LED CONDITION Normal condition Off Cover ERROR Red 1 time blink (repeatedly) Temperature ERROR Red 2 times blink (repeatedly) Fan ERROR Keylocked (when push key) Standby (Power-saving) Standby (Normal) Red 4 times blink (repeatedly) Orange light up Off Green light LED SEQUENCE Off 0.5 secs on 2.5 secs off (0.5 secs ON > 0.5 secs OFF) * 2 > 2.0 secs OFF (0.5 secs ON > 0.5 secs OFF) * 4 > 2.0 secs OFF On Off On PROJECTOR CONDITION Power on page 8 for location). Troubleshooting 7. Appendix Indicator Messages Several indicator messages are used by the projector to alert users...
NP4100 : user's manual
Page 135
... the Auto Adjust button on the projector. 2. Ensure the projector-to correct the problem. Turn off all equipment and power up again in the correct order. Adjust the Focus on the remote control or projector. 3. To check if the signal is recognized, go to "Source" under "Information" menu. (see page 99) When "WXGA Mode" is set to On, an XGA (1024 x 768) signal may not be recognized on NP4100W. Use the Keystone button on the Adjust menu of...
... the Auto Adjust button on the projector. 2. Ensure the projector-to correct the problem. Turn off all equipment and power up again in the correct order. Adjust the Focus on the remote control or projector. 3. To check if the signal is recognized, go to "Source" under "Information" menu. (see page 99) When "WXGA Mode" is set to On, an XGA (1024 x 768) signal may not be recognized on NP4100W. Use the Keystone button on the Adjust menu of...

NP4100 : user's manual
Page 155
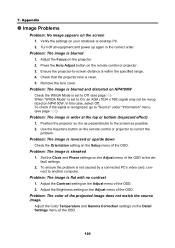
... audio input of the image are supported by the projector. Image appears blurry or out of Occurrence always sometimes (How often?________) other (________) Power No power (POWER indicator does not light green) See also "Status Indicator (STATUS)". AUDIO OUT is correctly connected to the Troubleshooting section on a computer signal. No image (blue background, logo, no image even though you carry out [Reset] in the projector's menu. Still no display). Still unchanged even though you adjusted the focus. Input source's resolution...
... audio input of the image are supported by the projector. Image appears blurry or out of Occurrence always sometimes (How often?________) other (________) Power No power (POWER indicator does not light green) See also "Status Indicator (STATUS)". AUDIO OUT is correctly connected to the Troubleshooting section on a computer signal. No image (blue background, logo, no image even though you carry out [Reset] in the projector's menu. Still no display). Still unchanged even though you adjusted the focus. Input source's resolution...

NP4100 : user's manual
Page 156
...Buttons on Green of connected equipment STATUS Indicator: Steady light Orange Green Flashing light [ ] cycles Remote control model number: 141 In the space below please describe your projector is not used Projector Installation environment Model number: Screen size: inch Serial No: Screen type: White matte Beads Polarization Date of purchase: Wide angle High contrast Lamp operating time (hours): Lamp Mode: Normal Eco Throw distance: feet/inch/m Information on input signal: Orientation: Ceiling mount Desktop Horizontal synch frequency [ ] kHz Power outlet connection...
...Buttons on Green of connected equipment STATUS Indicator: Steady light Orange Green Flashing light [ ] cycles Remote control model number: 141 In the space below please describe your projector is not used Projector Installation environment Model number: Screen size: inch Serial No: Screen type: White matte Beads Polarization Date of purchase: Wide angle High contrast Lamp operating time (hours): Lamp Mode: Normal Eco Throw distance: feet/inch/m Information on input signal: Orientation: Ceiling mount Desktop Horizontal synch frequency [ ] kHz Power outlet connection...


