
Users Manual
Page 6
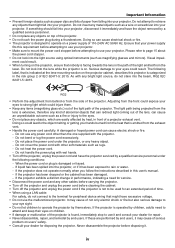
... power supply fits this user's manual. - Serious damage to your dealer for service. • Disconnect the power cord and any bright light source, do not connect to the terminal for disposing the projector. Do not use the malfunctioned projector. Visual impair- The following conditions: - The light path being projected from the lens is damaged or frayed. - Do not cover the power cord with any other cables before carrying the projector. • Turn...
... power supply fits this user's manual. - Serious damage to your dealer for service. • Disconnect the power cord and any bright light source, do not connect to the terminal for disposing the projector. Do not use the malfunctioned projector. Visual impair- The following conditions: - The light path being projected from the lens is damaged or frayed. - Do not cover the power cord with any other cables before carrying the projector. • Turn...

Users Manual
Page 15
... the ASCII Control Command 157 ❽ Changing the Background Logo (Virtual Remote Tool 159 ❾ Troubleshooting...160 ❿ PC Control Codes and Cable Connection 167 ⓫ Troubleshooting Check List 168 xiii Appendix...143 ❶ Throw distance and screen size 143 ❷ Mounting the Optional Board (sold separately 133 ❷ Connecting to Other Equipment 135 ❸ Portrait projection (vertical orientation 137 ❹ Stacking projectors...139 7. Using On-Screen Menu 71 ❶ Using the...
... the ASCII Control Command 157 ❽ Changing the Background Logo (Virtual Remote Tool 159 ❾ Troubleshooting...160 ❿ PC Control Codes and Cable Connection 167 ⓫ Troubleshooting Check List 168 xiii Appendix...143 ❶ Throw distance and screen size 143 ❷ Mounting the Optional Board (sold separately 133 ❷ Connecting to Other Equipment 135 ❸ Portrait projection (vertical orientation 137 ❹ Stacking projectors...139 7. Using On-Screen Menu 71 ❶ Using the...

Users Manual
Page 18
...-chip DLP projector with high resolution and high brightness Realized to project the image in the resolution 3840 × 2160 pixels (4K UHD), the aspect ratio in 16:9, and the brightness in the portrait installation. • Double stackable for high light output projection By stacking 2 projectors, increased brightness on a large screen is possible. • Power lens control for quick and easy adjustment By using buttons on the projector or the remote control, zoom, focus, and position (lens...
...-chip DLP projector with high resolution and high brightness Realized to project the image in the resolution 3840 × 2160 pixels (4K UHD), the aspect ratio in 16:9, and the brightness in the portrait installation. • Double stackable for high light output projection By stacking 2 projectors, increased brightness on a large screen is possible. • Power lens control for quick and easy adjustment By using buttons on the projector or the remote control, zoom, focus, and position (lens...

Users Manual
Page 27
... the remote control and the sensor, or if strong light falls on the remote control. REMOTE Remote Jack NOTE: • When a remote cable is used in Wired Operation Connect one end of the remote sensor on the projector cabinet. • The projector will also prevent the remote control from properly operating the projector. Operating Range for infrared wireless communication. • Power will not be supplied to the remote control by line-of-sight up to a distance...
... the remote control and the sensor, or if strong light falls on the remote control. REMOTE Remote Jack NOTE: • When a remote cable is used in Wired Operation Connect one end of the remote sensor on the projector cabinet. • The projector will also prevent the remote control from properly operating the projector. Operating Range for infrared wireless communication. • Power will not be supplied to the remote control by line-of-sight up to a distance...

Users Manual
Page 32
... adjustable zoom, shift, and focus range. While performing Lens Calibration, the STATUS indicator flashes in green twice per cycle. • The following lenses need calibration: NP16FL-4K, NP17ZL-4K, NP18ZL-4K, NP19ZL-4K, NP20ZL-4K, NP21ZL-4K, NP31ZL-4K 17 When turning on the projector cabinet for the lens. The POWER indicator goes from a steady green light to perform [LENS CALIBRATION] by factory default menu settings). button on the remote control. Press the (POWER) button...
... adjustable zoom, shift, and focus range. While performing Lens Calibration, the STATUS indicator flashes in green twice per cycle. • The following lenses need calibration: NP16FL-4K, NP17ZL-4K, NP18ZL-4K, NP19ZL-4K, NP20ZL-4K, NP21ZL-4K, NP31ZL-4K 17 When turning on the projector cabinet for the lens. The POWER indicator goes from a steady green light to perform [LENS CALIBRATION] by factory default menu settings). button on the remote control. Press the (POWER) button...

Users Manual
Page 57
... formula shown below is used , there will not apply to the power consumption which is set to now. Amount of CO2 emission reduction = (Power consumption in the [POWER OFF/ ARE YOU SURE ?] message at the time of CO2 emission reduction. LIGHT MODE] is turned on savings recorded in 15 minutes intervals. • This formula will be displayed in [NORMAL] [REF. The...
... formula shown below is used , there will not apply to the power consumption which is set to now. Amount of CO2 emission reduction = (Power consumption in the [POWER OFF/ ARE YOU SURE ?] message at the time of CO2 emission reduction. LIGHT MODE] is turned on savings recorded in 15 minutes intervals. • This formula will be displayed in [NORMAL] [REF. The...

Users Manual
Page 88
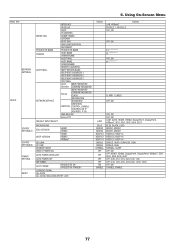
...PICTURE DETAIL SETTINGS ADJUST IMAGE OPTIONS VIDEO LENS MEMORY CONTRAST BRIGHTNESS SHARPNESS COLOR HUE RESET HORIZONTAL VERTICAL BLANKING OVERSCAN ASPECT RATIO DEINTERLACE CONTRAST ENHANCEMENT SIGNAL TYPE VIDEO LEVEL HDR MODE*4 STORE MOVE RESET Default Options GENERAL REFERENCE GAMMA SELECT CORRECTION*1 REFERENCE SCREEN SIZE*2 COLOR TEMPERATURE*3 DYNAMIC CONTRAST LIGHT MODE LIGHT ADJUST CONSTANT BRIGHTNESS Brilliant Color WHITE BALANCE CONTRAST R CONTRAST G CONTRAST B BRIGHTNESS R BRIGHTNESS G BRIGHTNESS B COLOR CORRECTION RED GREEN BLUE YELLOW MAGENTA CYAN MODE...
...PICTURE DETAIL SETTINGS ADJUST IMAGE OPTIONS VIDEO LENS MEMORY CONTRAST BRIGHTNESS SHARPNESS COLOR HUE RESET HORIZONTAL VERTICAL BLANKING OVERSCAN ASPECT RATIO DEINTERLACE CONTRAST ENHANCEMENT SIGNAL TYPE VIDEO LEVEL HDR MODE*4 STORE MOVE RESET Default Options GENERAL REFERENCE GAMMA SELECT CORRECTION*1 REFERENCE SCREEN SIZE*2 COLOR TEMPERATURE*3 DYNAMIC CONTRAST LIGHT MODE LIGHT ADJUST CONSTANT BRIGHTNESS Brilliant Color WHITE BALANCE CONTRAST R CONTRAST G CONTRAST B BRIGHTNESS R BRIGHTNESS G BRIGHTNESS B COLOR CORRECTION RED GREEN BLUE YELLOW MAGENTA CYAN MODE...
Users Manual
Page 92
5. Using On-Screen Menu Menu Item NETWORK SETTINGS SETUP SOURCE OPTIONS(1) SOURCE OPTIONS(2) POWER OPTIONS RESET WIRED LAN PROJECTOR NAME DOMAIN ALERT MAIL NETWORK SERVICE INTERFACE PROFILES DHCP IP ADDRESS SUBNET MASK GATEWAY AUTO DNS DNS CONFIGURATION RECONNECT PROJECTOR NAME HOST NAME DOMAIN NAME ALERT MAIL HOST NAME DOMAIN NAME SENDER'S ADDRESS SMTP SERVER NAME RECIPIENT'S ADDRESS 1 RECIPIENT'S ADDRESS 2 RECIPIENT'S ADDRESS 3 TEST MAIL HTTP NEW PASSWORD SERVER CONFIRM PASSWORD NEW PASSWORD PJLink CONFIRM PASSWORD CLASS DESTINATION ROOMVIEW CRESTRON ...
5. Using On-Screen Menu Menu Item NETWORK SETTINGS SETUP SOURCE OPTIONS(1) SOURCE OPTIONS(2) POWER OPTIONS RESET WIRED LAN PROJECTOR NAME DOMAIN ALERT MAIL NETWORK SERVICE INTERFACE PROFILES DHCP IP ADDRESS SUBNET MASK GATEWAY AUTO DNS DNS CONFIGURATION RECONNECT PROJECTOR NAME HOST NAME DOMAIN NAME ALERT MAIL HOST NAME DOMAIN NAME SENDER'S ADDRESS SMTP SERVER NAME RECIPIENT'S ADDRESS 1 RECIPIENT'S ADDRESS 2 RECIPIENT'S ADDRESS 3 TEST MAIL HTTP NEW PASSWORD SERVER CONFIRM PASSWORD NEW PASSWORD PJLink CONFIRM PASSWORD CLASS DESTINATION ROOMVIEW CRESTRON ...

Users Manual
Page 96
...)] is executed. Press the ◀ or ▶ button to 18 alphanumeric characters can be saved. Set so that the selected signal cannot be used. The EDIT window will be skipped during auto search. 3. 5. Up to select [ (STORE)] and press the ENTER button. NOTE: • The input terminal cannot be displayed. Using On-Screen Menu Entering the currently projected signal into the Entry List [ (STORE)] 1.
...)] is executed. Press the ◀ or ▶ button to 18 alphanumeric characters can be saved. Set so that the selected signal cannot be used. The EDIT window will be skipped during auto search. 3. 5. Up to select [ (STORE)] and press the ENTER button. NOTE: • The input terminal cannot be displayed. Using On-Screen Menu Entering the currently projected signal into the Entry List [ (STORE)] 1.

Users Manual
Page 141
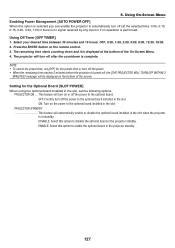
[POWER OPTIONS] 5. Enabling Direct Power On [DIRECT POWER ON] Turns the projector on automatically when the power cable is always connected to the HDBaseT port for use the POWER button on the projector setting and the state of the connected device. (→ page 163) SLEEP Maintain the state of NORMAL. OFF AUTO POWER ON SELECT function becomes inactive. Using On-Screen Menu [STANDBY MODE] Select the standby setting after powering OFF the projector, interrupt signal from input terminals or...
[POWER OPTIONS] 5. Enabling Direct Power On [DIRECT POWER ON] Turns the projector on automatically when the power cable is always connected to the HDBaseT port for use the POWER button on the projector setting and the state of the connected device. (→ page 163) SLEEP Maintain the state of NORMAL. OFF AUTO POWER ON SELECT function becomes inactive. Using On-Screen Menu [STANDBY MODE] Select the standby setting after powering OFF the projector, interrupt signal from input terminals or...
Users Manual
Page 142
... input or if no operation is in the projector standby. 127 PROJECTOR STANDBY This feature will be displayed on the remote control. 3. PROJECTOR ON This feature will turn on the power to the optional board. ENABLE: Select this option to automatically turn off the power. • When the remaining time reaches 3 minutes before the projector is turned off (at the bottom of the screen. Setting for the preset time or turn...
... input or if no operation is in the projector standby. 127 PROJECTOR STANDBY This feature will be displayed on the remote control. 3. PROJECTOR ON This feature will turn on the power to the optional board. ENABLE: Select this option to automatically turn off the power. • When the remaining time reaches 3 minutes before the projector is turned off (at the bottom of the screen. Setting for the preset time or turn...

Users Manual
Page 149
..., turn the lens counterclockwise. After slowly pulling the lens off . 4. While pressing the LENS release button on the projector and display an image. (→ page 16) 2. The lens is cool enough to the home position. 3. Removing the lens Before removing the lens: 1. The lens position will be removed when the LENS release button is pressed, check whether the lens theft prevention screw is heard. Turn off the main power switch, and then unplug the power cord...
..., turn the lens counterclockwise. After slowly pulling the lens off . 4. While pressing the LENS release button on the projector and display an image. (→ page 16) 2. The lens is cool enough to the home position. 3. Removing the lens Before removing the lens: 1. The lens position will be removed when the LENS release button is pressed, check whether the lens theft prevention screw is heard. Turn off the main power switch, and then unplug the power cord...
Users Manual
Page 154
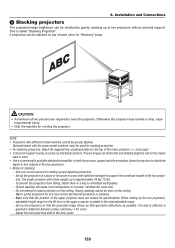
... for setting up to the top of each other for "Stacking" setup. Precise images as possible. Gravity stacking cannot be doubled by gravity stacking up and adjusting projectors. - CAUTION: • A minimum of the two projectors. • Notes for stacking projection. • For stacking projectors, attach the supplied four stacking holders to two projectors without external support. The single projector with different model numbers cannot...
... for setting up to the top of each other for "Stacking" setup. Precise images as possible. Gravity stacking cannot be doubled by gravity stacking up and adjusting projectors. - CAUTION: • A minimum of the two projectors. • Notes for stacking projection. • For stacking projectors, attach the supplied four stacking holders to two projectors without external support. The single projector with different model numbers cannot...

Users Manual
Page 172
...TX, Auto-Negotiation) Use the TCP port number 7142 for transmitting and receiving command. 157 CONNECTION INTERFACE 1. Connection thru the serial port. Connects the projector to a computer by a serial cable (straight cable). 2. Connection via network Communication Protocol (Connection via network (LAN/HDBaseT) Connects the projector to a computer by a LAN cable. Connection thru the serial port. Please visit our web site for controlling our projector and monitor. 8. Appendix ❼ About the ASCII Control Command This device supports the common ASCII Control Command...
...TX, Auto-Negotiation) Use the TCP port number 7142 for transmitting and receiving command. 157 CONNECTION INTERFACE 1. Connection thru the serial port. Connects the projector to a computer by a serial cable (straight cable). 2. Connection via network Communication Protocol (Connection via network (LAN/HDBaseT) Connects the projector to a computer by a LAN cable. Connection thru the serial port. Please visit our web site for controlling our projector and monitor. 8. Appendix ❼ About the ASCII Control Command This device supports the common ASCII Control Command...
Users Manual
Page 175
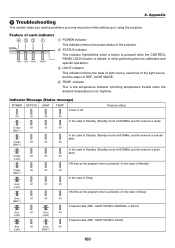
... Off (Light) ON time as the program timer is utilized, or while performing the lens calibration and specific operations. ③ LIGHT indicator This indicator informs the state of light source, used time of the light source, and the status of Sleep) Green Off Off Off (Blink*3) Powered state (REF. LIGHT MODE is too high/low. Feature of each indicator ① POWER indicator This indicator informs the power status of the projector. ② STATUS indicator This indicator lights/blinks when a button is pressed while the CONTROL PANEL LOCK function...
... Off (Light) ON time as the program timer is utilized, or while performing the lens calibration and specific operations. ③ LIGHT indicator This indicator informs the state of light source, used time of the light source, and the status of Sleep) Green Off Off Off (Blink*3) Powered state (REF. LIGHT MODE is too high/low. Feature of each indicator ① POWER indicator This indicator informs the power status of the projector. ② STATUS indicator This indicator lights/blinks when a button is pressed while the CONTROL PANEL LOCK function...
Users Manual
Page 177
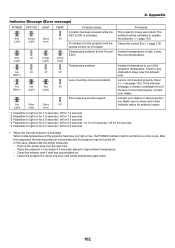
ID numbers for 0.5 seconds / off . Temperature problem (In the Forced ECO) Temperature problem Off Lens mounting error/Lens problem Off Error requiring service support Off Procedure The projector's keys are locked. The setting must be turned off for about one hour until inside temperature of the operation temperature. Lens is out of the projector becomes too high or low, the POWER indicator start to operate the projector. (→ page 115) Check the control IDs (→ page 116) Ambient temteprature is high. 8. Check if any...
ID numbers for 0.5 seconds / off . Temperature problem (In the Forced ECO) Temperature problem Off Lens mounting error/Lens problem Off Error requiring service support Off Procedure The projector's keys are locked. The setting must be turned off for about one hour until inside temperature of the operation temperature. Lens is out of the projector becomes too high or low, the POWER indicator start to operate the projector. (→ page 115) Check the control IDs (→ page 116) Ambient temteprature is high. 8. Check if any...
Users Manual
Page 180
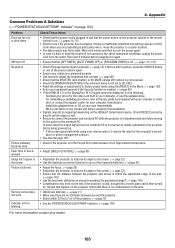
...; Use menus to light. Remote control does not work Indicator is lit or blinking • Install new batteries. (→ page 11) • Make sure there are not pressed. • Check the [POWER ON SHUTTER] in the onscreen menu is not set to [CLOSE]. • Reset the settings or adjustments to the screen. (→ page 22) • Ensure that the [OFF TIMER], [AUTO POWER OFF] or [PROGRAM TIMER] is off No picture Picture suddenly...
...; Use menus to light. Remote control does not work Indicator is lit or blinking • Install new batteries. (→ page 11) • Make sure there are not pressed. • Check the [POWER ON SHUTTER] in the onscreen menu is not set to [CLOSE]. • Reset the settings or adjustments to the screen. (→ page 22) • Ensure that the [OFF TIMER], [AUTO POWER OFF] or [PROGRAM TIMER] is off No picture Picture suddenly...
Users Manual
Page 181
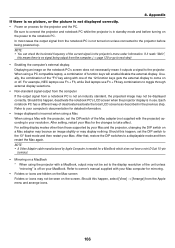
... process for the changes to owner's manual supplied with a MacBook, output may display nothing. NOTE: • A Video Adapter cable manufactured by your Mac and the projector, changing the DIP switch on a Mac adapter may bounce an image slightly or may not be seen on unless connected to toggle through external display selections. • Non-standard signal output from the computer If the output signal from the Apple menu and arrange icons...
... process for the changes to owner's manual supplied with a MacBook, output may display nothing. NOTE: • A Video Adapter cable manufactured by your Mac and the projector, changing the DIP switch on a Mac adapter may bounce an image slightly or may not be seen on unless connected to toggle through external display selections. • Non-standard signal output from the computer If the output signal from the Apple menu and arrange icons...
Users Manual
Page 183
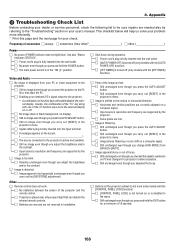
... are correctly adjusted on a computer signal. □ Input source's resolution and frequency are supported by the projector. □ Some pixels are needed also by referring to the projector is not turned on the screen. Video and Audio □ No image is displayed from [HIGH] to projector's native resolution. □ Still unchanged even though you carry out the [KEYSTONE] adjustment). Appendix ⓫ Troubleshooting Check List Before contacting your user's manual. The source connected to the "Troubleshooting" section...
... are correctly adjusted on a computer signal. □ Input source's resolution and frequency are supported by the projector. □ Some pixels are needed also by referring to the projector is not turned on the screen. Video and Audio □ No image is displayed from [HIGH] to projector's native resolution. □ Still unchanged even though you carry out the [KEYSTONE] adjustment). Appendix ⓫ Troubleshooting Check List Before contacting your user's manual. The source connected to the "Troubleshooting" section...

Installation Guide
Page 1
... 25.4. Distances may vary ±5%. PX1005QL Installation Guide Desktop and Ceiling Mount NEC Display Solutions of 12 If the figures on the projection tables, use the figures in . Rev 1.6 Contents Product Description, Lens Specs, Screen/Aspect Ratio Notes Distance Charts and Formulas Ceiling Mount/Desktop Installation Lens Shift Adjustable Range Cabinet Dimensions Cabinet Dimensions Optional Lens Dimensions Ventilation Requirements/Portrait Requirements Regulatory Labels Input Panel and Button Panel Control Codes Product Description Type: 1 chip DMD Reflection Type...
... 25.4. Distances may vary ±5%. PX1005QL Installation Guide Desktop and Ceiling Mount NEC Display Solutions of 12 If the figures on the projection tables, use the figures in . Rev 1.6 Contents Product Description, Lens Specs, Screen/Aspect Ratio Notes Distance Charts and Formulas Ceiling Mount/Desktop Installation Lens Shift Adjustable Range Cabinet Dimensions Cabinet Dimensions Optional Lens Dimensions Ventilation Requirements/Portrait Requirements Regulatory Labels Input Panel and Button Panel Control Codes Product Description Type: 1 chip DMD Reflection Type...

