User Manual
Page 2
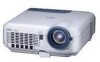
... on a ceiling*1.The remote control can use the projector to project images from your dealer for both horizontally and vertically so that the image is square even when projector is positioned off center of the very best projectors available today. The NEC optional wireless LAN card ...wirelessly. *1 Do not attempt to mount the projector on Your Purchase of The LT260/LT240/ LT220 Projector The LT260/LT240/LT220 is one of the rooms screen. • The LT260/LT240/LT220 projector provides wired and wireless networking. The projector must be installed by qualified technicians in accordance...
... on a ceiling*1.The remote control can use the projector to project images from your dealer for both horizontally and vertically so that the image is square even when projector is positioned off center of the very best projectors available today. The NEC optional wireless LAN card ...wirelessly. *1 Do not attempt to mount the projector on Your Purchase of The LT260/LT240/ LT220 Projector The LT260/LT240/LT220 is one of the rooms screen. • The LT260/LT240/LT220 projector provides wired and wireless networking. The projector must be installed by qualified technicians in accordance...
User Manual
Page 3
...8235;ן1200) and SXGA image (1280ן1024) are displayed with NEC's Advanced AccuBlend on LT260/LT240/LT220. E-3 Password prevents unauthorized individuals from changing projector settings or adjustments Security offers complete protection by using your PC card as a protect key so... technology - An XGA image (1024ן768) is not available at the site. • A high-bright 220 watt DC lamp. • The Standby mode reduces standby power consumption significantly. • The supplied wireless remote control that the projector will not project...
...8235;ן1200) and SXGA image (1280ן1024) are displayed with NEC's Advanced AccuBlend on LT260/LT240/LT220. E-3 Password prevents unauthorized individuals from changing projector settings or adjustments Security offers complete protection by using your PC card as a protect key so... technology - An XGA image (1024ן768) is not available at the site. • A high-bright 220 watt DC lamp. • The Standby mode reduces standby power consumption significantly. • The supplied wireless remote control that the projector will not project...

User Manual
Page 5
... to operate your PC's mouse wirelessly from across the room with the built-in remote mouse function. • You can control the projector with a PC using the PC Control port. • USB port allows USB mouse operation*4. *4 The USB ports meet the USB1.1 specification. • The contemporary cabinet ...
... to operate your PC's mouse wirelessly from across the room with the built-in remote mouse function. • You can control the projector with a PC using the PC Control port. • USB port allows USB mouse operation*4. *4 The USB ports meet the USB1.1 specification. • The contemporary cabinet ...

User Manual
Page 6
Attaching the lens cap To attach the lens cap to the bottom of the projector. The logo is a registered trademark of Kensington Microware Inc. Use the rivet to attach the string to the bottom with the supplied string and rivet: ...slot supports the MicroSaver® Security System. E-6 MicroSaver® is trademarked and owned by Kensington Microware Inc. INTRODUCTION Ͼ Part Names of the Projector Part Names of the Projector Remote Sensor (See page E-20) Focus Ring (See page E-44) Controls (See page E-8) ON STAND BY PO SWTEALRTAUMSP ALIGNMENT AUTO ADJUST PC-CARD TER...
Attaching the lens cap To attach the lens cap to the bottom of the projector. The logo is a registered trademark of Kensington Microware Inc. Use the rivet to attach the string to the bottom with the supplied string and rivet: ...slot supports the MicroSaver® Security System. E-6 MicroSaver® is trademarked and owned by Kensington Microware Inc. INTRODUCTION Ͼ Part Names of the Projector Part Names of the Projector Remote Sensor (See page E-20) Focus Ring (See page E-44) Controls (See page E-8) ON STAND BY PO SWTEALRTAUMSP ALIGNMENT AUTO ADJUST PC-CARD TER...

User Manual
Page 7
INTRODUCTION Ͼ Part Names of the Projector PC Card Slot Remote Sensor (See page E-20) PC Card Eject Button Monaural Speaker (2W) Lamp cover (See page E-118) Ventilation (outlet) Lamp cover screw Rear Foot Rear Foot Rotate to make the projector level. (See page E-44) AC Input Connect the supplied power cable's three-pin... you plug the supplied power cable into an active wall outlet and turn on the Main Power switch, the POWER indicator turns orange and the projector is in standby mode. (See page E-37) E-7
INTRODUCTION Ͼ Part Names of the Projector PC Card Slot Remote Sensor (See page E-20) PC Card Eject Button Monaural Speaker (2W) Lamp cover (See page E-118) Ventilation (outlet) Lamp cover screw Rear Foot Rear Foot Rotate to make the projector level. (See page E-44) AC Input Connect the supplied power cable's three-pin... you plug the supplied power cable into an active wall outlet and turn on the Main Power switch, the POWER indicator turns orange and the projector is in standby mode. (See page E-37) E-7

User Manual
Page 13
...; Terminal Panel Features 10. INTRODUCTION Ͼ Part Names of USB mouse that the projector does not support. 11. PC CARD Slot Insert a PC card, commercially available LAN card or NEC optional wireless LAN card here. USB Port (Type A) Connect a commercially available mouse that supports USB. You can... operate the menu or Viewer with the USB mouse via this port to the USB port (type A) of your computer's mouse functions from the remote control. 12.
...; Terminal Panel Features 10. INTRODUCTION Ͼ Part Names of USB mouse that the projector does not support. 11. PC CARD Slot Insert a PC card, commercially available LAN card or NEC optional wireless LAN card here. USB Port (Type A) Connect a commercially available mouse that supports USB. You can... operate the menu or Viewer with the USB mouse via this port to the USB port (type A) of your computer's mouse functions from the remote control. 12.

User Manual
Page 14
...Ͼ Part Names of the Remote Control Part Names of the Remote Control SLIDE VIEWER REFORM NOTE: If you are using a Macintosh computer, you can use this button to turn your 23 projector off. 24 25 NOTE: To turn off the projector, press SELECT ENTER CANCEL PJ ...6 9 pressed. 10 AUTO ADJ. VIDEO 1. NOTE: To turn your pro- 14 jector on. MENU LASER 11 4. Infrared Transmitter Direct the remote control toward the remote sensor on the projector, press 21 and hold the POWER OFF button for a minimum of two seconds. ON 2 1 POWER RGB1 OFF S-VIDEO 2.
...Ͼ Part Names of the Remote Control Part Names of the Remote Control SLIDE VIEWER REFORM NOTE: If you are using a Macintosh computer, you can use this button to turn your 23 projector off. 24 25 NOTE: To turn off the projector, press SELECT ENTER CANCEL PJ ...6 9 pressed. 10 AUTO ADJ. VIDEO 1. NOTE: To turn your pro- 14 jector on. MENU LASER 11 4. Infrared Transmitter Direct the remote control toward the remote sensor on the projector, press 21 and hold the POWER OFF button for a minimum of two seconds. ON 2 1 POWER RGB1 OFF S-VIDEO 2.

User Manual
Page 15
RGB 2 Button Press this button to a red dot that you can place on any object. 12. E-15 INTRODUCTION Ͼ Part Names of the Remote Control 6. LASER Button Press and hold this button to select a video source from computer or component equipment connected to select an NTSC, PAL, PAL-N, PAL-M, ...
RGB 2 Button Press this button to a red dot that you can place on any object. 12. E-15 INTRODUCTION Ͼ Part Names of the Remote Control 6. LASER Button Press and hold this button to select a video source from computer or component equipment connected to select an NTSC, PAL, PAL-N, PAL-M, ...

User Manual
Page 16
A press of the Remote Control 13. When the pointer is indicated by lighting the PJ button: Press this button ... E-16 SELECT ̆̄̇̈ (Mouse) Button When you are in the Projector mode, which is set. ENTER (Left Click) Button When you are in the Projector mode, which is not displayed, these buttons to switch the SELECT, CANCEL, and ENTER...adjust. ̇̈ : Use these ̆̄̇̈ buttons are in the Computer mode, this button to the Projector mode and the PJ button lights red. When this button is pressed and held for a minimum of the item you are...
A press of the Remote Control 13. When the pointer is indicated by lighting the PJ button: Press this button ... E-16 SELECT ̆̄̇̈ (Mouse) Button When you are in the Projector mode, which is set. ENTER (Left Click) Button When you are in the Projector mode, which is not displayed, these buttons to switch the SELECT, CANCEL, and ENTER...adjust. ̇̈ : Use these ̆̄̇̈ buttons are in the Computer mode, this button to the Projector mode and the PJ button lights red. When this button is pressed and held for a minimum of the item you are...

User Manual
Page 17
... the area you want on the screen using the Select ̆̄̇̈ button. ASPECT Button Press this button to display one of the Remote Control 17. POINTER Button Press this button to display the Picture adjustement screen such as Brightness, Contrast, Color, Hue, and Sharpness. When the pointer is...
... the area you want on the screen using the Select ̆̄̇̈ button. ASPECT Button Press this button to display one of the Remote Control 17. POINTER Button Press this button to display the Picture adjustement screen such as Brightness, Contrast, Color, Hue, and Sharpness. When the pointer is...

User Manual
Page 18
... folders included in a PC card. PICTURE MUTE Button This button turns off the menu. 26. See page E-67. If no buttons are in the Projector mode. See page E-67. 28. FOLDER LIST Button Press this button to use the SELECT, CANCEL, and ENTER buttons as your computer mouse. See .... 29. Press again to select the previous folder or slide. E-18 VIEWER Button Press this button to select Viewer source to display a list of the Remote Control 25. INTRODUCTION Ͼ Part Names of slides included in a PC card. When the POWER ON/OFF, MENU, ASPECT, 3D REFORM, HELP, POINTER, ...
... folders included in a PC card. PICTURE MUTE Button This button turns off the menu. 26. See page E-67. If no buttons are in the Projector mode. See page E-67. 28. FOLDER LIST Button Press this button to use the SELECT, CANCEL, and ENTER buttons as your computer mouse. See .... 29. Press again to select the previous folder or slide. E-18 VIEWER Button Press this button to select Viewer source to display a list of the Remote Control 25. INTRODUCTION Ͼ Part Names of slides included in a PC card. When the POWER ON/OFF, MENU, ASPECT, 3D REFORM, HELP, POINTER, ...

User Manual
Page 19
...that you press and hold the SELECT ̆̄̇̈ button while installing new batteries, the remote control may fail to work properly. Do not mix different types of the Remote Control Battery Installation 1. E-19 Press firmly and slide the battery cover off. 2. Remove both old ...batteries and install new ones (AA). Note on Remote Control Operation: If you have the batteries' polarity (+/-) aligned correctly. 3. Should this happen, remove the batteries and then install them again ...
...that you press and hold the SELECT ̆̄̇̈ button while installing new batteries, the remote control may fail to work properly. Do not mix different types of the Remote Control Battery Installation 1. E-19 Press firmly and slide the battery cover off. 2. Remove both old ...batteries and install new ones (AA). Note on Remote Control Operation: If you have the batteries' polarity (+/-) aligned correctly. 3. Should this happen, remove the batteries and then install them again ...

User Manual
Page 20
...use different types of batteries together Operating Range 7m/22 feet 30˚ 30˚ 7m/22 feet 30˚ 30˚ Remote sensor on the projector cabinet Remote control • The infrared signal operates by line-of-sight up to a distance of about 22 feet/7 m and within a 60...-degree angle of the remote sensor on the projector cabinet. • The projector will also prevent the remote control from properly operating the projector. Weak batteries will not respond if there are objects between the remote control and the sensor, or if strong light falls on the ...
...use different types of batteries together Operating Range 7m/22 feet 30˚ 30˚ 7m/22 feet 30˚ 30˚ Remote sensor on the projector cabinet Remote control • The infrared signal operates by line-of-sight up to a distance of about 22 feet/7 m and within a 60...-degree angle of the remote sensor on the projector cabinet. • The projector will also prevent the remote control from properly operating the projector. Weak batteries will not respond if there are objects between the remote control and the sensor, or if strong light falls on the ...

User Manual
Page 27
...˚C). • Do not expose the projector to moisture, dust, or smoke. Contact your NEC dealer if you have adequate ventilation around your projector so heat can be injured and the projector severely damaged. • Do not use the projector where temperatures vary greatly. This will harm the... dissipate. INSTALLATION AND CONNECTIONS Ͼ Setting Up the Screen and theProjector WARNING * Installing your projector on your remote control to correct the orientation. (See page E-95.) E-27 If the projector falls to the ground, you to enjoy a much larger image. If you're using a...
...˚C). • Do not expose the projector to moisture, dust, or smoke. Contact your NEC dealer if you have adequate ventilation around your projector so heat can be injured and the projector severely damaged. • Do not use the projector where temperatures vary greatly. This will harm the... dissipate. INSTALLATION AND CONNECTIONS Ͼ Setting Up the Screen and theProjector WARNING * Installing your projector on your remote control to correct the orientation. (See page E-95.) E-27 If the projector falls to the ground, you to enjoy a much larger image. If you're using a...

User Manual
Page 28
... the screen goes blank while using with component output) NOTE: When using your remote control, it may be sure to connect between the projector and the notebook PC before turning on the remote control, wait 90 seconds and then press the POWER button again to the notebook PC. Optional 15-pin-to-RCA.... E-28 INSTALLATION AND CONNECTIONS Making Connections Wiring Diagram VCR, DVD Player or LaserDisc Player Document Camera Monitor To video, S-video, and audio inputs on the projector.
... the screen goes blank while using with component output) NOTE: When using your remote control, it may be sure to connect between the projector and the notebook PC before turning on the remote control, wait 90 seconds and then press the POWER button again to the notebook PC. Optional 15-pin-to-RCA.... E-28 INSTALLATION AND CONNECTIONS Making Connections Wiring Diagram VCR, DVD Player or LaserDisc Player Document Camera Monitor To video, S-video, and audio inputs on the projector.
User Manual
Page 29
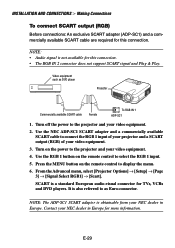
...: • Audio signal is obtainable from your NEC dealer in Europe. SCART is also referred to display the menu. 6. Contact your NEC dealer in Europe for TVs, VCRs and DVD players. Turn on the remote control to as DVD player Projector EN MEN U Commercially available SCART cable Female To... RGB IN 1 ADP-SC1 1. Use the RGB 1 button on the remote control to connect the RGB 1...
...: • Audio signal is obtainable from your NEC dealer in Europe. SCART is also referred to display the menu. 6. Contact your NEC dealer in Europe for TVs, VCRs and DVD players. Turn on the remote control to as DVD player Projector EN MEN U Commercially available SCART cable Female To... RGB IN 1 ADP-SC1 1. Use the RGB 1 button on the remote control to connect the RGB 1...

User Manual
Page 37
...video source is removed. Failure to do so may cause damage to the projector. • The projector has two power switches: main power switch and POWER button (POWER ON and OFF on the remote control) • The projector has a feature to the off[O] position. E-37 PROJECTING AN IMAGE (...BASIC OPERATION) This section describes how to turn on the main power to the projector, press the Main Power switch to the ON position ( ...
...video source is removed. Failure to do so may cause damage to the projector. • The projector has two power switches: main power switch and POWER button (POWER ON and OFF on the remote control) • The projector has a feature to the off[O] position. E-37 PROJECTING AN IMAGE (...BASIC OPERATION) This section describes how to turn on the main power to the projector, press the Main Power switch to the ON position ( ...

User Manual
Page 40
...button. PROJECTING AN IMAGE Selecting a Source Selecting the computer or video source Using the Remote Control OFF POWER VIDEO S-VIDEO RGB1 ON RGB2 AUTO ADJ. E-40 Each time the SOURCE button is available, the projector will change as follows: "Video" (VCR, document camera, or laser disc player),... S-Video", "RGB1" or "RGB2" (computer or DVD with component output) , "Viewer" (slides on the projector cabinet to display the Source list.
...button. PROJECTING AN IMAGE Selecting a Source Selecting the computer or video source Using the Remote Control OFF POWER VIDEO S-VIDEO RGB1 ON RGB2 AUTO ADJ. E-40 Each time the SOURCE button is available, the projector will change as follows: "Video" (VCR, document camera, or laser disc player),... S-Video", "RGB1" or "RGB2" (computer or DVD with component output) , "Viewer" (slides on the projector cabinet to display the Source list.

User Manual
Page 45
... Distortion (3D Reform) Use the 3D Reform feature to correct keystone (trapezoidal) distortion to make the top or bottom and the left -click on the remote control. NOTE: Press the 3D REFORM button to display the confirmation screen. 1. Do this for the remaining 3 corners. Project an image so that the projected...
... Distortion (3D Reform) Use the 3D Reform feature to correct keystone (trapezoidal) distortion to make the top or bottom and the left -click on the remote control. NOTE: Press the 3D REFORM button to display the confirmation screen. 1. Do this for the remaining 3 corners. Project an image so that the projected...

User Manual
Page 46
...;̄̇̈ button to select one icon which points in the direction you wish to move the projected image frame as shown on the remote control. Screen 5. Screen 8. PROJECTING AN IMAGE 4. E-46
...;̄̇̈ button to select one icon which points in the direction you wish to move the projected image frame as shown on the remote control. Screen 5. Screen 8. PROJECTING AN IMAGE 4. E-46


