
User Manual
Page 2
... Ordinance: The sound pressure level is not supplied with any part inside of your supplier. Your serial number is dangerous to make any modifications or changes to provide reasonable protection against harmful interference in accordance with this government regulation could void your NEC MultiSync MT840/MT1040/MT1045 Projector and keep the manual handy for a Class A digital device, pursuant to Part 15 of...
... Ordinance: The sound pressure level is not supplied with any part inside of your supplier. Your serial number is dangerous to make any modifications or changes to provide reasonable protection against harmful interference in accordance with this government regulation could void your NEC MultiSync MT840/MT1040/MT1045 Projector and keep the manual handy for a Class A digital device, pursuant to Part 15 of...

User Manual
Page 4
... after turning off the projector. Do not touch them as paper clips and bits of the projector. E-4 If something should fall into your projector. Then disconnect the power cable and allow 60 minutes to replace the lamp when the Status light comes on . If you continue to use the lamp after 2000 hours (1500 hours : MT1045) of use, the lamp bulb may be scattered in the lamp case...
... after turning off the projector. Do not touch them as paper clips and bits of the projector. E-4 If something should fall into your projector. Then disconnect the power cable and allow 60 minutes to replace the lamp when the Status light comes on . If you continue to use the lamp after 2000 hours (1500 hours : MT1045) of use, the lamp bulb may be scattered in the lamp case...
User Manual
Page 5
...41 PC Control Codes E-42 Cable Connection E-42 E-5 TROUBLESHOOTING Status Light Messages E-35 Common Problems & Solutions E-35 6. MAINTENANCE Replacing the Lamp E-33 Remote Control Battery Installation E-34 Cleaning or Replacing the Filters E-34 5. INTRODUCTION Introduction to Know Your MultiSync MT840/MT1040/MT1045 Projector ..... OPERATION General Controls E-17 Using the Menus E-17 Using a USB Mouse E-17 Menu Tree E-18 Menu Elements E-19 Menu Descriptions & Functions E-20 Source Select E-20 RGB1/2 E-20 Video/S-Video E-20 PC Card Viewer E-20 Adjustments E-20 Picture...
...41 PC Control Codes E-42 Cable Connection E-42 E-5 TROUBLESHOOTING Status Light Messages E-35 Common Problems & Solutions E-35 6. MAINTENANCE Replacing the Lamp E-33 Remote Control Battery Installation E-34 Cleaning or Replacing the Filters E-34 5. INTRODUCTION Introduction to Know Your MultiSync MT840/MT1040/MT1045 Projector ..... OPERATION General Controls E-17 Using the Menus E-17 Using a USB Mouse E-17 Menu Tree E-18 Menu Elements E-19 Menu Descriptions & Functions E-20 Source Select E-20 RGB1/2 E-20 Video/S-Video E-20 PC Card Viewer E-20 Adjustments E-20 Picture...
User Manual
Page 6
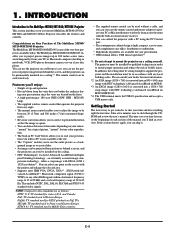
...: TV standard used without a cable, and you can be installed on PAL TVs. If the section doesn't apply, you can even use the remote control and mouse adapter to use the projector to project images from behind a screen, and the projector can even be used in order to mount the projector on the screen with the pointer and enlarge the selected area. • Supports most IBM VGA, SVGA, XGA*2 , SXGA...
...: TV standard used without a cable, and you can be installed on PAL TVs. If the section doesn't apply, you can even use the remote control and mouse adapter to use the projector to project images from behind a screen, and the projector can even be used in order to mount the projector on the screen with the pointer and enlarge the selected area. • Supports most IBM VGA, SVGA, XGA*2 , SXGA...

User Manual
Page 7
Lens Focus Adjustable Tilt Foot Ventilation (outlet) Rear Features Remote Sensor One-Touch Tilt Button Lamp Cover Lamp Cover Screw SOURCE AUTO ADJUST MENU SELECT ENTER STATPUOSWER CANCEL ON/OFF Bilt-In Stereo Speaker (1W) Rear Foot Remote Sensor Rear Foot Bilt-In Stereo Speaker (1W) E-7 Getting to Know Your MultiSync MT840/MT1040/MT1045 Projector Front Features Controls USB (Mouse) Terminal Zoom Remote Sensor STATPUOSWER ENTER ON/OFF SELECT CANCEL SOURCE MENU USB PC...
Lens Focus Adjustable Tilt Foot Ventilation (outlet) Rear Features Remote Sensor One-Touch Tilt Button Lamp Cover Lamp Cover Screw SOURCE AUTO ADJUST MENU SELECT ENTER STATPUOSWER CANCEL ON/OFF Bilt-In Stereo Speaker (1W) Rear Foot Remote Sensor Rear Foot Bilt-In Stereo Speaker (1W) E-7 Getting to Know Your MultiSync MT840/MT1040/MT1045 Projector Front Features Controls USB (Mouse) Terminal Zoom Remote Sensor STATPUOSWER ENTER ON/OFF SELECT CANCEL SOURCE MENU USB PC...
User Manual
Page 8
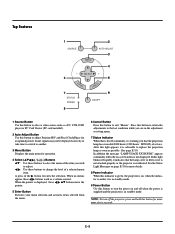
... the lamp cover or filter cover is not attached properly or the projector is lit red continually, it indicates that the projection lamp has exceeded 2000 hours (1500 hours : MT1045) of two seconds. E-8 Top Features 1 SOURCE MENU 2 AUTO ADJUST 3 4 SELECT 5 6 L E NTER CANCE 7 STATUS POWER 9 ON/OFF 8 1 Source Button Use this button to select a video source such as a PC, VCR, DVD player or PC Card Viewer (PC card installed). 2 Auto Adjust Button Use this button to exit "Menus". Some signals may...
... the lamp cover or filter cover is not attached properly or the projector is lit red continually, it indicates that the projection lamp has exceeded 2000 hours (1500 hours : MT1045) of two seconds. E-8 Top Features 1 SOURCE MENU 2 AUTO ADJUST 3 4 SELECT 5 6 L E NTER CANCE 7 STATUS POWER 9 ON/OFF 8 1 Source Button Use this button to select a video source such as a PC, VCR, DVD player or PC Card Viewer (PC card installed). 2 Auto Adjust Button Use this button to exit "Menus". Some signals may...

User Manual
Page 10
...; Remote Control 16 11 15 POWER OFF ON 12 COMPUTER PJ PROJECTOR SOURCE AUTO ADJ. 13 1 S A 2 3 MENU LASER 14 - + 6 4 (Underneath) 5 CANCEL R-CLICK 8 HELP POINTER PIC-MUTE ? 9 MAGNIFY + 7 10 Remote Jack Connect your projected computer image. When the Pointer is not displayed, the magnified image is displayed, these ᮤ ᮣ buttons work as a mouse for your remote control cable here for a source to be in the adjustment or setting menu. 6 Left Click / Enter Button Use this button to...
...; Remote Control 16 11 15 POWER OFF ON 12 COMPUTER PJ PROJECTOR SOURCE AUTO ADJ. 13 1 S A 2 3 MENU LASER 14 - + 6 4 (Underneath) 5 CANCEL R-CLICK 8 HELP POINTER PIC-MUTE ? 9 MAGNIFY + 7 10 Remote Jack Connect your projected computer image. When the Pointer is not displayed, the magnified image is displayed, these ᮤ ᮣ buttons work as a mouse for your remote control cable here for a source to be in the adjustment or setting menu. 6 Left Click / Enter Button Use this button to...

User Manual
Page 12
... carry your projector is not in use, cover the lens with the supplied string and rivet. Ensure that the projector is simple to set up your image. Carrying handle SOURCE AUTO ADJUST MENU SELECT ENTER CAN CEL USB STATUS POWER ON/OFF 2. Ensure that the power cable and any other cables connecting to center the image horizontally on the screen, rotate the foot. Top view Screen 4. Move the projector left or right to video sources are disconnected...
... carry your projector is not in use, cover the lens with the supplied string and rivet. Ensure that the projector is simple to set up your image. Carrying handle SOURCE AUTO ADJUST MENU SELECT ENTER CAN CEL USB STATUS POWER ON/OFF 2. Ensure that the power cable and any other cables connecting to center the image horizontally on the screen, rotate the foot. Top view Screen 4. Move the projector left or right to video sources are disconnected...

User Manual
Page 15
... the OFF button on the projector. Document Camera To video, S-video, and audio VCR, DVD Player or LaserDisc Player inputs on the projector and the computer. 4. If the projector goes blank after connecting with the mouse output port of the computer's screen-saver or power management software. 4. When using with component output) Optional Component V cable Signal cable (supplied) To mini D-Sub 15-pin connector on the remote control, wait one...
... the OFF button on the projector. Document Camera To video, S-video, and audio VCR, DVD Player or LaserDisc Player inputs on the projector and the computer. 4. If the projector goes blank after connecting with the mouse output port of the computer's screen-saver or power management software. 4. When using with component output) Optional Component V cable Signal cable (supplied) To mini D-Sub 15-pin connector on the remote control, wait one...
User Manual
Page 16
... Serial cable (Supplied) PC CONTROL MOUSE OUT REMOTE CONTROL INPUT AUDIO RGB INPUT 1 AUDIO RGB INPUT 2 S-VIDEO L/MONO R VIDEO Macintosh IBM PS2 Serial cable (Supplied) NOTE:Some computers or software programs may not work with a Macintosh PowerBook, output may display nothing. When using a Macintosh with component outputs or Video output. If this capability). Connecting Your DVD Player You can connect your projector to a DVD player with the projector, set the DIP switches of DIP switch setting 17" multi-scan mode VGA...
... Serial cable (Supplied) PC CONTROL MOUSE OUT REMOTE CONTROL INPUT AUDIO RGB INPUT 1 AUDIO RGB INPUT 2 S-VIDEO L/MONO R VIDEO Macintosh IBM PS2 Serial cable (Supplied) NOTE:Some computers or software programs may not work with a Macintosh PowerBook, output may display nothing. When using a Macintosh with component outputs or Video output. If this capability). Connecting Your DVD Player You can connect your projector to a DVD player with the projector, set the DIP switches of DIP switch setting 17" multi-scan mode VGA...

User Manual
Page 17
... power cable during this time. The change is turned on and that the projector does not support. CANCEL: Return to adjust the brightness. Using a USB Mouse Using a USB mouse gives you use the menu and enable the "Auto Start" feature. (See page E23.) 2. Menu Display Clicking with a mouse button to make the image larger up to display the image. Clicking displays the pull-down menu. To save the adjustments, click . The projector will go out. The power indicator...
... power cable during this time. The change is turned on and that the projector does not support. CANCEL: Return to adjust the brightness. Using a USB Mouse Using a USB mouse gives you use the menu and enable the "Auto Start" feature. (See page E23.) 2. Menu Display Clicking with a mouse button to make the image larger up to display the image. Clicking displays the pull-down menu. To save the adjustments, click . The projector will go out. The power indicator...

User Manual
Page 18
...* Sharpness* Auto Adjust** Position** Pixel Adjust** Resolution** All Data/Current Signal R, V, C R, V, C V, C V, C V R R R R Aspect Ratio V, C Gamma Noise Reduction Color Matrix Language Source Display Projector Pointer Orientation Background Signal Select Auto Start Power Management Power Off Confirmation Mouse Button Mouse Sensitivity Clear Lamp Hour Meter Keystone Save Fan High Speed Mode Remote Sensor S-Video Mode Select PC Card Viewer Options Capture Options Source Name Input Terminal Frequency FH Frequency FV Sync Polarity Signal Type Video Type Sync Type Interlace Resolution Aspect...
...* Sharpness* Auto Adjust** Position** Pixel Adjust** Resolution** All Data/Current Signal R, V, C R, V, C V, C V, C V R R R R Aspect Ratio V, C Gamma Noise Reduction Color Matrix Language Source Display Projector Pointer Orientation Background Signal Select Auto Start Power Management Power Off Confirmation Mouse Button Mouse Sensitivity Clear Lamp Hour Meter Keystone Save Fan High Speed Mode Remote Sensor S-Video Mode Select PC Card Viewer Options Capture Options Source Name Input Terminal Frequency FH Frequency FV Sync Polarity Signal Type Video Type Sync Type Interlace Resolution Aspect...
User Manual
Page 20
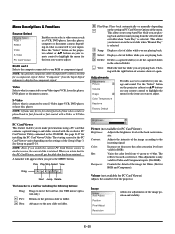
... the MENU button. This allows you to stop Auto Play while you are playing back. Adjustments Adjustments Picture Volume Image Color Temperature Keystone Factory Default Provides access to controls for Video and Component inputs (Not RGB). This adjustment is only valid for your image and sound. RGB1 and 2 Selects the computer connected to your Video input-VCR, laser disc player, DVD player or document camera. NOTE: An optional component cable (Component V cable) is...
... the MENU button. This allows you to stop Auto Play while you are playing back. Adjustments Adjustments Picture Volume Image Color Temperature Keystone Factory Default Provides access to controls for Video and Component inputs (Not RGB). This adjustment is only valid for your image and sound. RGB1 and 2 Selects the computer connected to your Video input-VCR, laser disc player, DVD player or document camera. NOTE: An optional component cable (Component V cable) is...
User Manual
Page 21
...-to-9 aspect ratio. Resets the adjustments for the current RGB input signal to project an image using the slide bar. Auto Adjust: When "Auto Adjust" is set to "On", the projector automatically determines the best resolution for the current signal to the factory preset levels. This adjustment may be automatically adjusted for the first time. Auto: Turns on the slide bar to -3 aspect ratio. The projector displays the current image in the horizontal direction...
...-to-9 aspect ratio. Resets the adjustments for the current RGB input signal to project an image using the slide bar. Auto Adjust: When "Auto Adjust" is set to "On", the projector automatically determines the best resolution for the current signal to the factory preset levels. This adjustment may be automatically adjusted for the first time. Auto: Turns on the slide bar to -3 aspect ratio. The projector displays the current image in the horizontal direction...

User Manual
Page 22
... screen. NOTE: There may be displayed each time you want on the screen, press the Magnify button on the projector. E-22 NOTE: The Color Matrix feature is not available for component video signal only. Source Display: You can turn on the remote control to set preferences and other operating options. When this option is recommnded for : Normal: Default for RGB signal (Factory preset) Natural 1: Default for Video and S-Video signal Natural 2: Default for component signal...
... screen. NOTE: There may be displayed each time you want on the screen, press the Magnify button on the projector. E-22 NOTE: The Color Matrix feature is not available for component video signal only. Source Display: You can turn on the remote control to set preferences and other operating options. When this option is recommnded for : Normal: Default for RGB signal (Factory preset) Natural 1: Default for Video and S-Video signal Natural 2: Default for component signal...

User Manual
Page 23
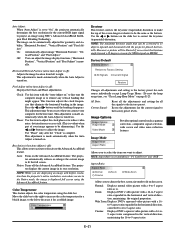
... projector using the remote control. Background: Use this is installed on the supplied CD-ROM. This must be done for all sources. Transferring a logo from your PC You can transfer your changes for Video and S-Video respectively. [Page2] Setup Page1 Page2 Page3 Page4 Mouse Button Right Hand Left Hand Sensitivity Fast Medium Slow Clear Lamp Hour Mater Auto Start Power Management Power Off Confirmation Keystone Save Fan High Speed Mode OK Cancel Auto Start: Turns the projector...
... projector using the remote control. Background: Use this is installed on the supplied CD-ROM. This must be done for all sources. Transferring a logo from your PC You can transfer your changes for Video and S-Video respectively. [Page2] Setup Page1 Page2 Page3 Page4 Mouse Button Right Hand Left Hand Sensitivity Fast Medium Slow Clear Lamp Hour Mater Auto Start Power Management Power Off Confirmation Keystone Save Fan High Speed Mode OK Cancel Auto Start: Turns the projector...

User Manual
Page 26
... slides or any specific slide High quality images • High resolution up to 1024ן768 dots(MT840: up . • The eject button pops out once the PC card is fully inserted. It cannot be conducted simply with its data is being accessed. Attempting to the PC card's operating instructions for playing images taken on the projector. E-26 Check that the...
... slides or any specific slide High quality images • High resolution up to 1024ן768 dots(MT840: up . • The eject button pops out once the PC card is fully inserted. It cannot be conducted simply with its data is being accessed. Attempting to the PC card's operating instructions for playing images taken on the projector. E-26 Check that the...

User Manual
Page 28
... for captured images, but is only displayed when images have selected. A tool bar will appear when you can light in Auto Play mode. NOTE:To use the v and w buttons to select the Source Select, then press the ᮣ button to display the source menu. 2) Select the "Viewer" using the remote control. Play: Play/Stop: Plays back automatically or manually depending on the setting on the remote control or the projector cabinet...
... for captured images, but is only displayed when images have selected. A tool bar will appear when you can light in Auto Play mode. NOTE:To use the v and w buttons to select the Source Select, then press the ᮣ button to display the source menu. 2) Select the "Viewer" using the remote control. Play: Play/Stop: Plays back automatically or manually depending on the setting on the remote control or the projector cabinet...
User Manual
Page 33
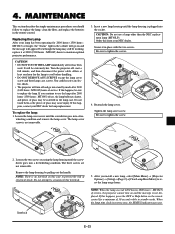
... the remote control for lamp replacement. Insert a new lamp housing until the lamp housing is reset to use the lamp after 2100 (1600 hours : MT1045) hours of glass may cause injury. CANCEL CANCEL E-33 Even though the lamp may shatter, and pieces of service. If you continue to zero, the STATUS indicator goes out. wheeling condition and remove the lamp cover. Turn the projector off and go on and the message is not removable...
... the remote control for lamp replacement. Insert a new lamp housing until the lamp housing is reset to use the lamp after 2100 (1600 hours : MT1045) hours of glass may cause injury. CANCEL CANCEL E-33 Even though the lamp may shatter, and pieces of service. If you continue to zero, the STATUS indicator goes out. wheeling condition and remove the lamp cover. Turn the projector off and go on and the message is not removable...
User Manual
Page 35
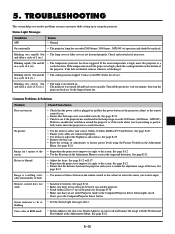
... Auto Adjust is installed correctly. If the room temperature is on . If there is scrolling verti- • Use menus or Source button on . See page E-12 screen • Use the Keystone in red. See page E-13 Image is insufficient ventilation around the projector or if the room where you want to correct the trapezoid distortion. cally, horizontally or both Remote control does not work • Install new batteries...
... Auto Adjust is installed correctly. If the room temperature is on . If there is scrolling verti- • Use menus or Source button on . See page E-12 screen • Use the Keystone in red. See page E-13 Image is insufficient ventilation around the projector or if the room where you want to correct the trapezoid distortion. cally, horizontally or both Remote control does not work • Install new batteries...

