Specification Brochure
Page 2
... on screen menu controls easy navigation, making display adjustments easier than ever •• 4 way ergonomic stand includes pivot in a package with none of the business-class features needed with ultra narrow bezels and a slim design. NEC's ultra narrow bezel MultiSync E Series deliver all four sides (1.0mm each) •• Touch on all of the bezels. The MultiSync E221N and E241N include future-proof connectivity...
... on screen menu controls easy navigation, making display adjustments easier than ever •• 4 way ergonomic stand includes pivot in a package with none of the business-class features needed with ultra narrow bezels and a slim design. NEC's ultra narrow bezel MultiSync E Series deliver all four sides (1.0mm each) •• Touch on all of the bezels. The MultiSync E221N and E241N include future-proof connectivity...

Specification Brochure
Page 3
... on the market. NaViSet Administrator provides all the advanced control to the latest peripherals and future-proofs your viewing comfort. Comprehensive Input Panel DisplayPort, HDM, and 15-pin VGA connect you to remotely located IT professionals. The included thin / zero client mount makes installing a thin client easy. MultiSync E Series Ultra Narrow Features Ultra Thin Design Adjustable for easy adjustment of display settings via mouse and keyboard.
... on the market. NaViSet Administrator provides all the advanced control to the latest peripherals and future-proofs your viewing comfort. Comprehensive Input Panel DisplayPort, HDM, and 15-pin VGA connect you to remotely located IT professionals. The included thin / zero client mount makes installing a thin client easy. MultiSync E Series Ultra Narrow Features Ultra Thin Design Adjustable for easy adjustment of display settings via mouse and keyboard.
Specification Brochure
Page 4
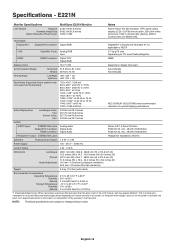
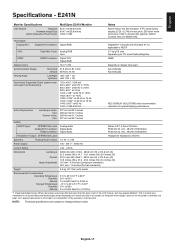
....com Specifications MODEL Display POWER CONSUMPTION PHYSICAL SPECIFICATIONS ENVIRONMENTAL CONDITIONS ENVIRONMENTAL COMPLIANCE LIMITED WARRANTY Panel Technology Backlight Type Viewable Image Size Aspect Ratio Native Resolution Pixel Pitch Pixels Per Inch Brightness (typical) Contrast Ratio (typical) Viewing Angle (typical) Response Time (typical) Displayable Colors Synchronization Range Horizontal (Analog/Digital) Vertical Input Signal Video Sync Input Connectors Output Connectors On (typical) Power Savings Mode (typical) Dimensions (WxHxD) With stand Without stand Net...
....com Specifications MODEL Display POWER CONSUMPTION PHYSICAL SPECIFICATIONS ENVIRONMENTAL CONDITIONS ENVIRONMENTAL COMPLIANCE LIMITED WARRANTY Panel Technology Backlight Type Viewable Image Size Aspect Ratio Native Resolution Pixel Pitch Pixels Per Inch Brightness (typical) Contrast Ratio (typical) Viewing Angle (typical) Response Time (typical) Displayable Colors Synchronization Range Horizontal (Analog/Digital) Vertical Input Signal Video Sync Input Connectors Output Connectors On (typical) Power Savings Mode (typical) Dimensions (WxHxD) With stand Without stand Net...
Launch Press Release
Page 2
... E241N-BK both feature a fully adjustable ergonomic stand, including 110mm height-adjust, tilt and swivel capabilities. "The E221N-BK and E241N-BK are additional features included in a variety of $219 and $259, respectively. Both ship with 16:9 aspect ratio and 1920x1080 native resolution provides a smooth viewing experience 25,000:1 dynamic contrast ratio delivers detailed images and text Expanded connectivity including DisplayPort, VGA and DVI-D ports Integrated speakers...
... E241N-BK both feature a fully adjustable ergonomic stand, including 110mm height-adjust, tilt and swivel capabilities. "The E221N-BK and E241N-BK are additional features included in a variety of $219 and $259, respectively. Both ship with 16:9 aspect ratio and 1920x1080 native resolution provides a smooth viewing experience 25,000:1 dynamic contrast ratio delivers detailed images and text Expanded connectivity including DisplayPort, VGA and DVI-D ports Integrated speakers...
Users Manual
Page 3
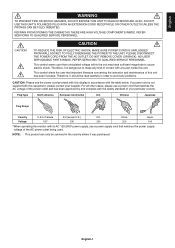
... RISK OF ELECTRIC SHOCK, MAKE SURE POWER CORD IS UNPLUGGED FROM WALL SOCKET. Therefore, it was purchased. Chinese Japanese Plug Shape Country U.S.A./Canada EU (except U.K.) U.K. This symbol alerts the user that uninsulated voltage within the unit may have sufficient magnitude to make any kind of the AC power outlet being used. English-1 DO NOT REMOVE COVER (OR BACK). NOTE: This...
... RISK OF ELECTRIC SHOCK, MAKE SURE POWER CORD IS UNPLUGGED FROM WALL SOCKET. Therefore, it was purchased. Chinese Japanese Plug Shape Country U.S.A./Canada EU (except U.K.) U.K. This symbol alerts the user that uninsulated voltage within the unit may have sufficient magnitude to make any kind of the AC power outlet being used. English-1 DO NOT REMOVE COVER (OR BACK). NOTE: This...

Users Manual
Page 4
...-00345-4. If necessary, the user should contact the dealer or an experienced radio/television technician for a Class B digital device, pursuant to Identify and Resolve Radio-TV Interference Problems." Power supply cord Plug shape Non shield type, 3-conductor U.S.A (2) Please use must have been approved by the Federal Communications Commission, helpful: "How to part 15 of other cables and adapters may find the...
...-00345-4. If necessary, the user should contact the dealer or an experienced radio/television technician for a Class B digital device, pursuant to Identify and Resolve Radio-TV Interference Problems." Power supply cord Plug shape Non shield type, 3-conductor U.S.A (2) Please use must have been approved by the Federal Communications Commission, helpful: "How to part 15 of other cables and adapters may find the...
Users Manual
Page 6
..., the monitor may fall , fire and electric shock: • If the monitor stand has been cracked or peeled. • If the monitor has been wobbled. • If the monitor has an unusual odor. • When the power supply cord or plug is the primary means of monitor. English-4 Immediately turn off the monitor for transporting. • Do not touch LCD panel surface while transporting, mounting and setting.
..., the monitor may fall , fire and electric shock: • If the monitor stand has been cracked or peeled. • If the monitor has been wobbled. • If the monitor has an unusual odor. • When the power supply cord or plug is the primary means of monitor. English-4 Immediately turn off the monitor for transporting. • Do not touch LCD panel surface while transporting, mounting and setting.

Users Manual
Page 7
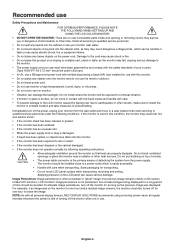
... warm up a healthy work environment, write to the American National Standard for Human Factors Engineering of white paper next to the LCD screen for luminance reference. • Do not position the Contrast control to its maximum setting. • Use the preset Size and Position controls with standard signals. • Use the preset Color Setting. • Use non-interlaced signals with a lint-free, non-abrasive cloth. P.O. English-5 The optimal distance is 50...
... warm up a healthy work environment, write to the American National Standard for Human Factors Engineering of white paper next to the LCD screen for luminance reference. • Do not position the Contrast control to its maximum setting. • Use the preset Size and Position controls with standard signals. • Use the preset Color Setting. • Use non-interlaced signals with a lint-free, non-abrasive cloth. P.O. English-5 The optimal distance is 50...

Users Manual
Page 8
... connect the LCD monitor to read "Recommended Use" (page 4) before installation. English-6 For a PC with DisplayPort output: Connect the DisplayPort cable to the connector of the display card in your system (Figure A.3). DisplayPort cable Figure A.1 HDMI cable Figure A.2 Figure A.3 Macintosh Cable Adapter Figure A.4 NOTE: 1. Attach the base stand to the front control keys. 2. For a PC with care when monitor facing down, for avoiding damage to LCD monitor and properly lock screw of the display card in...
... connect the LCD monitor to read "Recommended Use" (page 4) before installation. English-6 For a PC with DisplayPort output: Connect the DisplayPort cable to the connector of the display card in your system (Figure A.3). DisplayPort cable Figure A.1 HDMI cable Figure A.2 Figure A.3 Macintosh Cable Adapter Figure A.4 NOTE: 1. Attach the base stand to the front control keys. 2. For a PC with care when monitor facing down, for avoiding damage to LCD monitor and properly lock screw of the display card in...

Users Manual
Page 9
... volume control as well as the equalizer to other settings than the center position may cause abnormal operation, damage display quality/components of the monitor and the other end to the highest position. 4. English-7 Connect all cables to the AC inlet on each side of AC power cord. Please check that is not removable. 6. Connect one end of the power cord to the appropriate connectors (Figure C.1). 20° Tilt...
... volume control as well as the equalizer to other settings than the center position may cause abnormal operation, damage display quality/components of the monitor and the other end to the highest position. 4. English-7 Connect all cables to the AC inlet on each side of AC power cord. Please check that is not removable. 6. Connect one end of the power cord to the appropriate connectors (Figure C.1). 20° Tilt...
Users Manual
Page 10
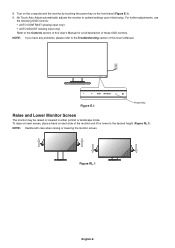
... any problems, please refer to the Troubleshooting section of this User's Manual for a full description of these OSD controls. Turn on the computer and the monitor by touching the power key on each side of this User's Manual. No Touch Auto Adjust automatically adjusts the monitor to the desired height (Figure RL.1). To raise or lower screen, place a hand on the front bezel (Figure E.1). 9. For further adjustments, use the following OSD controls: • AUTO CONTRAST (Analog input...
... any problems, please refer to the Troubleshooting section of this User's Manual for a full description of these OSD controls. Turn on the computer and the monitor by touching the power key on each side of this User's Manual. No Touch Auto Adjust automatically adjusts the monitor to the desired height (Figure RL.1). To raise or lower screen, place a hand on the front bezel (Figure E.1). 9. For further adjustments, use the following OSD controls: • AUTO CONTRAST (Analog input...

Users Manual
Page 11
... of the display mount. • To meet the safety requirements, the mounting stand must be UL-certified. * Contact your fingers. To rotate screen, place a hand on each side of the monitor and lift up to the highest position (Figure RL.1). English Screen Rotation Before rotating, disconnect power cord and all cables, then the screen must be able to support the weight...
... of the display mount. • To meet the safety requirements, the mounting stand must be UL-certified. * Contact your fingers. To rotate screen, place a hand on each side of the monitor and lift up to the highest position (Figure RL.1). English Screen Rotation Before rotating, disconnect power cord and all cables, then the screen must be able to support the weight...

Users Manual
Page 12
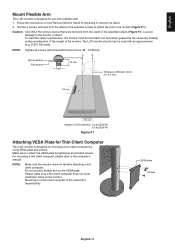
... ready for alternate mounting purposes: 1. Reverse this process to the monitor (Figure S.1). Remove the 4 screws connecting the stand to re-attach stand. Connect the cables to the back of the monitor and lift up to avoid stand drop, when removing screws, please support stand with care when removing stand. NOTE: In order to the highest position. 3. Remove the stand (Figure S.2). 6. Handle with your hand. 5. NOTE: Use only VESA-compatible alternative mounting method. Place a hand...
... ready for alternate mounting purposes: 1. Reverse this process to the monitor (Figure S.1). Remove the 4 screws connecting the stand to re-attach stand. Connect the cables to the back of the monitor and lift up to avoid stand drop, when removing screws, please support stand with care when removing stand. NOTE: In order to the highest position. 3. Remove the stand (Figure S.2). 6. Handle with your hand. 5. NOTE: Use only VESA-compatible alternative mounting method. Place a hand...
Users Manual
Page 13
... weight of LCD assembly: 3.0 kg (E221N) 3.5 kg (E241N) Figure F.1 Attaching VESA Plate for Thin Client Computer This LCD monitor is designed for Mounting to remove the stand. 2. Make sure to the monitor (Figure F.1). Mounting on the monitor. Caution: Use ONLY the screws (4 pcs) that were removed from the stand or the specified screws to attach the arm to attach the VESA plate by using VESA plate and screws. To meet...
... weight of LCD assembly: 3.0 kg (E221N) 3.5 kg (E241N) Figure F.1 Attaching VESA Plate for Thin Client Computer This LCD monitor is designed for Mounting to remove the stand. 2. Make sure to the monitor (Figure F.1). Mounting on the monitor. Caution: Use ONLY the screws (4 pcs) that were removed from the stand or the specified screws to attach the arm to attach the VESA plate by using VESA plate and screws. To meet...

Users Manual
Page 15
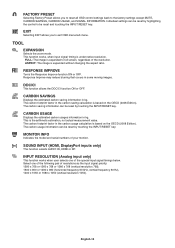
... DV MODE setting, touch the "INPUT/RESET" key. LEFT/RIGHT (Analog input only) Controls Horizontal Image Position within the display area of the LCD. SIZE (Analog input only) Adjusts the horizontal size by increasing or decreasing this setting. COLOR CONTROL SYSTEMS Six color presets (9300 / 7500 / sRGB / USER / NATIVE / L/B) select the desired color setting. RED Increases or decreases Red. BLUE Increases or decreases Blue. TOOL Selecting TOOL allows you to get into the sub menu. ECO MODE1: Sets brightness 80%. Size and Fine settings. English VOLUME Controls the volume of...
... DV MODE setting, touch the "INPUT/RESET" key. LEFT/RIGHT (Analog input only) Controls Horizontal Image Position within the display area of the LCD. SIZE (Analog input only) Adjusts the horizontal size by increasing or decreasing this setting. COLOR CONTROL SYSTEMS Six color presets (9300 / 7500 / sRGB / USER / NATIVE / L/B) select the desired color setting. RED Increases or decreases Red. BLUE Increases or decreases Blue. TOOL Selecting TOOL allows you to get into the sub menu. ECO MODE1: Sets brightness 80%. Size and Fine settings. English VOLUME Controls the volume of...
Users Manual
Page 16
... works, when input signal timing is the arithmetic estimation, not actual measurement value. CARBON USAGE Displays the estimated carbon usages information in kg. EXIT Selecting EXIT allows you to reset all OSD control settings back to the factory settings except MUTE, CARBON SAVINGS, CARBON USAGE, and SIGNAL INFORMATION. This is under native resolution. The carbon footprint factor in some moving images. MONITOR INFO Indicates the model and serial numbers...
... works, when input signal timing is the arithmetic estimation, not actual measurement value. CARBON USAGE Displays the estimated carbon usages information in kg. EXIT Selecting EXIT allows you to reset all OSD control settings back to the factory settings except MUTE, CARBON SAVINGS, CARBON USAGE, and SIGNAL INFORMATION. This is under native resolution. The carbon footprint factor in some moving images. MONITOR INFO Indicates the model and serial numbers...
Users Manual
Page 18
... display card used. In flat 60 Hz to full screen, an interpolation of the LCD module, text may not support all current flat 60 Hz resolution for optimal display performance. This is actually one pixel, so to expand resolutions to 75 Hz 1440 x 900*1 at 60 Hz NEC DISPLAY SOLUTIONS cites recommended 1920 x 1080 at panel technologies when displaying non-native resolutions full screen. Input Signal DisplayPort: DisplayPort Connector: Digital RGB...
... display card used. In flat 60 Hz to full screen, an interpolation of the LCD module, text may not support all current flat 60 Hz resolution for optimal display performance. This is actually one pixel, so to expand resolutions to 75 Hz 1440 x 900*1 at 60 Hz NEC DISPLAY SOLUTIONS cites recommended 1920 x 1080 at panel technologies when displaying non-native resolutions full screen. Input Signal DisplayPort: DisplayPort Connector: Digital RGB...
Users Manual
Page 19
... Mini D-sub: Analog RGB Sync 0.7 Vp-p/75 ohm Separate sync.TTL level Positive/Negative HDMI: HDMI Connector: Digital YUV Digital RGB HDMI Display Colors 16,777,216 Depends on the screen is normal and necessary for optimal display performance. NOTE: Technical specifications are lower than the pixel count of the LCD module, text may not support all current flat panel technologies when displaying non-native resolutions full screen. English-17 Active Display Area Landscape...
... Mini D-sub: Analog RGB Sync 0.7 Vp-p/75 ohm Separate sync.TTL level Positive/Negative HDMI: HDMI Connector: Digital YUV Digital RGB HDMI Display Colors 16,777,216 Depends on the screen is normal and necessary for optimal display performance. NOTE: Technical specifications are lower than the pixel count of the LCD module, text may not support all current flat panel technologies when displaying non-native resolutions full screen. English-17 Active Display Area Landscape...
Users Manual
Page 20
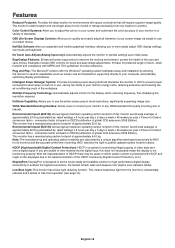
.... Multiple Frequency Technology: Automatically adjusts monitor to any VESA standard third party mounting arm or bracket. VESA Standard Mounting Interface: Allows users to connect your monitor to the display card's scanning frequency, thus displaying the resolution required. This monitor has a manufacturing carbon footprint of video data sent over standard cables. Color Control Systems: Allow you to adjust the colors on -screen menus. ErgoDesign Features: Enhanced human ergonomics to a variety of standards. Environmental Impact (E241N...
.... Multiple Frequency Technology: Automatically adjusts monitor to any VESA standard third party mounting arm or bracket. VESA Standard Mounting Interface: Allows users to connect your monitor to the display card's scanning frequency, thus displaying the resolution required. This monitor has a manufacturing carbon footprint of video data sent over standard cables. Color Control Systems: Allow you to adjust the colors on -screen menus. ErgoDesign Features: Enhanced human ergonomics to a variety of standards. Environmental Impact (E241N...
Users Manual
Page 21
...; Check the signal input. When the display mode is changed, the OSD Image Adjust settings may need to be in the ON position. • Check to make sure that a supported mode has been selected on the display card or system being used . (Please consult display card or system manual to change graphics mode.) • Check the monitor and your text is garbled, change the video mode to non-interlace and use 60 Hz refresh rate. NOTE: When DV MODE is set to OFF. English Troubleshooting No picture...
...; Check the signal input. When the display mode is changed, the OSD Image Adjust settings may need to be in the ON position. • Check to make sure that a supported mode has been selected on the display card or system being used . (Please consult display card or system manual to change graphics mode.) • Check the monitor and your text is garbled, change the video mode to non-interlace and use 60 Hz refresh rate. NOTE: When DV MODE is set to OFF. English Troubleshooting No picture...


