Users Manual
Page 8
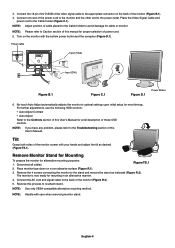
... R.2). For further adjustments, use the following OSD controls: • Auto Adjust Contrast • Auto Adjust Refer to the Troubleshooting section of the monitor (Figure R.3). 5. Figure TS.1 2. NOTE: If you have any problem, please refer to the Controls section of this User's Manual. Remove the 4 screws connecting the monitor to the appropriate... the other end to the power outlet. Connect one end of the video signal cable to the stand and remove the stand as desired (Figure TS.1).
... R.2). For further adjustments, use the following OSD controls: • Auto Adjust Contrast • Auto Adjust Refer to the Troubleshooting section of the monitor (Figure R.3). 5. Figure TS.1 2. NOTE: If you have any problem, please refer to the Controls section of this User's Manual. Remove the 4 screws connecting the monitor to the appropriate... the other end to the power outlet. Connect one end of the video signal cable to the stand and remove the stand as desired (Figure TS.1).