User Manual
Page 3
.... GPSGV (for Germany only) The highest sound pressure level is less than 70 dB (A) in an outlet unless all requirements of this unit's plug with an extension cord or in accordance with any part inside of your NEC NP4001/NP4000 projector and keep the manual handy for Canada only) This Class B digital apparatus meets all the prongs can...
.... GPSGV (for Germany only) The highest sound pressure level is less than 70 dB (A) in an outlet unless all requirements of this unit's plug with an extension cord or in accordance with any part inside of your NEC NP4001/NP4000 projector and keep the manual handy for Canada only) This Class B digital apparatus meets all the prongs can...
User Manual
Page 8
... not use for a number of time. • When using the tilt foot to touch the ventilation outlet on the rear as using a LAN cable: ƒ For safety, do not connect to the projector. • Do not send the projector in the Fan Mode window to reduce heat stress on the projector (see Fan Mode). 1 • Do not unplug the power cable from the wall...
... not use for a number of time. • When using the tilt foot to touch the ventilation outlet on the rear as using a LAN cable: ƒ For safety, do not connect to the projector. • Do not send the projector in the Fan Mode window to reduce heat stress on the projector (see Fan Mode). 1 • Do not unplug the power cable from the wall...
User Manual
Page 10
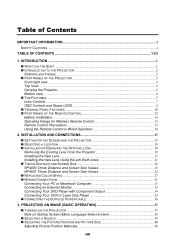
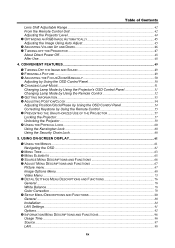
... and Screen Size Values 24 r REPLACING COLOR WHEEL ...27 s MAKING CONNECTIONS...31 Connecting Your PC or Macintosh Computer 31 Connecting an External Monitor 33 Connecting Your DVD Player with Component Output 34 Connecting Your VCR or Laser Disc Player 35 t CONNECTING THE SUPPLIED POWER CABLE 36 3. PROJECTING AN IMAGE (BASIC OPERATION 37 n TURNING ON THE PROJECTOR ...37 Note on Startup Screen (Menu Language Select screen 38 o SELECTING A SOURCE ...39 p ADJUSTING THE PICTURE POSITION AND PICTURE SIZE 40 Adjusting Picture Position Manually...
... and Screen Size Values 24 r REPLACING COLOR WHEEL ...27 s MAKING CONNECTIONS...31 Connecting Your PC or Macintosh Computer 31 Connecting an External Monitor 33 Connecting Your DVD Player with Component Output 34 Connecting Your VCR or Laser Disc Player 35 t CONNECTING THE SUPPLIED POWER CABLE 36 3. PROJECTING AN IMAGE (BASIC OPERATION 37 n TURNING ON THE PROJECTOR ...37 Note on Startup Screen (Menu Language Select screen 38 o SELECTING A SOURCE ...39 p ADJUSTING THE PICTURE POSITION AND PICTURE SIZE 40 Adjusting Picture Position Manually...
User Manual
Page 11
... q OPTIMIZING AN RGB IMAGE AUTOMATICALLY 45 Adjusting the Image Using Auto Adjust 45 r ADJUSTING VOLUME UP AND DOWN 46 s TURNING OFF THE PROJECTOR ...47 About Direct Power Off...48 After Use...48 4. CONVENIENT FEATURES ...49 n TURNING OFF THE IMAGE AND SOUND 49 o FREEZING A PICTURE ...49 p ADJUSTING THE FOCUS/ZOOM MANUALLY 50 Adjusting by Using the OSD Control Panel 50 q CHANGING LAMP MODE ...51 Changing Lamp Mode by Using the Projector's OSD Control Panel 51 Changing Lamp Mode by Using the Remote Control 52 r GETTING INFORMATION...53 s ADJUSTING POSITION/CLOCK...
... q OPTIMIZING AN RGB IMAGE AUTOMATICALLY 45 Adjusting the Image Using Auto Adjust 45 r ADJUSTING VOLUME UP AND DOWN 46 s TURNING OFF THE PROJECTOR ...47 About Direct Power Off...48 After Use...48 4. CONVENIENT FEATURES ...49 n TURNING OFF THE IMAGE AND SOUND 49 o FREEZING A PICTURE ...49 p ADJUSTING THE FOCUS/ZOOM MANUALLY 50 Adjusting by Using the OSD Control Panel 50 q CHANGING LAMP MODE ...51 Changing Lamp Mode by Using the Projector's OSD Control Panel 51 Changing Lamp Mode by Using the Remote Control 52 r GETTING INFORMATION...53 s ADJUSTING POSITION/CLOCK...

User Manual
Page 14
... Enhanced smart security settings for property management. Also, the power cable can be turned off center screen installations. z A variety of input ports and a comprehensive array of BrilliantColor™ and 6-segment color wheel offers a more true color re- z 3W+3W Stereo speaker Built in 3W x 2 speakers are available. z Combination of system control interfaces This projector supports input signals including BNC, DVI-D, analog RGB, component, S-video, and composite. z Direct Power Off & Auto Start The projector...
... Enhanced smart security settings for property management. Also, the power cable can be turned off center screen installations. z A variety of input ports and a comprehensive array of BrilliantColor™ and 6-segment color wheel offers a more true color re- z 3W+3W Stereo speaker Built in 3W x 2 speakers are available. z Combination of system control interfaces This projector supports input signals including BNC, DVI-D, analog RGB, component, S-video, and composite. z Direct Power Off & Auto Start The projector...

User Manual
Page 15
... release button Press the release button before use 10. Anti-Theft Screw Prevent theft of the Projector Front-right view 1. Intake vent Lamp cooling vent - do not obstruct 7. Do not obstruct any of dust - Introduction ITEM 1. 2. 3. Intake vent and front filter Keeps the front fan free of the grill openings. 3 clean regularly for IR signal from remote control Remove cover to replace lamp or color wheel...
... release button Press the release button before use 10. Anti-Theft Screw Prevent theft of the Projector Front-right view 1. Intake vent Lamp cooling vent - do not obstruct 7. Do not obstruct any of dust - Introduction ITEM 1. 2. 3. Intake vent and front filter Keeps the front fan free of the grill openings. 3 clean regularly for IR signal from remote control Remove cover to replace lamp or color wheel...

User Manual
Page 39
... or leave fingerprints, causing the image quality to degrade. • Heed the following guide. Be sure to use the color wheel pre-installed or supplied with a four-segment color wheel installed. Loosen the captive screw (A) on the lamp cover. 2. Remove the lamp cover by sliding in the direction of the color wheel. To replace the color wheel (located under the lamp cover adjacent to lamp 1) refer...
... or leave fingerprints, causing the image quality to degrade. • Heed the following guide. Be sure to use the color wheel pre-installed or supplied with a four-segment color wheel installed. Loosen the captive screw (A) on the lamp cover. 2. Remove the lamp cover by sliding in the direction of the color wheel. To replace the color wheel (located under the lamp cover adjacent to lamp 1) refer...

User Manual
Page 58
The volume level is displayed on the OSD control panel to the following as a guide. 1. buttons or the Select pad left and right keys on the OSD control panel. Use the Volume +/- Projecting an Image (Basic Operation) r Adjusting Volume Up and Down The volume can be adjusted from the OSD Control Panel or with the Remote Control unit. Press the Volume +/buttons on the remote control or the Select pad left and right keys on screen. 2. 3. Refer to adjust the level. 46
The volume level is displayed on the OSD control panel to the following as a guide. 1. buttons or the Select pad left and right keys on the OSD control panel. Use the Volume +/- Projecting an Image (Basic Operation) r Adjusting Volume Up and Down The volume can be adjusted from the OSD Control Panel or with the Remote Control unit. Press the Volume +/buttons on the remote control or the Select pad left and right keys on screen. 2. 3. Refer to adjust the level. 46

User Manual
Page 59
... IN connector of the projector and (or) the prong plug of making adjustment or setting changes and closing the menu. Doing so can cause damage to default. The cooling fans stop operating when the projector turns off time). Press the Main Power switch to the off position (O) to verify power off the projector. 47 Press the On/Standby button again or Enter on , use a power strip...
... IN connector of the projector and (or) the prong plug of making adjustment or setting changes and closing the menu. Doing so can cause damage to default. The cooling fans stop operating when the projector turns off time). Press the Main Power switch to the off position (O) to verify power off the projector. 47 Press the On/Standby button again or Enter on , use a power strip...

User Manual
Page 67
... Keystone by Using the Remote Control IMPORTANT: When adjusting the keystone, set the lens shift position to the following. • Horizontal: the lens center • Vertical: the bottom of the projected image is a regular shape (see diagram). 4. Adjust the Horizontal and Vertical sliding bars using the select buttons. 3. Note: Holding down the Keystone button 2 seconds resets the default keystone values. 55 Adjust the slide bars until the screen trapezoid is...
... Keystone by Using the Remote Control IMPORTANT: When adjusting the keystone, set the lens shift position to the following. • Horizontal: the lens center • Vertical: the bottom of the projected image is a regular shape (see diagram). 4. Adjust the Horizontal and Vertical sliding bars using the select buttons. 3. Note: Holding down the Keystone button 2 seconds resets the default keystone values. 55 Adjust the slide bars until the screen trapezoid is...

User Manual
Page 75
.../9300K/10500K BrilliantColor Image Options Video Volume Setup General Contrast Brightness Sharpness Color Hue Reset Aspect Ratio Overscan Position/Clock WXGA Mode (NP4001 only) Noise Reduction 3D Y/C Separation Deinterlace Color Matrix Telecine 0~61 Keystone Lamp Mode Lamp Select Lamp Interval Menu Mode Language White Balance Color Correction Brightness R Brightness G Brightness B Contrast R Contrast G Contrast B Red, Green, Blue, Yellow, Magenta, Cyan NP4000: 4:3/16:9/Crop/Native/Normal NP4001: 4:3/16:9/15:9/Letterbox/Native/Normal 0%/5%/10%/15% Horizontal Vertical Clock Phase Off...
.../9300K/10500K BrilliantColor Image Options Video Volume Setup General Contrast Brightness Sharpness Color Hue Reset Aspect Ratio Overscan Position/Clock WXGA Mode (NP4001 only) Noise Reduction 3D Y/C Separation Deinterlace Color Matrix Telecine 0~61 Keystone Lamp Mode Lamp Select Lamp Interval Menu Mode Language White Balance Color Correction Brightness R Brightness G Brightness B Contrast R Contrast G Contrast B Red, Green, Blue, Yellow, Magenta, Cyan NP4000: 4:3/16:9/Crop/Native/Normal NP4001: 4:3/16:9/15:9/Letterbox/Native/Normal 0%/5%/10%/15% Horizontal Vertical Clock Phase Off...

User Manual
Page 79
... be accessed from the list. Using On-Screen Display r Adjust Menu Descriptions and Functions The Adjust menu contains overall projector settings for Picture will change depending on page 76. ITEM Preset Detail Setting Contrast Brightness Sharpness Color Hue Reset DESCRIPTION Select a set of preset values using ◄or► to sharpen or blur the borders between light and dark areas of the picture. Adjust the Brightness value using ◄or► to...
... be accessed from the list. Using On-Screen Display r Adjust Menu Descriptions and Functions The Adjust menu contains overall projector settings for Picture will change depending on page 76. ITEM Preset Detail Setting Contrast Brightness Sharpness Color Hue Reset DESCRIPTION Select a set of preset values using ◄or► to sharpen or blur the borders between light and dark areas of the picture. Adjust the Brightness value using ◄or► to...

User Manual
Page 97
... facing projection (Default setting). Ceiling Front - The setting will change to produce the image from the following: Desktop Front - Standby Mode Select Standby Mode. Forward facing ceiling mounted projection. Ceiling Rear - Control Panel Lock Note: y This Control Panel Lock does not affect the remote control functions. Black level is locked, pressing and holding the Exit button on the projector cabinet for PC control. Range: Front/Back, Front, Back LAN Settings Opens LAN preferences...
... facing projection (Default setting). Ceiling Front - The setting will change to produce the image from the following: Desktop Front - Standby Mode Select Standby Mode. Forward facing ceiling mounted projection. Ceiling Rear - Control Panel Lock Note: y This Control Panel Lock does not affect the remote control functions. Black level is locked, pressing and holding the Exit button on the projector cabinet for PC control. Range: Front/Back, Front, Back LAN Settings Opens LAN preferences...

User Manual
Page 98
Using On-Screen Display Desktop front Desktop rear Ceiling rear Ceiling front Communication Speed Select communication speed to set the baud rate of the connection. Note: Longer cable connections may require lower settings. Select from the following options: ƒ 4800bps ƒ 9600bps ƒ 19200bps ƒ 38400bps Menu Color Select Select color modes to set the menu color. 5. Select from the following options: 86
Using On-Screen Display Desktop front Desktop rear Ceiling rear Ceiling front Communication Speed Select communication speed to set the baud rate of the connection. Note: Longer cable connections may require lower settings. Select from the following options: ƒ 4800bps ƒ 9600bps ƒ 19200bps ƒ 38400bps Menu Color Select Select color modes to set the menu color. 5. Select from the following options: 86

User Manual
Page 105
... the power cable is on the remote control or projector cabinet. y When the projector is off the power (AC) to an active power outlet and the main power switch is connected to the projector by any input. 93 Range: Auto, NTSC, PAL, SECAM (see page 95). Set this item to on to use the POWER (ON/STANDBY) button on . Using On-Screen Display ITEM DESCRIPTION Color System Select the default Color System...
... the power cable is on the remote control or projector cabinet. y When the projector is off the power (AC) to an active power outlet and the main power switch is connected to the projector by any input. 93 Range: Auto, NTSC, PAL, SECAM (see page 95). Set this item to on to use the POWER (ON/STANDBY) button on . Using On-Screen Display ITEM DESCRIPTION Color System Select the default Color System...

User Manual
Page 123
... information, see the user documentation or online help supplied with your computer. scrolls the viewing area of the window or to the previous or next slide in PowerPoint on the Windows. works as the mouse right button. moves the mouse cursor on your computer's mouse from the remote control. MOUSE R-CLICK Button - Note: When you operate the computer using the USB terminal 7. The...
... information, see the user documentation or online help supplied with your computer. scrolls the viewing area of the window or to the previous or next slide in PowerPoint on the Windows. works as the mouse right button. moves the mouse cursor on your computer's mouse from the remote control. MOUSE R-CLICK Button - Note: When you operate the computer using the USB terminal 7. The...
User Manual
Page 124
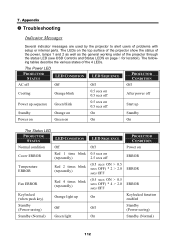
... the general working order of the projector through the status LED (see OSD Controls and Status LEDS on ERROR ERROR ERROR Keylocked function enabled Standby (Power-saving) Standby (Normal) 112 The following tables describe the various states of problems with setup or internal parts. Appendix o Troubleshooting Indicator Messages Several indicator messages are used by the projector to alert users of the 4 LEDs. The Power LED PROJECTOR STATUS LED CONDITION LED SEQUENCE...
... the general working order of the projector through the status LED (see OSD Controls and Status LEDS on ERROR ERROR ERROR Keylocked function enabled Standby (Power-saving) Standby (Normal) 112 The following tables describe the various states of problems with setup or internal parts. Appendix o Troubleshooting Indicator Messages Several indicator messages are used by the projector to alert users of the 4 LEDs. The Power LED PROJECTOR STATUS LED CONDITION LED SEQUENCE...
User Manual
Page 127
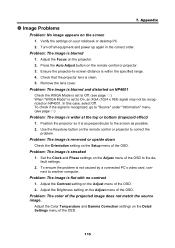
... on the Setup menu of the OSD. 115 Press the Auto Adjust button on the Adjust menu of the projected image does not match the source image. Problem: The image is flat with no contrast 1. Position the projector so it is within the specified range. 4. To ensure the problem is not caused by a connected PC's video card, connect to -screen distance is as possible. 2. Adjust the Contrast setting on the remote control or projector. 3. Appendix p Image Problems Problem: No image appears on...
... on the Setup menu of the OSD. 115 Press the Auto Adjust button on the Adjust menu of the projected image does not match the source image. Problem: The image is flat with no contrast 1. Position the projector so it is within the specified range. 4. To ensure the problem is not caused by a connected PC's video card, connect to -screen distance is as possible. 2. Adjust the Contrast setting on the remote control or projector. 3. Appendix p Image Problems Problem: No image appears on...
User Manual
Page 149
...). Power cable's plug is too dark. Horizontal and vertical positions are supported by the projector. No sound. Video and Audio No image is correctly connected to the projector. • A combination of function keys will help us solve your user's manual. Input source's resolution and frequency are correctly adjusted on a computer signal. Still unchanged even though you carry out [Reset] in the projector's menu. Lamp Hours Used (lamp operation hours) was cleared after lamp replacement. No image (blue...
...). Power cable's plug is too dark. Horizontal and vertical positions are supported by the projector. No sound. Video and Audio No image is correctly connected to the projector. • A combination of function keys will help us solve your user's manual. Input source's resolution and frequency are correctly adjusted on a computer signal. Still unchanged even though you carry out [Reset] in the projector's menu. Lamp Hours Used (lamp operation hours) was cleared after lamp replacement. No image (blue...

User Manual
Page 150
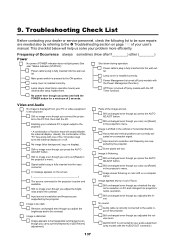
... button for a minimum of the projector and the remote control. Control Panel Lock is not turned on application and environment where your problem in detail. Projector is not used Projector Installation environment Model number: Screen size: inch Serial No: Screen type: White matte Beads Polarization Date of purchase: Wide angle High contrast Lamp operating time (hours): Lamp Mode: Normal Eco Throw distance: feet/inch/m Information on input signal: Orientation: Ceiling mount Desktop Horizontal synch frequency [ ] kHz Power outlet connection: Vertical...
... button for a minimum of the projector and the remote control. Control Panel Lock is not turned on application and environment where your problem in detail. Projector is not used Projector Installation environment Model number: Screen size: inch Serial No: Screen type: White matte Beads Polarization Date of purchase: Wide angle High contrast Lamp operating time (hours): Lamp Mode: Normal Eco Throw distance: feet/inch/m Information on input signal: Orientation: Ceiling mount Desktop Horizontal synch frequency [ ] kHz Power outlet connection: Vertical...


