
User Guide
Page 6
...forms, please use the 7-digit order numbers listed below. Changes or modifications not expressly approved by Motorola may void the user's authority granted by the Federal Communications Commission (FCC). If using the FCC Fax-on determining your radio frequency, please call the FCC forms hotline system at: at... at 1-800-448-6686. For questions on -Demand system, use the following contact information: Faxed Mailed contact the Fax-On-Demand call Motorola Product Services at : 1-888-CALL-FCC 1-888-225-5322 or: http://www.fcc.gov Request forms 3060001, 3060003, and 3060006 Request ...
...forms, please use the 7-digit order numbers listed below. Changes or modifications not expressly approved by Motorola may void the user's authority granted by the Federal Communications Commission (FCC). If using the FCC Fax-on determining your radio frequency, please call the FCC forms hotline system at: at... at 1-800-448-6686. For questions on -Demand system, use the following contact information: Faxed Mailed contact the Fax-On-Demand call Motorola Product Services at : 1-888-CALL-FCC 1-888-225-5322 or: http://www.fcc.gov Request forms 3060001, 3060003, and 3060006 Request ...
User Guide
Page 15
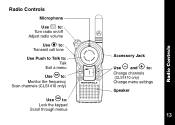
Radio Controls Microphone Use P to: Turn radio on/off Adjust radio volume Use B to: Transmit call tone Use Push to Talk to: Talk Exit a menu Use T to: Monitor the frequency Scan channels (CLS1410 only) Use S to: Lock the keypad Scroll through menus Accessory Jack Use [ and ] to: Change channels (CLS1410 only) Change menu settings Speaker 020976o 13 Radio Controls
Radio Controls Microphone Use P to: Turn radio on/off Adjust radio volume Use B to: Transmit call tone Use Push to Talk to: Talk Exit a menu Use T to: Monitor the frequency Scan channels (CLS1410 only) Use S to: Lock the keypad Scroll through menus Accessory Jack Use [ and ] to: Change channels (CLS1410 only) Change menu settings Speaker 020976o 13 Radio Controls
User Guide
Page 26
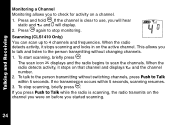
... activity, it stops scanning and locks in on that channel and displays w and the channel number. 2. To talk to the person transmitting without changing channels. 1. If the channel is scanning, the radio transmits on the channel you were on a channel. 1. To start scanning, briefly press ...T. Press T again to Talk while the radio is clear to 4 channels and frequencies. To stop monitoring. Talking and Receiving Monitoring a Channel Monitoring allows you to check for activity on before you started scanning. 24 If you ...
... activity, it stops scanning and locks in on that channel and displays w and the channel number. 2. To talk to the person transmitting without changing channels. 1. If the channel is scanning, the radio transmits on the channel you were on a channel. 1. To start scanning, briefly press ...T. Press T again to Talk while the radio is clear to 4 channels and frequencies. To stop monitoring. Talking and Receiving Monitoring a Channel Monitoring allows you to check for activity on before you started scanning. 24 If you ...
User Guide
Page 28
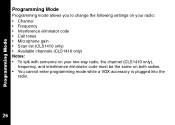
Programming Mode Programming Mode Programming mode allows you to change the following settings on your radio: • Channel • Frequency • Interference eliminator code • Call tones • Microphone gain • Scan list (CLS1410 only) • Available channels (CLS1410 only) Notes: • To talk with someone on your two-way radio, the channel (CLS1410 only), frequency, and interference eliminator code must be the same on both radios. • You cannot enter programming mode while a VOX accessory is plugged into the radio. 26
Programming Mode Programming Mode Programming mode allows you to change the following settings on your radio: • Channel • Frequency • Interference eliminator code • Call tones • Microphone gain • Scan list (CLS1410 only) • Available channels (CLS1410 only) Notes: • To talk with someone on your two-way radio, the channel (CLS1410 only), frequency, and interference eliminator code must be the same on both radios. • You cannot enter programming mode while a VOX accessory is plugged into the radio. 26
User Guide
Page 37
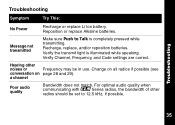
Recharge, replace, and/or reposition batteries. Hearing other radios should be in use. Change on all radios if possible (see conversation on page 28 and 29). Reposition or replace Alkaline batteries. Verify the transmit light is completely pressed while ...transmitting. a channel Poor audio quality Bandwidth does not match. Message not transmitted Make sure Push to 12.5 kHz, if possible. 35 Verify Channel, Frequency, and Code settings are correct. For optimal audio quality when communicating with _Series radios, the bandwidth of other noises or...
Recharge, replace, and/or reposition batteries. Hearing other radios should be in use. Change on all radios if possible (see conversation on page 28 and 29). Reposition or replace Alkaline batteries. Verify the transmit light is completely pressed while ...transmitting. a channel Poor audio quality Bandwidth does not match. Message not transmitted Make sure Push to 12.5 kHz, if possible. 35 Verify Channel, Frequency, and Code settings are correct. For optimal audio quality when communicating with _Series radios, the bandwidth of other noises or...

User Guide
Page 38
.... Radios are interfering with transmission. Confirm radios have the same channel, frequency, and interference eliminator code settings (see page 22). Recharge, replace, and/or reposition batteries. Low batteries 36 Recharge or replace batteries. Extreme operating temperatures affect battery life. Change location of sight to improve range. Move to body such as in...
.... Radios are interfering with transmission. Confirm radios have the same channel, frequency, and interference eliminator code settings (see page 22). Recharge, replace, and/or reposition batteries. Low batteries 36 Recharge or replace batteries. Extreme operating temperatures affect battery life. Change location of sight to improve range. Move to body such as in...
User Guide
Page 47
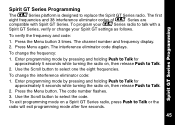
Press the Menu button 3 times. The channel number and frequency display. 2. To change the interference eliminator code: 1. To change the frequency: 1. The code number flashes. 3. To program your Spirit GT settings as follows. The interference eliminator code displays. ... 38 interference eliminator codes of _ Series are compatible with a Spirit GT Series, verify or change your _Series radio to select one the eight frequencies. Press Menu again. To verify the frequency and code: 1. Enter programming mode by pressing and holding Push to Talk for approximately 5 seconds ...
Press the Menu button 3 times. The channel number and frequency display. 2. To change the interference eliminator code: 1. To change the frequency: 1. The code number flashes. 3. To program your Spirit GT settings as follows. The interference eliminator code displays. ... 38 interference eliminator codes of _ Series are compatible with a Spirit GT Series, verify or change your _Series radio to select one the eight frequencies. Press Menu again. To verify the frequency and code: 1. Enter programming mode by pressing and holding Push to Talk for approximately 5 seconds ...

User Guide
Page 57
Press [ or ] to change the frequency. Press S until y displays.Press [or ] to change the code. Set the Frequency Set the Interference Eliminator Code Set Available Channels* * CLS1410 Only Press S until = displays. Press [ or ] to Talk and Qfor 3 seconds while turning the radio on. ... To enter programming mode, press and hold Push to select number of available channels. The radio beeps and displays k, the channel number flashes, and the frequency (indicated by l) and code (indicated by y) display alternately.
Press [ or ] to change the frequency. Press S until y displays.Press [or ] to change the code. Set the Frequency Set the Interference Eliminator Code Set Available Channels* * CLS1410 Only Press S until = displays. Press [ or ] to Talk and Qfor 3 seconds while turning the radio on. ... To enter programming mode, press and hold Push to select number of available channels. The radio beeps and displays k, the channel number flashes, and the frequency (indicated by l) and code (indicated by y) display alternately.


