User Guide
Page 3
... Installing the Batteries 15 Charging the Battery 16 Turning Your Radio On and Off . 19 Adjusting the Volume 20 Factory Default Settings 27 Entering Programming Mode .....28 Cloning Radio Settings 32 Advanced Features 33 Troubleshooting 35 Use and Care 38 Frequencies and Bandwidths.....39 Spirit GT Series Programming ... 45 Warranty 46 Reading the Display 20 Talking and Receiving 21 Basic Radio Operation 21 Signal Strength and Channel Busy Indicators......... 21 Talk Range 22 Handsfree Use (VOX) (CLS1410 only 22 Locking the Keypad 23 Monitoring a Channel 24 Scanning...
... Installing the Batteries 15 Charging the Battery 16 Turning Your Radio On and Off . 19 Adjusting the Volume 20 Factory Default Settings 27 Entering Programming Mode .....28 Cloning Radio Settings 32 Advanced Features 33 Troubleshooting 35 Use and Care 38 Frequencies and Bandwidths.....39 Spirit GT Series Programming ... 45 Warranty 46 Reading the Display 20 Talking and Receiving 21 Basic Radio Operation 21 Signal Strength and Channel Busy Indicators......... 21 Talk Range 22 Handsfree Use (VOX) (CLS1410 only 22 Locking the Keypad 23 Monitoring a Channel 24 Scanning...

User Guide
Page 6
... FCC website, please request document number 000601, which frequency(ies) you must decide which includes all forms and instructions. For questions on determining your application, you can operate on. FCC Licensing Information FCC Licensing Information _Series professional two-way radios operate on radio frequencies that are required to have a license issued by the FCC. Application is made . To obtain the required forms, please use the 7-digit order numbers listed...
... FCC website, please request document number 000601, which frequency(ies) you must decide which includes all forms and instructions. For questions on determining your application, you can operate on. FCC Licensing Information FCC Licensing Information _Series professional two-way radios operate on radio frequencies that are required to have a license issued by the FCC. Application is made . To obtain the required forms, please use the 7-digit order numbers listed...
User Guide
Page 8
... Receive Procedure Your two-way radio contains a transmitter and a receiver. Read This Information Before Using Your Radio. To control your exposure and ensure compliance with the following procedure: • Transmit no more than 50% of measuring standards compliance). Transmitting 50% of the time, or less, is designed to comply with the occupational/controlled environment exposure limits, always adhere to Talk (PTT) button...
... Receive Procedure Your two-way radio contains a transmitter and a receiver. Read This Information Before Using Your Radio. To control your exposure and ensure compliance with the following procedure: • Transmit no more than 50% of measuring standards compliance). Transmitting 50% of the time, or less, is designed to comply with the occupational/controlled environment exposure limits, always adhere to Talk (PTT) button...
User Guide
Page 9
...radio in a vertical position with the microphone 1 to 2 inches (2.5 to 5 cm) away from 3 kHz to Radio Frequency ...FCC regulations. Two-Way Radio Operation When using your radio as a traditional two-way radio, hold the antenna when the radio is within the guidelines set forth in the Frequency Range from the lips. 7 Limits of Health (Canada) Safety Code 6. To assure optimal radio performance and make sure human exposure to radio frequency electromagnetic energy is "IN USE." Portable Radio Operation and EME Exposure Antenna Care Use only the supplied or an approved replacement antenna...
...radio in a vertical position with the microphone 1 to 2 inches (2.5 to 5 cm) away from 3 kHz to Radio Frequency ...FCC regulations. Two-Way Radio Operation When using your radio as a traditional two-way radio, hold the antenna when the radio is within the guidelines set forth in the Frequency Range from the lips. 7 Limits of Health (Canada) Safety Code 6. To assure optimal radio performance and make sure human exposure to radio frequency electromagnetic energy is "IN USE." Portable Radio Operation and EME Exposure Antenna Care Use only the supplied or an approved replacement antenna...
User Guide
Page 10
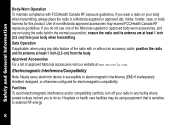
... posted notices instruct you do so. Approved Accessories For a list of non-Motorola-approved accessories may be using the radio held in a Motorola-supplied or approved clip, holder, holster, case, or body harness for electromagnetic compatibility. Facilities To avoid electromagnetic interference and/or compatibility conflicts, turn off your body when transmitting, always place the radio in the normal use position, ensure the radio and its antenna at least...
... posted notices instruct you do so. Approved Accessories For a list of non-Motorola-approved accessories may be using the radio held in a Motorola-supplied or approved clip, holder, holster, case, or body harness for electromagnetic compatibility. Facilities To avoid electromagnetic interference and/or compatibility conflicts, turn off your body when transmitting, always place the radio in the normal use position, ensure the radio and its antenna at least...
User Guide
Page 13
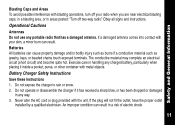
... use any way. 3. Batteries All batteries can result. Exercise care in handling any charged battery, particularly when placing it has received a sharp blow, or has been dropped or damaged in a risk of electric shock. 11 Safety and General Information Blasting Caps and Areas To avoid possible interference with metal objects. If a damaged antenna comes into contact with the unit. Battery Charger Safety Instructions...
... use any way. 3. Batteries All batteries can result. Exercise care in handling any charged battery, particularly when placing it has received a sharp blow, or has been dropped or damaged in a risk of electric shock. 11 Safety and General Information Blasting Caps and Areas To avoid possible interference with metal objects. If a damaged antenna comes into contact with the unit. Battery Charger Safety Instructions...
User Guide
Page 15
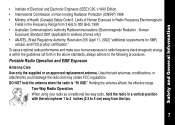
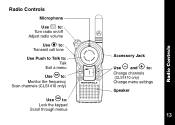
Radio Controls Microphone Use P to: Turn radio on/off Adjust radio volume Use B to: Transmit call tone Use Push to Talk to: Talk Exit a menu Use T to: Monitor the frequency Scan channels (CLS1410 only) Use S to: Lock the keypad Scroll through menus Accessory Jack Use [ and ] to: Change channels (CLS1410 only) Change menu settings Speaker 020976o 13 Radio Controls
Radio Controls Microphone Use P to: Turn radio on/off Adjust radio volume Use B to: Transmit call tone Use Push to Talk to: Talk Exit a menu Use T to: Monitor the frequency Scan channels (CLS1410 only) Use S to: Lock the keypad Scroll through menus Accessory Jack Use [ and ] to: Change channels (CLS1410 only) Change menu settings Speaker 020976o 13 Radio Controls

User Guide
Page 22
Note: Do not hold the radio too close to decrease the volume. Getting Started Reading the Display Signal Strength and Channel Busy Indicator Battery Meter Channel Interference Eliminator Code Indicator Programming Mode Scan (CLS1410 Only) 20 VibraCall® Alert Indicator Frequency and Interference Eliminator Code Keypad Lock Frequency Indicator Microphone Gain and VOX (CLS1410 only) Adjusting the Volume Turn P clockwise to increase the volume, and counterclockwise to your ear when adjusting the volume.
Note: Do not hold the radio too close to decrease the volume. Getting Started Reading the Display Signal Strength and Channel Busy Indicator Battery Meter Channel Interference Eliminator Code Indicator Programming Mode Scan (CLS1410 Only) 20 VibraCall® Alert Indicator Frequency and Interference Eliminator Code Keypad Lock Frequency Indicator Microphone Gain and VOX (CLS1410 only) Adjusting the Volume Turn P clockwise to increase the volume, and counterclockwise to your ear when adjusting the volume.

User Guide
Page 23
... is receiving), the radio displays w and a signal strength from your mouth. 3. Press T again to Talk. To listen, release Push to stop monitoring. 2. This can help determine when a radio is red when transmitting. Do not transmit if someone is speaking on a frequency, the radio displays w and the transmit light flashes at a faster rate of the radio is moving out of the incoming signal. 21 Signal Strength and Channel Busy Indicators...
... is receiving), the radio displays w and a signal strength from your mouth. 3. Press T again to Talk. To listen, release Push to stop monitoring. 2. This can help determine when a radio is red when transmitting. Do not transmit if someone is speaking on a frequency, the radio displays w and the transmit light flashes at a faster rate of the radio is moving out of the incoming signal. 21 Signal Strength and Channel Busy Indicators...

User Guide
Page 24
.... Open the accessory cover. 3. Plug the audio accessory firmly into the accessory jack. 4. Lower the radio volume BEFORE placing the accessory in or near your ear. 22 Talk Range Industrial Inside steel/concrete industrial buildings Up to 5 miles Talking and Receiving Handsfree Use (VOX) (CLS1410 only) The CLS1410 model radio can operate handsfree when used with compatible voice activation (VOX) accessories. ft. Turn the radio off. 2. If g is flashing and you start talking and when the radio transmits. A short...
.... Open the accessory cover. 3. Plug the audio accessory firmly into the accessory jack. 4. Lower the radio volume BEFORE placing the accessory in or near your ear. 22 Talk Range Industrial Inside steel/concrete industrial buildings Up to 5 miles Talking and Receiving Handsfree Use (VOX) (CLS1410 only) The CLS1410 model radio can operate handsfree when used with compatible voice activation (VOX) accessories. ft. Turn the radio off. 2. If g is flashing and you start talking and when the radio transmits. A short...

User Guide
Page 25
... your point of your radio settings. 1. To unlock, press and hold S for 3 seconds. 23 Press S until g displays. Setting the VOX Sensitivity You can lock the keypad to Talk or remove the audio accessory. To disable VOX operation, press Push to avoid accidentally changing your radio's accessory or microphone during VOX operation to select the sensitivity level: 0 = Off 1 = Low 2 = Medium 3 = High Locking the Keypad External VOX 020995o You can adjust the sensitivity of purchase. To receive, stop talking.
... your point of your radio settings. 1. To unlock, press and hold S for 3 seconds. 23 Press S until g displays. Setting the VOX Sensitivity You can lock the keypad to Talk or remove the audio accessory. To disable VOX operation, press Push to avoid accidentally changing your radio's accessory or microphone during VOX operation to select the sensitivity level: 0 = Off 1 = Low 2 = Medium 3 = High Locking the Keypad External VOX 020995o You can adjust the sensitivity of purchase. To receive, stop talking.
User Guide
Page 28
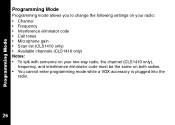
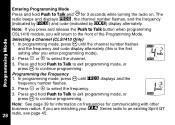
Programming Mode Programming Mode Programming mode allows you to change the following settings on your radio: • Channel • Frequency • Interference eliminator code • Call tones • Microphone gain • Scan list (CLS1410 only) • Available channels (CLS1410 only) Notes: • To talk with someone on your two-way radio, the channel (CLS1410 only), frequency, and interference eliminator code must be the same on both radios. • You cannot enter programming mode while a VOX accessory is plugged into the radio. 26
Programming Mode Programming Mode Programming mode allows you to change the following settings on your radio: • Channel • Frequency • Interference eliminator code • Call tones • Microphone gain • Scan list (CLS1410 only) • Available channels (CLS1410 only) Notes: • To talk with someone on your two-way radio, the channel (CLS1410 only), frequency, and interference eliminator code must be the same on both radios. • You cannot enter programming mode while a VOX accessory is plugged into the radio. 26
User Guide
Page 30
... Talk button when programming CSL1410 models, you will return to Talk and T for 3 seconds while turning the radio on frequencies for information on . In programming mode, press S until the channel number flashes and the frequency and code display alternately (this is the first setting after you are matching your _ Series radio to select the channel. 3. Programming Mode Entering Programming Mode Press and hold Push to the front of the Programming Mode. The radio beeps and displays k, the channel number flashes, and the frequency...
... Talk button when programming CSL1410 models, you will return to Talk and T for 3 seconds while turning the radio on frequencies for information on . In programming mode, press S until the channel number flashes and the frequency and code display alternately (this is the first setting after you are matching your _ Series radio to select the channel. 3. Programming Mode Entering Programming Mode Press and hold Push to the front of the Programming Mode. The radio beeps and displays k, the channel number flashes, and the frequency...

User Guide
Page 32
... programming mode, or press S to hear and select the call tone. Programming Mode Programming Call Tones and VibraCall® (CLS1410 only) Your radio can transmit call tones to other radios in the last 30 seconds. Your radio is programmed at the factory with call tones turned off (set to 0), but you can alert them that makes the CLS1410 radio vibrate briefly when it receives if you have not transmitted or received in your call tone...
... programming mode, or press S to hear and select the call tone. Programming Mode Programming Call Tones and VibraCall® (CLS1410 only) Your radio can transmit call tones to other radios in the last 30 seconds. Your radio is programmed at the factory with call tones turned off (set to 0), but you can alert them that makes the CLS1410 radio vibrate briefly when it receives if you have not transmitted or received in your call tone...

User Guide
Page 34
... radio using the 56531 Multi-Unit Charger (MUC) optional accessory. The source radio transmits its settings to be plugged in the charging pocket Paired that is cloned. The MUC does not have to the target radio. Turn the target radio off and back on again to a singlechannel radio, but both radios require charged batteries. On the source radio, press and hold Push to Talk and T for cloning, but only the first channel...
... radio using the 56531 Multi-Unit Charger (MUC) optional accessory. The source radio transmits its settings to be plugged in the charging pocket Paired that is cloned. The MUC does not have to the target radio. Turn the target radio off and back on again to a singlechannel radio, but both radios require charged batteries. On the source radio, press and hold Push to Talk and T for cloning, but only the first channel...
User Guide
Page 37
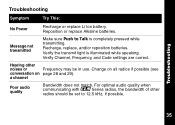
... other noises or Frequency may be set to Talk is illuminated while speaking. Recharge, replace, and/or reposition batteries. Hearing other radios should be in use. Verify Channel, Frequency, and Code settings are correct. Verify the transmit light is completely pressed while transmitting. a channel Poor audio quality Bandwidth does not match. Message not transmitted Make sure Push to 12.5 kHz, if possible. 35 Reposition or replace Alkaline batteries. Troubleshooting Troubleshooting Symptom Try This: No Power Recharge or replace...
... other noises or Frequency may be set to Talk is illuminated while speaking. Recharge, replace, and/or reposition batteries. Hearing other radios should be in use. Verify Channel, Frequency, and Code settings are correct. Verify the transmit light is completely pressed while transmitting. a channel Poor audio quality Bandwidth does not match. Message not transmitted Make sure Push to 12.5 kHz, if possible. 35 Reposition or replace Alkaline batteries. Troubleshooting Troubleshooting Symptom Try This: No Power Recharge or replace...

User Guide
Page 38
... location. Low batteries 36 Recharge or replace batteries. Move to body such as in a pocket or on a belt decreases range. Extreme operating temperatures affect battery life. Symptom Try This: Troubleshooting Limited talk range Message not received Heavy static or interference Steel and/or concrete structures, heavy foliage, buildings, or vehicles decrease range (see page 26). Keypad locked Unlock by holding S for clear line of radio. Check for 3 seconds. Change location of...
... location. Low batteries 36 Recharge or replace batteries. Move to body such as in a pocket or on a belt decreases range. Extreme operating temperatures affect battery life. Symptom Try This: Troubleshooting Limited talk range Message not received Heavy static or interference Steel and/or concrete structures, heavy foliage, buildings, or vehicles decrease range (see page 26). Keypad locked Unlock by holding S for clear line of radio. Check for 3 seconds. Change location of...
User Guide
Page 39
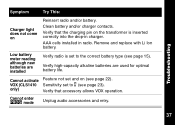
... that the charging pin on the transformer is set to the correct battery type (see page 23). Troubleshooting Symptom Try This: Charger light does not come on (see page 22). Remove and replace with Li Ion battery. Cannot enter k mode Unplug audio accessories and retry. 37 Low battery meter reading although new batteries are used for optimal battery life. Verify that accessory allows VOX operation. Verify high-capacity alkaline batteries are installed Verify radio is...
... that the charging pin on the transformer is set to the correct battery type (see page 23). Troubleshooting Symptom Try This: Charger light does not come on (see page 22). Remove and replace with Li Ion battery. Cannot enter k mode Unplug audio accessories and retry. 37 Low battery meter reading although new batteries are used for optimal battery life. Verify that accessory allows VOX operation. Verify high-capacity alkaline batteries are installed Verify radio is...
User Guide
Page 47
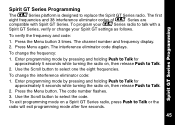
... Spirit GT settings as follows. Use the Scroll button to select the code. The first eight frequencies and 38 interference eliminator codes of _ Series are compatible with a Spirit GT Series, verify or change your _Series radio to Talk. 2. Press Menu again. To change the interference eliminator code: 1. The code number flashes. 3. To verify the frequency and code: 1. Enter programming mode by pressing and holding Push to Talk for approximately 5 seconds while turning the radio on a Spirit GT Series radio, press Push to replace the Spirit GT Series radio. Use...
... Spirit GT settings as follows. Use the Scroll button to select the code. The first eight frequencies and 38 interference eliminator codes of _ Series are compatible with a Spirit GT Series, verify or change your _Series radio to Talk. 2. Press Menu again. To change the interference eliminator code: 1. The code number flashes. 3. To verify the frequency and code: 1. Enter programming mode by pressing and holding Push to Talk for approximately 5 seconds while turning the radio on a Spirit GT Series radio, press Push to replace the Spirit GT Series radio. Use...
User Guide
Page 50
... at your address and telephone number. What This Warranty Does Not Cover • Products that are operated in any way. Warranty You will ship repaired or replacement Products at our expense for the freight and insurance, but at the telephone number listed above. You must also return all detachable parts such as antennas, batteries and chargers. We will receive instructions on how to ship...
... at your address and telephone number. What This Warranty Does Not Cover • Products that are operated in any way. Warranty You will ship repaired or replacement Products at our expense for the freight and insurance, but at the telephone number listed above. You must also return all detachable parts such as antennas, batteries and chargers. We will receive instructions on how to ship...


