User Guide
Page 4
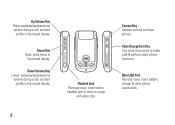
Down Volume Key Lower earpiece/speakerphone volume during a call , set alert profile in flip-closed display. Mini-USB Port Remove cover, insert battery charger & other phone accessories. Camera Key Activate camera and take photos. Smart Key Open quick menu in flip-closed display. Voice Recognition Key Use voice commands to songs and video clips. Up Volume Key Raise earpiece/speakerphone volume during a call , set alert profile in flip-closed display. 2 Headset Jack Remove cover, insert stereo headset jack to listen to make calls & perform basic phone functions.
Down Volume Key Lower earpiece/speakerphone volume during a call , set alert profile in flip-closed display. Mini-USB Port Remove cover, insert battery charger & other phone accessories. Camera Key Activate camera and take photos. Smart Key Open quick menu in flip-closed display. Voice Recognition Key Use voice commands to songs and video clips. Up Volume Key Raise earpiece/speakerphone volume during a call , set alert profile in flip-closed display. 2 Headset Jack Remove cover, insert stereo headset jack to listen to make calls & perform basic phone functions.

User Guide
Page 5
Camera Lens Speaker Listen to set macro mode (for self-portraits. Stylus Use with touchscreen display. Camera Mode Switch Slide right to set normal picture mode, slide left to audio playback of business cards or small objects). Mirror Aim camera lens for close-up shots of music & video clips. 3 Camera Key Activate camera and take photos.
Camera Lens Speaker Listen to set macro mode (for self-portraits. Stylus Use with touchscreen display. Camera Mode Switch Slide right to set normal picture mode, slide left to audio playback of business cards or small objects). Mirror Aim camera lens for close-up shots of music & video clips. 3 Camera Key Activate camera and take photos.
User Guide
Page 6
...reproduce the copyrighted software. Caution: Changes or modifications made in the U.S. Furthermore, the purchase of the Motorola products shall not be activated by Motorola, will void the user's authority to be modified, reverse-engineered, distributed, or reproduced in the United ... about feature availability and functionality. Always contact your service provider, and/or the provider's network settings may include copyrighted Motorola and third-party software stored in this manual may limit the feature's functionality. Accordingly, any third-party software provider,...
...reproduce the copyrighted software. Caution: Changes or modifications made in the U.S. Furthermore, the purchase of the Motorola products shall not be activated by Motorola, will void the user's authority to be modified, reverse-engineered, distributed, or reproduced in the United ... about feature availability and functionality. Always contact your service provider, and/or the provider's network settings may include copyrighted Motorola and third-party software stored in this manual may limit the feature's functionality. Accordingly, any third-party software provider,...
User Guide
Page 7
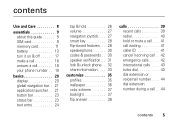
contents Use and Care 8 essentials 9 about this guide 9 SIM card 9 memory card 11 battery 13 turn it on & off 17 make a call 18 answer a call 18 your phone number . . 19 basics 20 display 20 global navigation bar. . 21 application launcher . . 21 button bar 23 status bar 23 text entry 24 tap & hold 26 volume 27 navigation joystick. . . . 27 smart key 28 flip-closed features . . . 28 speakerphone 30 codes & passwords . . 30 speaker verification. . . 31 lock & unlock phone . . 32 share information . . . . 33 customize 35 profiles 35 wallpaper 36 color scheme 37 backlight...
contents Use and Care 8 essentials 9 about this guide 9 SIM card 9 memory card 11 battery 13 turn it on & off 17 make a call 18 answer a call 18 your phone number . . 19 basics 20 display 20 global navigation bar. . 21 application launcher . . 21 button bar 23 status bar 23 text entry 24 tap & hold 26 volume 27 navigation joystick. . . . 27 smart key 28 flip-closed features . . . 28 speakerphone 30 codes & passwords . . 30 speaker verification. . . 31 lock & unlock phone . . 32 share information . . . . 33 customize 35 profiles 35 wallpaper 36 color scheme 37 backlight...
User Guide
Page 8
address book 45 view contact list . . . . . 45 add new contact . . . . . 46 create group 47 call or send message. . 47 search 48 sort 48 delete contact 49 storage location. . . . . . 49 copy contacts 49 categories 50 check capacity 51 share contact 52 synchronize contacts. . 52 owner's information. . . 53 messages 54 message center. . . . . . 54 signature 55 send text message . . . 56 send multimedia message 57 6 contents unsent messages . . . . 60 tips for sending messages 60 receive message . . . . . 60 read and reply 62 store message object . 62 sort messages 62 drafts 63...
address book 45 view contact list . . . . . 45 add new contact . . . . . 46 create group 47 call or send message. . 47 search 48 sort 48 delete contact 49 storage location. . . . . . 49 copy contacts 49 categories 50 check capacity 51 share contact 52 synchronize contacts. . 52 owner's information. . . 53 messages 54 message center. . . . . . 54 signature 55 send text message . . . 56 send multimedia message 57 6 contents unsent messages . . . . 60 tips for sending messages 60 receive message . . . . . 60 read and reply 62 store message object . 62 sort messages 62 drafts 63...
User Guide
Page 9
other features 131 advanced calling . . . . 131 setup 133 call times & costs. . . 135 handsfree 137 security 138 memory management 139 service and repairs . . . 142 SAR Data 143 EU Conformance . . . . 145 GNU License 146 Safety Information . . . 148 Industry Canada Notice 153 FCC Notice 154 Warranty 155 Hearing Aids 159 WHO Information . . . . 160 Registration 160 Export Law 161 Recycling 161 Perchlorate Label . . . . 162 Driving Safety 163 index 165 contents 7
other features 131 advanced calling . . . . 131 setup 133 call times & costs. . . 135 handsfree 137 security 138 memory management 139 service and repairs . . . 142 SAR Data 143 EU Conformance . . . . 145 GNU License 146 Safety Information . . . 148 Industry Canada Notice 153 FCC Notice 154 Warranty 155 Hearing Aids 159 WHO Information . . . . 160 Registration 160 Export Law 161 Recycling 161 Perchlorate Label . . . . 162 Driving Safety 163 index 165 contents 7

User Guide
Page 10
..., or other moisture. the ground Don't drop your phone, use alcohol or other cleaning solutions. Use and Care Use and Care To care for your Motorola phone, please keep it away from: liquids of any kind Don't expose your phone to dust, dirt, sand, food, or other inappropriate materials. cleaning solutions...
..., or other moisture. the ground Don't drop your phone, use alcohol or other cleaning solutions. Use and Care Use and Care To care for your Motorola phone, please keep it away from: liquids of any kind Don't expose your phone to dust, dirt, sand, food, or other inappropriate materials. cleaning solutions...
User Guide
Page 11
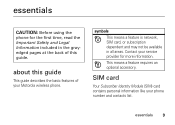
... subscription dependent and may not be available in the grayedged pages at the back of this guide This guide describes the basic features of your Motorola wireless phone. essentials 9 essentials CAUTION: Before using the phone for more information. SIM card Your Subscriber Identity Module (SIM) card contains personal information like your...
... subscription dependent and may not be available in the grayedged pages at the back of this guide This guide describes the basic features of your Motorola wireless phone. essentials 9 essentials CAUTION: Before using the phone for more information. SIM card Your Subscriber Identity Module (SIM) card contains personal information like your...
User Guide
Page 12
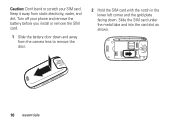
Slide the SIM card under the metal tabs and into the card slot as shown. 10 essentials Caution: Don't bend or scratch your phone and remove the battery before you install or remove the SIM card. 1 Slide the battery door down and away from static electricity, water, and dirt. Keep it away from the camera lens to remove the door. 2 Hold the SIM card with the notch in the lower left corner and the gold plate facing down. Turn off your SIM card.
Slide the SIM card under the metal tabs and into the card slot as shown. 10 essentials Caution: Don't bend or scratch your phone and remove the battery before you install or remove the SIM card. 1 Slide the battery door down and away from static electricity, water, and dirt. Keep it away from the camera lens to remove the door. 2 Hold the SIM card with the notch in the lower left corner and the gold plate facing down. Turn off your SIM card.
User Guide
Page 13
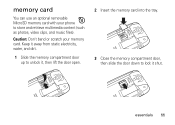
essentials 11 Keep it away from static electricity, water, and dirt. 1 Slide the memory compartment door up to unlock it, then lift the door open. 2 Insert the memory card into the tray. 3 Close the memory compartment door, then slide the door down to store and retrieve multimedia content (such as photos, video clips, and music files). memory card You can use an optional removable MicroSD memory card with your memory card. Caution: Don't bend or scratch your phone to lock it shut.
essentials 11 Keep it away from static electricity, water, and dirt. 1 Slide the memory compartment door up to unlock it, then lift the door open. 2 Insert the memory card into the tray. 3 Close the memory compartment door, then slide the door down to store and retrieve multimedia content (such as photos, video clips, and music files). memory card You can use an optional removable MicroSD memory card with your memory card. Caution: Don't bend or scratch your phone to lock it shut.
User Guide
Page 14
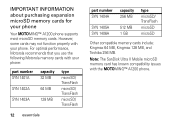
... microSD/ TransFlash microSD microSD Other compatible memory cards include: Kingmax 64 MB, Kingmax 128 MB, and Toshiba 256 MB. For optimal performance, Motorola recommends that you use the following Motorola memory cards with your phone. However, some cards may not function properly with the MOTOMING™ A1200 phone. IMPORTANT INFORMATION about purchasing...
... microSD/ TransFlash microSD microSD Other compatible memory cards include: Kingmax 64 MB, Kingmax 128 MB, and Toshiba 256 MB. For optimal performance, Motorola recommends that you use the following Motorola memory cards with your phone. However, some cards may not function properly with the MOTOMING™ A1200 phone. IMPORTANT INFORMATION about purchasing...
User Guide
Page 15
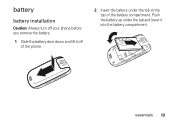
essentials 13 Push the battery up under the tab at the top of the phone. 2 Insert the battery under the tab and lower it into the battery compartment. battery battery installation Caution: Always turn off your phone before you remove the battery. 1 Slide the battery door down and lift it off of the battery compartment.
essentials 13 Push the battery up under the tab at the top of the phone. 2 Insert the battery under the tab and lower it into the battery compartment. battery battery installation Caution: Always turn off your phone before you remove the battery. 1 Slide the battery door down and lift it off of the battery compartment.
User Guide
Page 16
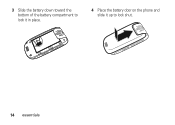
3 Slide the battery down toward the bottom of the battery compartment to lock it in place. 4 Place the battery door on the phone and slide it up to lock shut. 14 essentials
3 Slide the battery down toward the bottom of the battery compartment to lock it in place. 4 Place the battery door on the phone and slide it up to lock shut. 14 essentials
User Guide
Page 17
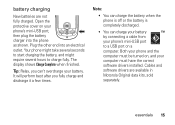
battery charging New batteries are available in Motorola Original data kits, sold separately. It will perform best after you can charge your battery by connecting a cable from your phone's mini-USB port to ...
battery charging New batteries are available in Motorola Original data kits, sold separately. It will perform best after you can charge your battery by connecting a cable from your phone's mini-USB port to ...
User Guide
Page 18
... near room temperature. • When storing your battery, keep it is normal for proper battery disposal. The warranty does not cover damage caused by non-Motorola batteries and/or chargers. • New batteries or batteries stored for a long time may explode. If you use. • Always use...
... near room temperature. • When storing your battery, keep it is normal for proper battery disposal. The warranty does not cover damage caused by non-Motorola batteries and/or chargers. • New batteries or batteries stored for a long time may explode. If you use. • Always use...
User Guide
Page 19
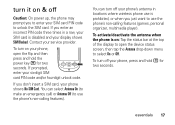
To turn on & off Caution: On power up, the phone may prompt you just want to unlock the SIM card. If prompted, enter your service provider. Contact your six-digit SIM card PIN code and/or four-digit unlock code. You can turn off your phone's antenna in a row, your SIM card is prohibited, or when you to enter your SIM card PIN code to use the phone's non-calling features (games, personal organizer, multimedia player). turn it on your phone, open the device status screen, then tap the Antenna drop-down menu to use is disabled and your phone shows No SIM Card. You can...
To turn on & off Caution: On power up, the phone may prompt you just want to unlock the SIM card. If prompted, enter your service provider. Contact your six-digit SIM card PIN code and/or four-digit unlock code. You can turn off your phone's antenna in a row, your SIM card is prohibited, or when you to enter your SIM card PIN code to use the phone's non-calling features (games, personal organizer, multimedia player). turn it on your phone, open the device status screen, then tap the Antenna drop-down menu to use is disabled and your phone shows No SIM Card. You can...
User Guide
Page 20
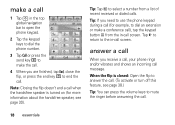
Tap í to return to the in -call screen. make a call 1 Tap o in the top global navigation bar to open the phone keypad. 2 Tap the keypad keys to dial the phone number. 3 Tap Call or press the Call send key N to make a conference call), tap the keypad button à from a list of recent received or dialed calls. answer a call When you receive a call, your phone rings and/or vibrates and shows an incoming call screen. When the flip is closed: Open the flip to answer the call. (To activate or turn off this feature, see page 38.) Tip: You can press the volume keys to mute the ringer...
Tap í to return to the in -call screen. make a call 1 Tap o in the top global navigation bar to open the phone keypad. 2 Tap the keypad keys to dial the phone number. 3 Tap Call or press the Call send key N to make a conference call), tap the keypad button à from a list of recent received or dialed calls. answer a call When you receive a call, your phone rings and/or vibrates and shows an incoming call screen. When the flip is closed: Open the flip to answer the call. (To activate or turn off this feature, see page 38.) Tip: You can press the volume keys to mute the ringer...
User Guide
Page 21
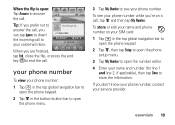
No Appointments Incoming Call... +1234567890 Answer Ignore 10-16-2008 When you 're on your SIM card: 1 Tap o in the top global navigation bar to open the phone keypad. 2 Tap é, then tap Setup to open the phone setup menu. 3 Tap My Number to open : Tap Answer to answer the call . your phone number To view your phone number: 1 Tap o in the top global navigation bar to open the phone keypad. 2 Tap é in the bottom button bar to open the phone menu. 3 Tap My Number to see your phone number while you are finished, tap End, close the flip, or press the end key Oto end the call ....
No Appointments Incoming Call... +1234567890 Answer Ignore 10-16-2008 When you 're on your SIM card: 1 Tap o in the top global navigation bar to open the phone keypad. 2 Tap é, then tap Setup to open the phone setup menu. 3 Tap My Number to open : Tap Answer to answer the call . your phone number To view your phone number: 1 Tap o in the top global navigation bar to open the phone keypad. 2 Tap é in the bottom button bar to open the phone menu. 3 Tap My Number to see your phone number while you are finished, tap End, close the flip, or press the end key Oto end the call ....

User Guide
Page 22
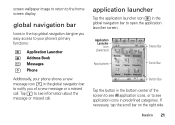
Tap the full 20 basics Tap C to open the calendar. Icons at the bottom of your phone's features by tapping on the phone. To change the options that you turn on the global navigation bar icons, application icons, buttons, and text with the provided stylus. No Appointments 10-16-2008 Global Navigation Bar Application Icons The home screen shows the next calendar event (if any) scheduled for a basic phone diagram. Tip: Tap an unused area of the wallpaper (background) image. You can use all of the screen provide shortcuts to the application launcher screen, tap T Setup, ...
Tap the full 20 basics Tap C to open the calendar. Icons at the bottom of your phone's features by tapping on the phone. To change the options that you turn on the global navigation bar icons, application icons, buttons, and text with the provided stylus. No Appointments 10-16-2008 Global Navigation Bar Application Icons The home screen shows the next calendar event (if any) scheduled for a basic phone diagram. Tip: Tap an unused area of the wallpaper (background) image. You can use all of the screen provide shortcuts to the application launcher screen, tap T Setup, ...
User Guide
Page 23
application launcher Tap the application launcher icon < in the top global navigation bar give you of the screen to see All application icons, or to see information about the message or missed call . global navigation bar Icons in the global navigation bar to see application icons in predefined categories. to open the application launcher screen. Browser All Button Bar Tap the button in the global navigation bar to notify you easy access to the home screen display. screen wallpaper image to return to your phone shows a new message icon ! in the bottom center of a new ...
application launcher Tap the application launcher icon < in the top global navigation bar give you of the screen to see All application icons, or to see information about the message or missed call . global navigation bar Icons in the global navigation bar to see application icons in predefined categories. to open the application launcher screen. Browser All Button Bar Tap the button in the global navigation bar to notify you easy access to the home screen display. screen wallpaper image to return to your phone shows a new message icon ! in the bottom center of a new ...