
Owners Manual
Page 4
... unit from a lightning storm, or when it can result in fire, electric shock or other controls may cause serious personal injury. 24. Read the owner's manual of time, unplug it is damaged. IMPORTANT SAFEGUARDS 13. If the unit has been exposed to do so may result in a risk of fire or...
... unit from a lightning storm, or when it can result in fire, electric shock or other controls may cause serious personal injury. 24. Read the owner's manual of time, unplug it is damaged. IMPORTANT SAFEGUARDS 13. If the unit has been exposed to do so may result in a risk of fire or...

Owners Manual
Page 7
... Remote control 10 Basic connections 12 CATV (CABLE TV) connections 14 Playback connection 16 Setting up the VCR section Setting the video channel 18 Setting the language 18 Manual clock setting 19 Tuner setting 20 To ADD/DELETE channels 21 Noise elimination 21 Loading and Unloading a ...soundtrack language 42 Subtitles 42 Karaoke playback 42 Changing angles 43 Title selection 43 DVD menu 43 Advanced function of DVD section Parental control 44 Temporary disabling of rating level by DVD disc ... 45 Setting menu language 46 Setting subtitle language 47 Setting audio soundtrack...
... Remote control 10 Basic connections 12 CATV (CABLE TV) connections 14 Playback connection 16 Setting up the VCR section Setting the video channel 18 Setting the language 18 Manual clock setting 19 Tuner setting 20 To ADD/DELETE channels 21 Noise elimination 21 Loading and Unloading a ...soundtrack language 42 Subtitles 42 Karaoke playback 42 Changing angles 43 Title selection 43 DVD menu 43 Advanced function of DVD section Parental control 44 Temporary disabling of rating level by DVD disc ... 45 Setting menu language 46 Setting subtitle language 47 Setting audio soundtrack...

Owners Manual
Page 10
... DVD operation status 27,50 INPUT SELECT Switch the connected TV to external mode 32 PROGRESSIVE Set the progressive scanning mode to active 52 CH / Select channel of the connected TV or VCR 26,28 / Cursor buttons 34 TRACKING/SET -/+ Setting buttons 29,30 Manual tracking buttons in playback mode... 24 / Cursor buttons 18 SELECT/ENTER Enter information in the menu 18 Select option in the menu 34 DVD MENU Select menu of a DVD disc 43 SETUP/VCR MENU Display menu of setup 18,34,44,46...
... DVD operation status 27,50 INPUT SELECT Switch the connected TV to external mode 32 PROGRESSIVE Set the progressive scanning mode to active 52 CH / Select channel of the connected TV or VCR 26,28 / Cursor buttons 34 TRACKING/SET -/+ Setting buttons 29,30 Manual tracking buttons in playback mode... 24 / Cursor buttons 18 SELECT/ENTER Enter information in the menu 18 Select option in the menu 34 DVD MENU Select menu of a DVD disc 43 SETUP/VCR MENU Display menu of setup 18,34,44,46...
Owners Manual
Page 16
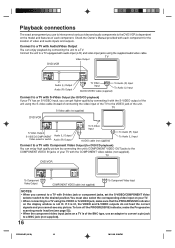
... jack (not supplied). 16 2C51001AE (16-19) 16 18/11/03, 2:38 PM Connect the unit to a TV. TV S-Video cable (not supplied) DVD/VCR S-Video Output S-VIDEO/COMPONENT Audio (L) Output Video selector switch Audio (R) Output To S-Video Input AUDIO cable (not supplied) To Audio (R) Input To Audio (L)...Audio/Video Output You can enjoy high quality picture by connecting the unit to a TV equipped with each component. Check the Owner's Manual provided with audio input (L/R) and video input jacks using the VIDEO or S-VIDEO jack, make the Progressive scanning mode inactive (see any picture....
... jack (not supplied). 16 2C51001AE (16-19) 16 18/11/03, 2:38 PM Connect the unit to a TV. TV S-Video cable (not supplied) DVD/VCR S-Video Output S-VIDEO/COMPONENT Audio (L) Output Video selector switch Audio (R) Output To S-Video Input AUDIO cable (not supplied) To Audio (R) Input To Audio (L)...Audio/Video Output You can enjoy high quality picture by connecting the unit to a TV equipped with each component. Check the Owner's Manual provided with audio input (L/R) and video input jacks using the VIDEO or S-VIDEO jack, make the Progressive scanning mode inactive (see any picture....

Owners Manual
Page 18
... the TV to CH 3 or 4, play back a prerecorded tape and tune the TV to select CH 3 or 4. The VCR indicator on your TV owner's manual for 3 seconds in the standby mode to receive a sharp color picture from the video cassette recorder. to select the desired language...until the MENU screen is connected with the channel selected in step 1. 3 Press POWER to turn on the DVD/VCR. 4 Press VCR/DVD to select the VCR mode. to select the VCR position. POWER EJECT OPEN/ CLOSE VCR/DVD 1 2 3 DISPLAY/CALL 4 5 6 INPUT SELECT/ PROGRESSIVE 7890 TRACKING/ SET - SYSTEM SETUP CLOCK ...
... the TV to CH 3 or 4, play back a prerecorded tape and tune the TV to select CH 3 or 4. The VCR indicator on your TV owner's manual for 3 seconds in the standby mode to receive a sharp color picture from the video cassette recorder. to select the desired language...until the MENU screen is connected with the channel selected in step 1. 3 Press POWER to turn on the DVD/VCR. 4 Press VCR/DVD to select the VCR mode. to select the VCR position. POWER EJECT OPEN/ CLOSE VCR/DVD 1 2 3 DISPLAY/CALL 4 5 6 INPUT SELECT/ PROGRESSIVE 7890 TRACKING/ SET - SYSTEM SETUP CLOCK ...

Owners Manual
Page 19
... blinks, then press SET + or -. 5 Set the day, year and time as in step 4. CH SELECT/ ENTER TRACKING/ SET + CH SETUP/ DVD MENU VCR MENU CLEAR/ CANCEL RETURN MARKER ZOOM TOP MENU REPEAT A-B AUDIO/ JUMP/ ANGLE/ CLOCK/ AUDIO SELECT ZERO RETURN COUNTER RESET COUNTER SUB TITLE/ TIMER REC ATR...the power, the timer settings will appear. 2 Press SET + or - Manual clock setting Preparation: • Turn ON the TV and set to the video input mode. • Press VCR/DVD to "8:30 AM" March, 27 (SAT), 2004. 1 Press VCR MENU. MENU TIMER REC SET AUTO REPEAT ON OFF SAP ON OFF CH...
... blinks, then press SET + or -. 5 Set the day, year and time as in step 4. CH SELECT/ ENTER TRACKING/ SET + CH SETUP/ DVD MENU VCR MENU CLEAR/ CANCEL RETURN MARKER ZOOM TOP MENU REPEAT A-B AUDIO/ JUMP/ ANGLE/ CLOCK/ AUDIO SELECT ZERO RETURN COUNTER RESET COUNTER SUB TITLE/ TIMER REC ATR...the power, the timer settings will appear. 2 Press SET + or - Manual clock setting Preparation: • Turn ON the TV and set to the video input mode. • Press VCR/DVD to "8:30 AM" March, 27 (SAT), 2004. 1 Press VCR MENU. MENU TIMER REC SET AUTO REPEAT ON OFF SAP ON OFF CH...

Owners Manual
Page 21
...OTR STOP SKIP/INDEX SLOW PAUSE/STILL 1 Repeat the step 1 on the screen to set to the video input mode. • Press VCR/DVD to add the unmemorized channel. ADD CH 003 〈+/-/0-9/ENTER/MENU〉 To delete channels Press ENTER until the menu screen is set .... (The VCR indicator will blink. 3 Repeat 1 to 2 to receive a weak signal broadcast, the Blue back screen can add the channels you want or delete the channels you want manually. SYSTEM SETUP CLOCK SET LANGUAGE/IDIOMA/LANGUE NO NOISE BACKGROUND ON OFF á+/-/ENTER/MENUñ 3 Press VCR MENU until...
...OTR STOP SKIP/INDEX SLOW PAUSE/STILL 1 Repeat the step 1 on the screen to set to the video input mode. • Press VCR/DVD to add the unmemorized channel. ADD CH 003 〈+/-/0-9/ENTER/MENU〉 To delete channels Press ENTER until the menu screen is set .... (The VCR indicator will blink. 3 Repeat 1 to 2 to receive a weak signal broadcast, the Blue back screen can add the channels you want or delete the channels you want manually. SYSTEM SETUP CLOCK SET LANGUAGE/IDIOMA/LANGUE NO NOISE BACKGROUND ON OFF á+/-/ENTER/MENUñ 3 Press VCR MENU until...

Owners Manual
Page 24
... Press PAUSE during SPEED SEARCH, STILL, FRAME ADVANCE and SLOW MOTION. • During picture search mode there will be repeated. 1 Press VCR MENU. will be played until the menu screen is muted during playback. "AUTO TR." NOTES: • The audio output is cleared. ... REPEAT ON OFF SAP CH SETUP ON OFF SYSTEM SETUP 〈+/-/ENTER/MENU〉 3 Press VCR MENU until its end. If the still picture jitters excessively, press TRACKING + or - Manual tracking adjustment If automatic tracking cannot eliminate noises satisfactorily during slow motion, press the TRACKING + or...
... Press PAUSE during SPEED SEARCH, STILL, FRAME ADVANCE and SLOW MOTION. • During picture search mode there will be repeated. 1 Press VCR MENU. will be played until the menu screen is muted during playback. "AUTO TR." NOTES: • The audio output is cleared. ... REPEAT ON OFF SAP CH SETUP ON OFF SYSTEM SETUP 〈+/-/ENTER/MENU〉 3 Press VCR MENU until its end. If the still picture jitters excessively, press TRACKING + or - Manual tracking adjustment If automatic tracking cannot eliminate noises satisfactorily during slow motion, press the TRACKING + or...

Owners Manual
Page 54
...proper language in the menu options. 34 • No disc is not shown in your local dealer or service outlet if problems persist. SYMPTOMS DVD/VCR DVD/VCR does not operate. Playback doesn't start /end time is not set properly. • The unit is in the Special playback mode. 12...18 12~17 - - • Check the unit is connected correctly. • Check the input selector of automatic tracking circuit. 24 Try Manual tracking adjustment. • Video heads are weak. Consult your language. Problems and troubleshooting Use the following check list for troubleshooting when you have ...
...proper language in the menu options. 34 • No disc is not shown in your local dealer or service outlet if problems persist. SYMPTOMS DVD/VCR DVD/VCR does not operate. Playback doesn't start /end time is not set properly. • The unit is in the Special playback mode. 12...18 12~17 - - • Check the unit is connected correctly. • Check the input selector of automatic tracking circuit. 24 Try Manual tracking adjustment. • Video heads are weak. Consult your language. Problems and troubleshooting Use the following check list for troubleshooting when you have ...
