
Owners Manual
Page 4
... when it is closing. Adjust only those that could result in wire to qualified service personnel under the following the operating instructions. It may expose you connect the product to proper grounding of the mast and supporting structure, grounding of liquid into the unit. 17. OVERLOADING Do not overload wall outlets and extension cords, as the original part. SERVICING Do not attempt...
... when it is closing. Adjust only those that could result in wire to qualified service personnel under the following the operating instructions. It may expose you connect the product to proper grounding of the mast and supporting structure, grounding of liquid into the unit. 17. OVERLOADING Do not overload wall outlets and extension cords, as the original part. SERVICING Do not attempt...

Owners Manual
Page 5
... if the DVD/VCR is brought from the AC outlet and plug it back in its new surroundings for operation on , or make sure that the room temperature rises gradually. NOTES: • Never connect the AC line cord plug to file or cut the blade. DISC Do not use a cracked, deformed, or repaired disc. NOTE TO CATV SYSTEM INSTALLER This reminder is the user's responsibility...
... if the DVD/VCR is brought from the AC outlet and plug it back in its new surroundings for operation on , or make sure that the room temperature rises gradually. NOTES: • Never connect the AC line cord plug to file or cut the blade. DISC Do not use a cracked, deformed, or repaired disc. NOTE TO CATV SYSTEM INSTALLER This reminder is the user's responsibility...
Owners Manual
Page 6
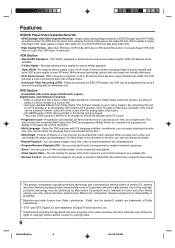
... DVD discs recorded in programmed or random-selected sequences. • Zoom - Provides optimal picture quality for up to a DTS decoder or an AV amplifier with Video Cassette Recorder - It increases the vertical resolution. • Multi-Language - The DVD PLAYER can play back tracks in this format can play back audio CDs. • High Quality Picture - Progressive scan displays all the horizontal lines of copyrighted television programs, films, video cassettes and other limited viewing uses...
... DVD discs recorded in programmed or random-selected sequences. • Zoom - Provides optimal picture quality for up to a DTS decoder or an AV amplifier with Video Cassette Recorder - It increases the vertical resolution. • Multi-Language - The DVD PLAYER can play back tracks in this format can play back audio CDs. • High Quality Picture - Progressive scan displays all the horizontal lines of copyrighted television programs, films, video cassettes and other limited viewing uses...

Owners Manual
Page 7
... using your unit IMPORTANT SAFEGUARDS 3 Power Source 5 Features 6 Contents 7 Parts and functions 8 Display 9 Remote control 10 Basic connections 12 CATV (CABLE TV) connections 14 Playback connection 16 Setting up the VCR section Setting the video channel 18 Setting the language 18 Manual clock setting 19 Tuner setting 20 To ADD/DELETE channels 21 Noise elimination 21 Loading and Unloading a cassette tape ......... 22 Tape playback operation Cassette tape playback 23 Special playback 24 ZERO RETURN function 25 Video index search system 25 Recording Recording a TV program...
... using your unit IMPORTANT SAFEGUARDS 3 Power Source 5 Features 6 Contents 7 Parts and functions 8 Display 9 Remote control 10 Basic connections 12 CATV (CABLE TV) connections 14 Playback connection 16 Setting up the VCR section Setting the video channel 18 Setting the language 18 Manual clock setting 19 Tuner setting 20 To ADD/DELETE channels 21 Noise elimination 21 Loading and Unloading a cassette tape ......... 22 Tape playback operation Cassette tape playback 23 Special playback 24 ZERO RETURN function 25 Video index search system 25 Recording Recording a TV program...

Owners Manual
Page 10
... ANGLE Change playback angle of a DVD disc 43 COUNTER RESET Reset the counter to 00:00 25 CLOCK/COUNTER Change the front Display mode 25 TIMER REC Set the unit to start recording at a preset time. 29,30 SUB TITLE Set Subtitle of a DVD disc 42 ATR Digital AUTO TRACKING 24 PLAY MODE Select playback mode 38,39 SPEED Sets the tape speed for recording 26,28 TV/VCR Switches between TV and VCR 18,27 REW/SEARCH Rewind/Review playback 23...
... ANGLE Change playback angle of a DVD disc 43 COUNTER RESET Reset the counter to 00:00 25 CLOCK/COUNTER Change the front Display mode 25 TIMER REC Set the unit to start recording at a preset time. 29,30 SUB TITLE Set Subtitle of a DVD disc 42 ATR Digital AUTO TRACKING 24 PLAY MODE Select playback mode 38,39 SPEED Sets the tape speed for recording 26,28 TV/VCR Switches between TV and VCR 18,27 REW/SEARCH Rewind/Review playback 23...
Owners Manual
Page 16
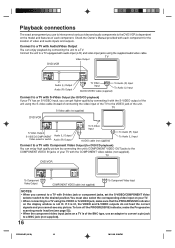
... lit, the VIDEO and S-VIDEO outputs do not feed the correct signals and you use an adapter to convert a pin jack to a TV equipped with each component. TV Video Output DVD/VCR Audio (L) Output Audio (R) Output To Video Input To Audio (R) Input To Audio (L) Input AUDIO/VIDEO cable (supplied) Connect to a TV with S-video jack or component jacks, set the S-VIDEO/COMPONENT Video selector switch to a TV using the supplied audio/video cable. Playback connections The exact arrangement you cannot see page 52). • When the component video input jacks on the display window is of...
... lit, the VIDEO and S-VIDEO outputs do not feed the correct signals and you use an adapter to convert a pin jack to a TV equipped with each component. TV Video Output DVD/VCR Audio (L) Output Audio (R) Output To Video Input To Audio (R) Input To Audio (L) Input AUDIO/VIDEO cable (supplied) Connect to a TV with S-video jack or component jacks, set the S-VIDEO/COMPONENT Video selector switch to a TV using the supplied audio/video cable. Playback connections The exact arrangement you cannot see page 52). • When the component video input jacks on the display window is of...
Owners Manual
Page 17
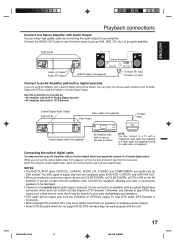
... digital input connector) which do not set DOLBY DIGITAL to DOLBY DIGITAL or DTS to an AV Amplifier with an Optical digital cable (not supplied) instead of a Coaxial digital cable. DVD/VCR Stereo Amplifier Audio (L) Output Audio (R) Output AUDIO cable (not supplied) To Audio (R) Input To Audio (L) Input Connect to your ears and damage your amplifier. NOTES: • The DVD OUTPUT jacks (OPTICAL, COAXIAL, AUDIO L/R, S-VIDEO and COMPONENT) are using the Optical or Coaxial Digital Output. To hear DTS audio, DTS-Decoder is output...
... digital input connector) which do not set DOLBY DIGITAL to DOLBY DIGITAL or DTS to an AV Amplifier with an Optical digital cable (not supplied) instead of a Coaxial digital cable. DVD/VCR Stereo Amplifier Audio (L) Output Audio (R) Output AUDIO cable (not supplied) To Audio (R) Input To Audio (L) Input Connect to your ears and damage your amplifier. NOTES: • The DVD OUTPUT jacks (OPTICAL, COAXIAL, AUDIO L/R, S-VIDEO and COMPONENT) are using the Optical or Coaxial Digital Output. To hear DTS audio, DTS-Decoder is output...

Owners Manual
Page 18
... to receive a sharp color picture from factory, the video channel is connected with the channel selected in step 1. 3 Press POWER to turn on the front panel will appear on the screen for about 4 seconds. 2 Turn ON the TV and set to receive a TV station in your TV owner's manual for 3 seconds in step 2 may affect the player's operation. The VCR indicator on the DVD/VCR. 4 Press VCR/DVD to select CH 3 or 4. The VCR menu screen will...
... to receive a sharp color picture from factory, the video channel is connected with the channel selected in step 1. 3 Press POWER to turn on the front panel will appear on the screen for about 4 seconds. 2 Turn ON the TV and set to receive a TV station in your TV owner's manual for 3 seconds in step 2 may affect the player's operation. The VCR indicator on the DVD/VCR. 4 Press VCR/DVD to select CH 3 or 4. The VCR menu screen will...

Owners Manual
Page 19
... time will light.) POWER EJECT OPEN/ CLOSE VCR/DVD 1 2 3 DISPLAY/CALL 4 5 6 INPUT SELECT/ PROGRESSIVE 7890 TRACKING/ SET - Manual clock setting Preparation: • Turn ON the TV and set to the video input mode. • Press VCR/DVD to set the date and time for timer recordings. MONTH 3 DAY 1 (SAT) YEAR 2003 TIME 12 : 00AM 〈+/-/ENTER/CANCEL/MENU〉 To make corrections any time during the process Press CANCEL repeatedly until the item you want to select the "SYSTEM SETUP" menu...
... time will light.) POWER EJECT OPEN/ CLOSE VCR/DVD 1 2 3 DISPLAY/CALL 4 5 6 INPUT SELECT/ PROGRESSIVE 7890 TRACKING/ SET - Manual clock setting Preparation: • Turn ON the TV and set to the video input mode. • Press VCR/DVD to set the date and time for timer recordings. MONTH 3 DAY 1 (SAT) YEAR 2003 TIME 12 : 00AM 〈+/-/ENTER/CANCEL/MENU〉 To make corrections any time during the process Press CANCEL repeatedly until the item you want to select the "SYSTEM SETUP" menu...
Owners Manual
Page 20
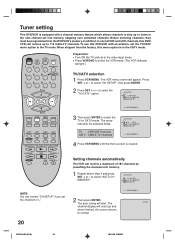
... MENU REPEAT A-B AUDIO/ JUMP/ ANGLE/ CLOCK/ AUDIO SELECT ZERO RETURN COUNTER RESET COUNTER TIMER REC SUB TITLE/ ATR PLAY MODE/ SPEED TV/VCR REW/SEARCH PLAY SEARCH/F.FWD 2 Press SET + or - CABLE TV channels CH SETUP TV CATV AUTO CH MEMORY ADD/DELETE á+/-/ENTER/MENUñ 4 Press VCR MENU until the menu screen is in the CATV mode. POWER EJECT OPEN/ CLOSE VCR/DVD 1 2 3 DISPLAY/CALL Preparation: • Turn ON the TV and set the channel to normal. TV - The VCR menu screen will light.) 4 5 6 INPUT...
... MENU REPEAT A-B AUDIO/ JUMP/ ANGLE/ CLOCK/ AUDIO SELECT ZERO RETURN COUNTER RESET COUNTER TIMER REC SUB TITLE/ ATR PLAY MODE/ SPEED TV/VCR REW/SEARCH PLAY SEARCH/F.FWD 2 Press SET + or - CABLE TV channels CH SETUP TV CATV AUTO CH MEMORY ADD/DELETE á+/-/ENTER/MENUñ 4 Press VCR MENU until the menu screen is in the CATV mode. POWER EJECT OPEN/ CLOSE VCR/DVD 1 2 3 DISPLAY/CALL Preparation: • Turn ON the TV and set the channel to normal. TV - The VCR menu screen will light.) 4 5 6 INPUT...

Owners Manual
Page 21
The channel number will blink. 3 Repeat 1 to 2 to add or delete other channel. 3 Press VCR MENU until "ADD" appears on the screen to set to the video input mode. • Press VCR/DVD to select the VCR mode. (The VCR indicator will light.) POWER EJECT OPEN/ CLOSE VCR/DVD 1 2 3 DISPLAY/CALL 4 5 6 INPUT SELECT/ PROGRESSIVE 7890 TRACKING/ SET - Preparation: • Turn ON the TV and set to add the unmemorized channel. to select a channel number you want to add or delete. 2 To add channels Press ENTER...
The channel number will blink. 3 Repeat 1 to 2 to add or delete other channel. 3 Press VCR MENU until "ADD" appears on the screen to set to the video input mode. • Press VCR/DVD to select the VCR mode. (The VCR indicator will light.) POWER EJECT OPEN/ CLOSE VCR/DVD 1 2 3 DISPLAY/CALL 4 5 6 INPUT SELECT/ PROGRESSIVE 7890 TRACKING/ SET - Preparation: • Turn ON the TV and set to add the unmemorized channel. to select a channel number you want to add or delete. 2 To add channels Press ENTER...
Owners Manual
Page 26
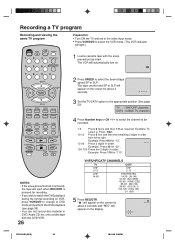
... 2 digits in DVD, Audio CD, etc. INDEX 2C51001AE (26-31) 26 18/11/03, 2:38 PM TV - CABLE TV channels 4 Press Number keys or CH / to select the channel to select the desired tape speed SP or SLP. Recording a TV program Recording and viewing the same TV program POWER EJECT OPEN/ CLOSE VCR/DVD 1 2 3 DISPLAY/CALL 4 5 6 INPUT SELECT/ PROGRESSIVE Preparation: • Turn ON the TV and set to the video input mode. • Press VCR/DVD to select the VCR mode...
... 2 digits in DVD, Audio CD, etc. INDEX 2C51001AE (26-31) 26 18/11/03, 2:38 PM TV - CABLE TV channels 4 Press Number keys or CH / to select the channel to select the desired tape speed SP or SLP. Recording a TV program Recording and viewing the same TV program POWER EJECT OPEN/ CLOSE VCR/DVD 1 2 3 DISPLAY/CALL 4 5 6 INPUT SELECT/ PROGRESSIVE Preparation: • Turn ON the TV and set to the video input mode. • Press VCR/DVD to select the VCR mode...

Owners Manual
Page 28
.../ ATR PLAY MODE/ SPEED TV/VCR REW/SEARCH PLAY SEARCH/F.FWD INDEX/SKIP STOP SKIP/INDEX REC/OTR SLOW PAUSE/STILL Example: One-touch Timer Recording for about 4 seconds. CABLE TV channels 4 Press Number keys or CH / to select the channel to make a timed recording. The tape counter and SP or SLP will automatically turn off the power. TV - " " will light.) POWER EJECT OPEN/ CLOSE VCR/DVD 1 2 3 DISPLAY/CALL 4 5 6 INPUT SELECT/ PROGRESSIVE 7890 TRACKING/ SET - Each...
.../ ATR PLAY MODE/ SPEED TV/VCR REW/SEARCH PLAY SEARCH/F.FWD INDEX/SKIP STOP SKIP/INDEX REC/OTR SLOW PAUSE/STILL Example: One-touch Timer Recording for about 4 seconds. CABLE TV channels 4 Press Number keys or CH / to select the channel to make a timed recording. The tape counter and SP or SLP will automatically turn off the power. TV - " " will light.) POWER EJECT OPEN/ CLOSE VCR/DVD 1 2 3 DISPLAY/CALL 4 5 6 INPUT SELECT/ PROGRESSIVE 7890 TRACKING/ SET - Each...

Owners Manual
Page 29
... be programmed on timer program number 1 (Tape speed: SLP). 1 Press VCR MENU. MENU TIMER REC SET AUTO REPEAT ON OFF SAP ON OFF CH SETUP SYSTEM SETUP á+/-/ENTER/MENUñ 2 Press SET + or - ENGLISH Timer recording can use the VCR, press TIMER REC at 20 seconds before the time you predetermined. SELECT/ ENTER TRACKING/ SET + CH SETUP/ CLEAR/ DVD MENU VCR MENU CANCEL RETURN MARKER ZOOM TOP MENU REPEAT A-B AUDIO/ JUMP / ANGLE/ CLOCK/ AUDIO SELECT ZERO RETURN COUNTER RESET...
... be programmed on timer program number 1 (Tape speed: SLP). 1 Press VCR MENU. MENU TIMER REC SET AUTO REPEAT ON OFF SAP ON OFF CH SETUP SYSTEM SETUP á+/-/ENTER/MENUñ 2 Press SET + or - ENGLISH Timer recording can use the VCR, press TIMER REC at 20 seconds before the time you predetermined. SELECT/ ENTER TRACKING/ SET + CH SETUP/ CLEAR/ DVD MENU VCR MENU CANCEL RETURN MARKER ZOOM TOP MENU REPEAT A-B AUDIO/ JUMP / ANGLE/ CLOCK/ AUDIO SELECT ZERO RETURN COUNTER RESET...

Owners Manual
Page 31
... Hi-Fi channel to SAP When the VCR is turned on or a channel selection is received, the word STEREO will be monaural. • When listening to a second audio program when viewing a selected channel. POWER EJECT OPEN/ CLOSE VCR/DVD 1 2 3 DISPLAY/CALL INPUT SELECT/ 45 6 PROGRESSIVE 7890 TRACKING/ SET - MENU TIMER REC SET AUTO REPEAT ON OFF SAP ON OFF CH SETUP SYSTEM SETUP á+/-/ENTER/MENUñ NOTES: • When playing back a tape that the "Second Audio Program" broadcasting...
... Hi-Fi channel to SAP When the VCR is turned on or a channel selection is received, the word STEREO will be monaural. • When listening to a second audio program when viewing a selected channel. POWER EJECT OPEN/ CLOSE VCR/DVD 1 2 3 DISPLAY/CALL INPUT SELECT/ 45 6 PROGRESSIVE 7890 TRACKING/ SET - MENU TIMER REC SET AUTO REPEAT ON OFF SAP ON OFF CH SETUP SYSTEM SETUP á+/-/ENTER/MENUñ NOTES: • When playing back a tape that the "Second Audio Program" broadcasting...

Owners Manual
Page 34
.../STILL 1 Press VCR/DVD to the video input mode. • When using an amplifier, switch on the amplifier. Disconnect the AC power cord once, then connect it again. Preparation: • Turn ON the TV and set to select the DVD mode. (The DVD indicator will light) "No Disc" will start automatically.) No Disc 2 Press SETUP in the stop mode. POWER EJECT OPEN/ CLOSE VCR/DVD 1 2 3 DISPLAY/CALL INPUT SELECT/ 4 5 6 PROGRESSIVE 7 8 9 0 TRACKING/ SET - NOTE: To make the SETUP screen disappear, press SETUP (or RETURN). 34...
.../STILL 1 Press VCR/DVD to the video input mode. • When using an amplifier, switch on the amplifier. Disconnect the AC power cord once, then connect it again. Preparation: • Turn ON the TV and set to select the DVD mode. (The DVD indicator will light) "No Disc" will start automatically.) No Disc 2 Press SETUP in the stop mode. POWER EJECT OPEN/ CLOSE VCR/DVD 1 2 3 DISPLAY/CALL INPUT SELECT/ 4 5 6 PROGRESSIVE 7 8 9 0 TRACKING/ SET - NOTE: To make the SETUP screen disappear, press SETUP (or RETURN). 34...

Owners Manual
Page 35
... time. Since this case, press , , , or ENTER to the type of the DVD/VCR are connected to select the DVD mode. (The DVD indicator will open. 7 8 9 0 TRACKING/ SET - CH SELECT/ ENTER TRACKING/ SET + CH SETUP/ DVD MENU VCR MENU CLEAR/ CANCEL RETURN 2 Place a disc onto the tray. " " keep blinking in its proper position. 3 Press PLAY or OPEN/CLOSE. The disc tray closes automatically and DVD/VCR turns off. NOTES: • If a non-compatible disc is loaded, "Incorrect Disc", "Region Code Error" or "Parental Error...
... time. Since this case, press , , , or ENTER to the type of the DVD/VCR are connected to select the DVD mode. (The DVD indicator will open. 7 8 9 0 TRACKING/ SET - CH SELECT/ ENTER TRACKING/ SET + CH SETUP/ DVD MENU VCR MENU CLEAR/ CANCEL RETURN 2 Place a disc onto the tray. " " keep blinking in its proper position. 3 Press PLAY or OPEN/CLOSE. The disc tray closes automatically and DVD/VCR turns off. NOTES: • If a non-compatible disc is loaded, "Incorrect Disc", "Region Code Error" or "Parental Error...
Owners Manual
Page 42
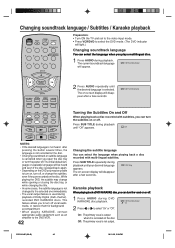
.../03, 2:39 PM Changing soundtrack language / Subtitles / Karaoke playback POWER EJECT OPEN/ CLOSE VCR/DVD 1 2 3 DISPLAY/CALL INPUT SELECT/ 4 5 6 PROGRESSIVE 7 8 9 0 CH Preparation: • Turn ON the TV and set to the video input mode. • Press VCR/DVD to select the DVD mode. (The DVD indicator will disappear after a few seconds. 2/8 Fra DolbyDigital AUDIO/ JUMP/ ANGLE/ CLOCK/ AUDIO SELECT ZERO RETURN COUNTER RESET COUNTER TIMER REC SUB TITLE/ ATR PLAY MODE/ SPEED TV/VCR REW/SEARCH PLAY SEARCH/F.FWD INDEX...
.../03, 2:39 PM Changing soundtrack language / Subtitles / Karaoke playback POWER EJECT OPEN/ CLOSE VCR/DVD 1 2 3 DISPLAY/CALL INPUT SELECT/ 4 5 6 PROGRESSIVE 7 8 9 0 CH Preparation: • Turn ON the TV and set to the video input mode. • Press VCR/DVD to select the DVD mode. (The DVD indicator will disappear after a few seconds. 2/8 Fra DolbyDigital AUDIO/ JUMP/ ANGLE/ CLOCK/ AUDIO SELECT ZERO RETURN COUNTER RESET COUNTER TIMER REC SUB TITLE/ ATR PLAY MODE/ SPEED TV/VCR REW/SEARCH PLAY SEARCH/F.FWD INDEX...

Owners Manual
Page 52
... set to start playback. • To make the progressive scanning mode active in the Progressive scanning mode. S-VIDEO/COMPONENT Video selector switch INPUT SELECT/ 4 5 6 PROGRESSIVE 7 8 9 0 TRACKING/ SET Ð CH SELECT/ ENTER TRACKING/ SET + CH DVD MENU SETUP/ VCR MENU CLEAR/ CANCEL RETURN MARKER ZOOM TOP MENU REPEAT A-B AUDIO/ JUMP/ ANGLE/ CLOCK/ AUDIO SELECT ZERO RETURN COUNTER RESET COUNTER TIMER REC SUB TITLE/ ATR PLAY MODE/ SPEED TV/VCR REW/SEARCH PLAY SEARCH/F.FWD Preparation: • Connect to create the interpolated picture and outputs...
... set to start playback. • To make the progressive scanning mode active in the Progressive scanning mode. S-VIDEO/COMPONENT Video selector switch INPUT SELECT/ 4 5 6 PROGRESSIVE 7 8 9 0 TRACKING/ SET Ð CH SELECT/ ENTER TRACKING/ SET + CH DVD MENU SETUP/ VCR MENU CLEAR/ CANCEL RETURN MARKER ZOOM TOP MENU REPEAT A-B AUDIO/ JUMP/ ANGLE/ CLOCK/ AUDIO SELECT ZERO RETURN COUNTER RESET COUNTER TIMER REC SUB TITLE/ ATR PLAY MODE/ SPEED TV/VCR REW/SEARCH PLAY SEARCH/F.FWD Preparation: • Connect to create the interpolated picture and outputs...

Owners Manual
Page 54
... not function. Replace the batteries. 11 • Check the batteries are inserted correctly. • Check all connections are weak. Noise bars on screen. Stopping playback, search, slowmotion play, repeat play, or program play DVD-ROMs, etc. 33 • Some discs may be performed. • The erase prevention tab of the TV is not set to VIDEO. SYMPTOMS DVD/VCR DVD/VCR does not operate. No picture. POSSIBLE SOLUTIONS PAGE • Make sure the power cord...
... not function. Replace the batteries. 11 • Check the batteries are inserted correctly. • Check all connections are weak. Noise bars on screen. Stopping playback, search, slowmotion play, repeat play, or program play DVD-ROMs, etc. 33 • Some discs may be performed. • The erase prevention tab of the TV is not set to VIDEO. SYMPTOMS DVD/VCR DVD/VCR does not operate. No picture. POSSIBLE SOLUTIONS PAGE • Make sure the power cord...


