
Owners Manual
Page 4
... the product to other equipment, turn off the power and unplug all servicing to its normal operation. Failure to rain or water. Read the owner's manual of fire or electric shock. 16. This will often require extensive work by the operating instructions, as radiators, heat registers, stoves, or other products (including...
... the product to other equipment, turn off the power and unplug all servicing to its normal operation. Failure to rain or water. Read the owner's manual of fire or electric shock. 16. This will often require extensive work by the operating instructions, as radiators, heat registers, stoves, or other products (including...

Owners Manual
Page 7
... Remote control 10 Basic connections 12 CATV (CABLE TV) connections 14 Playback connection 16 Setting up the VCR section Setting the video channel 18 Setting the language 18 Manual clock setting 19 Tuner setting 20 To ADD/DELETE channels 21 Noise elimination 21 Loading and Unloading a ...soundtrack language 42 Subtitles 42 Karaoke playback 42 Changing angles 43 Title selection 43 DVD menu 43 Advanced function of DVD section Parental control 44 Temporary disabling of rating level by DVD disc ... 45 Setting menu language 46 Setting subtitle language 47 Setting audio soundtrack...
... Remote control 10 Basic connections 12 CATV (CABLE TV) connections 14 Playback connection 16 Setting up the VCR section Setting the video channel 18 Setting the language 18 Manual clock setting 19 Tuner setting 20 To ADD/DELETE channels 21 Noise elimination 21 Loading and Unloading a ...soundtrack language 42 Subtitles 42 Karaoke playback 42 Changing angles 43 Title selection 43 DVD menu 43 Advanced function of DVD section Parental control 44 Temporary disabling of rating level by DVD disc ... 45 Setting menu language 46 Setting subtitle language 47 Setting audio soundtrack...

Owners Manual
Page 10
... DVD operation status 27,50 INPUT SELECT Switch the connected TV to external mode 32 PROGRESSIVE Set the progressive scanning mode to active 52 CH / Select channel of the connected TV or VCR 26,28 / Cursor buttons 34 TRACKING/SET -/+ Setting buttons 29,30 Manual tracking buttons in playback mode... 24 / Cursor buttons 18 SELECT/ENTER Enter information in the menu 18 Select option in the menu 34 DVD MENU Select menu of a DVD disc 43 SETUP/VCR MENU Display menu of setup 18,34,44,46...
... DVD operation status 27,50 INPUT SELECT Switch the connected TV to external mode 32 PROGRESSIVE Set the progressive scanning mode to active 52 CH / Select channel of the connected TV or VCR 26,28 / Cursor buttons 34 TRACKING/SET -/+ Setting buttons 29,30 Manual tracking buttons in playback mode... 24 / Cursor buttons 18 SELECT/ENTER Enter information in the menu 18 Select option in the menu 34 DVD MENU Select menu of a DVD disc 43 SETUP/VCR MENU Display menu of setup 18,34,44,46...
Owners Manual
Page 16
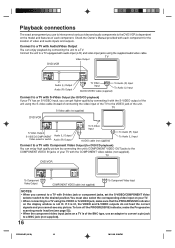
... To Audio (L) Input AUDIO/VIDEO cable (supplied) Connect to a TV with S-Video Output (for the location of video and audio inputs and outputs. TV DVD/VCR To Component Video Output COMPONENT VIDEO cable (not supplied) To Component Video Input NOTES: • When you connect to a TV with audio input (L/R) and ...of the TV to the VIDEO jack of the unit. Connect to a TV with the COMPONENT video cables (not supplied). Check the Owner's Manual provided with the S-VIDEO output of the unit using the supplied audio/video cable. To turn off the PROGRESSIVE indicator, make sure that the ...
... To Audio (L) Input AUDIO/VIDEO cable (supplied) Connect to a TV with S-Video Output (for the location of video and audio inputs and outputs. TV DVD/VCR To Component Video Output COMPONENT VIDEO cable (not supplied) To Component Video Input NOTES: • When you connect to a TV with audio input (L/R) and ...of the TV to the VIDEO jack of the unit. Connect to a TV with the COMPONENT video cables (not supplied). Check the Owner's Manual provided with the S-VIDEO output of the unit using the supplied audio/video cable. To turn off the PROGRESSIVE indicator, make sure that the ...

Owners Manual
Page 18
...with the 75 ohm coaxial cable only. 1 Press and hold 3 or 4 on the remote control for 3 seconds in the standby mode to your TV owner's manual for the on-screen displays. 1 Press VCR MENU. The selected channel number will return to receive a sharp color picture from the video cassette recorder. The... SET + or - The channel number will appear in the display. 6 Select any channel to receive a TV station in step 1. 3 Press POWER to turn on the DVD/VCR. 4 Press VCR/DVD to select the "LANGUAGE" option, then press ENTER. Disconnect the AC power cord, then connect it again. • Both the...
...with the 75 ohm coaxial cable only. 1 Press and hold 3 or 4 on the remote control for 3 seconds in the standby mode to your TV owner's manual for the on-screen displays. 1 Press VCR MENU. The selected channel number will return to receive a sharp color picture from the video cassette recorder. The... SET + or - The channel number will appear in the display. 6 Select any channel to receive a TV station in step 1. 3 Press POWER to turn on the DVD/VCR. 4 Press VCR/DVD to select the "LANGUAGE" option, then press ENTER. Disconnect the AC power cord, then connect it again. • Both the...

Owners Manual
Page 19
... - to change blinks, then press SET + or -. 5 Set the day, year and time as in step 4. The VCR menu screen will light.) POWER EJECT OPEN/ CLOSE VCR/DVD 1 2 3 DISPLAY/CALL 4 5 6 INPUT SELECT/ PROGRESSIVE 7890 TRACKING/ SET - Manual clock setting Preparation: • Turn ON the TV and set to the video input mode. • Press...
... - to change blinks, then press SET + or -. 5 Set the day, year and time as in step 4. The VCR menu screen will light.) POWER EJECT OPEN/ CLOSE VCR/DVD 1 2 3 DISPLAY/CALL 4 5 6 INPUT SELECT/ PROGRESSIVE 7890 TRACKING/ SET - Manual clock setting Preparation: • Turn ON the TV and set to the video input mode. • Press...

Owners Manual
Page 21
... is set to the "ON". 1 Repeat the steps 1~2 on the screen to set to the video input mode. • Press VCR/DVD to select the VCR mode. (The VCR indicator will blink. 3 Repeat 1 to 2 to add the unmemorized channel. SYSTEM SETUP CLOCK SET LANGUAGE/IDIOMA/LANGUE NO NOISE BACKGROUND ON... - ADD CH 003 〈+/-/0-9/ENTER/MENU〉 To delete channels Press ENTER until "DELETE" appears on page 20. Noise elimination When you want manually. CH SETUP TV CATV AUTO CH MEMORY ADD/DELETE 〈+/-/ENTER/MENU〉 2 To Add or Delete desired channels 1 Press Number keys or SET...
... is set to the "ON". 1 Repeat the steps 1~2 on the screen to set to the video input mode. • Press VCR/DVD to select the VCR mode. (The VCR indicator will blink. 3 Repeat 1 to 2 to add the unmemorized channel. SYSTEM SETUP CLOCK SET LANGUAGE/IDIOMA/LANGUE NO NOISE BACKGROUND ON... - ADD CH 003 〈+/-/0-9/ENTER/MENU〉 To delete channels Press ENTER until "DELETE" appears on page 20. Noise elimination When you want manually. CH SETUP TV CATV AUTO CH MEMORY ADD/DELETE 〈+/-/ENTER/MENU〉 2 To Add or Delete desired channels 1 Press Number keys or SET...

Owners Manual
Page 24
... repeat mode: Follow the above step 1, then press ENTER to the TV. 2C51001AE (20-25) 24 18/11/03, 2:38 PM Manual tracking adjustment If automatic tracking cannot eliminate noises satisfactorily during the playback. "AUTO TR." will appear. The tape will then automatically rewind to protect... the video tape against excessive wear. 24 Repeat playback The entire video tape will be repeated endlessly. Press SET + or - Press VCR MENU to return to select the OFF position. To return to reactivate automatic tracking again. Press it briefly for a fine adjustment, or ...
... repeat mode: Follow the above step 1, then press ENTER to the TV. 2C51001AE (20-25) 24 18/11/03, 2:38 PM Manual tracking adjustment If automatic tracking cannot eliminate noises satisfactorily during the playback. "AUTO TR." will appear. The tape will then automatically rewind to protect... the video tape against excessive wear. 24 Repeat playback The entire video tape will be repeated endlessly. Press SET + or - Press VCR MENU to return to select the OFF position. To return to reactivate automatic tracking again. Press it briefly for a fine adjustment, or ...

Owners Manual
Page 54
...29 • TIMER REC has not been pressed ( is not lit). 29 • Tracking adjustment beyond range of automatic tracking circuit. 24 Try Manual tracking adjustment. • Video heads are dirty. 55 • The tape is worn or damaged. - • Select proper language in the ...language. No CATV reception. Clean up the disc. 33 • The unit cannot play , etc. DVD Display is not set correctly. 19 • The recording start . SYMPTOMS DVD/VCR DVD/VCR does not operate. Problems and troubleshooting Use the following check list for troubleshooting when you have problems with ...
...29 • TIMER REC has not been pressed ( is not lit). 29 • Tracking adjustment beyond range of automatic tracking circuit. 24 Try Manual tracking adjustment. • Video heads are dirty. 55 • The tape is worn or damaged. - • Select proper language in the ...language. No CATV reception. Clean up the disc. 33 • The unit cannot play , etc. DVD Display is not set correctly. 19 • The recording start . SYMPTOMS DVD/VCR DVD/VCR does not operate. Problems and troubleshooting Use the following check list for troubleshooting when you have problems with ...
