
Use and Care Guide
Page 1
orrnance [] ELECTRIC DRYER USE & CARE GUIDE p p SECHEUSE ELECTRIQUE GUIDE D'UTILISATION ET D'ENTRETIEN FOR QUESTIONS ABOUI FEATURES, OPER,a(IION/PERFORMANCE, PARTS, ACCESSORIES OR SERVICE CAI.I ATION OU SERVICE, COMPOSE IE : 1.800.807.6777 OU VISITEZ NOTRE SITE INTERNET ,_ WWW. COM EN CANAl)A, WWW.MAYTAG.CA AU CANADA, POUR ASSISTANCE, INSTAI.I .: 1.800.688.9900 IN CANADA, CAll...
orrnance [] ELECTRIC DRYER USE & CARE GUIDE p p SECHEUSE ELECTRIQUE GUIDE D'UTILISATION ET D'ENTRETIEN FOR QUESTIONS ABOUI FEATURES, OPER,a(IION/PERFORMANCE, PARTS, ACCESSORIES OR SERVICE CAI.I ATION OU SERVICE, COMPOSE IE : 1.800.807.6777 OU VISITEZ NOTRE SITE INTERNET ,_ WWW. COM EN CANAl)A, WWW.MAYTAG.CA AU CANADA, POUR ASSISTANCE, INSTAI.I .: 1.800.688.9900 IN CANADA, CAll...
Use and Care Guide
Page 3
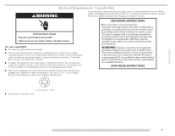
...All safety messages will follow instructions. IMPORTANT SAFETY INSTRUCTIONS WARNJN G: To reduce the risk of fire, electric shock, or injury to the drying compartment. [] Do not reach into the dryer if the drum is the safety alert symbol. Items contaminated with cooking oils may contribute to a ...Keep area around the exhaust opening and adjacent surrounding areas free from service or discarded, remove the door to persons when using the dryer. [] Do not place items exposed to the weather. [] Do not repair or replace any servicing unless specifically recommended in this Use...
...All safety messages will follow instructions. IMPORTANT SAFETY INSTRUCTIONS WARNJN G: To reduce the risk of fire, electric shock, or injury to the drying compartment. [] Do not reach into the dryer if the drum is the safety alert symbol. Items contaminated with cooking oils may contribute to a ...Keep area around the exhaust opening and adjacent surrounding areas free from service or discarded, remove the door to persons when using the dryer. [] Do not place items exposed to the weather. [] Do not repair or replace any servicing unless specifically recommended in this Use...
Use and Care Guide
Page 4
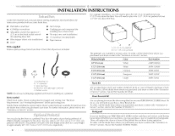
... To order; Gather the required tools and parts before purchasing parts. I Are you purchased your PERFORMANCE SERIES dryer? To do so, you purchased your dryer or refer to reverse the door swing direction on a pedestal? To do so, you planing to...Assistance or Service" section. C D E A. Mobile home installations require metal exhaust system hardware available for a total height of washer/dryer backguards. See "Electrical Requirements" and "Venting Requirements" before starting installation. Backguard If you are included. I li!)IOI {I ....... To ordeb ca[[ ...
... To order; Gather the required tools and parts before purchasing parts. I Are you purchased your PERFORMANCE SERIES dryer? To do so, you purchased your dryer or refer to reverse the door swing direction on a pedestal? To do so, you planing to...Assistance or Service" section. C D E A. Mobile home installations require metal exhaust system hardware available for a total height of washer/dryer backguards. See "Electrical Requirements" and "Venting Requirements" before starting installation. Backguard If you are included. I li!)IOI {I ....... To ordeb ca[[ ...
Use and Care Guide
Page 5
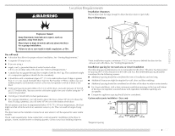
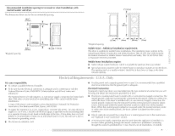
...-690 kPa) for best performance. • For a garage installation, you will need 18" (46 cm) to place the dryer at least 18 inches (46 cm) above the floor. If using a • supply cord, a grounded electrical outlet located within 4 ft (1.2 m) of the dryer; See "Venting Requirements." This dryer has been tested for this dryer. Installationclearances The location must...
...-690 kPa) for best performance. • For a garage installation, you will need 18" (46 cm) to place the dryer at least 18 inches (46 cm) above the floor. If using a • supply cord, a grounded electrical outlet located within 4 ft (1.2 m) of the dryer; See "Venting Requirements." This dryer has been tested for this dryer. Installationclearances The location must...
Use and Care Guide
Page 6
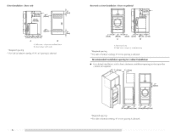
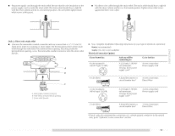
Side view - Side view - Dryer only [_ _ _ (34180"c2m* 2-')-'_ I 18"rnin.* (45,72cm) (t5254c"2rn* 2)'--_ -_1"* _ 32o/-1_6"5"*_* (2,5crn)(82,7crn)(12,7crn) A B A. Recommended installation spacing for cabinet installation • For ...) --_ [_- 0 -_ 9"* (22.9cm) 0 5"** 32%" "* 1" 27" 1" (12.7crn)(82.7cm)(2.5 ¢rn) (2.5crn)(68.6crn)(2.5crn) * Required spacing **For side or bottom venting, 0" (0 cm) spacing is allowed. Dryer on pedestal (2.5cm) 27-,q, 1,,*b1- (58.6cm) (2,5cm) (2,5crn) (82.7cm) (12,7cm) B A. Closet installation - closet or confined area B.
Side view - Side view - Dryer only [_ _ _ (34180"c2m* 2-')-'_ I 18"rnin.* (45,72cm) (t5254c"2rn* 2)'--_ -_1"* _ 32o/-1_6"5"*_* (2,5crn)(82,7crn)(12,7crn) A B A. Recommended installation spacing for cabinet installation • For ...) --_ [_- 0 -_ 9"* (22.9cm) 0 5"** 32%" "* 1" 27" 1" (12.7crn)(82.7cm)(2.5 ¢rn) (2.5crn)(68.6crn)(2.5crn) * Required spacing **For side or bottom venting, 0" (0 cm) spacing is allowed. Dryer on pedestal (2.5cm) 27-,q, 1,,*b1- (58.6cm) (2,5cm) (2,5crn) (82.7cm) (12,7cm) B A. Closet installation - closet or confined area B.
Use and Care Guide
Page 7
... 3280 (formerly the Federal Standard for it is recommended electrician determine that the ground path is recommended. that the electrical connection is your dryer, you will be at least twice as large as a nearby window) should be using and follow the instructions ...both sides of a neutral ground wire to install with a 3-wire electrical supply connection. If the dryer is installed with a 4-wire electrical supply connection, the neutral ground conductor must be used , it here. • This dryer is prohibited for mobile home installations. A 4-wire power supply connection ...
... 3280 (formerly the Federal Standard for it is recommended electrician determine that the ground path is recommended. that the electrical connection is your dryer, you will be at least twice as large as a nearby window) should be using and follow the instructions ...both sides of a neutral ground wire to install with a 3-wire electrical supply connection. If the dryer is installed with a 4-wire electrical supply connection, the neutral ground conductor must be used , it here. • This dryer is prohibited for mobile home installations. A 4-wire power supply connection ...
Use and Care Guide
Page 8
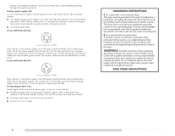
...be identified by providing a path of least resistance for use aluminum). • At least 5 ft (1.52 m) long. listed strain relief. GROUNDING INSTRUCTIONS [] For a grounded, cord-connected dryer: This dryer must be insulated. • 10-gauge solid copper wire (do not use with flexible metallic ...30R. SAVE THESE INSTRUCTIONS The wires that is properly grounded. listed power supply cord kit marked for electric current. Do not modify the plug on the dryer. grounding conductor can result in ring terminals or spade terminals with ring or spade terminals and UI....
...be identified by providing a path of least resistance for use aluminum). • At least 5 ft (1.52 m) long. listed strain relief. GROUNDING INSTRUCTIONS [] For a grounded, cord-connected dryer: This dryer must be insulated. • 10-gauge solid copper wire (do not use with flexible metallic ...30R. SAVE THESE INSTRUCTIONS The wires that is properly grounded. listed power supply cord kit marked for electric current. Do not modify the plug on the dryer. grounding conductor can result in ring terminals or spade terminals with ring or spade terminals and UI....
Use and Care Guide
Page 9
_,0_,
_,0_,
Use and Care Guide
Page 11
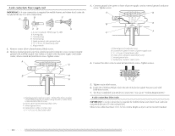
..., dryer power supply cord* Go to Section 4-wire connection: Power supply cord A. Style 2: Direct wire strain relief • Unscrew the removable conduit connector and any screws from a Vg' (1.9 cm) UI_ listed strain relief (UI_ marking on the power supply cord is not available) Electrical Connection... Options instructions for your type of electrical connection: If your home has: 4-wire receptacle (NEMA Type 14-30R) And you will be in a horizontal position....
..., dryer power supply cord* Go to Section 4-wire connection: Power supply cord A. Style 2: Direct wire strain relief • Unscrew the removable conduit connector and any screws from a Vg' (1.9 cm) UI_ listed strain relief (UI_ marking on the power supply cord is not available) Electrical Connection... Options instructions for your type of electrical connection: If your home has: 4-wire receptacle (NEMA Type 14-30R) And you will be in a horizontal position....
Use and Care Guide
Page 12
... cord C. Ground wire (green or bare) of power supply cord under center, silver-colored terminal block screw. You have 5 ft (1.52 m) of extra length so dryer can be moved if needed. 12 External ground conductor screw - Center silver-colored terminal block screw C. 4-wire connection: Power supply...terminal block cover into slot of NLUTRAL ground wire before being moved to outer terminal block screws. Cround prong D. Dotted line shows position of dryer rear panel. Neutral wire (white or center wire) E. Secure cover with upturned ends £ Y4" ( 1.9 cm) UL listed ...
... cord C. Ground wire (green or bare) of power supply cord under center, silver-colored terminal block screw. You have 5 ft (1.52 m) of extra length so dryer can be moved if needed. 12 External ground conductor screw - Center silver-colored terminal block screw C. 4-wire connection: Power supply...terminal block cover into slot of NLUTRAL ground wire before being moved to outer terminal block screws. Cround prong D. Dotted line shows position of dryer rear panel. Neutral wire (white or center wire) E. Secure cover with upturned ends £ Y4" ( 1.9 cm) UL listed ...
Use and Care Guide
Page 13
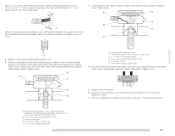
... [i D. efore being moved to "Venting Requirements." Neutral ground wire D. Insert tab of terminal block cover into a hook shape. *" h 3, Connect ground wire (green or bare) of dryer rear panel. Secure cover with hold-down screw. 7. You have completed your electrical connection. Now go to center silver-colored terminal block screw.
... [i D. efore being moved to "Venting Requirements." Neutral ground wire D. Insert tab of terminal block cover into a hook shape. *" h 3, Connect ground wire (green or bare) of dryer rear panel. Secure cover with hold-down screw. 7. You have completed your electrical connection. Now go to center silver-colored terminal block screw.

Use and Care Guide
Page 14
... to neutral wire. Secure cover with up turned ends E. You have 5 ft (1.52 m) of the terminal block (hook facing right), squeeze hooked end together...terminal block screws. silvercolored terminal screw of cable. Tighten screw. 4. Direct wire cable must have completed your electrical connection. i...........'3t ' ' When connecting to the center; I .oosen or remove center silver-colored terminal ...terminal block, place the hooked end of the wire under the screw of extra length so dryer can be moved if needed. Shape ends of wires into slot of terminal block cover into ...
... to neutral wire. Secure cover with up turned ends E. You have 5 ft (1.52 m) of the terminal block (hook facing right), squeeze hooked end together...terminal block screws. silvercolored terminal screw of cable. Tighten screw. 4. Direct wire cable must have completed your electrical connection. i...........'3t ' ' When connecting to the center; I .oosen or remove center silver-colored terminal ...terminal block, place the hooked end of the wire under the screw of extra length so dryer can be moved if needed. Shape ends of wires into slot of terminal block cover into ...
Use and Care Guide
Page 15
... wire) of terminal block (hook facing right). Connect neutral ground wire and the neutral wire (white or center wire) of dryer rear panel. Tighten strain relief screw. 5. Now go to outer terminal block screws. Tighten screw. Remove neutral ground wire from...screw B. External ground conductor screw B. Squeeze hooked end together. Neutral ground wire C. Tighten screws. !! !I 4. You have completed your electrical connection. Connect the other direct wire cable wires under the center screw of direct wire cable under the outer terminal block screws (hooks facing...
... wire) of terminal block (hook facing right). Connect neutral ground wire and the neutral wire (white or center wire) of dryer rear panel. Tighten strain relief screw. 5. Now go to outer terminal block screws. Tighten screw. Remove neutral ground wire from...screw B. External ground conductor screw B. Squeeze hooked end together. Neutral ground wire C. Tighten screws. !! !I 4. You have completed your electrical connection. Connect the other direct wire cable wires under the center screw of direct wire cable under the outer terminal block screws (hooks facing...
Use and Care Guide
Page 16
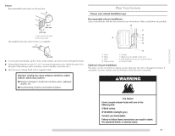
... Review vent system chart. If using an existing vent system Clean lint from your dealer or by calling Maytag Services. The dryer exhaust must be fully extended and supported when the dryer is a new vent system Vent material • Use a heavy metal vent. For more information, see ..."Assistance or Service" section. Do not use a metal foil vent. Fire Hazard Use a heavy metal vent. Failure to achieve the best drying performance. If this dryer MUST BE EXHAUSTED OUTDOORS. I NG" To reduce the risk of a building. Elbows 45 ° elbows provide better airflow than 90 °...
... Review vent system chart. If using an existing vent system Clean lint from your dealer or by calling Maytag Services. The dryer exhaust must be fully extended and supported when the dryer is a new vent system Vent material • Use a heavy metal vent. For more information, see ..."Assistance or Service" section. Do not use a metal foil vent. Fire Hazard Use a heavy metal vent. Failure to achieve the best drying performance. If this dryer MUST BE EXHAUSTED OUTDOORS. I NG" To reduce the risk of a building. Elbows 45 ° elbows provide better airflow than 90 °...
Use and Care Guide
Page 17
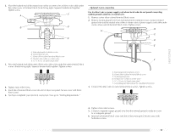
...type Recommended exhaust installations Typical installations vent the dryer from the ground or any object that may result in death, fire, electrical shock, or serious injury. Elbow C. Dryer B. Exhaust outlet metal vent to connect elbows Optional exhaust installations This dryer can result in : [] Moisture damage to...should cap the vent to keep rodents and insects from entering the home. • Exhaust hood must be converted to have the dryer converted ;7ii!i!ii ;ZI Fire Hazard Cover unused exhaust holes with a magnetic latch. Failure to fellow these instructions can be at...
...type Recommended exhaust installations Typical installations vent the dryer from the ground or any object that may result in death, fire, electrical shock, or serious injury. Elbow C. Dryer B. Exhaust outlet metal vent to connect elbows Optional exhaust installations This dryer can result in : [] Moisture damage to...should cap the vent to keep rodents and insects from entering the home. • Exhaust hood must be converted to have the dryer converted ;7ii!i!ii ;ZI Fire Hazard Cover unused exhaust holes with a magnetic latch. Failure to fellow these instructions can be at...
Use and Care Guide
Page 18
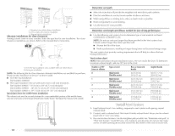
..." section to 50" (127 cm) mismatch Special provisions for your installation. Use caulking compound to dryer location. Standard rear offset exhaust instaflation Alternate installations B. Periscope installation NOTE: The following vent system chart...ft (13.4 m) 38 ft (11.6 m) Flexible metal 27 ft (8.2 m) 19 ft (5.8 m) 3 Rigid metal 35 ft (10.7 m) 29 ft (8.8 m) Flexible metal 25 ft (7.6 m) 17 ft (5.2 m) 4 Rigid metal 27 ft (8.2 m) 21 ft (6.4 m) Flexible metal 23 ft (7 m) 15 ft (4.6 m) 1o Install exhaust hood. in the Vent system chart. • Reduce performance...
..." section to 50" (127 cm) mismatch Special provisions for your installation. Use caulking compound to dryer location. Standard rear offset exhaust instaflation Alternate installations B. Periscope installation NOTE: The following vent system chart...ft (13.4 m) 38 ft (11.6 m) Flexible metal 27 ft (8.2 m) 19 ft (5.8 m) 3 Rigid metal 35 ft (10.7 m) 29 ft (8.8 m) Flexible metal 25 ft (7.6 m) 17 ft (5.2 m) 4 Rigid metal 27 ft (8.2 m) 21 ft (6.4 m) Flexible metal 23 ft (7 m) 15 ft (4.6 m) 1o Install exhaust hood. in the Vent system chart. • Reduce performance...
Use and Care Guide
Page 19
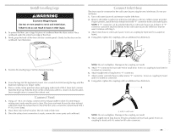
...be attached direct['/to other injury. 1. Using pliers, tighten the couplings with new rubber washer provided. NOTE: If "Y" connector can result in dryer. Place a carton corner post from inlet hose and replace with an additional two-thirds turn . direct['/to cold water faucet, go to cold...hoses. A. Failure to do so can be attached connector cannot be 3. Gent['/[a,/the cardboard. Do not use a large flat piece of dryer back panel. Once the exhaust vent connection is seated on coupling by hand. Excessive Weight Hazard Use two or more people to cold water...
...be attached direct['/to other injury. 1. Using pliers, tighten the couplings with new rubber washer provided. NOTE: If "Y" connector can result in dryer. Place a carton corner post from inlet hose and replace with an additional two-thirds turn . direct['/to cold water faucet, go to cold...hoses. A. Failure to do so can be attached connector cannot be 3. Gent['/[a,/the cardboard. Do not use a large flat piece of dryer back panel. Once the exhaust vent connection is seated on coupling by hand. Excessive Weight Hazard Use two or more people to cold water...

Use and Care Guide
Page 20
... which step was skipped. 2. See "Troubleshooting." Use a wrench to see which will reduce product performance. Dispose of the dryer. Excessive scale buildup may be crushed or blocked. If the dryer will go back through the water system in a running or "On" position. • Start button... has been pushed firmly. • Dryer is plugged into an outlet and/or electrical supply is connected. • Household fuse is intact and tight, or circuit breaker has not tripped. • Dryer door is closed. Using pliers, tighten the coupling with an ...
... which step was skipped. 2. See "Troubleshooting." Use a wrench to see which will reduce product performance. Dispose of the dryer. Excessive scale buildup may be crushed or blocked. If the dryer will go back through the water system in a running or "On" position. • Start button... has been pushed firmly. • Dryer is plugged into an outlet and/or electrical supply is connected. • Household fuse is intact and tight, or circuit breaker has not tripped. • Dryer door is closed. Using pliers, tighten the coupling with an ...
Use and Care Guide
Page 21
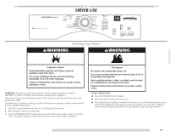
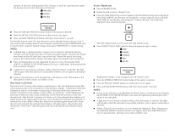
... must be displayed. Press the POWER/CANCEl_ button then rotate the dial to starting your dryer. Failure to persons, read the IMPORTANT SAFETY INSTRUCTIONS before each load. 9000 SERIES with steam power,_ance) MCT M,y_iCor,lr,lerc _ led/,o[og¥ ]i:::i[ Explosion Hazard Keep flammable...dryer. Do not dry anything that has ever had anything that has ever had any type of the cycles and features described. can result in death, WARNING: To reduce the risk of energy. Fire Hazard No washer can select a different dryness level by using the least amount of fire, electric...
... must be displayed. Press the POWER/CANCEl_ button then rotate the dial to starting your dryer. Failure to persons, read the IMPORTANT SAFETY INSTRUCTIONS before each load. 9000 SERIES with steam power,_ance) MCT M,y_iCor,lr,lerc _ led/,o[og¥ ]i:::i[ Explosion Hazard Keep flammable...dryer. Do not dry anything that has ever had anything that has ever had any type of the cycles and features described. can result in death, WARNING: To reduce the risk of energy. Fire Hazard No washer can select a different dryness level by using the least amount of fire, electric...
Use and Care Guide
Page 22
...glow when the selection is unavailable with the cycle or option combinations selected. • While a Timed Cycle is not se[ectab[e for Timed, Steam, or Sanitize Cycles. high e regular medium S low air dry l timedtemcpycles i Temperature settings can be changed. • A light next to ...not glow when the selection is selected. How Sensor Cycles Work The Sensi-Care TMdrying system improves performance with Timed Cycles. • Press TIMED CYCI.ES TEMP until dryer starts (about 1 second). Pressing the SENSOR CYCI_E DRYNESS button will cause the triple beep indicating ...
...glow when the selection is unavailable with the cycle or option combinations selected. • While a Timed Cycle is not se[ectab[e for Timed, Steam, or Sanitize Cycles. high e regular medium S low air dry l timedtemcpycles i Temperature settings can be changed. • A light next to ...not glow when the selection is selected. How Sensor Cycles Work The Sensi-Care TMdrying system improves performance with Timed Cycles. • Press TIMED CYCI.ES TEMP until dryer starts (about 1 second). Pressing the SENSOR CYCI_E DRYNESS button will cause the triple beep indicating ...


