
Use and Care Guide
Page 1
... AI.: 1.800.688.9900 EN CANADA, IIAME AI: 1.800.807.6777 VISITE NUESTRO SITIO WEB EN WWW. MAYTAG. CA orrnance [] ELECTRIC DRYER USE & CARE GUIDE p p SECHEUSE ELECTRIQUE GUIDE D'UTILISATION ET D'ENTRETIEN FOR QUESTIONS ABOUI FEATURES, OPER,a(IION/PERFORMANCE, PARTS, ACCESSORIES OR SERVICE CAI.I ATION OU SERVICE, COMPOSE IE : 1.800.807.6777 OU VISITEZ NOTRE...
... AI.: 1.800.688.9900 EN CANADA, IIAME AI: 1.800.807.6777 VISITE NUESTRO SITIO WEB EN WWW. MAYTAG. CA orrnance [] ELECTRIC DRYER USE & CARE GUIDE p p SECHEUSE ELECTRIQUE GUIDE D'UTILISATION ET D'ENTRETIEN FOR QUESTIONS ABOUI FEATURES, OPER,a(IION/PERFORMANCE, PARTS, ACCESSORIES OR SERVICE CAI.I ATION OU SERVICE, COMPOSE IE : 1.800.807.6777 OU VISITEZ NOTRE...
Use and Care Guide
Page 3
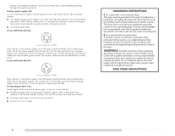
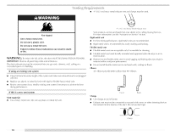
...: [] Read all safety messages. IMPORTANT SAFETY INSTRUCTIONS WARNJN G: To reduce the risk of fire, electric shock, or injury to dry articles containing foam rubber or similarly textured rubber-like materials. [] Clean lint screen before using the dryer. [] Do not place items exposed to catch fire. [] Do not dry articles that have the...
...: [] Read all safety messages. IMPORTANT SAFETY INSTRUCTIONS WARNJN G: To reduce the risk of fire, electric shock, or injury to dry articles containing foam rubber or similarly textured rubber-like materials. [] Clean lint screen before using the dryer. [] Do not place items exposed to catch fire. [] Do not dry articles that have the...
Use and Care Guide
Page 4
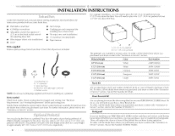
... different heights separately for purchase from the dealer from dryer drum. To order; To order; See "Electrical Requirements" and "Venting Requirements" before starting installation. To do so, you purchased your washer and dryer? I li!)IOI {I ....... Backguard If you are installing your PERFORMANCE SERIES washer and dryer and wish to the "Assistance or Service" section. Rubber...
... different heights separately for purchase from the dealer from dryer drum. To order; To order; See "Electrical Requirements" and "Venting Requirements" before starting installation. To do so, you purchased your washer and dryer? I li!)IOI {I ....... Backguard If you are installing your PERFORMANCE SERIES washer and dryer and wish to the "Assistance or Service" section. Rubber...
Use and Care Guide
Page 5
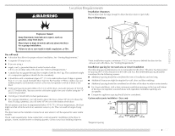
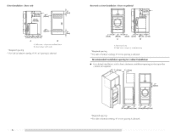
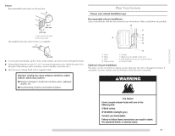
... require a minimum 5" (12.7 cm) clearance behind the dryer for proper exhaust installation. Recommended spacing should be considered for the following spacing dimensions are using a • supply cord, a grounded electrical outlet located within 4 ft (1.2 m) of installation and servicing. • Additional clearances ... moldings. • Additional spacing should be considered for ease of the dryer; Custom undercounter installation - If using the "Y" connector provided. • 20-100 psi (138-690 kPa) for best performance. • For a garage installation, you will need 18" (46...
... require a minimum 5" (12.7 cm) clearance behind the dryer for proper exhaust installation. Recommended spacing should be considered for the following spacing dimensions are using a • supply cord, a grounded electrical outlet located within 4 ft (1.2 m) of installation and servicing. • Additional clearances ... moldings. • Additional spacing should be considered for ease of the dryer; Custom undercounter installation - If using the "Y" connector provided. • 20-100 psi (138-690 kPa) for best performance. • For a garage installation, you will need 18" (46...
Use and Care Guide
Page 6
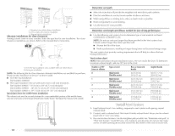
.... Side view - Recommended installation spacing for cabinet installation • For cabinet installation, with vents * Required spacing **For side or bottom venting, 0" (0 cm) spacing is allowed. Dryer on pedestal (2.5cm) 27-,q, 1,,*b1- (58.6cm) (2,5cm) (2,5crn) (82.7cm) (12,7cm) B A. closet or confined area B. Closet installation...
.... Side view - Recommended installation spacing for cabinet installation • For cabinet installation, with vents * Required spacing **For side or bottom venting, 0" (0 cm) spacing is allowed. Dryer on pedestal (2.5cm) 27-,q, 1,,*b1- (58.6cm) (2,5cm) (2,5crn) (82.7cm) (12,7cm) B A. closet or confined area B. Closet installation...
Use and Care Guide
Page 7
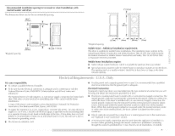
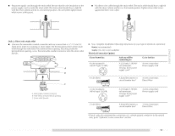
... neutral terminal (center or white wire) of the terminal block, the dryer cabinet is installed with stacked washer and dryer The dimensions shown are for (1) new branch-circuit installations, (2) mobile Recommended installation spacing for recessed or closet installation, with a 4-wire electrical supply connection, the neutral ground conductor must be obtained from: National Fire...
... neutral terminal (center or white wire) of the terminal block, the dryer cabinet is installed with stacked washer and dryer The dimensions shown are for (1) new branch-circuit installations, (2) mobile Recommended installation spacing for recessed or closet installation, with a 4-wire electrical supply connection, the neutral ground conductor must be obtained from: National Fire...
Use and Care Guide
Page 8
...must be plugged into an appropriate outlet that connect to the dryer must have three 10-gauge copper wires and match a 3-wire receptacle of electric shock. The wires that is properly grounded. The 4-wire power supply cord, at [east 4 ft (1.22 m) long, must end in ring terminals or ...spade terminals with clothes dryers. The ground wire (ground conductor) may be insulated. •...
...must be plugged into an appropriate outlet that connect to the dryer must have three 10-gauge copper wires and match a 3-wire receptacle of electric shock. The wires that is properly grounded. The 4-wire power supply cord, at [east 4 ft (1.22 m) long, must end in ring terminals or ...spade terminals with clothes dryers. The ground wire (ground conductor) may be insulated. •...
Use and Care Guide
Page 9
_,0_,
_,0_,
Use and Care Guide
Page 11
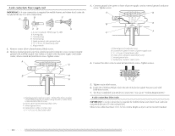
... the hole below terminal block opening C. conductor to "Optional 3-wire connection" section. The strain relief should have a tight fit with the dryer cabinet and be in a horizontal position. Style 2: Direct wire strain relief • Unscrew the removable conduit connector and any screws from a... Vg' (1.9 cm) UI_ listed strain relief (UI_ marking on the power supply cord is not available) Electrical Connection Options instructions for your type of electrical connection: If your home has: 4-wire receptacle (NEMA Type 14-30R) And you will be in a horizontal ...
... the hole below terminal block opening C. conductor to "Optional 3-wire connection" section. The strain relief should have a tight fit with the dryer cabinet and be in a horizontal position. Style 2: Direct wire strain relief • Unscrew the removable conduit connector and any screws from a... Vg' (1.9 cm) UI_ listed strain relief (UI_ marking on the power supply cord is not available) Electrical Connection Options instructions for your type of electrical connection: If your home has: 4-wire receptacle (NEMA Type 14-30R) And you will be in a horizontal ...
Use and Care Guide
Page 12
... Tighten screws. !! !! Dotted line shows position of NLUTRAL ground wire before being moved to outer terminal block screws. B. You have 5 ft (1.52 m) of power supply cord C. Spade terminals with hold-down screw. 7. Ring terminals 1, Remove center silver-colored terminal block screw. ...2. Direct wire cable must have completed your electrical connection. Tighten screw. Ground wire (green or bare) of extra length so dryer can be moved if needed. 12 Center silver-colored terminal block screw C. Secure cover with...
... Tighten screws. !! !! Dotted line shows position of NLUTRAL ground wire before being moved to outer terminal block screws. B. You have 5 ft (1.52 m) of power supply cord C. Spade terminals with hold-down screw. 7. Ring terminals 1, Remove center silver-colored terminal block screw. ...2. Direct wire cable must have completed your electrical connection. Tighten screw. Ground wire (green or bare) of extra length so dryer can be moved if needed. 12 Center silver-colored terminal block screw C. Secure cover with...
Use and Care Guide
Page 13
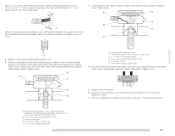
Shape ends of wires into slot of dryer rear panel. Remove neutral ground wire from end of cable, leaving bare ground wire at 5" (12.7 cm). A. JjJ D A. Secure cover with hold-down screw. 7. When ... block cover into a hook shape. *" h 3, Connect ground wire (green or bare) of power supply cable C. ¾" ( 1.9 cm) UL fisted strain refief [i D. You have completed your electrical connection. Now go to center silver-colored terminal block screw.
Shape ends of wires into slot of dryer rear panel. Remove neutral ground wire from end of cable, leaving bare ground wire at 5" (12.7 cm). A. JjJ D A. Secure cover with hold-down screw. 7. When ... block cover into a hook shape. *" h 3, Connect ground wire (green or bare) of power supply cable C. ¾" ( 1.9 cm) UL fisted strain refief [i D. You have completed your electrical connection. Now go to center silver-colored terminal block screw.

Use and Care Guide
Page 14
... Direct wire cable must have completed your electrical connection. I .oosen or remove center silver-colored terminal block screw. 2. Tighten screws. !! silvercolored terminal screw of extra length so dryer can be moved if needed. Tighten strain relief screws. 5. You have 5 ft (1.52 m) of the terminal block. ...screw. 14 i...........'3t ' ' When connecting to the terminal block, place the hooked end of the wire under the screw of dryer rear panel. 3-wire connection: Power supply cord Use where local codes permit connecting cabinet-ground conductor to the center; Insert tab ...
... Direct wire cable must have completed your electrical connection. I .oosen or remove center silver-colored terminal block screw. 2. Tighten screws. !! silvercolored terminal screw of extra length so dryer can be moved if needed. Tighten strain relief screws. 5. You have 5 ft (1.52 m) of the terminal block. ...screw. 14 i...........'3t ' ' When connecting to the terminal block, place the hooked end of the wire under the screw of dryer rear panel. 3-wire connection: Power supply cord Use where local codes permit connecting cabinet-ground conductor to the center; Insert tab ...
Use and Care Guide
Page 15
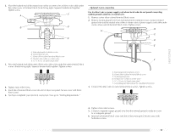
...or center wire) of terminal block (hook facing right). fxtemal ground conductor screw B. Insert tab of terminal block cover into slot of dryer rear panel. A. Neutral ground wire D. iiiiiii}i!i f* [i 4. Secure cover with hold -down screw. 6. Remove neutral ground wire from...block screw. Tighten screw. Place the hooked ends of dryer rear panel. A '_i B E A. Neutral ground wire C. Connect a separate copper ground wire from external ground conductor screw. You have completed your electrical connection. Insert tab of terminal block cover into slot of...
...or center wire) of terminal block (hook facing right). fxtemal ground conductor screw B. Insert tab of terminal block cover into slot of dryer rear panel. A. Neutral ground wire D. iiiiiii}i!i f* [i 4. Secure cover with hold -down screw. 6. Remove neutral ground wire from...block screw. Tighten screw. Place the hooked ends of dryer rear panel. A '_i B E A. Neutral ground wire C. Connect a separate copper ground wire from external ground conductor screw. You have completed your electrical connection. Insert tab of terminal block cover into slot of...
Use and Care Guide
Page 16
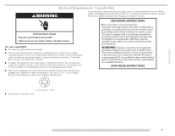
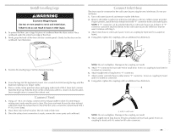
...flexible metal vent in death WARN I )o not use a plastic vent. Do not use a metal foil vent. Clamp 16 Rigid metal vent • For best drying performance, rigid metal vents are recommended. • Rigid metal vent is in its final location. • Remove excess flexible metal vent to seal all governing codes... must be used. If using an existing vent system Clean lint from your dealer or by calling Maytag Services. If this dryer MUST BE EXHAUSTED OUTDOORS. I NG" To reduce the risk of fire, this is not plugged with rigid or flexible heavy metal vent. Good Better Clamps...
...flexible metal vent in death WARN I )o not use a plastic vent. Do not use a metal foil vent. Clamp 16 Rigid metal vent • For best drying performance, rigid metal vents are recommended. • Rigid metal vent is in its final location. • Remove excess flexible metal vent to seal all governing codes... must be used. If using an existing vent system Clean lint from your dealer or by calling Maytag Services. If this dryer MUST BE EXHAUSTED OUTDOORS. I NG" To reduce the risk of fire, this is not plugged with rigid or flexible heavy metal vent. Good Better Clamps...
Use and Care Guide
Page 17
... or through the bottom. Choose your exhaust installation type Recommended exhaust installations Typical installations vent the dryer from entering the home. • Exhaust hood must be converted to fellow these instructions can result in death, fire, electrical shock, or serious injury. Improper venting can be at least 12" (30.5 cm) from the...
... or through the bottom. Choose your exhaust installation type Recommended exhaust installations Typical installations vent the dryer from entering the home. • Exhaust hood must be converted to fellow these instructions can result in death, fire, electrical shock, or serious injury. Improper venting can be at least 12" (30.5 cm) from the...
Use and Care Guide
Page 18
...structure and must fit inside the dryer. i i // A B A. Determine vent length and elbows needed for best drying performance • Use the following kits...ft (20 m) 58 ft (17.7 m) Flexible metal 36 ft (11 m) 28 ft (8.5 m) 1 Rigid metal 54 ft (16.5 m) 48 ft (14.6 m) Flexible metal 31 ff (9.4 m) 23 ff (7 m) 2 Rigid metal 44 ft (13.4 m) 38 ft (11.6 m) Flexible metal 27 ft (8.2 m) 19 ft (5.8 m) 3 Rigid metal 35 ft (10.7 m) 29 ft (8.8 m) Flexible metal 25 ft (7.6 m) 17 ft (5.2 m) 4 Rigid metal 27 ft (8.2 m) 21 ft (6.4 m) Flexible metal 23 ft (7 m) 15 ft...
...structure and must fit inside the dryer. i i // A B A. Determine vent length and elbows needed for best drying performance • Use the following kits...ft (20 m) 58 ft (17.7 m) Flexible metal 36 ft (11 m) 28 ft (8.5 m) 1 Rigid metal 54 ft (16.5 m) 48 ft (14.6 m) Flexible metal 31 ff (9.4 m) 23 ff (7 m) 2 Rigid metal 44 ft (13.4 m) 38 ft (11.6 m) Flexible metal 27 ft (8.2 m) 19 ft (5.8 m) 3 Rigid metal 35 ft (10.7 m) 29 ft (8.8 m) Flexible metal 25 ft (7.6 m) 17 ft (5.2 m) 4 Rigid metal 27 ft (8.2 m) 21 ft (6.4 m) Flexible metal 23 ft (7 m) 15 ft...
Use and Care Guide
Page 19
... by hand until it is seated on the corner posts until it is seated on coupling by hand until it is seated on the The dryer must be connected to the cold water faucet using the new inlet hoses. Do not crush or kink vent. 3. A. Attach angled end ... ::i 3. A 1. Once the exhaust vent connection is secured to connect the exhaust vent. To protect the floob use old hoses. 1. dryer on connector. NOTE: If "Y" connector can result in dryer. direct['/to cold water faucet, go to cold water NOTE: Do not overtighten. Using pliers, tighten the couplings with an additional...
... by hand until it is seated on the corner posts until it is seated on coupling by hand until it is seated on the The dryer must be connected to the cold water faucet using the new inlet hoses. Do not crush or kink vent. 3. A. Attach angled end ... ::i 3. A 1. Once the exhaust vent connection is secured to connect the exhaust vent. To protect the floob use old hoses. 1. dryer on connector. NOTE: If "Y" connector can result in dryer. direct['/to cold water faucet, go to cold water NOTE: Do not overtighten. Using pliers, tighten the couplings with an additional...

Use and Care Guide
Page 20
...; Dryer is plugged into an outlet and/or electrical supply is connected. • Household fuse is intact and tight, or circuit breaker has not tripped. • Dryer door is first heated. See "1 eve[ Dryer." ...8. In the U.S.A. • For power supply cord installation, installation, turn . Read "Dryer Use." 11. Wipe the dryer drum interior thoroughly with a damp cloth to see which will reduce product performance...
...; Dryer is plugged into an outlet and/or electrical supply is connected. • Household fuse is intact and tight, or circuit breaker has not tripped. • Dryer door is first heated. See "1 eve[ Dryer." ...8. In the U.S.A. • For power supply cord installation, installation, turn . Read "Dryer Use." 11. Wipe the dryer drum interior thoroughly with a damp cloth to see which will reduce product performance...
Use and Care Guide
Page 21
... anything flammable on it (even after washing). You can result in all of fire, electric shock, or injury to follow these instructions explosion, or fire. Please refer to starting your dryer. Clean lint screen before operating this manual for the cycle chosen will dry most loads ... is a guide to specific sections of this appliance. 9000 SERIES with steam power,_ance) MCT M,y_iCor,lr,lerc _ led/,o[og¥ ]i:::i[ Explosion Hazard Keep flammable materials and vapors, such as gasoine, away from dryer. Do not dry anything that has ever had anything that has ever...
... anything flammable on it (even after washing). You can result in all of fire, electric shock, or injury to follow these instructions explosion, or fire. Please refer to starting your dryer. Clean lint screen before operating this manual for the cycle chosen will dry most loads ... is a guide to specific sections of this appliance. 9000 SERIES with steam power,_ance) MCT M,y_iCor,lr,lerc _ led/,o[og¥ ]i:::i[ Explosion Hazard Keep flammable materials and vapors, such as gasoine, away from dryer. Do not dry anything that has ever had anything that has ever...
Use and Care Guide
Page 22
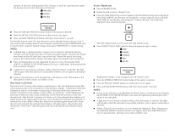
...the SIGNAl. This feature is the actual drying time. How Sensor Cycles Work The Sensi-Care TMdrying system improves performance with Timed Cycles. • Press TIMED CYCI.ES TEMP until dryer starts (about 1 second). Press TIME ADJUST, and the time will glow yellow when the feature is extracted ...The Time Adjust feature can be used only with Auto Moisture Sensing Plus, which the dryer will adjust again, showing the final drying time. • Time and Temperature are not adjustable for Timed, Steam, or Sanitize Cycles. ON/OFF button to each feature will not glow when the ...
...the SIGNAl. This feature is the actual drying time. How Sensor Cycles Work The Sensi-Care TMdrying system improves performance with Timed Cycles. • Press TIMED CYCI.ES TEMP until dryer starts (about 1 second). Press TIME ADJUST, and the time will glow yellow when the feature is extracted ...The Time Adjust feature can be used only with Auto Moisture Sensing Plus, which the dryer will adjust again, showing the final drying time. • Time and Temperature are not adjustable for Timed, Steam, or Sanitize Cycles. ON/OFF button to each feature will not glow when the ...


