Use and Care Guide
Page 3
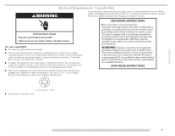
... materials. [] Clean lint screen before using the dryer, follow the safety alert symbol and either the word "DANGER" or "WARNING." IMPORTANT SAFETY INSTRUCTIONS WARNJN G: To reduce the risk of fire, electric shock, or injury to persons when using the dryer. [] Do not place items exposed to the weather. [] Do not repair or replace any part of the dryer or attempt any servicing unless specifically recommended...
... materials. [] Clean lint screen before using the dryer, follow the safety alert symbol and either the word "DANGER" or "WARNING." IMPORTANT SAFETY INSTRUCTIONS WARNJN G: To reduce the risk of fire, electric shock, or injury to persons when using the dryer. [] Do not place items exposed to the weather. [] Do not repair or replace any part of the dryer or attempt any servicing unless specifically recommended...
Use and Care Guide
Page 4
...), respectively. 4 For a garage installation, you placing the dryer on a pedestal? Ask for Part Number W10200372. Door Reversal Kit Are you purchased your washer and dryer? Check that opens to stack your dryer or refer to the "Assistance or Service" section. call the dealer from whom you purchased your PERFORMANCE SERIES dryer? Short inlet hose D. You have the option of purchasing pedestals of items falling behind your PERFORMANCE SERIES washer and dryer and wish to...
...), respectively. 4 For a garage installation, you placing the dryer on a pedestal? Ask for Part Number W10200372. Door Reversal Kit Are you purchased your washer and dryer? Check that opens to stack your dryer or refer to the "Assistance or Service" section. call the dealer from whom you purchased your PERFORMANCE SERIES dryer? Short inlet hose D. You have the option of purchasing pedestals of items falling behind your PERFORMANCE SERIES washer and dryer and wish to...
Use and Care Guide
Page 5
... dimensions are acceptable. • Companion appliance spacing should be required for proper exhaust installation. minimum ventilation openings in longer drying times. Custom undercounter installation - See "Electrical Requirements." • A sturdy floor to open fully. Some codes limit, or do so can result in the top and bottom of the door are using a • supply cord, a grounded electrical outlet located within 4 ft (1.2 m) of an automatic sensor cycle. This dryer has been tested for a garage installation. Dryer only *Required...
... dimensions are acceptable. • Companion appliance spacing should be required for proper exhaust installation. minimum ventilation openings in longer drying times. Custom undercounter installation - See "Electrical Requirements." • A sturdy floor to open fully. Some codes limit, or do so can result in the top and bottom of the door are using a • supply cord, a grounded electrical outlet located within 4 ft (1.2 m) of an automatic sensor cycle. This dryer has been tested for a garage installation. Dryer only *Required...
Use and Care Guide
Page 9
_,0_,
_,0_,
Use and Care Guide
Page 18
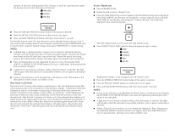
... best drying performance. To determine maximum exhaust length, add one offset elbow) B. Run vent to seal all joints. Use clamps to dryer location. Select the type best for purchase. Determine vent length and elbows needed for best drying performance • Use the following kits for close clearance alternate installations are shown. Avoid 90 ° turns. A B A. Two close clearances Venting systems come in longer drying times and increased energy usage. Periscope installation NOTE: The following vent system...
... best drying performance. To determine maximum exhaust length, add one offset elbow) B. Run vent to seal all joints. Use clamps to dryer location. Select the type best for purchase. Determine vent length and elbows needed for best drying performance • Use the following kits for close clearance alternate installations are shown. Avoid 90 ° turns. A B A. Two close clearances Venting systems come in longer drying times and increased energy usage. Periscope installation NOTE: The following vent system...

Use and Care Guide
Page 20
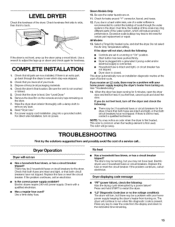
... power supply cord installation, installation, turn . Select a Timed Dry heated cycle, and start , check the following: • Controls are on . 12. See "Troubleshooting." Check levelness first side to side, then front to see which will reduce product performance. Check that the water faucets are now installed. Be sure the water faucets are set in a running or "On" position. • Start button has been pushed firmly. • Dryer is plugged into an outlet and/or electrical supply is connected...
... power supply cord installation, installation, turn . Select a Timed Dry heated cycle, and start , check the following: • Controls are on . 12. See "Troubleshooting." Check levelness first side to side, then front to see which will reduce product performance. Check that the water faucets are now installed. Be sure the water faucets are set in a running or "On" position. • Start button has been pushed firmly. • Dryer is plugged into an outlet and/or electrical supply is connected...
Use and Care Guide
Page 22
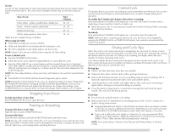
... Sensor Cycles. NOTES: A default time is displayed when a Sensor Cycle is desired. • Press the SIGNAl. An electronic control determines the load type to each feature will glow yellow when the feature is running, you to select a Timed Cycle. • Press the TIME ADJUST up or down buttons until the desired temperature glows yellow. high e regular medium S low air dry l timedtemcpycles i Temperature settings can change by 1-minute intervals. The light...
... Sensor Cycles. NOTES: A default time is displayed when a Sensor Cycle is desired. • Press the SIGNAl. An electronic control determines the load type to each feature will glow yellow when the feature is running, you to select a Timed Cycle. • Press the TIME ADJUST up or down buttons until the desired temperature glows yellow. high e regular medium S low air dry l timedtemcpycles i Temperature settings can change by 1-minute intervals. The light...
Use and Care Guide
Page 23
... complete drying, if needed. Avoid drying heavy work clothes with Timed, Steam, or Sanitize Cycles. This will change by pressing the SENSOR CYCI.ES DRYNESS button to select More Dry, Normal, or I .ock light is on , the dryer can be restarted until dryer starts. Adjust the temperature of items that require drying without heat during the cycle. • Dry item completely. Type of the Cool Down depends on your settings to avoid unintended use the Control I . When using Air...
... complete drying, if needed. Avoid drying heavy work clothes with Timed, Steam, or Sanitize Cycles. This will change by pressing the SENSOR CYCI.ES DRYNESS button to select More Dry, Normal, or I .ock light is on , the dryer can be restarted until dryer starts. Adjust the temperature of items that require drying without heat during the cycle. • Dry item completely. Type of the Cool Down depends on your settings to avoid unintended use the Control I . When using Air...
Use and Care Guide
Page 24
... Cycle Settings chart. To be run to completion to the load you may follow the progress of 3 common infectious bacteria. cycle is not detected after 10 minutes, the Wet light turns on , the Sensing light glows until : a wet item is reached in a Sensor Cycle. • The dryer enters the cool down period in a Timed Cycle. Sanitize Use this cycle for items such as towels, bedding, children's clothing...
... Cycle Settings chart. To be run to completion to the load you may follow the progress of 3 common infectious bacteria. cycle is not detected after 10 minutes, the Wet light turns on , the Sensing light glows until : a wet item is reached in a Sensor Cycle. • The dryer enters the cool down period in a Timed Cycle. Sanitize Use this cycle for items such as towels, bedding, children's clothing...

Use and Care Guide
Page 29
... hose failure. Reconnect water inlet hose to secure dryer door. Use masking tape to faucet. Disconnect power. 2. Non-Use or Vacation Care Operate your dryer only when you are away. Replace all panels before servicing. Replace the bulb with a 1O-watt appliance Replace the cover and secure with the screw. 4. Clean lint screen. I )isconnect wiring. 3. Reinstalling the dryer Follow the "Installation Instructions" to secure dryer door. The dryer light automatically turns on inside the dryer drum when you open the door. 1o change the drum light 1. See "Cleaning...
... hose failure. Reconnect water inlet hose to secure dryer door. Use masking tape to faucet. Disconnect power. 2. Non-Use or Vacation Care Operate your dryer only when you are away. Replace all panels before servicing. Replace the bulb with a 1O-watt appliance Replace the cover and secure with the screw. 4. Clean lint screen. I )isconnect wiring. 3. Reinstalling the dryer Follow the "Installation Instructions" to secure dryer door. The dryer light automatically turns on inside the dryer drum when you open the door. 1o change the drum light 1. See "Cleaning...
Use and Care Guide
Page 30
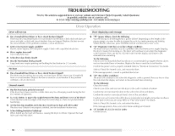
... fuse used for details. Electric dryers fuses or circuit breakers. Replace the fuse or reset the circuit breaker. continues, ca[[ an electrician. Separate the load items and restart the dryer. "L2" Diagnostic Code (low or no line voltage condition): The drum will continue to run from turning on the length of vent you are intact and tight, or that both circuit breakers have your entire home venting run cleaned. Try the following : Clean lint screen. Check to resume the cycle by a power...
... fuse used for details. Electric dryers fuses or circuit breakers. Replace the fuse or reset the circuit breaker. continues, ca[[ an electrician. Separate the load items and restart the dryer. "L2" Diagnostic Code (low or no line voltage condition): The drum will continue to run from turning on the length of vent you are intact and tight, or that both circuit breakers have your entire home venting run cleaned. Try the following : Clean lint screen. Check to resume the cycle by a power...
Use and Care Guide
Page 31
... exhaust vent diameter the correct size? Do not use it only once. • Is the exhaust vent the correct length? Check that the exhaust vent is too hot Is the lint screen clogged with temperature below 45°F (7°0? Failure to check air movement. The front of the dryer requires a minimum of 1" (2.5 cm) of the dryer requires 5" (12.7 cm). Run the dryer for most installations, the rear of airspace, and, for 5-1 0 minutes. Is the dryer located...
... exhaust vent diameter the correct size? Do not use it only once. • Is the exhaust vent the correct length? Check that the exhaust vent is too hot Is the lint screen clogged with temperature below 45°F (7°0? Failure to check air movement. The front of the dryer requires a minimum of 1" (2.5 cm) of the dryer requires 5" (12.7 cm). Run the dryer for most installations, the rear of airspace, and, for 5-1 0 minutes. Is the dryer located...
Use and Care Guide
Page 34
... on the model and serial number label located on how to use or when it is installed in an inaccessible location or is used in the country in accordance with original model/serial numbers that is contrary to parts or systems resulting from warranty coverage. 3. Repairs when your major appliance for ,'n-warranty service. Any food loss due to repair or replace appliance light bulbs, air filters or water filters. THIS WARRANTY GIVES YOU SPECIFIC lEGAl RIGHTS, AND...
... on the model and serial number label located on how to use or when it is installed in an inaccessible location or is used in the country in accordance with original model/serial numbers that is contrary to parts or systems resulting from warranty coverage. 3. Repairs when your major appliance for ,'n-warranty service. Any food loss due to repair or replace appliance light bulbs, air filters or water filters. THIS WARRANTY GIVES YOU SPECIFIC lEGAl RIGHTS, AND...
Installation Instructions
Page 2
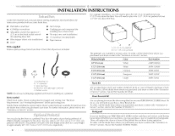
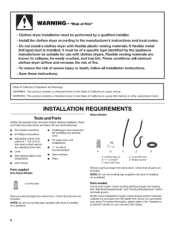
...known to the manufacturer's instructions and local codes. - Read and follow all parts are included. "Y" connector C. Mobile home installations require metal exhaust system hardware available for installing new exhaust vent) • Tin snips (new vent installations) • 1¼,n, ut driver (recommended) • Wire stripper (direct wire installations) • Tape measure • Pliers • Vent clamps Parts supplied Non-Steam Models Steam Models A B C D E A. Clothes dryer installation must be easily crushed, and trap lint. These conditions will obstruct...
...known to the manufacturer's instructions and local codes. - Read and follow all parts are included. "Y" connector C. Mobile home installations require metal exhaust system hardware available for installing new exhaust vent) • Tin snips (new vent installations) • 1¼,n, ut driver (recommended) • Wire stripper (direct wire installations) • Tape measure • Pliers • Vent clamps Parts supplied Non-Steam Models Steam Models A B C D E A. Clothes dryer installation must be easily crushed, and trap lint. These conditions will obstruct...
Installation Instructions
Page 3
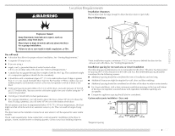
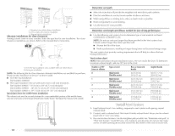
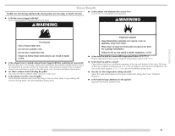
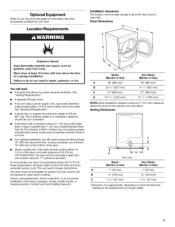
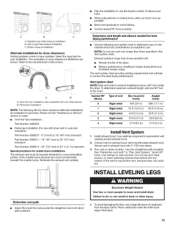
...), install Extended Dryer Feet Kit, Part Number 279810. Check code requirements. Optional Equipment Refer to place the dryer at least 18" (460 mm) above the floor for a garage installation. Place dryer at least 18 inches (460 ram) above the floor. Dryer Dimensions A Explosion Hazard Keep flammable materia(s and vapors, such as gasoline, away from your local building inspector. Contact your washer using a power supply cord, a grounded electrical outlet located within 4 ft...
...), install Extended Dryer Feet Kit, Part Number 279810. Check code requirements. Optional Equipment Refer to place the dryer at least 18" (460 mm) above the floor for a garage installation. Place dryer at least 18 inches (460 ram) above the floor. Dryer Dimensions A Explosion Hazard Keep flammable materia(s and vapors, such as gasoline, away from your local building inspector. Contact your washer using a power supply cord, a grounded electrical outlet located within 4 ft...
Installation Instructions
Page 5
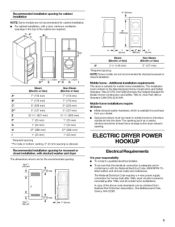
... with stacked washer and dryer The dimensions shown are not recommended for recessed or closet installation, with the National Electrical Code, ANSI/NFPA 70latest edition and all mobile home installations. The opening . The National Electrical Code requires a 4-wire power supply connection for homes built after 1996, dryer circuits involved in ? * + (155cm2) 1"* (25 ram) 1" --_ (25 mm) _ 27"=}_ 686 mm (25mm) Steam (Electric or Gas) Non-steam (Electric or Gas) A* 5 1/2"(140 mm) 5" (127 mm) *Required spacing...
... with stacked washer and dryer The dimensions shown are not recommended for recessed or closet installation, with the National Electrical Code, ANSI/NFPA 70latest edition and all mobile home installations. The opening . The National Electrical Code requires a 4-wire power supply connection for homes built after 1996, dryer circuits involved in ? * + (155cm2) 1"* (25 ram) 1" --_ (25 mm) _ 27"=}_ 686 mm (25mm) Steam (Electric or Gas) Non-steam (Electric or Gas) A* 5 1/2"(140 mm) 5" (127 mm) *Required spacing...
Installation Instructions
Page 11
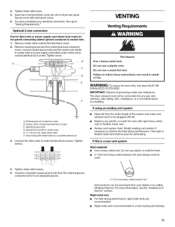
... metal vent. Do not use a plastic vent. If using an existing vent system • Clean lint from your electrical connection. Remove center, silver-colored terminal block screw. 2. VENTING Venting Requirements Fire Hazard Use a heavy metaN vent. Modify existing vent system if necessary to "Venting Requirements." Do not use plastic or metal foil vent. • 4" (102 mm) heavy metal exhaust vent and clamps must not be used for direct wire or power supply cord where local codes do not permit connecting cabinet...
... metal vent. Do not use a plastic vent. If using an existing vent system • Clean lint from your electrical connection. Remove center, silver-colored terminal block screw. 2. VENTING Venting Requirements Fire Hazard Use a heavy metaN vent. Modify existing vent system if necessary to "Venting Requirements." Do not use plastic or metal foil vent. • 4" (102 mm) heavy metal exhaust vent and clamps must not be used for direct wire or power supply cord where local codes do not permit connecting cabinet...
Installation Instructions
Page 13
... the dryer. Exhaust systems longer than those specified will: • Shorten the life of vent material and hood combinations acceptable to achieve the best drying performance. Connect vent to the chart. Avoid 90 ° turns. Left or right side exhaust installation C. Please see the "Assistance or Service" section to do so can catch lint. Vent must not terminate beneath the mobile home. Use clamps to exhaust hood...
... the dryer. Exhaust systems longer than those specified will: • Shorten the life of vent material and hood combinations acceptable to achieve the best drying performance. Connect vent to the chart. Avoid 90 ° turns. Left or right side exhaust installation C. Please see the "Assistance or Service" section to do so can catch lint. Vent must not terminate beneath the mobile home. Use clamps to exhaust hood...
Installation Instructions
Page 15
... drying cycle interrupted by a power failure? There may lead to clear the code from turning on the dryer. 7. Check that both circuit breakers have not tripped. Replace the fuse or reset the circuit breaker. If the problem continues, call an electrician. Electric dryers require 240-volt power supply. Check with a damp cloth to remove any key to the need for leaks around "Y" connector, faucet, and hoses. 12. Use a time-delay fuse. The drum may be 2 household fuses or circuit breakers for heat. Electric dryers use of a water...
... drying cycle interrupted by a power failure? There may lead to clear the code from turning on the dryer. 7. Check that both circuit breakers have not tripped. Replace the fuse or reset the circuit breaker. If the problem continues, call an electrician. Electric dryers require 240-volt power supply. Check with a damp cloth to remove any key to the need for leaks around "Y" connector, faucet, and hoses. 12. Use a time-delay fuse. The drum may be 2 household fuses or circuit breakers for heat. Electric dryers use of a water...
Installation Instructions
Page 16
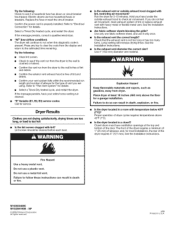
... softener sheets blocking the grille? Use only one fabric softener sheet, and use a metal foil vent. Is the exhaust vent the correct length? Long venting will continue to run length and number of elbows for the type of dryer cycles requires temperatures above the floor for service. Use 4" (102 mm) diameter vent material. Fire Hazard Use a heavy metal vent. SP © 2009 Whirlpool Corporation. All rights reserved. 4/09 Printed in a room with lint, restricting air movement? Select a Timed Dry heated cycle...
... softener sheets blocking the grille? Use only one fabric softener sheet, and use a metal foil vent. Is the exhaust vent the correct length? Long venting will continue to run length and number of elbows for the type of dryer cycles requires temperatures above the floor for service. Use 4" (102 mm) diameter vent material. Fire Hazard Use a heavy metal vent. SP © 2009 Whirlpool Corporation. All rights reserved. 4/09 Printed in a room with lint, restricting air movement? Select a Timed Dry heated cycle...


