
Use and Care Guide
Page 1
...WWW.MAYTAG.COM IN CANADA, WWW.MAYIAG.CA W10057353A SI TIENE PREGUNFAS RESPECTO A IAS CARACTERiSTICAS, FUNCIONAMIENTO, RENDIMIENTO, PARTES, ACCESORIOS O SERVICIO TECNICO, IIAME AI.: 1.800.688.9900 EN CANADA, IIAME AI: 1.800.807.6777 VISITE NUESTRO SITIO WEB EN WWW. orrnance [] ELECTRIC DRYER USE... & CARE GUIDE p p SECHEUSE ELECTRIQUE GUIDE D'UTILISATION ET D'ENTRETIEN FOR QUESTIONS ABOUI FEATURES, OPER,a(IION/PERFORMANCE, PARTS, ACCESSORIES OR SERVICE CAI.I ATION OU SERVICE, COMPOSE IE : 1.800....
...WWW.MAYTAG.COM IN CANADA, WWW.MAYIAG.CA W10057353A SI TIENE PREGUNFAS RESPECTO A IAS CARACTERiSTICAS, FUNCIONAMIENTO, RENDIMIENTO, PARTES, ACCESORIOS O SERVICIO TECNICO, IIAME AI.: 1.800.688.9900 EN CANADA, IIAME AI: 1.800.807.6777 VISITE NUESTRO SITIO WEB EN WWW. orrnance [] ELECTRIC DRYER USE... & CARE GUIDE p p SECHEUSE ELECTRIQUE GUIDE D'UTILISATION ET D'ENTRETIEN FOR QUESTIONS ABOUI FEATURES, OPER,a(IION/PERFORMANCE, PARTS, ACCESSORIES OR SERVICE CAI.I ATION OU SERVICE, COMPOSE IE : 1.800....
Use and Care Guide
Page 3
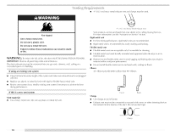
... foam rubber or similarly textured rubber-like materials. [] Clean lint screen before using the dryer, follow instructions. Items contaminated with controls. IMPORTANT SAFETY INSTRUCTIONS WARNJN G: To reduce the risk of fire, electric shock, or injury to reduce the chance of injury, and tell you what the potential... hazard is moving. [] Do not install or store the dryer where it will tell you what can kill or hurt you ...
... foam rubber or similarly textured rubber-like materials. [] Clean lint screen before using the dryer, follow instructions. Items contaminated with controls. IMPORTANT SAFETY INSTRUCTIONS WARNJN G: To reduce the risk of fire, electric shock, or injury to reduce the chance of injury, and tell you what the potential... hazard is moving. [] Do not install or store the dryer where it will tell you what can kill or hurt you ...
Use and Care Guide
Page 4
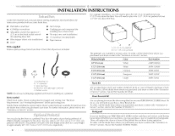
... C. Mobile home installations require metal exhaust system hardware available for a total height of items falling behind your machines, you purchased your PERFORMANCE SERIES dryer? The pedestal will need to the "Assistance or Service" section. To ordeb ca[[ the dealer from whom you will add to... the total height of the dryer for purchase from the dealer from dryer drum. To order; Check existing electrical supply and venting. Ask for Part Number 8212640. Gather the required tools and parts before ...
... C. Mobile home installations require metal exhaust system hardware available for a total height of items falling behind your machines, you purchased your PERFORMANCE SERIES dryer? The pedestal will need to the "Assistance or Service" section. To ordeb ca[[ the dealer from whom you will add to... the total height of the dryer for purchase from the dealer from dryer drum. To order; Check existing electrical supply and venting. Ask for Part Number 8212640. Gather the required tools and parts before ...
Use and Care Guide
Page 5
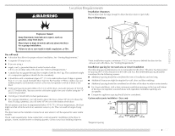
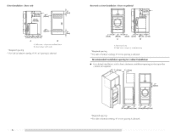
...and floor moldings. • Additional spacing should also be considered for proper exhaust installation. Dryer Dimensions I .ouvered doors with elbow. Place dryer at least 18" (46 cm) above the floor for best performance. • For a garage installation, you will need 18" (46 cm) to ...8226; 20-100 psi (138-690 kPa) for a garage installation. The dryer must be considered. If slope is not level. • Cold water faucets located within 2 ft (61 cm) of either side of the dryer. See "Electrical Requirements." • A sturdy floor to reduce noise transfer. • For...
...and floor moldings. • Additional spacing should also be considered for proper exhaust installation. Dryer Dimensions I .ouvered doors with elbow. Place dryer at least 18" (46 cm) above the floor for best performance. • For a garage installation, you will need 18" (46 cm) to ...8226; 20-100 psi (138-690 kPa) for a garage installation. The dryer must be considered. If slope is not level. • Cold water faucets located within 2 ft (61 cm) of either side of the dryer. See "Electrical Requirements." • A sturdy floor to reduce noise transfer. • For...
Use and Care Guide
Page 6
...; For cabinet installation, with vents * Required spacing **For side or bottom venting, 0" (0 cm) spacing is allowed. Closet installation - Dryer only [_ _ _ (34180"c2m* 2-')-'_ I 18"rnin.* (45,72cm) (t5254c"2rn* 2)'--_ -_1"* _ 32o/-1_6"5"*_* (2,5crn)(82,7crn)(12,7crn) A B A. Dryer on pedestal (2.5cm) 27-,q, 1,,*b1- (58.6cm) (2,5cm) (2,5crn) (82.7cm) (12,7cm) B A. Recessed area...
...; For cabinet installation, with vents * Required spacing **For side or bottom venting, 0" (0 cm) spacing is allowed. Closet installation - Dryer only [_ _ _ (34180"c2m* 2-')-'_ I 18"rnin.* (45,72cm) (t5254c"2rn* 2)'--_ -_1"* _ 32o/-1_6"5"*_* (2,5crn)(82,7crn)(12,7crn) A B A. Dryer on pedestal (2.5cm) 27-,q, 1,,*b1- (58.6cm) (2,5cm) (2,5crn) (82.7cm) (12,7cm) B A. Recessed area...
Use and Care Guide
Page 7
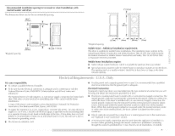
.... • I)o not use an extension cord. • If codes permit and a separate ground wire is used when the appliance is installed with a 3-wire electrical supply connection. If the dryer is installed in . 2 * (166cm2) 3"* (7.6cm) %,,,{,:'7! _- 1"* (2.6 cm) 6"*(;6.2 cm) 76" (193era) t 21 -- _- 1" _ (12.7cm) (2.6cm) _ 27"-_,,-(68.6cm) (2.5cm) *Required spacing Mobile home - H""_7 21...
.... • I)o not use an extension cord. • If codes permit and a separate ground wire is used when the appliance is installed with a 3-wire electrical supply connection. If the dryer is installed in . 2 * (166cm2) 3"* (7.6cm) %,,,{,:'7! _- 1"* (2.6 cm) 6"*(;6.2 cm) 76" (193era) t 21 -- _- 1" _ (12.7cm) (2.6cm) _ 27"-_,,-(68.6cm) (2.5cm) *Required spacing Mobile home - H""_7 21...
Use and Care Guide
Page 8
... use aluminum). • At least 5 ft (1.52 m) long. If using a power supply cord: Use a UI. listed power supply cord kit marked for electric current. The wires that is properly grounded. GROUNDING INSTRUCTIONS [] For a grounded, cord-connected dryer: This dryer must be insulated. • 10-gauge ...kit should be type SRI) or SRI)T and be at [east 4 ft (1.22 m) long, must be identified by providing a path of electric shock by a white cover. Do not modify the plug on the dryer. This dryer uses a cord having an equipment-grounding conductor and a grounding plug. ...
... use aluminum). • At least 5 ft (1.52 m) long. If using a power supply cord: Use a UI. listed power supply cord kit marked for electric current. The wires that is properly grounded. GROUNDING INSTRUCTIONS [] For a grounded, cord-connected dryer: This dryer must be insulated. • 10-gauge ...kit should be type SRI) or SRI)T and be at [east 4 ft (1.22 m) long, must be identified by providing a path of electric shock by a white cover. Do not modify the plug on the dryer. This dryer uses a cord having an equipment-grounding conductor and a grounding plug. ...
Use and Care Guide
Page 9
_,0_,
_,0_,
Use and Care Guide
Page 11
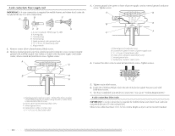
... ern) 3-wire receptacle (NEMA type 10-30R) A fused disconnect or circuit breaker box* A UI_ listed, 120/240volt minimum, 30-amp, dryer power supply cord* 4-wire connection: Direct Wire 3-wire connection: Power supply cord 3-wire direct A fused disconnect or 3-wire connection: circuit breaker ...box* Direct Wire *If local codes do not permit the connection of electrical connection: If your type of a cabinet-ground wire, go to the neutral conductor to "Optional 3-wire connection" section. Reaching inside ...
... ern) 3-wire receptacle (NEMA type 10-30R) A fused disconnect or circuit breaker box* A UI_ listed, 120/240volt minimum, 30-amp, dryer power supply cord* 4-wire connection: Direct Wire 3-wire connection: Power supply cord 3-wire direct A fused disconnect or 3-wire connection: circuit breaker ...box* Direct Wire *If local codes do not permit the connection of electrical connection: If your type of a cabinet-ground wire, go to the neutral conductor to "Optional 3-wire connection" section. Reaching inside ...
Use and Care Guide
Page 12
...silver-colored terminal block screw E. Tighten strain relief screws. 6. You have 5 ft (1.52 m) of extra length so dryer can be moved if needed. 12 Direct wire cable must have completed your electrical connection. Tighten screw. Cround prong D. Connect neutral ground wire and the neutral... supply cord to outer terminal block screws. Tighten screws. !! !! External ground conductor screw - Ground wire (green or bare) of dryer rear panel. Neutral ground wire D. Now go to "Venting Requirements." 4-wire connection: Direct wire IMPORTANT: A 4-wire connection is required...
...silver-colored terminal block screw E. Tighten strain relief screws. 6. You have 5 ft (1.52 m) of extra length so dryer can be moved if needed. 12 Direct wire cable must have completed your electrical connection. Tighten screw. Cround prong D. Connect neutral ground wire and the neutral... supply cord to outer terminal block screws. Tighten screws. !! !! External ground conductor screw - Ground wire (green or bare) of dryer rear panel. Neutral ground wire D. Now go to "Venting Requirements." 4-wire connection: Direct wire IMPORTANT: A 4-wire connection is required...
Use and Care Guide
Page 13
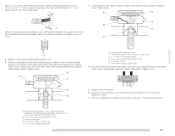
...." Insert tab of terminal block cover into a hook shape. *" h 3, Connect ground wire (green or bare) of dryer rear panel. Now go to center silver-colored terminal block screw. Shape ends of wires into slot of direct wire cable ... cover with hold-down screw. 7. When connecting to external ground conductor screw. External ground conductor screw - Neutral ground wire D. You have completed your electrical connection. Tighten screw. Squeeze hooked ends together. JjJ D A. A. Tighten screws. !! !! Tighten strain relief screw. 6. Center siher-colored terminal block...
...." Insert tab of terminal block cover into a hook shape. *" h 3, Connect ground wire (green or bare) of dryer rear panel. Now go to center silver-colored terminal block screw. Shape ends of wires into slot of direct wire cable ... cover with hold-down screw. 7. When connecting to external ground conductor screw. External ground conductor screw - Neutral ground wire D. You have completed your electrical connection. Tighten screw. Squeeze hooked ends together. JjJ D A. A. Tighten screws. !! !! Tighten strain relief screw. 6. Center siher-colored terminal block...

Use and Care Guide
Page 14
...block screw. 2. Neutral prong D. silvercolored terminal screw of cable. Secure cover with hold- Direct wire cable must have completed your electrical connection. Strip insulation back 1" (2.5 cm). 3-wire connection: Power supply cord Use where local codes permit connecting cabinet-ground conductor to... Tighten screws. !! I .oosen or remove center silver-colored terminal block screw. 14 down screw. 6. You have 5 ft (1.52 m) of extra length so dryer can be moved if needed. Strip 3V2' (8.9 cm) of outer covering from end of the terminal block. External ground conductor...
...block screw. 2. Neutral prong D. silvercolored terminal screw of cable. Secure cover with hold- Direct wire cable must have completed your electrical connection. Strip insulation back 1" (2.5 cm). 3-wire connection: Power supply cord Use where local codes permit connecting cabinet-ground conductor to... Tighten screws. !! I .oosen or remove center silver-colored terminal block screw. 14 down screw. 6. You have 5 ft (1.52 m) of extra length so dryer can be moved if needed. Strip 3V2' (8.9 cm) of outer covering from end of the terminal block. External ground conductor...
Use and Care Guide
Page 15
... permit connecting cabinet-ground conductor to "Venting Requirements." Insert tab of terminal block cover into slot of dryer rear panel. Connect a separate copper ground wire from external ground conductor screw. You have completed your electrical connection. Neutral wire (white or center wire) E. ¾" (1.9 cm) UL fisted strain relief £ Grounding path determined...
... permit connecting cabinet-ground conductor to "Venting Requirements." Insert tab of terminal block cover into slot of dryer rear panel. Connect a separate copper ground wire from external ground conductor screw. You have completed your electrical connection. Neutral wire (white or center wire) E. ¾" (1.9 cm) UL fisted strain relief £ Grounding path determined...
Use and Care Guide
Page 16
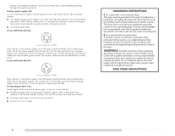
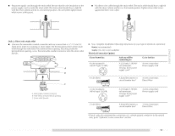
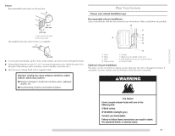
...metal foil vent. Elbows 45 ° elbows provide better airflow than 90 ° elbows. Fire Hazard Use a heavy metal vent. If this dryer MUST BE EXHAUSTED OUTDOORS. Do not use a plastic vent. Failure to seal all governing codes and ordinances. Review vent system chart. Good Better...using an existing vent system Clean lint from your dealer or by calling Maytag Services. Replace any plastic or metal foil vent with screws or other fastening devices that may result in reduced airflow and poor performance. • Do not install flexible metal vent in death WARN I ...
...metal foil vent. Elbows 45 ° elbows provide better airflow than 90 ° elbows. Fire Hazard Use a heavy metal vent. If this dryer MUST BE EXHAUSTED OUTDOORS. Do not use a plastic vent. Failure to seal all governing codes and ordinances. Review vent system chart. Good Better...using an existing vent system Clean lint from your dealer or by calling Maytag Services. Replace any plastic or metal foil vent with screws or other fastening devices that may result in reduced airflow and poor performance. • Do not install flexible metal vent in death WARN I ...
Use and Care Guide
Page 17
...white) W10186596 (midnight grey) Contact your exhaust installation type Recommended exhaust installations Typical installations vent the dryer from the ground or any object that may result in death, fire, electrical shock, or serious injury. Wall D. Clamps £ Rigid metal or flexible C. Exhaust outlet ...metal vent to connect elbows Optional exhaust installations This dryer can cause moisture and lint to collect indoors, which may...
...white) W10186596 (midnight grey) Contact your exhaust installation type Recommended exhaust installations Typical installations vent the dryer from the ground or any object that may result in death, fire, electrical shock, or serious injury. Wall D. Clamps £ Rigid metal or flexible C. Exhaust outlet ...metal vent to connect elbows Optional exhaust installations This dryer can cause moisture and lint to collect indoors, which may...
Use and Care Guide
Page 18
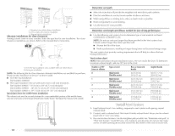
...90 ° turn to achieve the best drying performance. Number of 90 ° turns or elbows Type of the dryer. Connect vent to the manufacturer's instructions. See...ft (20 m) 58 ft (17.7 m) Flexible metal 36 ft (11 m) 28 ft (8.5 m) 1 Rigid metal 54 ft (16.5 m) 48 ft (14.6 m) Flexible metal 31 ff (9.4 m) 23 ff (7 m) 2 Rigid metal 44 ft (13.4 m) 38 ft (11.6 m) Flexible metal 27 ft (8.2 m) 19 ft (5.8 m) 3 Rigid metal 35 ft (10.7 m) 29 ft (8.8 m) Flexible metal 25 ft (7.6 m) 17 ft (5.2 m) 4 Rigid metal 27 ft (8.2 m) 21 ft (6.4 m) Flexible metal 23 ft (7 m) 15 ft...
...90 ° turn to achieve the best drying performance. Number of 90 ° turns or elbows Type of the dryer. Connect vent to the manufacturer's instructions. See...ft (20 m) 58 ft (17.7 m) Flexible metal 36 ft (11 m) 28 ft (8.5 m) 1 Rigid metal 54 ft (16.5 m) 48 ft (14.6 m) Flexible metal 31 ff (9.4 m) 23 ff (7 m) 2 Rigid metal 44 ft (13.4 m) 38 ft (11.6 m) Flexible metal 27 ft (8.2 m) 19 ft (5.8 m) 3 Rigid metal 35 ft (10.7 m) 29 ft (8.8 m) Flexible metal 25 ft (7.6 m) 17 ft (5.2 m) 4 Rigid metal 27 ft (8.2 m) 21 ft (6.4 m) Flexible metal 23 ft (7 m) 15 ft...
Use and Care Guide
Page 19
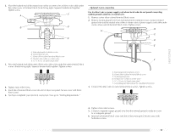
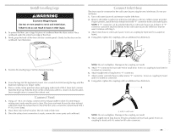
...to the coupling can result. 5. Find the diamond marking. 4. Use a wrench to its final location. Place a carton corner post from the dryer carton. Slide the dryer on connector. 6. Screw on coupling by hand 8. Using pliers, tighten the couplings with an additional two-thirds turn . Damage to Step 6. Firmly...until it is seated on the corner posts until it is seated on connector. If connecting to move and install dryer. The dryer vent must fit over the dryer exhaust outlet and inside the exhaust hood. Excessive Weight Hazard Use two or more people to existing vent, make ...
...to the coupling can result. 5. Find the diamond marking. 4. Use a wrench to its final location. Place a carton corner post from the dryer carton. Slide the dryer on connector. 6. Screw on coupling by hand 8. Using pliers, tighten the couplings with an additional two-thirds turn . Damage to Step 6. Firmly...until it is seated on the corner posts until it is seated on connector. If connecting to move and install dryer. The dryer vent must fit over the dryer exhaust outlet and inside the exhaust hood. Excessive Weight Hazard Use two or more people to existing vent, make ...

Use and Care Guide
Page 20
...in a hard water area, use of the water system, which step was skipped. 2. Wipe the dryer drum interior thoroughly with a damp cloth to see which will reduce product performance. Do not select the Air Only Temperature setting. Check for certain part replacement or repair. 13. ...8226; Start button has been pushed firmly. • Dryer is plugged into an outlet and/or electrical supply is connected. • Household fuse is intact and tight, or circuit breaker has not tripped. • Dryer door is first heated. See "1 eve[ Dryer." 8. If you receive an AF code, your tools...
...in a hard water area, use of the water system, which step was skipped. 2. Wipe the dryer drum interior thoroughly with a damp cloth to see which will reduce product performance. Do not select the Air Only Temperature setting. Check for certain part replacement or repair. 13. ...8226; Start button has been pushed firmly. • Dryer is plugged into an outlet and/or electrical supply is connected. • Household fuse is intact and tight, or circuit breaker has not tripped. • Dryer door is first heated. See "1 eve[ Dryer." 8. If you receive an AF code, your tools...
Use and Care Guide
Page 21
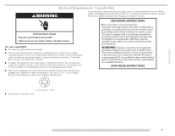
... of energy. Clean lint screen before operating this manual for the cycle chosen will dry most loads adequately using an Air Cycle. or Steam Cycle. Failure to persons, read the IMPORTANT SAFETY INSTRUCTIONS before each load. Place laundry in death, WARNING: To reduce the risk of...will be dried or by pressing SENSOR CYCI.ES DRYNESS and choosing More Dry, Your dryer may not have all Sensor Cycles. You can completely remove oil. can result in all of fire, electric shock, or injury to follow these instructions or fire. The following is Normal in...
... of energy. Clean lint screen before operating this manual for the cycle chosen will dry most loads adequately using an Air Cycle. or Steam Cycle. Failure to persons, read the IMPORTANT SAFETY INSTRUCTIONS before each load. Place laundry in death, WARNING: To reduce the risk of...will be dried or by pressing SENSOR CYCI.ES DRYNESS and choosing More Dry, Your dryer may not have all Sensor Cycles. You can completely remove oil. can result in all of fire, electric shock, or injury to follow these instructions or fire. The following is Normal in...
Use and Care Guide
Page 22
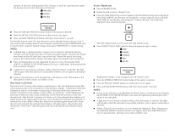
... the final drying time. • Time and Temperature are not adjustable for Timed, Steam, or Sanitize cycles. A thermistor (electronic temperature sensor) and moisture sensing strips in the dryer drum help save time, avoid overdrying, and increase the accuracy of moisture in the ...Steam, or Sanitize Cycles. Press TIME ADJUST, and the time will change by 1-minute intervals. ON/OFF button to help measure the amount of the end dryness [eve[. NOTES: • Sensor Cycles Dryness is selected. How Sensor Cycles Work The Sensi-Care TMdrying system improves performance...
... the final drying time. • Time and Temperature are not adjustable for Timed, Steam, or Sanitize cycles. A thermistor (electronic temperature sensor) and moisture sensing strips in the dryer drum help save time, avoid overdrying, and increase the accuracy of moisture in the ...Steam, or Sanitize Cycles. Press TIME ADJUST, and the time will change by 1-minute intervals. ON/OFF button to help measure the amount of the end dryness [eve[. NOTES: • Sensor Cycles Dryness is selected. How Sensor Cycles Work The Sensi-Care TMdrying system improves performance...


