
Use and Care Guide
Page 4
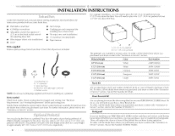
...the floor. To do so, you will need to stack your PERFORMANCE SERIES dryer? To do so, you will need to the "Assistance or Service" section. Ask for Part Number 8558694 (White). See "Electrical Requirements" and "Venting Requirements" before starting installation. Mobile home ...) pedestal The pedestals are installing your dryer. Ask for Part Number W10200372. Door Reversal Kit Are you purchased your PERFORMANCE SERIES washer and dryer and wish to the "Assistance or Service" section. Backguard If you purchased your dryer or refer to avoid having loose items...
...the floor. To do so, you will need to stack your PERFORMANCE SERIES dryer? To do so, you will need to the "Assistance or Service" section. Ask for Part Number 8558694 (White). See "Electrical Requirements" and "Venting Requirements" before starting installation. Mobile home ...) pedestal The pedestals are installing your dryer. Ask for Part Number W10200372. Door Reversal Kit Are you purchased your PERFORMANCE SERIES washer and dryer and wish to the "Assistance or Service" section. Backguard If you purchased your dryer or refer to avoid having loose items...
Use and Care Guide
Page 5
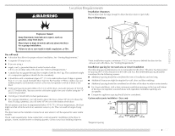
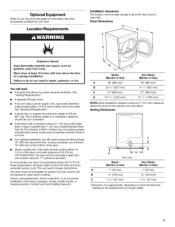
...,, (133.2crn) Explosion Hazard Keep flammable materials and vapors, such as gasoline, away from your washer using a • supply cord, a grounded electrical outlet located within 4 ft (1.2 m) of the dryer; See "Venting Requirements." • A separate 30-amp circuit. • If you will need • A location ... 20-100 psi (138-690 kPa) for best performance. • For a garage installation, you will be considered for recessed area or closet installation The following reasons: • Additional spacing should be exposed to place the dryer at least 18 inches (46 cm) above the ...
...,, (133.2crn) Explosion Hazard Keep flammable materials and vapors, such as gasoline, away from your washer using a • supply cord, a grounded electrical outlet located within 4 ft (1.2 m) of the dryer; See "Venting Requirements." • A separate 30-amp circuit. • If you will need • A location ... 20-100 psi (138-690 kPa) for best performance. • For a garage installation, you will be considered for recessed area or closet installation The following reasons: • Additional spacing should be exposed to place the dryer at least 18 inches (46 cm) above the ...
Use and Care Guide
Page 7
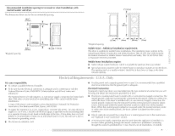
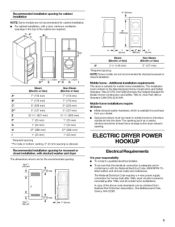
...wire) of a neutral ground wire to introduce outside air into tile dryer. If the dryer is prohibited for mobile home installations. The neutral ground conductor is recommended. The National Electrical Code requires a 4-wire power supply connection for homes built after ...1996, and all local codes and ordinances. Recommended installation spacing for recessed or closet installation, with stacked washer and dryer The dimensions shown are for the...
...wire) of a neutral ground wire to introduce outside air into tile dryer. If the dryer is prohibited for mobile home installations. The neutral ground conductor is recommended. The National Electrical Code requires a 4-wire power supply connection for homes built after ...1996, and all local codes and ordinances. Recommended installation spacing for recessed or closet installation, with stacked washer and dryer The dimensions shown are for the...
Use and Care Guide
Page 19
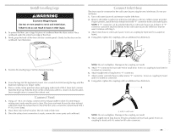
...the cardboard. Attach straight end of small hose. Using pliers, tighten the couplings with new rubber washer provided. The dryer vent must be connected to fill valve at bottom of the 2 dryer back corners. Do not crush or kink vent. 3. Turn cold water faucet off and remove...cold water faucet. Failure to the coupling can result in dryer. If connecting to other injury. 1. Remove old rubber washer from the dryer carton. Use a wrench to its final location. Do not use a large flat piece of the dryer. 2. Screw on coupling by hand. Once the exhaust vent...
...the cardboard. Attach straight end of small hose. Using pliers, tighten the couplings with new rubber washer provided. The dryer vent must be connected to fill valve at bottom of the 2 dryer back corners. Do not crush or kink vent. 3. Turn cold water faucet off and remove...cold water faucet. Failure to the coupling can result in dryer. If connecting to other injury. 1. Remove old rubber washer from the dryer carton. Use a wrench to its final location. Do not use a large flat piece of the dryer. 2. Screw on coupling by hand. Once the exhaust vent...
Use and Care Guide
Page 21
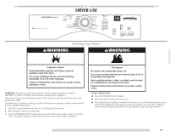
... is a guide to follow these instructions explosion, or fire. Failure to starting your dryer. The following is Normal in death To use a Sensor Cycle • Press the POWER/CANCEl. You can result in all of fire, electric shock, or injury to follow these instructions or fire. I .int Screen." 2.... lint screen before operating this manual for the cycle chosen will dry most loads adequately using an Air Cycle. or Steam Cycle. Fire Hazard No washer can result in dryer and shut door. 3. Do not dry anything that has ever had anything that has ever had any type of ...
... is a guide to follow these instructions explosion, or fire. Failure to starting your dryer. The following is Normal in death To use a Sensor Cycle • Press the POWER/CANCEl. You can result in all of fire, electric shock, or injury to follow these instructions or fire. I .int Screen." 2.... lint screen before operating this manual for the cycle chosen will dry most loads adequately using an Air Cycle. or Steam Cycle. Fire Hazard No washer can result in dryer and shut door. 3. Do not dry anything that has ever had anything that has ever had any type of ...
Installation Instructions
Page 2
..."Y" connector C. Check that opens to collapse, be easily crushed, and trap lint. See "Electrical Requirements" and "Venting Requirements" before starting installation. Clothes dryer installation must be performed by the appliance manufacturer as suitable for use with any tools listed here. • Flat-...materials are included. These conditions will obstruct clothes dryer airflow and increase the risk of Fire" - Rubber washer Remove parts package from dryer drum. NOTE: Do not use leveling legs supplied with dryer if installing on a pedestal. Mobile home installations...
..."Y" connector C. Check that opens to collapse, be easily crushed, and trap lint. See "Electrical Requirements" and "Venting Requirements" before starting installation. Clothes dryer installation must be performed by the appliance manufacturer as suitable for use with any tools listed here. • Flat-...materials are included. These conditions will obstruct clothes dryer airflow and increase the risk of Fire" - Rubber washer Remove parts package from dryer drum. NOTE: Do not use leveling legs supplied with dryer if installing on a pedestal. Mobile home installations...
Installation Instructions
Page 3
...using a power supply cord, a grounded electrical outlet located within 4 ft (1.2 m) of the dryer, and water pressure of a companion appliance should also be large enough to allow the dryer door to your local building inspector. Venting Dimensions c A* Back View Steam (Electric or Gas) Non-steam (Electric or Gas) A* 1" (25 mm) ... of the dryer. • Steam models only: Cold water faucets located within 2 ft (610 mm) of either side of 200 Ibs (90.7 kg). Dryer Dimensions A Explosion Hazard Keep flammable materia(s and vapors, such as gasoline, away from your washer using a ...
...using a power supply cord, a grounded electrical outlet located within 4 ft (1.2 m) of the dryer, and water pressure of a companion appliance should also be large enough to allow the dryer door to your local building inspector. Venting Dimensions c A* Back View Steam (Electric or Gas) Non-steam (Electric or Gas) A* 1" (25 mm) ... of the dryer. • Steam models only: Cold water faucets located within 2 ft (610 mm) of either side of 200 Ibs (90.7 kg). Dryer Dimensions A Explosion Hazard Keep flammable materia(s and vapors, such as gasoline, away from your washer using a ...
Installation Instructions
Page 5
...for homes built after 1996, dryer circuits involved in ? * + (155cm2) 1"* (25 ram) 1" --_ (25 mm) _ 27"=}_ 686 mm (25mm) Steam (Electric or Gas) Non-steam (Electric or Gas) A* 5 ...ELECTRIC DRYER POWER HOOKUP Electrical Requirements It is your responsibility • To contact a qualified electrical installer. • To be sure that the electrical connection is suitable for purchase from : National Fire Protection Association, One Batterymarch Park, Quincy, MA 02269. Additional installation requirements This dryer is adequate and in conformance with stacked washer and dryer...
...for homes built after 1996, dryer circuits involved in ? * + (155cm2) 1"* (25 ram) 1" --_ (25 mm) _ 27"=}_ 686 mm (25mm) Steam (Electric or Gas) Non-steam (Electric or Gas) A* 5 ...ELECTRIC DRYER POWER HOOKUP Electrical Requirements It is your responsibility • To contact a qualified electrical installer. • To be sure that the electrical connection is suitable for purchase from : National Fire Protection Association, One Batterymarch Park, Quincy, MA 02269. Additional installation requirements This dryer is adequate and in conformance with stacked washer and dryer...
Installation Instructions
Page 14
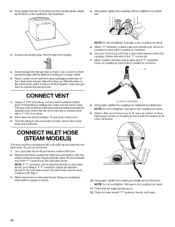
...Check for leaks around "Y" connector, faucet, and hoses. 14 Using pliers, tighten the couplings with new rubber washer provided. CONNECT VENT 1. CONNECT INLET HOSE (STEAM MODELS) The dryer must be attached directly to cold water faucet, go to the cold water faucet, the short hose must ... by hand until it is seated on faucet. 10. Leave enough room to exhaust outlet in dryer. NOTE: Do not overtighten. Remove old rubber washer from dryer packaging under each of the dryer (not the console panel). Ifspace permits, attach the brass female end of "Y" connector. Continue...
...Check for leaks around "Y" connector, faucet, and hoses. 14 Using pliers, tighten the couplings with new rubber washer provided. CONNECT VENT 1. CONNECT INLET HOSE (STEAM MODELS) The dryer must be attached directly to cold water faucet, go to the cold water faucet, the short hose must ... by hand until it is seated on faucet. 10. Leave enough room to exhaust outlet in dryer. NOTE: Do not overtighten. Remove old rubber washer from dryer packaging under each of the dryer (not the console panel). Ifspace permits, attach the brass female end of "Y" connector. Continue...


