Maytag MED6000AW Support Question
Maytag MED6000AW Support Question
Find answers below for this question about Maytag MED6000AW.Need a Maytag MED6000AW manual? We have 4 online manuals for this item!
Question posted by kingandipt on September 30th, 2013
Why Is The Lid Lock Blinking On My Maytag Washer
The person who posted this question about this Maytag product did not include a detailed explanation. Please use the "Request More Information" button to the right if more details would help you to answer this question.
Current Answers
Answer #1: Posted by BusterDoogen on September 30th, 2013 6:02 PM
BusterDoogen

Member since:
October 30th, 2011 Points: 28,565,407

Member since:
October 30th, 2011 Points: 28,565,407
If it is flashing "LID " that means that the controller cannot detect the lid switch is opening or closing properly.
TEST #8 Lid Lock Perform the following checks if washer fails to lock (or unlock). 1. Perform Manual: Lid Switch and Manual: Lid Lock tests on page 2.
PAGE 2 Manual: Lid Lock (See Manual Activation, at left) NOTE: Lid must be closed. If lid is not closed, an invalid button press beep will occur when performing next step. Press and release: EXTRA RINSE e32; Lid locks, Lid Lock indicator turns on. Repeat e32; Lid unlocks, Lid Lock indicator turns off. e32; If lid does not lock or unlock, go to TEST #8,
TEST 8 2. Remove the console to access the machine/motor control assembly. See Accessing & Removing the Electronic Assemblies, at right. 3. Visually check that the P12 connector is inserted all the way into the machine/motor control. e32; If visual check passes, go to step 4. e32; If visual check fails, reconnect P4 and repeat step 1. 4. Check the lid lock motor winding and switches by removing P12 from the machine/motor control and checking the resistance values shown in the Lid Lock
P12-1 to P12-4 0 ohms Unlocked and Open Circuit Locked P12-1 to P12-7 Open Circuit Unlocked and 0 ohms Locked P12-1 to P12-5 0 ohms Lid closed and Open circuit Lid Open
e32; If resistance values are good, go to step 5. e32; If switch measurements do not match the values shown in the table for unlocked (or locked) conditioned, a problem exists in the lid lock. Replace the lid lock. 5. If the Manual: Lid Switch or Manual: Lid Lock tests in step 1 failed, the lock may be stuck or the lock is defective. e32; Unplug washer or disconnect power. e32; Replace Lid Lock Assembly. e32; Repeat the Manual: Lid Switch and Manual: Lid Lock tests on page 2 to verify repair.
Now to put it through diagnostics and reset it Do this:
ACTIVATION OF AUTOMATIC DIAGNOSTIC TEST MODE 1. Be sure the washer is in standby mode (plugged in with all indicators off; or with only the Clean indicator on). 2. Select any one button (except POWER, START and PAUSE/CANCEL) and follow the steps below, using the same button: a. Press/hold 3 seconds. b. Release for 3 seconds. c. Press/hold 3 seconds. d. Release for 3 seconds. e. Press/hold 3 seconds. e32; If this test mode has been entered successfully, all indicators on the console are illuminated for 5 seconds with 88 showing in the Estimated Time Remaining two-digit display. e32; If indicators do not display as described above, the press/hold/release procedure above may not have been performed within the time frame necessary for successful entry. Repeat step 2 to ensure this was not the cause. If still unsuccessful, see Diagnostic: Unsuccessful Entry, at right
There is a good chance the motor controller is bad, that is the control located in the console with the pressure tube attached to it.
Expert: Appliance Guru replied 1 year ago.
Please respond to my effort to provide you with the best possible solution by using the "Acceptable Solution" and/or the "Helpful" buttons when the answer has proven to be helpful. Please feel free to submit further info for your question, if a solution was not provided. I appreciate the opportunity to serve you!
Related Maytag MED6000AW Manual Pages
Warranty Information - Page 1

... IMPLIED WARRANTY OF MERCHANTABILITY OR IMPLIED WARRANTY OF FITNESS FOR A PARTICULAR PURPOSE, ARE LIMITED TO ONE YEAR OR THE SHORTEST PERIOD ALLOWED BY LAW. MAYTAG® LAUNDRY WARRANTY
LIMITED WARRANTY
For one year from the date of purchase, when this major appliance is installed, operated, and maintained according to instructions attached to...
Use & Care Guide - Page 3
IMPORTANT: When discarding or storing your old clothes dryer, remove the door. 3
Use & Care Guide - Page 4
... working height. ACCESSORIES
Customize your dealer, call 1-800-807-6777, or visit: www.maytag.ca
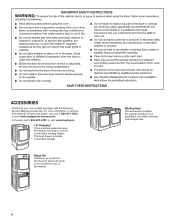
15" Pedestal Color-matched pedestals raise the washer and dryer to be installed on options and ordering, contact your new washer and dryer with the following genuine Maytag accessories.
For more comfortable working and storage area.
4 In Canada, call us at...
Use & Care Guide - Page 5

...additional touching up after cycles that use steam.
Use the NORMAL dryness level to efficiently dry laundry. n The Custom Refresh Cycle (on some models) is best for reducing light wrinkles ...cotton-polyester blend, common knits, and synthetic garments.
5
n Use the shortest length of the dryer.
Use Sensor cycles for better fabric care and energy savings
Use the Sensor Cycles to 9 dry...
Use & Care Guide - Page 6

... pause it.
4 TIMED DRY ADJUST for your laundry load. Touch to stop/cancel a cycle at any time.
2 CYCLE CONTROL KNOB Use your dryer's cycle control knob to increase or decrease the ... features and cycles are registered, touch the control panel with Timed Cycles to select available cycles on your dryer. When selecting a setting or option, simply touch its name.
9-Cycle Models
5 4 2 1
6
...
Use & Care Guide - Page 7

...approximately 8 minutes to adjust settings. Steam Boost Steam Boost adds steam to the end of the dryer and avoid an accidental change in the load. When selected, a series of beeps will also turn... of the drying cycle is not adjustable. Wrinkle Prevent If you will be displayed. Control Lock Use to lock the controls of the Heavy Duty, Bedding, Normal, or Garments cycle to help smooth wrinkles...
Use & Care Guide - Page 8

...drying starting with high heat, which has been proven to tumble freely.
8 Medium load: Fill the dryer drum up to add a short steam cycle after 60 minutes. Do not overload. CYCLE GUIDE - ... the preferred energy cycle. Use Sensor Cycles for better fabric care and energy savings
The dryer senses moisture in bold are default settings for improved moisture removal and enhanced fabric care....
Use & Care Guide - Page 9

.... This is available only with High and Medium Drying Temperature settings. Do not add dryer sheets.
Selecting the Drying Temperature
A High heat setting may select the "With Steam... short steam cycle after 60 minutes. Items to about 1/2 full. Medium load: Fill the dryer drum up to refresh:
Cycle:
Drying
Default Available
Temperature: Time: Options:
Shirts, blouses,
...
Use & Care Guide - Page 10

... persons, read the IMPORTANT SAFETY INSTRUCTIONS before each cycle. Push the lint screen firmly back into place. Load the dryer
4.
Items need to remove lint. For additional cleaning information, see "Dryer Care."
2. Place laundry in the dryer. Do not rinse or wash screen to tumble freely. Wet lint is hard to turn on the...
Use & Care Guide - Page 12

...on top of a cycle. Select a Timed Dry/Air Only, or Low Temperature cycle. Start the dryer.
Done This will indicate that you use with the Timed Dry cycle only. The drying rack is selected..., the Estimated Time Remaining display shows the default time. Open dryer door.
2. Close the door.
5.
Use the Drying Rack for use the drying rack, the ...
Use & Care Guide - Page 13

...stains are not harmful to remove. IMPORTANT: n Do not run the dryer with a soft cloth. 2. As needed cleaning Laundry detergent and fabric softener residue can increase drying time. The screen is ...brightly colored cotton items, may discolor the rear of the dryer. This includes clearing piles of laundry in front of the dryer interior.
CLEANING THE LINT SCREEN
Every load cleaning The ...
Use & Care Guide - Page 14

...and replace inlet hose if bulges, kinks, cuts, wear, or leaks are secure in dryer base. 6. Plug in dryer or reconnect power as described in gas supply line. 3. Disconnect wiring. 3. Steam ...: Disconnect the water inlet hose from faucet, then drain the
hose. Because some water may stay in dryer base. 8. Clean lint screen. See "Cleaning the Lint Screen." 3. Gas models only: Cap the ...
Use & Care Guide - Page 15

... lint. Replace the fuses or reset the circuit breaker.
On gas dryers, you experience
Possible Causes
Solution
Dryer Operation
Dryer will increase drying times.
The dryer is blown or circuit breaker has tripped. Select the correct temperature for small objects. In Canada www.maytag.ca for 5-10 minutes. If you may vibrate if not properly...
Use & Care Guide - Page 16

... in a cycle. If loads are consistently ending too early, see also "Changing the Sensor Cycle settings to possibly avoid a service call.
Add dryer fabric softener sheets at www.maytag.com/product_help - These will change the amount of drying time in a closet.
For steam cycles, the water is not properly connected with steam...
Use & Care Guide - Page 17

.... Touch and hold CONTROL LOCK for service.
17 Select a Timed Dry heated cycle, and restart the dryer. Try the following :
Check to the dryer. If the message persists, have your dryer is best for assistance and to restart the dryer. When the odors or fumes are using. In Canada www.maytag.ca for reducing wrinkles and...
Use & Care Guide - Page 18

... resulting from unauthorized modifications made to determine if another warranty applies.
Some states and provinces do not allow limitations on major appliances with Maytag published installation instructions.
10.
MAYTAG® LAUNDRY WARRANTY
LIMITED WARRANTY
For one year from the date of purchase, when this major appliance is installed, operated, and maintained according to...
Installation Guide - Page 3

...
"Y" connector
Parts package is located in ring terminals or spade terminals with clothes dryers. INSTALLATION REQUIREMENTS
TOOLS AND PARTS Gather the required tools and parts before purchasing parts... for installing new exhaust vent)
2' (0.6 m) inlet hose
5' (1.52 m) inlet hose and rubber washer
Additional parts may be at least 4 ft. (1.22 m) long. Parts needed: (Not supplied with...
Installation Guide - Page 4

... arrangement, consider allowing more space for exhaust vent with maximum slope of dryer to fully open. Add spacing on all sides of 1" (25 mm) under entire dryer. Contact your local building inspector.
spacing for companion appliances and clearances for your washer using the "Y" connector and short hose (if needed) which are required. If...
Installation Guide - Page 15
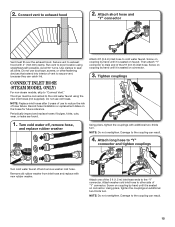
...connector. Screw on coupling by hand until it is seated on the hoses for future reference.
Attach washer cold inlet hose to other fastening devices that extend into interior of hose failure. Using pliers, ...an additional two-thirds turn . Attach one of the 2 ft (0.6 m) inlet hose. The dryer must fit over the exhaust hood. Screw on coupling by hand until it is seated on connector...
Installation Guide - Page 20

... edge with 2 notches at the top, align the notches on the trim ring and lower into place (figure B). 6. Rotate and reassemble outer window
assembly to lock tabs into place as shown in place.
8. Reinstall hinge and latch on the opposite sides from which they were removed.
20 Using a Phillips screwdriver, secure...
Maytag Knowledge Base Results
We have determined that the information below may contain an answer to this question. If you find an answer, please remember to return to this page and add it here using the "I KNOW THE ANSWER!" button above. It's that easy to earn points!-
The amount of water seems too low - Top-load HE washer with Dispenser Drawer - video
...size. Load-sensing Energy Star top-load washer with Dispenser Drawer - You may notice during a cycle that the wash load is not cleaning laundry - How Sensing works and water amount determined:...washer determines water level. video Washer will first perform a self-test on the lid lock. Does the water level seem too low, or does the washer appear to the load. Top-load HE washer... -
Wash light remains on - Top-load HE washer with Dispenser Drawer
... hose in High Efficiency Top-load and Front-load washers - Is the drain hose extending more than 4.5" (113 mm) into the drainpipe or laundry tub. There must be loose, yet secure. The...it fills. Washer will break the suction. video Damaged clothing - The wash light indicates that the top of the drain is at least 39" (99 cm) high (as described in Corners Lid lock light is ... -
Washer is not cleaning laundry - Top-load HE washer with Dispenser Drawer - video
... on the lid lock. You will hear a click, the basket will unlock briefly before locking again. Is the wash water temperature too low? Did you have hard water? See the Installation Instructions for temperature recommendations. Top-load HE washer with Dispenser Drawer - video High Efficiency washer is not cleaning laundry - Next, the washer will then...
Similar Questions

How To Bypass Lid Lock On Maytag Bravo Washer
(Posted by atistone 9 years ago)

How To Repair Lid Lock On Maytag Bravo Washer
(Posted by rusdjoul 9 years ago)

What Is The Price Range For The Washer And Dryer
(Posted by bobhruby 10 years ago)

I Have A Maytag Bravos And Broke The Lid Lock Tab Off.
Where do I get a new one? and how do I install it?
Where do I get a new one? and how do I install it?
(Posted by mjeagle1 13 years ago)
Lid Lock Replacement On Maytag Bravos 400 Top Loader
I have a broken lid lock on my Maytag Bravos 400(model# 58714132100) and have purchased a new one to...
I have a broken lid lock on my Maytag Bravos 400(model# 58714132100) and have purchased a new one to...
(Posted by bcooley 13 years ago)