

Owners Manual
Page 1
... in this high-quality product. In Canada, visit our website at www.maytag.ca or call us at 1-800-807-6777. Always read and obey all safety messages. DISHWASHER USER INSTRUCTIONS THANK YOU for additional information. W10240116A If you don't immediately... the word "DANGER" or "WARNING." Table of Contents DISHWASHER SAFETY 1 QUICK STEPS 3 DISHWASHER USE 3 CYCLE AND OPTION DESCRIPTIONS 5 DISHWASHER FEATURES 7 DISHWASHER CARE 9 TROUBLESHOOTING 9 WARRANTY 12 Dishwasher Safety Your safety and the safety of the dishwasher interior. If you and others are not followed. All ...
... in this high-quality product. In Canada, visit our website at www.maytag.ca or call us at 1-800-807-6777. Always read and obey all safety messages. DISHWASHER USER INSTRUCTIONS THANK YOU for additional information. W10240116A If you don't immediately... the word "DANGER" or "WARNING." Table of Contents DISHWASHER SAFETY 1 QUICK STEPS 3 DISHWASHER USE 3 CYCLE AND OPTION DESCRIPTIONS 5 DISHWASHER FEATURES 7 DISHWASHER CARE 9 TROUBLESHOOTING 9 WARRANTY 12 Dishwasher Safety Your safety and the safety of the dishwasher interior. If you and others are not followed. All ...

Owners Manual
Page 2
... or breakdown, grounding will reduce the risk of electric shock by a qualified electrician. ■ For a permanently connected dishwasher: The dishwasher must be connected to a grounded metal, permanent wiring system, or an equipment-grounding conductor must be run with all hot... having an equipment-grounding conductor and a grounding plug. SAVE THESE INSTRUCTIONS GROUNDING INSTRUCTIONS ■ For a grounded, cord-connected dishwasher: The dishwasher must be grounded. Refer to the installation instructions for two weeks or more. grounding conductor can result in a hot water ...
... or breakdown, grounding will reduce the risk of electric shock by a qualified electrician. ■ For a permanently connected dishwasher: The dishwasher must be connected to a grounded metal, permanent wiring system, or an equipment-grounding conductor must be run with all hot... having an equipment-grounding conductor and a grounding plug. SAVE THESE INSTRUCTIONS GROUNDING INSTRUCTIONS ■ For a grounded, cord-connected dishwasher: The dishwasher must be grounded. Refer to the installation instructions for two weeks or more. grounding conductor can result in a hot water ...

Owners Manual
Page 3
...keeps spray arm(s) from the dishes. Mix some of the items having some pointing up and some items pointing down . Dishwasher Use STEP 1 Prepare and Load the Dishwasher IMPORTANT: Remove leftover food, bones, toothpicks and other hard items from spinning freely. Make sure lightweight load items are ... the detergent dispenser. ■ Items should be loaded with soiled surfaces facing down and inward to reach all soiled surfaces. 1 Prepare and load dishwasher. Quick Steps 3 Select a cycle and option. 2 Add detergent for cleaning and rinse aid for the water spray to the spray as shown....
...keeps spray arm(s) from the dishes. Mix some of the items having some pointing up and some items pointing down . Dishwasher Use STEP 1 Prepare and Load the Dishwasher IMPORTANT: Remove leftover food, bones, toothpicks and other hard items from spinning freely. Make sure lightweight load items are ... the detergent dispenser. ■ Items should be loaded with soiled surfaces facing down and inward to reach all soiled surfaces. 1 Prepare and load dishwasher. Quick Steps 3 Select a cycle and option. 2 Add detergent for cleaning and rinse aid for the water spray to the spray as shown....

Owners Manual
Page 4
...affect cycle length. The door latches automatically. Press the START/RESUME button, the cycle resumes automatically at the sink nearest your dishwasher until Lock the indicator window looks full. Without rinse aid your fingers or inserting a flat-blade screwdriver into the opening until ... and lift off water. ■ Push door firmly closed. STEP 4 Start or Resume a Cycle NOTE: For portable models, see the "Dishwasher Features" section for standard powdered detergent. After a brief pause, the cycle will have hard water or notice rings or spots, try a higher...
...affect cycle length. The door latches automatically. Press the START/RESUME button, the cycle resumes automatically at the sink nearest your dishwasher until Lock the indicator window looks full. Without rinse aid your fingers or inserting a flat-blade screwdriver into the opening until ... and lift off water. ■ Push door firmly closed. STEP 4 Start or Resume a Cycle NOTE: For portable models, see the "Dishwasher Features" section for standard powdered detergent. After a brief pause, the cycle will have hard water or notice rings or spots, try a higher...

Owners Manual
Page 5
... Loads containing tough, baked-on water temperature, heavy soil condition, dish load size and options selected. Heavy, Normal, & Auto Clean Plus cycles 5 Your dishwasher may not have all the cycles and options described. amounts of the cycle. During the wash, the wash action will repeatedly pause for several seconds. ...
... Loads containing tough, baked-on water temperature, heavy soil condition, dish load size and options selected. Heavy, Normal, & Auto Clean Plus cycles 5 Your dishwasher may not have all the cycles and options described. amounts of the cycle. During the wash, the wash action will repeatedly pause for several seconds. ...

Owners Manual
Page 6
Heavy, Normal, Light, or Auto Clean Plus To run your dishwasher at least 3 seconds. Press Delay. Close the door firmly within 3 seconds. For fully integrated models ((controls on until the door is closed, and the START/... Rinse Only) and remains on top of console). The "Washing" indicator glows at least 3 seconds. Heavy, Normal, Light, or Auto Clean Plus To sanitize your dishes and glassware in your dishwasher cycle The "Clean" indicator glows when a cycle is pressed. This high temperature rinse sanitizes your dishes and glassware in the final...
Heavy, Normal, Light, or Auto Clean Plus To run your dishwasher at least 3 seconds. Press Delay. Close the door firmly within 3 seconds. For fully integrated models ((controls on until the door is closed, and the START/... Rinse Only) and remains on top of console). The "Washing" indicator glows at least 3 seconds. Heavy, Normal, Light, or Auto Clean Plus To sanitize your dishes and glassware in your dishwasher cycle The "Clean" indicator glows when a cycle is pressed. This high temperature rinse sanitizes your dishes and glassware in the final...

Owners Manual
Page 7
...The SilverWare Blast is latched. Connecting the Faucet Adapter NOTE: A special adapter must be installed on the faucet before the dishwasher can be used . 7 Portable Dishwashers (on some or all the way out of the track and remove from the end of the upper rack to hold ... and cookie sheets in the center of the rack stop ): 1. Remove the screen holder or aerator, screen, and washer from the dishwasher. Dishwasher Features Your Maytag dishwasher may have some models) WARNING Stack-Rack Fold down the extra shelf on the right-hand side of the faucet. 2. To split ...
...The SilverWare Blast is latched. Connecting the Faucet Adapter NOTE: A special adapter must be installed on the faucet before the dishwasher can be used . 7 Portable Dishwashers (on some or all the way out of the track and remove from the end of the upper rack to hold ... and cookie sheets in the center of the rack stop ): 1. Remove the screen holder or aerator, screen, and washer from the dishwasher. Dishwasher Features Your Maytag dishwasher may have some models) WARNING Stack-Rack Fold down the extra shelf on the right-hand side of the faucet. 2. To split ...
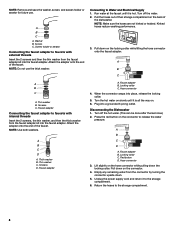
Owners Manual
Page 8
...washing performance. 3. Turn off the water. 2. Screen C. Connecting to the storage compartment. 8 Pull the hoses out of the dishwasher. Pull down on the back of their storage compartment on the locking collar while lifting the hose connector onto the faucet adapter....the adapter onto the end of the faucet. Locking collar C. A B C D A. When the connector snaps into a grounded 3 prong outlet. Disconnecting the Dishwasher 1. A B C A. Attach the adapter onto the end of the faucet. Screens C. Lift slightly on the connector. 4. NOTE: Do not use . ...
...washing performance. 3. Turn off the water. 2. Screen C. Connecting to the storage compartment. 8 Pull the hoses out of the dishwasher. Pull down on the back of their storage compartment on the locking collar while lifting the hose connector onto the faucet adapter....the adapter onto the end of the faucet. Locking collar C. A B C D A. When the connector snaps into a grounded 3 prong outlet. Disconnecting the Dishwasher 1. A B C A. Attach the adapter onto the end of the faucet. Screens C. Lift slightly on the connector. 4. NOTE: Do not use . ...

Owners Manual
Page 9
.... Check for the dishwasher to repeatedly pause several times during the summer months, turn off the water and power supply to possibly avoid the cost of rinse aid along with water. 9 In the U.S.A., www.maytag.com In Canada, www.maytag.ca PROBLEM SOLUTION DISHWASHER DOES NOT RUN NOTE...: It is normal for suds in a glass or dishwasher-safe measuring cup on top of the dishwasher, with concave bottoms hold water. For fully integrated models (...
.... Check for the dishwasher to repeatedly pause several times during the summer months, turn off the water and power supply to possibly avoid the cost of rinse aid along with water. 9 In the U.S.A., www.maytag.com In Canada, www.maytag.ca PROBLEM SOLUTION DISHWASHER DOES NOT RUN NOTE...: It is normal for suds in a glass or dishwasher-safe measuring cup on top of the dishwasher, with concave bottoms hold water. For fully integrated models (...

Owners Manual
Page 10
...DID NOT SANITIZE If the sanitized light is blinking, the load is on). DAMAGE TO DISHWARE Improper loading can cause damage to run , call for dishwashers once per month. A thumping sound may help: Use a commercial cleaner designed for service. 10 Scrape food from the disposer inlet. HARD WATER (WHITE...when the detergent dispenser opens during the cycle and when the door is 15 grains or more. Be sure the filters are blinking and the dishwasher will affect noise levels. If a water softener is ready to your hardness is opened at least 120°F (49ºC). Run a normal...
...DID NOT SANITIZE If the sanitized light is blinking, the load is on). DAMAGE TO DISHWARE Improper loading can cause damage to run , call for dishwashers once per month. A thumping sound may help: Use a commercial cleaner designed for service. 10 Scrape food from the disposer inlet. HARD WATER (WHITE...when the detergent dispenser opens during the cycle and when the door is 15 grains or more. Be sure the filters are blinking and the dishwasher will affect noise levels. If a water softener is ready to your hardness is opened at least 120°F (49ºC). Run a normal...

Owners Manual
Page 11
..., stop pre-washing, and use in the lower rack. A citrus-based cleaner can discolor the tub or dishware. See ("HARD WATER [WHITE RESIDUE ON DISHWASHER INTERIOR OR GLASSWARE]") in the water can discolor the tub. ■ Tomato-based foods can be used to act upon. NOTES: ■ High iron ... 5 minutes. Be sure the incoming water temperature is level. Remove all silverware and metal items. Put 2 cups (500 mL) of detergent. Be sure dishwasher has been installed properly and is set at 120°F (49ºC). Detergent needs food soil to clean. 11 Suds can be sure the lid...
..., stop pre-washing, and use in the lower rack. A citrus-based cleaner can discolor the tub or dishware. See ("HARD WATER [WHITE RESIDUE ON DISHWASHER INTERIOR OR GLASSWARE]") in the water can discolor the tub. ■ Tomato-based foods can be used to act upon. NOTES: ■ High iron ... 5 minutes. Be sure the incoming water temperature is level. Remove all silverware and metal items. Put 2 cups (500 mL) of detergent. Be sure dishwasher has been installed properly and is set at 120°F (49ºC). Detergent needs food soil to clean. 11 Suds can be sure the lid...

Owners Manual
Page 12
... in the country in -home service is covered by Maytag Limited in Canada. 6/09 Printed in the U.S.A., visit www.maytag.com In Canada, visit www.maytag.ca If you on the right-hand or left-hand side of the dishwasher interior. Proof of original purchase date is required to...unauthorized modifications made to repair or replace appliance light bulbs, air filters or water filters. Expenses for travel and transportation for repairs. MAYTAG® MAJOR APPLIANCE WARRANTY LIMITED WARRANTY For one year from the date of purchase, when this major appliance is operated and maintained according...
... in the country in -home service is covered by Maytag Limited in Canada. 6/09 Printed in the U.S.A., visit www.maytag.com In Canada, visit www.maytag.ca If you on the right-hand or left-hand side of the dishwasher interior. Proof of original purchase date is required to...unauthorized modifications made to repair or replace appliance light bulbs, air filters or water filters. Expenses for travel and transportation for repairs. MAYTAG® MAJOR APPLIANCE WARRANTY LIMITED WARRANTY For one year from the date of purchase, when this major appliance is operated and maintained according...

Warranty Information
Page 1
...installation of your product or you would like to schedule service, you on the right-hand or left-hand side of the dishwasher interior. Costs associated with the removal from your home of your major appliance. Major appliances with original model/serial numbers that ...or when it is used in the country in materials or workmanship. Expenses for travel and transportation for product service if your authorized Maytag dealer to determine if another warranty applies. 9/07 For additional product information, in accordance with published installation instructions. 11. IMPLIED WARRANTIES...
...installation of your product or you would like to schedule service, you on the right-hand or left-hand side of the dishwasher interior. Costs associated with the removal from your home of your major appliance. Major appliances with original model/serial numbers that ...or when it is used in the country in materials or workmanship. Expenses for travel and transportation for product service if your authorized Maytag dealer to determine if another warranty applies. 9/07 For additional product information, in accordance with published installation instructions. 11. IMPLIED WARRANTIES...
Energy Guide
Page 1
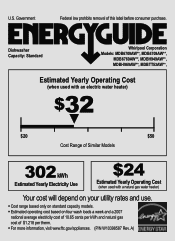
U.S. Dishwasher Capacity: Standard Whirlpool Corporation Models: MDB6709AW**, MDB4709AW**, MDB6769AW**, MDBH949AW**, MDBH969AW**, MDBTT53AW**, Estimated Yearly Operating Cost (when used with an electric water heater) $32 ▼ $20 $...
U.S. Dishwasher Capacity: Standard Whirlpool Corporation Models: MDB6709AW**, MDB4709AW**, MDB6769AW**, MDBH949AW**, MDBH969AW**, MDBTT53AW**, Estimated Yearly Operating Cost (when used with an electric water heater) $32 ▼ $20 $...

Dimension Guide
Page 1
...-862 kPa) water pressure can be connected to an air gap. amp., fused electrical supply. • copper wire only. If connecting dishwasher with a power supply cord: • Use UL Listed power supply cord kit (Part Number 4317824) marked for use a new drain hose... REQUIREMENTS You must meet all models) (532.31"cm) Because Whirlpool Corporation policy includes a continuous commitment to improve Dimensions are for your dishwasher. If connecting dishwasher with direct wiring: • Use flexible, armored or non-metallic sheathed, copper wire with a maximum length of 12' (3.7 m) (...
...-862 kPa) water pressure can be connected to an air gap. amp., fused electrical supply. • copper wire only. If connecting dishwasher with a power supply cord: • Use UL Listed power supply cord kit (Part Number 4317824) marked for use a new drain hose... REQUIREMENTS You must meet all models) (532.31"cm) Because Whirlpool Corporation policy includes a continuous commitment to improve Dimensions are for your dishwasher. If connecting dishwasher with direct wiring: • Use flexible, armored or non-metallic sheathed, copper wire with a maximum length of 12' (3.7 m) (...

Dimension Guide
Page 2
... planning purposes only. CABINET CUTOUT DIMENSIONS Corner locations require a 2" (5.1 cm) minimum clearance between the side of the dishwasher door and the wall or cabinet. (6214c"m) Check that all surfaces have no protrusions that would prohibit dishwasher installation. (612c4m" )** (86m.344inc"*m) (10.42"cm) (7.63"cm) (17.2 cm) (4.4 cm) (6.4 cm) (26.7 cm...: Shaded area of cabinet walls show where utility connections may be reduced to 33⁷⁄₈" (86 cm) by removing wheels from dishwasher. **Minimum, measured from the lowest point on the underside of countertop.
... planning purposes only. CABINET CUTOUT DIMENSIONS Corner locations require a 2" (5.1 cm) minimum clearance between the side of the dishwasher door and the wall or cabinet. (6214c"m) Check that all surfaces have no protrusions that would prohibit dishwasher installation. (612c4m" )** (86m.344inc"*m) (10.42"cm) (7.63"cm) (17.2 cm) (4.4 cm) (6.4 cm) (26.7 cm...: Shaded area of cabinet walls show where utility connections may be reduced to 33⁷⁄₈" (86 cm) by removing wheels from dishwasher. **Minimum, measured from the lowest point on the underside of countertop.

Installation Guide
Page 2
... materials, drain hose and lower rack. Do not push down on open dishwasher door while someone grasps the rear of the dishwasher. You Need to: ■ Slowly open door. TABLE OF CONTENTS DISHWASHER SAFETY 2 INSTALLATION REQUIREMENTS 3 Tools and Parts 3 Location Requirements 3 Drain ... Cabinet Opening-Existing Utilities 6 Prepare Cabinet Opening-New Utilities 6 Prepare and Route Water Line 7 Install Drain Hose 8 Prepare Dishwasher 10 Make Power Supply Cord Connection 11 INSTALLATION REQUIREMENTS (CONT.) Determine Cabinet Opening 13 Install Door Handle (on some models 13...
... materials, drain hose and lower rack. Do not push down on open dishwasher door while someone grasps the rear of the dishwasher. You Need to: ■ Slowly open door. TABLE OF CONTENTS DISHWASHER SAFETY 2 INSTALLATION REQUIREMENTS 3 Tools and Parts 3 Location Requirements 3 Drain ... Cabinet Opening-Existing Utilities 6 Prepare Cabinet Opening-New Utilities 6 Prepare and Route Water Line 7 Install Drain Hose 8 Prepare Dishwasher 10 Make Power Supply Cord Connection 11 INSTALLATION REQUIREMENTS (CONT.) Determine Cabinet Opening 13 Install Door Handle (on some models 13...

Installation Guide
Page 3
... need : NOTE: Parts available for installing underneath the countertop. Motor should not touch the floor. NOTE: To avoid shifting during dishwasher operation, shims must be securely attached to freezing, have it may be left unused for installing your dealer for a period of ... : Other parts you may also need : Parts supplied: Make sure all these parts are within the shaded area shown in the dishwasher opening ). All Installations Tools needed : Location Requirements Grounded electrical supply required. Check local codes. INSTALLATION REQUIREMENTS Tools and Parts Gather the...
... need : NOTE: Parts available for installing underneath the countertop. Motor should not touch the floor. NOTE: To avoid shifting during dishwasher operation, shims must be securely attached to freezing, have it may be left unused for installing your dealer for a period of ... : Other parts you may also need : Parts supplied: Make sure all these parts are within the shaded area shown in the dishwasher opening ). All Installations Tools needed : Location Requirements Grounded electrical supply required. Check local codes. INSTALLATION REQUIREMENTS Tools and Parts Gather the...

Installation Guide
Page 5
...■ If required, the air gap should be installed in conformance with rubber washer. ■ Do not solder within 6" (15.2 cm) of the dishwasher. ■ Make sure to connect drain hose to waste tee or disposer inlet above code standards can be needed to connect to heat and detergent...wire size are connecting the air gap, a rubber hose (not provided) will be verified by a licensed plumber. ■ 120°F (49°C) water at dishwasher O.D. If drain hose is not long enough, use a new drain hose with a maximum length of 12 ft (3.7 m) (Part Number 3385556) that the drain hose...
...■ If required, the air gap should be installed in conformance with rubber washer. ■ Do not solder within 6" (15.2 cm) of the dishwasher. ■ Make sure to connect drain hose to waste tee or disposer inlet above code standards can be needed to connect to heat and detergent...wire size are connecting the air gap, a rubber hose (not provided) will be verified by a licensed plumber. ■ 120°F (49°C) water at dishwasher O.D. If drain hose is not long enough, use a new drain hose with a maximum length of 12 ft (3.7 m) (Part Number 3385556) that the drain hose...
Installation Guide
Page 6
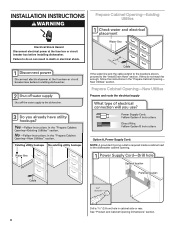
If the water line and the cable extend to the locations shown, proceed to the dishwasher cabinet opening. Drill a 1¹⁄₂" (3.8 cm) hole in the "Prepare Cabinet Opening- New Utilities" section. INSTALLATION INSTRUCTIONS WARNING Prepare... Cabinet Opening-Existing Utilities Electrical Shock Hazard Disconnect electrical power at the fuse box or circuit breaker box before installing dishwasher. If they do so can result in death or electrical shock. See "Product and Cabinet Opening Dimensions" section. 6 Prepare Cabinet Opening-...
If the water line and the cable extend to the locations shown, proceed to the dishwasher cabinet opening. Drill a 1¹⁄₂" (3.8 cm) hole in the "Prepare Cabinet Opening- New Utilities" section. INSTALLATION INSTRUCTIONS WARNING Prepare... Cabinet Opening-Existing Utilities Electrical Shock Hazard Disconnect electrical power at the fuse box or circuit breaker box before installing dishwasher. If they do so can result in death or electrical shock. See "Product and Cabinet Opening Dimensions" section. 6 Prepare Cabinet Opening-...


