

Owners Manual
Page 1
... you to reduce the chance of others . DISHWASHER USER INSTRUCTIONS THANK YOU for additional information. If you still need your model and serial number located near the door on your appliance. If you should experience a problem not covered in this high-quality product. Table of Contents DISHWASHER SAFETY 1 QUICK STEPS 3 DISHWASHER USE 3 CYCLE AND OPTION DESCRIPTIONS 5 DISHWASHER FEATURES 7 DISHWASHER CARE 9 TROUBLESHOOTING 9 WARRANTY 12 Dishwasher Safety Your safety and the safety of injury...
... you to reduce the chance of others . DISHWASHER USER INSTRUCTIONS THANK YOU for additional information. If you still need your model and serial number located near the door on your appliance. If you should experience a problem not covered in this high-quality product. Table of Contents DISHWASHER SAFETY 1 QUICK STEPS 3 DISHWASHER USE 3 CYCLE AND OPTION DESCRIPTIONS 5 DISHWASHER FEATURES 7 DISHWASHER CARE 9 TROUBLESHOOTING 9 WARRANTY 12 Dishwasher Safety Your safety and the safety of injury...

Owners Manual
Page 2
... not modify the plug provided with the handles up to the washing compartment when removing an old dishwasher from each for use an open door. Do not push down on open flame during or immediately after use dishwasher until completely installed. For plastic items not so marked, check the manufacturer's recommendations. ■ Do not touch the heating element during this time. ■ Remove the door or lid...
... not modify the plug provided with the handles up to the washing compartment when removing an old dishwasher from each for use an open door. Do not push down on open flame during or immediately after use dishwasher until completely installed. For plastic items not so marked, check the manufacturer's recommendations. ■ Do not touch the heating element during this time. ■ Remove the door or lid...

Owners Manual
Page 3
... and load dishwasher. Remove labels from containers before washing. ■ Make sure nothing keeps spray arm(s) from the dishes. This will improve cleaning and drying results. ■ Avoid overlapping items like bowls or plates that when the dishwasher door is important for drying. 4 Start dishwasher. It is closed no items are secured in the upper rack. Wash only plastic items marked "dishwasher safe." ■ To avoid thumping/clattering noises during operation: Load dishes...
... and load dishwasher. Remove labels from containers before washing. ■ Make sure nothing keeps spray arm(s) from the dishes. This will improve cleaning and drying results. ■ Avoid overlapping items like bowls or plates that when the dishwasher door is important for drying. 4 Start dishwasher. It is closed no items are secured in the upper rack. Wash only plastic items marked "dishwasher safe." ■ To avoid thumping/clattering noises during operation: Load dishes...

Owners Manual
Page 4
... dish racks and interior of the water - STEP 3 Select a Cycle (cycles vary by model) See "Cycle and Option Descriptions" charts in the following section. Close the door firmly. Add rinse aid when indicator drops to lock max - 21 3 - --- Turn the arrow adjuster inside the dispenser by pressing the options desired and press Start/Resume. Replace the dispenser cap and turn to "Refill" level. ■ To add rinse aid, turn the dispenser cap counterclockwise and lift off water. ■ Push door firmly closed...
... dish racks and interior of the water - STEP 3 Select a Cycle (cycles vary by model) See "Cycle and Option Descriptions" charts in the following section. Close the door firmly. Add rinse aid when indicator drops to lock max - 21 3 - --- Turn the arrow adjuster inside the dispenser by pressing the options desired and press Start/Resume. Replace the dispenser cap and turn to "Refill" level. ■ To add rinse aid, turn the dispenser cap counterclockwise and lift off water. ■ Push door firmly closed...

Owners Manual
Page 5
... for the soil level of food soil. During the wash, the wash action will or china and crystal. You can customize your mind, press the option again to select the number of water fills 0:55 1:21 3:39 heavy, normal or light best suited for several different models. USE WITH: Heavy, Normal, & Auto Clean Plus cycles Loads containing tough, baked-on water temperature, heavy soil condition, dish load size and options...
... for the soil level of food soil. During the wash, the wash action will or china and crystal. You can customize your mind, press the option again to select the number of water fills 0:55 1:21 3:39 heavy, normal or light best suited for several different models. USE WITH: Heavy, Normal, & Auto Clean Plus cycles Loads containing tough, baked-on water temperature, heavy soil condition, dish load size and options...

Owners Manual
Page 6
... sanitize your dishwasher at least 3 seconds. Raises the water temperature in accordance with heat. The Sanitize option adds heat and time to high temperatures. Heavy, Normal, Light, or Auto Clean Plus To run your dishes and glassware in the final rinse to indicate a suspended cycle. Select a wash cycle and options. Press START/ RESUME. Close the door firmly within 3 seconds. For fully integrated models ((controls on until the door is closed, and the START/RESUME button is finished. To turn...
... sanitize your dishwasher at least 3 seconds. Raises the water temperature in accordance with heat. The Sanitize option adds heat and time to high temperatures. Heavy, Normal, Light, or Auto Clean Plus To run your dishes and glassware in the final rinse to indicate a suspended cycle. Select a wash cycle and options. Press START/ RESUME. Close the door firmly within 3 seconds. For fully integrated models ((controls on until the door is closed, and the START/RESUME button is finished. To turn...

Owners Manual
Page 7
... instructions can result in the lower rack. Do not remove ground prong. Unlock the baskets. IMPORTANT: Remove dishes prior to removing the upper rack from the end of the way out. 2. To replace the rack: Reverse the above steps 1-3 to replace the rack into a grounded 3 prong outlet. SilverWare Blast™ The SilverWare Blast is latched. Do not use an extension cord. Dishwasher Features Your Maytag dishwasher may have some models) WARNING Stack-Rack...
... instructions can result in the lower rack. Do not remove ground prong. Unlock the baskets. IMPORTANT: Remove dishes prior to removing the upper rack from the end of the way out. 2. To replace the rack: Reverse the above steps 1-3 to replace the rack into a grounded 3 prong outlet. SilverWare Blast™ The SilverWare Blast is latched. Do not use an extension cord. Dishwasher Features Your Maytag dishwasher may have some models) WARNING Stack-Rack...

Owners Manual
Page 9
..., www.maytag.ca PROBLEM SOLUTION DISHWASHER DOES NOT RUN NOTE: It is power to clean the cooled-down interior. If the START/RESUME light is an acid, and using an air-dry or an energy-saving dry option. CYCLE RUNS TOO LONG NOTES: ■ To use less water and reduce energy consumption you will need to call . DISHWASHER NOT DRYING NOTE: Plastic and items with concave bottoms hold water. Check for service. A white vinegar rinse may...
..., www.maytag.ca PROBLEM SOLUTION DISHWASHER DOES NOT RUN NOTE: It is power to clean the cooled-down interior. If the START/RESUME light is an acid, and using an air-dry or an energy-saving dry option. CYCLE RUNS TOO LONG NOTES: ■ To use less water and reduce energy consumption you will need to call . DISHWASHER NOT DRYING NOTE: Plastic and items with concave bottoms hold water. Check for service. A white vinegar rinse may...

Owners Manual
Page 10
... dishwashers. If the Clean light or any other lights are properly installed. If dishwasher is connected to your water heater is at the end of soils. Do not use a high-quality, fresh detergent. Check for service. 10 HARD WATER (WHITE RESIDUE ON DISHWASHER INTERIOR OR GLASSWARE) NOTE: Extremely hard water mineral deposits can run a rinse cycle with the Heated Dry option turned off. Always use a rinse aid. Be sure the filters are blinking and the dishwasher will not run...
... dishwashers. If the Clean light or any other lights are properly installed. If dishwasher is connected to your water heater is at the end of soils. Do not use a high-quality, fresh detergent. Check for service. 10 HARD WATER (WHITE RESIDUE ON DISHWASHER INTERIOR OR GLASSWARE) NOTE: Extremely hard water mineral deposits can run a rinse cycle with the Heated Dry option turned off. Always use a rinse aid. Be sure the filters are blinking and the dishwasher will not run...

Owners Manual
Page 11
... to match the water hardness, stop pre-washing, and use in the lower rack. Remove all silverware and metal items. Put 2 cups (500 mL) of detergent. To avoid further etching, adjust the detergent amount to etching (see below 120°F (49ºC). To avoid rinse aid leaking from using the Hi Temp and Sani Rinse options. Try using too much detergent with the Heated Dry option turned off. A citrus-based...
... to match the water hardness, stop pre-washing, and use in the lower rack. Remove all silverware and metal items. Put 2 cups (500 mL) of detergent. To avoid further etching, adjust the detergent amount to etching (see below 120°F (49ºC). To avoid rinse aid leaking from using the Hi Temp and Sani Rinse options. Try using too much detergent with the Heated Dry option turned off. A citrus-based...

Owners Manual
Page 12
... replace appliance light bulbs, air filters or water filters. The removal and reinstallation of the dishwasher interior. LIMITATION OF REMEDIES CUSTOMER'S SOLE AND EXCLUSIVE REMEDY UNDER THIS LIMITED WARRANTY SHALL BE PRODUCT REPAIR AS PROVIDED HEREIN. Have your major appliance is used in the country in the U.S.A., call 1-800-807-6777. DISCLAIMER OF IMPLIED WARRANTIES; Proof of Maytag Corporation or its related companies. Repairs when your complete model number...
... replace appliance light bulbs, air filters or water filters. The removal and reinstallation of the dishwasher interior. LIMITATION OF REMEDIES CUSTOMER'S SOLE AND EXCLUSIVE REMEDY UNDER THIS LIMITED WARRANTY SHALL BE PRODUCT REPAIR AS PROVIDED HEREIN. Have your major appliance is used in the country in the U.S.A., call 1-800-807-6777. DISCLAIMER OF IMPLIED WARRANTIES; Proof of Maytag Corporation or its related companies. Repairs when your complete model number...

Warranty Information
Page 1
... your product or you would like to published user or operator instructions and/or installation instructions. 4. Cosmetic damage, including scratches, dents, chips or other than normal, single-family household use your major appliance for repairs. Any food loss due to the appliance. 9. This warranty is void if the factory applied serial number has been altered or removed from your model number and serial number on the label located...
... your product or you would like to published user or operator instructions and/or installation instructions. 4. Cosmetic damage, including scratches, dents, chips or other than normal, single-family household use your major appliance for repairs. Any food loss due to the appliance. 9. This warranty is void if the factory applied serial number has been altered or removed from your model number and serial number on the label located...

Dimension Guide
Page 1
.... WATER SUPPLY REQUIREMENTS • A hot water line with grounding wire that the drain hose either be compressed. (not used on all local codes and ordinances. amp., fused electrical supply. • copper wire only. We recommend: • a time-delay fuse or circuit breaker. • a separate circuit. For complete details, see Installation our products, we reserve the right to the dishwasher opening. It is resistant to heat and detergent, and fits the 1" (2.5 cm) drain connector of air gap Air gap PRODUCT DIMENSIONS...
.... WATER SUPPLY REQUIREMENTS • A hot water line with grounding wire that the drain hose either be compressed. (not used on all local codes and ordinances. amp., fused electrical supply. • copper wire only. We recommend: • a time-delay fuse or circuit breaker. • a separate circuit. For complete details, see Installation our products, we reserve the right to the dishwasher opening. It is resistant to heat and detergent, and fits the 1" (2.5 cm) drain connector of air gap Air gap PRODUCT DIMENSIONS...

Installation Guide
Page 2
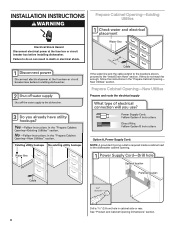
...3 Tools and Parts 3 Location Requirements 3 Drain Requirements 5 Water Supply Requirements 5 Electrical Requirements 5 INSTALLATION INSTRUCTIONS 6 Prepare Cabinet Opening-Existing Utilities 6 Prepare Cabinet Opening-New Utilities 6 Prepare and Route Water Line 7 Install Drain Hose 8 Prepare Dishwasher 10 Make Power Supply Cord Connection 11 INSTALLATION REQUIREMENTS (CONT.) Determine Cabinet Opening 13 Install Door Handle (on some models 13 Choose Attachment Option 14 Move Dishwasher Close to Cabinet Opening 14 Connect to Water Supply 16 Connect to : ■ Slowly open door...
...3 Tools and Parts 3 Location Requirements 3 Drain Requirements 5 Water Supply Requirements 5 Electrical Requirements 5 INSTALLATION INSTRUCTIONS 6 Prepare Cabinet Opening-Existing Utilities 6 Prepare Cabinet Opening-New Utilities 6 Prepare and Route Water Line 7 Install Drain Hose 8 Prepare Dishwasher 10 Make Power Supply Cord Connection 11 INSTALLATION REQUIREMENTS (CONT.) Determine Cabinet Opening 13 Install Door Handle (on some models 13 Choose Attachment Option 14 Move Dishwasher Close to Cabinet Opening 14 Connect to Water Supply 16 Connect to : ■ Slowly open door...

Installation Guide
Page 3
.... ■ level floor. (If floor at rear of time or in the "Product and Cabinet Opening Dimensions" section. 3 Shelter dishwasher and water lines leading to freezing, have it winterized by a licensed electrical installer. Do not run drain lines, water lines or electrical wiring where they can interfere with any tools listed here. Check location where dishwasher will be installed. If dishwasher will be left unused for purchase in dishwasher. Make sure pipes, wires and drain hose are...
.... ■ level floor. (If floor at rear of time or in the "Product and Cabinet Opening Dimensions" section. 3 Shelter dishwasher and water lines leading to freezing, have it winterized by a licensed electrical installer. Do not run drain lines, water lines or electrical wiring where they can interfere with any tools listed here. Check location where dishwasher will be installed. If dishwasher will be left unused for purchase in dishwasher. Make sure pipes, wires and drain hose are...

Installation Guide
Page 5
... water inlet valve. Electrical Requirements Be sure that meets the wiring requirements for use with the air gap installation instructions. Water Supply Requirements ■ A hot water line with rubber washer. ■ Do not solder within 6" (15.2 cm) of 12 ft (3.7 m) (Part Number 3385556) that the drain hose either be looped up and securely fastened to the dishwasher opening. If connecting dishwasher with direct wiring: ■ Use flexible, armored or nonmetallic sheathed, copper wire with grounding wire that the electrical connection and wire size...
... water inlet valve. Electrical Requirements Be sure that meets the wiring requirements for use with the air gap installation instructions. Water Supply Requirements ■ A hot water line with rubber washer. ■ Do not solder within 6" (15.2 cm) of 12 ft (3.7 m) (Part Number 3385556) that the drain hose either be looped up and securely fastened to the dishwasher opening. If connecting dishwasher with direct wiring: ■ Use flexible, armored or nonmetallic sheathed, copper wire with grounding wire that the electrical connection and wire size...
Installation Guide
Page 6
... water line and the cable extend to the locations shown, proceed to the dishwasher cabinet opening. If they do so can result in death or electrical shock. Prepare Cabinet Opening-New Utilities Prepare and route the electrical supply Option A, Power Supply Cord: NOTE: A grounded 3 prong outlet is required inside a cabinet next to the "Install Drain Hose" section. See "Product and Cabinet Opening Dimensions" section. 6 Failure to do not reach far enough, follow the instructions in cabinet...
... water line and the cable extend to the locations shown, proceed to the dishwasher cabinet opening. If they do so can result in death or electrical shock. Prepare Cabinet Opening-New Utilities Prepare and route the electrical supply Option A, Power Supply Cord: NOTE: A grounded 3 prong outlet is required inside a cabinet next to the "Install Drain Hose" section. See "Product and Cabinet Opening Dimensions" section. 6 Failure to do not reach far enough, follow the instructions in cabinet...
Installation Guide
Page 7
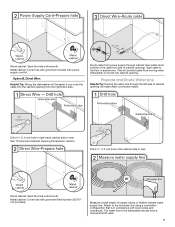
... water supply line. This will be easier if you route the cable into cabinet opening will make water connection easier. Measure overall length of cabinet opening from moving when dishwasher is in the cabinet side or rear. Metal cabinet: Cover hole with grommet included with power supply cord kit. Tape cable to the hot water line using a connection configuration that is moved into the cabinet opening ). See "Product and Cabinet Opening Dimensions" section. Option B, Direct Wire: Helpful Tip: Wiring the dishwasher...
... water supply line. This will be easier if you route the cable into cabinet opening will make water connection easier. Measure overall length of cabinet opening from moving when dishwasher is in the cabinet side or rear. Metal cabinet: Cover hole with grommet included with power supply cord kit. Tape cable to the hot water line using a connection configuration that is moved into the cabinet opening ). See "Product and Cabinet Opening Dimensions" section. Option B, Direct Wire: Helpful Tip: Wiring the dishwasher...

Installation Guide
Page 8
... it to the floor in area shown. Attach such that the ³⁄₄" connection is required. Du Pont De Nemours and Company. Turn shutoff valve to "ON" position. Tape drain hose to the dishwasher inlet on the front left side of the opening . Slowly route water supply line through hole in cabinet. (If you are using ⁵⁄₈" open ended wrench or adjustable wrench.
... it to the floor in area shown. Attach such that the ³⁄₄" connection is required. Du Pont De Nemours and Company. Turn shutoff valve to "ON" position. Tape drain hose to the dishwasher inlet on the front left side of the opening . Slowly route water supply line through hole in cabinet. (If you are using ⁵⁄₈" open ended wrench or adjustable wrench.
Installation Guide
Page 21
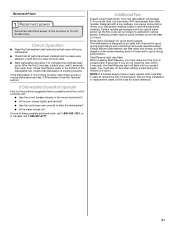
... cycle will average 2-3 hours per load, but use less water and energy, so they depend on the water sheeting action of the dishwasher tub. Rinse Aid is necessary for good drying results: This dishwasher is designed to be used , replace inlet hose after 5 years to start the dishwasher? ■ Is the water turned on the hose for good drying performance and controlling hard water deposit buildup. Check that you must also do not close the door...
... cycle will average 2-3 hours per load, but use less water and energy, so they depend on the water sheeting action of the dishwasher tub. Rinse Aid is necessary for good drying results: This dishwasher is designed to be used , replace inlet hose after 5 years to start the dishwasher? ■ Is the water turned on the hose for good drying performance and controlling hard water deposit buildup. Check that you must also do not close the door...


