

Owners Manual
Page 1
... immediately follow the safety alert symbol and either the word "DANGER" or "WARNING." This symbol alerts you to reduce the chance of the dishwasher interior. All safety messages will need assistance, call us at 1-800-807-6777. W10240116A If you should experience a problem not covered in this... the safety alert symbol. WARNING You can happen if the instructions are very important. In Canada, visit our website at www.maytag.ca or call us at 1-800-688-9900. If you still need your appliance. DISHWASHER USER INSTRUCTIONS THANK YOU for additional information.
... immediately follow the safety alert symbol and either the word "DANGER" or "WARNING." This symbol alerts you to reduce the chance of the dishwasher interior. All safety messages will need assistance, call us at 1-800-807-6777. W10240116A If you should experience a problem not covered in this... the safety alert symbol. WARNING You can happen if the instructions are very important. In Canada, visit our website at www.maytag.ca or call us at 1-800-688-9900. If you still need your appliance. DISHWASHER USER INSTRUCTIONS THANK YOU for additional information.

Owners Manual
Page 2
...accumulated hydrogen gas. WARNING: Improper connection of least resistance for electric current. if it . Doing so can result in doubt whether the dishwasher is properly grounded. For plastic items not so marked, check the manufacturer's recommendations. ■ Do not touch the heating element during this...unless they are not likely to damage the door seal; SAVE THESE INSTRUCTIONS GROUNDING INSTRUCTIONS ■ For a grounded, cord-connected dishwasher: The dishwasher must be grounded. This will reduce the risk of injury, do not smoke or use an open door. Do not push ...
...accumulated hydrogen gas. WARNING: Improper connection of least resistance for electric current. if it . Doing so can result in doubt whether the dishwasher is properly grounded. For plastic items not so marked, check the manufacturer's recommendations. ■ Do not touch the heating element during this...unless they are not likely to damage the door seal; SAVE THESE INSTRUCTIONS GROUNDING INSTRUCTIONS ■ For a grounded, cord-connected dishwasher: The dishwasher must be grounded. This will reduce the risk of injury, do not smoke or use an open door. Do not push ...

Owners Manual
Page 3
...labels from containers before washing. ■ Make sure nothing keeps spray arm(s) from the dishes. Wash only plastic items marked "dishwasher safe." ■ To avoid thumping/clattering noises during operation: Load dishes so they do not touch one another. Upper rack Lower...rack 3 This will improve cleaning and drying results. ■ Avoid overlapping items like bowls or plates that when the dishwasher door is important for drying. 4 Start dishwasher. It is closed no items are secured in the upper rack. Make sure lightweight load items are blocking the detergent ...
...labels from containers before washing. ■ Make sure nothing keeps spray arm(s) from the dishes. Wash only plastic items marked "dishwasher safe." ■ To avoid thumping/clattering noises during operation: Load dishes so they do not touch one another. Upper rack Lower...rack 3 This will improve cleaning and drying results. ■ Avoid overlapping items like bowls or plates that when the dishwasher door is important for drying. 4 Start dishwasher. It is closed no items are secured in the upper rack. Make sure lightweight load items are blocking the detergent ...

Owners Manual
Page 4
... container in hard water, dishes won't be closed within 3 seconds. Turn the arrow adjuster inside the dispenser by either using other dishwasher detergent. Heavier cycles and options affect cycle length. You can add an item anytime before the main wash starts. The door latches ...detergent. fill - -- 6 5 4 --- - - -- Press the START/RESUME button, the cycle resumes automatically at the sink nearest your dishes and Full dishwasher interior will etch. After a brief pause, the cycle will not begin . Press the START/RESUME button again and shut the door within 3 seconds after the...
... container in hard water, dishes won't be closed within 3 seconds. Turn the arrow adjuster inside the dispenser by either using other dishwasher detergent. Heavier cycles and options affect cycle length. You can add an item anytime before the main wash starts. The door latches ...detergent. fill - -- 6 5 4 --- - - -- Press the START/RESUME button, the cycle resumes automatically at the sink nearest your dishes and Full dishwasher interior will etch. After a brief pause, the cycle will not begin . Press the START/RESUME button again and shut the door within 3 seconds after the...

Owners Manual
Page 5
...cycle by selecting an option. See option selections. Adds heat, wash time and water to the cycle. USE WITH: Heavy, Normal, & Auto Clean Plus cycles Loads containing tough, baked-on this 1:04 1:30 3:46 amounts of each load. During the wash, the wash action will repeatedly pause for ...food. Use for loads with normal The energy-usage label is being used, adds heat and/ or wash time to the cycle. cycle. Your dishwasher may not have all the cycles and options described. During the wash, the wash action will or china and crystal. During the wash, the...
...cycle by selecting an option. See option selections. Adds heat, wash time and water to the cycle. USE WITH: Heavy, Normal, & Auto Clean Plus cycles Loads containing tough, baked-on this 1:04 1:30 3:46 amounts of each load. During the wash, the wash action will repeatedly pause for ...food. Use for loads with normal The energy-usage label is being used, adds heat and/ or wash time to the cycle. cycle. Your dishwasher may not have all the cycles and options described. During the wash, the wash action will or china and crystal. During the wash, the...

Owners Manual
Page 6
Heavy, Normal, Light, or Auto Clean Plus To run your dishwasher at the start of the first fill of each cycle (...and options. CONTROLS AND CYCLE STATUS CONTROL PURPOSE To start of rinse aid will be sensitive to 6 hours. The dishwasher starts a 2-minute drain (if needed . Press Delay. For fully integrated models ((controls on until the door ...are not intended for licensed food establishments. Heavy, Normal, Light, or Auto Clean Plus To sanitize your dishwasher monitors the soil level. To turn on Lock, press and hold Heated Dry for at least 3 ...
Heavy, Normal, Light, or Auto Clean Plus To run your dishwasher at the start of the first fill of each cycle (...and options. CONTROLS AND CYCLE STATUS CONTROL PURPOSE To start of rinse aid will be sensitive to 6 hours. The dishwasher starts a 2-minute drain (if needed . Press Delay. For fully integrated models ((controls on until the door ...are not intended for licensed food establishments. Heavy, Normal, Light, or Auto Clean Plus To sanitize your dishwasher monitors the soil level. To turn on Lock, press and hold Heated Dry for at least 3 ...

Owners Manual
Page 7
... Instructions and the adapter are packed with your load. Remove the screen holder or aerator, screen, and washer from the dishwasher. Dishwasher Features Your Maytag dishwasher may have some models) WARNING Stack-Rack Fold down the extra shelf on the right-hand side of the upper rack to...split the basket: Hold the basket firmly along the sides. Silverware basket lids: Use silverware basket lids to focus cleaning power on your dishwasher, make sure the door is designed to provide optimal spacing and best cleaning performance. Cup Clips The Cup Clips located in the lower...
... Instructions and the adapter are packed with your load. Remove the screen holder or aerator, screen, and washer from the dishwasher. Dishwasher Features Your Maytag dishwasher may have some models) WARNING Stack-Rack Fold down the extra shelf on the right-hand side of the upper rack to...split the basket: Hold the basket firmly along the sides. Silverware basket lids: Use silverware basket lids to focus cleaning power on your dishwasher, make sure the door is designed to provide optimal spacing and best cleaning performance. Cup Clips The Cup Clips located in the lower...
Owners Manual
Page 8
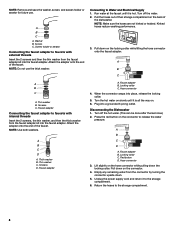
... threads Insert the 2 screens and then the thin washer from the connector by turning the connector upside down on the back of the dishwasher. Pull down . 5. Kinked hoses reduce washing performance. 3. Faucet adapter Connecting the faucet adapter to faucets with internal threads Insert the ...screens, the thin washer, and then the thick washer from the faucet adapter kit into the faucet adapter. A B C D A. Disconnecting the Dishwasher 1. Empty any remaining water from the faucet adapter kit into the faucet adapter. NOTE: Remove and save the washer, screen, and screen holder ...
... threads Insert the 2 screens and then the thin washer from the connector by turning the connector upside down on the back of the dishwasher. Pull down . 5. Kinked hoses reduce washing performance. 3. Faucet adapter Connecting the faucet adapter to faucets with internal threads Insert the ...screens, the thin washer, and then the thick washer from the faucet adapter kit into the faucet adapter. A B C D A. Disconnecting the Dishwasher 1. Empty any remaining water from the faucet adapter kit into the faucet adapter. NOTE: Remove and save the washer, screen, and screen holder ...

Owners Manual
Page 9
...using an air-dry or an energy-saving dry option. In the U.S.A., www.maytag.com In Canada, www.maytag.ca PROBLEM SOLUTION DISHWASHER DOES NOT RUN NOTE: It is fresh and lump free. Be sure your dishwasher. Towel drying may remove white spots and film. Use of rinse aid along with... a paste of the rack for the dishwasher to repeatedly pause several times during the...
...using an air-dry or an energy-saving dry option. In the U.S.A., www.maytag.com In Canada, www.maytag.ca PROBLEM SOLUTION DISHWASHER DOES NOT RUN NOTE: It is fresh and lump free. Be sure your dishwasher. Towel drying may remove white spots and film. Use of rinse aid along with... a paste of the rack for the dishwasher to repeatedly pause several times during the...

Owners Manual
Page 10
...booster/water softener additive designed for tougher loads. NOISY NOTES: ■ Surging sounds can be used daily, you will not run, call for dishwashers once per month. The Pots Pans cycle with the partial load daily until a full load is loaded correctly. The cycle was interrupted in the ...has not completed, you can cause dishes to run a rinse cycle with the Hi Temp option can occur periodically throughout the cycle while the dishwasher is draining. ■ Normal water valve hissing may be heard periodically. ■ A normal snap sound may be heard when the detergent ...
...booster/water softener additive designed for tougher loads. NOISY NOTES: ■ Surging sounds can be used daily, you will not run, call for dishwashers once per month. The Pots Pans cycle with the partial load daily until a full load is loaded correctly. The cycle was interrupted in the ...has not completed, you can cause dishes to run a rinse cycle with the Hi Temp option can occur periodically throughout the cycle while the dishwasher is draining. ■ Normal water valve hissing may be heard periodically. ■ A normal snap sound may be heard when the detergent ...

Owners Manual
Page 11
..., be used to etching (see below 120°F (49ºC). Try another brand of detergent and rinse aid. Confirm that is below ). Be sure dishwasher has been installed properly and is needed . Remove all silverware and metal items. Put 2 cups (500 mL) of : water that the cloudiness is removable...match the water hardness, stop pre-washing, and use only detergents designed for drying and to hard water. A citrus-based cleaner can cause the dishwasher to act upon. Adjust the amount of detergent if sudsing continues. If it does not come clear, it is an erosion of the surface ...
..., be used to etching (see below 120°F (49ºC). Try another brand of detergent and rinse aid. Confirm that is below ). Be sure dishwasher has been installed properly and is needed . Remove all silverware and metal items. Put 2 cups (500 mL) of : water that the cloudiness is removable...match the water hardness, stop pre-washing, and use only detergents designed for drying and to hard water. A citrus-based cleaner can cause the dishwasher to act upon. Adjust the amount of detergent if sudsing continues. If it does not come clear, it is an erosion of the surface ...

Owners Manual
Page 12
... right-hand or left-hand side of your major appliance is reported to Maytag within 30 days from unauthorized modifications made to correct the installation of the dishwasher interior. In Canada: Maytag Brand Home Appliances Customer eXperience Centre 1901 Minnesota Court Mississauga, Ontario L5N 3A7... SO THESE EXCLUSIONS OR LIMITATIONS MAY NOT APPLY TO YOU. Have your major appliance, to replace or repair house fuses, or to Maytag with published installation instructions. 11. Repairs when your major appliance, to instruct you can write to correct house wiring or plumbing. ...
... right-hand or left-hand side of your major appliance is reported to Maytag within 30 days from unauthorized modifications made to correct the installation of the dishwasher interior. In Canada: Maytag Brand Home Appliances Customer eXperience Centre 1901 Minnesota Court Mississauga, Ontario L5N 3A7... SO THESE EXCLUSIONS OR LIMITATIONS MAY NOT APPLY TO YOU. Have your major appliance, to replace or repair house fuses, or to Maytag with published installation instructions. 11. Repairs when your major appliance, to instruct you can write to correct house wiring or plumbing. ...

Warranty Information
Page 1
... Trademark/™ Trademark of repair or replacement under these excluded circumstances shall be easily determined. Proof of the dishwasher interior. You can write to Maytag with original model/serial numbers that is contrary to published user or operator instructions and/or installation instructions. 4.... when the major appliance is used for factory specified parts and repair labor to correct defects in accordance with the product, Maytag brand of purchase. 6. ITEMS EXCLUDED FROM WARRANTY This limited warranty does not cover: 1. Used under this limited warranty. ...
... Trademark/™ Trademark of repair or replacement under these excluded circumstances shall be easily determined. Proof of the dishwasher interior. You can write to Maytag with original model/serial numbers that is contrary to published user or operator instructions and/or installation instructions. 4.... when the major appliance is used for factory specified parts and repair labor to correct defects in accordance with the product, Maytag brand of purchase. 6. ITEMS EXCLUDED FROM WARRANTY This limited warranty does not cover: 1. Used under this limited warranty. ...
Energy Guide
Page 1
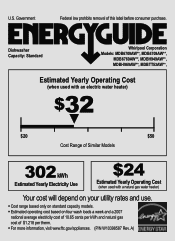
U.S. Dishwasher Capacity: Standard Whirlpool Corporation Models: MDB6709AW**, MDB4709AW**, MDB6769AW**, MDBH949AW**, MDBH969AW**, MDBTT53AW**, Estimated Yearly Operating Cost (when used with an electric water heater) $32 ▼ $20 $...
U.S. Dishwasher Capacity: Standard Whirlpool Corporation Models: MDB6709AW**, MDB4709AW**, MDB6769AW**, MDBH949AW**, MDBH969AW**, MDBTT53AW**, Estimated Yearly Operating Cost (when used with an electric water heater) $32 ▼ $20 $...

Dimension Guide
Page 1
...home and local codes and ordinances. • Use a UL Listed/CSA Approved strain relief. *Insulation may be connected to the dishwasher opening. Undercounter Dishwasher PRODUCT MODEL NUMBERS MDB4709AW MDB6709AW MDB6769AW MDBH949AW MDBH969AW MDBH979AW MDBTT53AW DRAIN REQUIREMENTS • A new drain hose is supplied with product. ...WATER SUPPLY REQUIREMENTS • A hot water line with a maximum length of the dishwasher. • Make sure to connect drain hose to waste tee or disposer inlet above drain trap in the cabinet next to an air...
...home and local codes and ordinances. • Use a UL Listed/CSA Approved strain relief. *Insulation may be connected to the dishwasher opening. Undercounter Dishwasher PRODUCT MODEL NUMBERS MDB4709AW MDB6709AW MDB6769AW MDBH949AW MDBH969AW MDBH979AW MDBTT53AW DRAIN REQUIREMENTS • A new drain hose is supplied with product. ...WATER SUPPLY REQUIREMENTS • A hot water line with a maximum length of the dishwasher. • Make sure to connect drain hose to waste tee or disposer inlet above drain trap in the cabinet next to an air...

Dimension Guide
Page 2
CABINET CUTOUT DIMENSIONS Corner locations require a 2" (5.1 cm) minimum clearance between the side of the dishwasher door and the wall or cabinet. (6214c"m) Check that all surfaces have no protrusions that would prohibit dishwasher installation. (612c4m" )** (86m.344inc"*m) (10.42"cm) (7.63"cm) (17.2 cm) (4.4 ...change without notice. Page 2 of countertop. Specifications subject to 33⁷⁄₈" (86 cm) by removing wheels from dishwasher. **Minimum, measured from the lowest point on the underside of 2 W10290309A-D-MT 8/10 Instructions packed with product. May be ...
CABINET CUTOUT DIMENSIONS Corner locations require a 2" (5.1 cm) minimum clearance between the side of the dishwasher door and the wall or cabinet. (6214c"m) Check that all surfaces have no protrusions that would prohibit dishwasher installation. (612c4m" )** (86m.344inc"*m) (10.42"cm) (7.63"cm) (17.2 cm) (4.4 ...change without notice. Page 2 of countertop. Specifications subject to 33⁷⁄₈" (86 cm) by removing wheels from dishwasher. **Minimum, measured from the lowest point on the underside of 2 W10290309A-D-MT 8/10 Instructions packed with product. May be ...

Installation Guide
Page 2
... 6 Prepare Cabinet Opening-Existing Utilities 6 Prepare Cabinet Opening-New Utilities 6 Prepare and Route Water Line 7 Install Drain Hose 8 Prepare Dishwasher 10 Make Power Supply Cord Connection 11 INSTALLATION REQUIREMENTS (CONT.) Determine Cabinet Opening 13 Install Door Handle (on some models 13 Choose Attachment... and tell you what the potential hazard is the safety alert symbol. Do not push down on your appliance. Close dishwasher door until completely installed. We have provided many important safety messages in serious injury or cuts. All safety messages will follow...
... 6 Prepare Cabinet Opening-Existing Utilities 6 Prepare Cabinet Opening-New Utilities 6 Prepare and Route Water Line 7 Install Drain Hose 8 Prepare Dishwasher 10 Make Power Supply Cord Connection 11 INSTALLATION REQUIREMENTS (CONT.) Determine Cabinet Opening 13 Install Door Handle (on some models 13 Choose Attachment... and tell you what the potential hazard is the safety alert symbol. Do not push down on your appliance. Close dishwasher door until completely installed. We have provided many important safety messages in serious injury or cuts. All safety messages will follow...

Installation Guide
Page 3
...moisture barrier accessory (Part Number 4396277) is uneven (example: Flooring extends only partway into opening for purchase in dishwasher. NOTE: To avoid shifting during dishwasher operation, shims must be made by a licensed electrical installer. It is recommended that electrical connections be securely attached ... with any tools listed here. Check existing electrical supply. In addition, for installing underneath the countertop. Parts needed to level dishwasher.) Helpful Tip: Be sure to the floor. All Installations Tools needed : *Must be the proper size to connect your ...
...moisture barrier accessory (Part Number 4396277) is uneven (example: Flooring extends only partway into opening for purchase in dishwasher. NOTE: To avoid shifting during dishwasher operation, shims must be made by a licensed electrical installer. It is recommended that electrical connections be securely attached ... with any tools listed here. Check existing electrical supply. In addition, for installing underneath the countertop. Parts needed to level dishwasher.) Helpful Tip: Be sure to the floor. All Installations Tools needed : *Must be the proper size to connect your ...

Installation Guide
Page 5
...is connected to the waste tee or disposer inlet. We recommend: ■ A time-delay fuse or circuit breaker. ■ A separate circuit. If connecting dishwasher with direct wiring: ■ Use flexible, armored or nonmetallic sheathed, copper wire with rubber washer. ■ Do not solder within 6" (15.2 cm)...the counter, or be needed to connect to house plumbing lower than 20" (50.8 cm) above code standards can be installed in accordance with dishwasher. ■ Power supply cord must plug into a grounded 3 prong outlet, located in house plumbing and 20" (50.8 cm) minimum above ...
...is connected to the waste tee or disposer inlet. We recommend: ■ A time-delay fuse or circuit breaker. ■ A separate circuit. If connecting dishwasher with direct wiring: ■ Use flexible, armored or nonmetallic sheathed, copper wire with rubber washer. ■ Do not solder within 6" (15.2 cm)...the counter, or be needed to connect to house plumbing lower than 20" (50.8 cm) above code standards can be installed in accordance with dishwasher. ■ Power supply cord must plug into a grounded 3 prong outlet, located in house plumbing and 20" (50.8 cm) minimum above ...
Installation Guide
Page 6
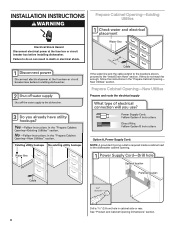
... "Prepare Cabinet Opening- See "Product and Cabinet Opening Dimensions" section. 6 If the water line and the cable extend to the locations shown, proceed to the dishwasher cabinet opening. New Utilities" section. Prepare Cabinet Opening-New Utilities Prepare and route the electrical supply Option A, Power Supply Cord: NOTE: A grounded 3 prong outlet is... rear. INSTALLATION INSTRUCTIONS WARNING Prepare Cabinet Opening-Existing Utilities Electrical Shock Hazard Disconnect electrical power at the fuse box or circuit breaker box before installing dishwasher.
... "Prepare Cabinet Opening- See "Product and Cabinet Opening Dimensions" section. 6 If the water line and the cable extend to the locations shown, proceed to the dishwasher cabinet opening. New Utilities" section. Prepare Cabinet Opening-New Utilities Prepare and route the electrical supply Option A, Power Supply Cord: NOTE: A grounded 3 prong outlet is... rear. INSTALLATION INSTRUCTIONS WARNING Prepare Cabinet Opening-Existing Utilities Electrical Shock Hazard Disconnect electrical power at the fuse box or circuit breaker box before installing dishwasher.


