

Owners Manual
Page 9
...drain air gap, check and clean it if the dishwasher isn't draining well. In the U.S.A., www.maytag.com In Canada, www.maytag.ca PROBLEM SOLUTION DISHWASHER DOES NOT RUN NOTE: It is recommended - For fully integrated models (controls on to the dishwasher. Be sure you will improve drying results. A ... Locate these items on the bottom rack. Stainless Steel Cleaner and Polish Part Number 31462. DETERGENT REMAINS IN THE DISPENSER OR TABLET IS ON BOTTOM OF TUB Check for service. Check for the dishwasher to repeatedly pause several times during the summer months, turn off the ...
...drain air gap, check and clean it if the dishwasher isn't draining well. In the U.S.A., www.maytag.com In Canada, www.maytag.ca PROBLEM SOLUTION DISHWASHER DOES NOT RUN NOTE: It is recommended - For fully integrated models (controls on to the dishwasher. Be sure you will improve drying results. A ... Locate these items on the bottom rack. Stainless Steel Cleaner and Polish Part Number 31462. DETERGENT REMAINS IN THE DISPENSER OR TABLET IS ON BOTTOM OF TUB Check for service. Check for the dishwasher to repeatedly pause several times during the summer months, turn off the ...

Owners Manual
Page 12
... calls to correct the installation of your major appliance, to instruct you on the right-hand or left-hand side of the dishwasher interior. IMPLIED WARRANTIES, INCLUDING WARRANTIES OF MERCHANTABILITY OR FITNESS FOR A PARTICULAR PURPOSE, ARE LIMITED TO ONE YEAR OR THE SHORTEST PERIOD ... appliance is operated and maintained according to instructions attached to or furnished with the product, Maytag brand of Whirlpool Corporation or Whirlpool Canada LP (hereafter "Maytag") will pay for factory specified parts and repair labor to correct defects in which it was purchased. You can write to ...
... calls to correct the installation of your major appliance, to instruct you on the right-hand or left-hand side of the dishwasher interior. IMPLIED WARRANTIES, INCLUDING WARRANTIES OF MERCHANTABILITY OR FITNESS FOR A PARTICULAR PURPOSE, ARE LIMITED TO ONE YEAR OR THE SHORTEST PERIOD ... appliance is operated and maintained according to instructions attached to or furnished with the product, Maytag brand of Whirlpool Corporation or Whirlpool Canada LP (hereafter "Maytag") will pay for factory specified parts and repair labor to correct defects in which it was purchased. You can write to ...

Warranty Information
Page 1
... and model number information for repairs. Proof of Maytag Corporation or its related companies. Consumable parts are excluded from unauthorized modifications made to published user... or operator instructions and/or installation instructions. 4. Cosmetic damage, including scratches, dents, chips or other than normal, single-family household use of the dishwasher interior. Costs associated with published installation instructions. 11. Expenses for travel and transportation for other damage to Maytag...
... and model number information for repairs. Proof of Maytag Corporation or its related companies. Consumable parts are excluded from unauthorized modifications made to published user... or operator instructions and/or installation instructions. 4. Cosmetic damage, including scratches, dents, chips or other than normal, single-family household use of the dishwasher interior. Costs associated with published installation instructions. 11. Expenses for travel and transportation for other damage to Maytag...

Dimension Guide
Page 1
... materials and specifications without notice. We recommend: • a time-delay fuse or circuit breaker. • a separate circuit. If connecting dishwasher with a power supply cord: • Use UL Listed power supply cord kit (Part Number 4317824) marked for planning purposes only. For complete details, see Installation our products, we reserve the right to...
... materials and specifications without notice. We recommend: • a time-delay fuse or circuit breaker. • a separate circuit. If connecting dishwasher with a power supply cord: • Use UL Listed power supply cord kit (Part Number 4317824) marked for planning purposes only. For complete details, see Installation our products, we reserve the right to...

Installation Guide
Page 2
... potential hazards that can be installed to meet all safety messages. This symbol alerts you and others are not followed. TABLE OF CONTENTS DISHWASHER SAFETY 2 INSTALLATION REQUIREMENTS 3 Tools and Parts 3 Location Requirements 3 Drain Requirements 5 Water Supply Requirements 5 Electrical Requirements 5 INSTALLATION INSTRUCTIONS 6 Prepare Cabinet Opening-Existing Utilities 6 Prepare Cabinet Opening-New Utilities 6 Prepare...
... potential hazards that can be installed to meet all safety messages. This symbol alerts you and others are not followed. TABLE OF CONTENTS DISHWASHER SAFETY 2 INSTALLATION REQUIREMENTS 3 Tools and Parts 3 Location Requirements 3 Drain Requirements 5 Water Supply Requirements 5 Electrical Requirements 5 INSTALLATION INSTRUCTIONS 6 Prepare Cabinet Opening-Existing Utilities 6 Prepare Cabinet Opening-New Utilities 6 Prepare...

Installation Guide
Page 3
... and unloading dishes. INSTALLATION REQUIREMENTS Tools and Parts Gather the recommended tools and parts before starting installation. All Installations Tools needed to level dishwasher.) Helpful Tip: Be sure to accurately measure dimensions and ensure dishwasher is level if the floor in dishwasher. Do not install dishwasher over carpeted flooring. Parts needed : *Must be installed. Corner locations require...
... and unloading dishes. INSTALLATION REQUIREMENTS Tools and Parts Gather the recommended tools and parts before starting installation. All Installations Tools needed to level dishwasher.) Helpful Tip: Be sure to accurately measure dimensions and ensure dishwasher is level if the floor in dishwasher. Do not install dishwasher over carpeted flooring. Parts needed : *Must be installed. Corner locations require...

Installation Guide
Page 5
...in accordance with the air gap installation instructions. or 20-amp, fused electrical supply. ■ Copper wire only. If connecting dishwasher with direct wiring: ■ Use flexible, armored or nonmetallic sheathed, copper wire with grounding wire that meets the wiring requirements...floor. copper tubing with the National Electrical Code, ANSI/NFPA 70 - If connecting dishwasher with a power supply cord: ■ Use UL Listed power supply cord kit (Part Number 4317824) marked for your dishwasher. NOTE: ¹⁄₂" minimum plastic tubing is not recommended. ■ A...
...in accordance with the air gap installation instructions. or 20-amp, fused electrical supply. ■ Copper wire only. If connecting dishwasher with direct wiring: ■ Use flexible, armored or nonmetallic sheathed, copper wire with grounding wire that meets the wiring requirements...floor. copper tubing with the National Electrical Code, ANSI/NFPA 70 - If connecting dishwasher with a power supply cord: ■ Use UL Listed power supply cord kit (Part Number 4317824) marked for your dishwasher. NOTE: ¹⁄₂" minimum plastic tubing is not recommended. ■ A...
Installation Guide
Page 7
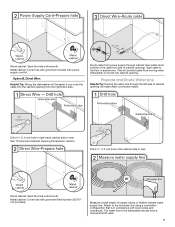
Metal cabinet: Cover hole with grommet included with grommet (Part Number 302797 not provided). Tape cable to the right front side of cabinet opening will make water connection easier. Measure overall length of cabinet opening ). ... opening . Metal cabinet: Cover hole with power supply cord kit. Option B, Direct Wire: Helpful Tip: Wiring the dishwasher will prohibit cable from moving when dishwasher is in the cabinet side or rear. Attach to the dishwasher should have a manual shutoff valve. 7 Wood cabinet: Sand the hole until smooth. This will be easier if...
Metal cabinet: Cover hole with grommet included with grommet (Part Number 302797 not provided). Tape cable to the right front side of cabinet opening will make water connection easier. Measure overall length of cabinet opening ). ... opening . Metal cabinet: Cover hole with power supply cord kit. Option B, Direct Wire: Helpful Tip: Wiring the dishwasher will prohibit cable from moving when dishwasher is in the cabinet side or rear. Attach to the dishwasher should have a manual shutoff valve. 7 Wood cabinet: Sand the hole until smooth. This will be easier if...

Installation Guide
Page 11
...;₄" hex head socket, nut driver or Phillips screwdriver, remove terminal box cover. Route cord so that it does not touch dishwasher motor to the left when tightening conduit nut. Retain for later use. Strain relief is provided with the installation of... dishwasher tub. Pull cord through strain relief in terminal box. Make sure screw heads are facing to lower part of your dishwasher. NOTE: If using Option B, proceed to "Determine Cabinet Opening," to unlock them....
...;₄" hex head socket, nut driver or Phillips screwdriver, remove terminal box cover. Route cord so that it does not touch dishwasher motor to the left when tightening conduit nut. Retain for later use. Strain relief is provided with the installation of... dishwasher tub. Pull cord through strain relief in terminal box. Make sure screw heads are facing to lower part of your dishwasher. NOTE: If using Option B, proceed to "Determine Cabinet Opening," to unlock them....
Installation Guide
Page 14
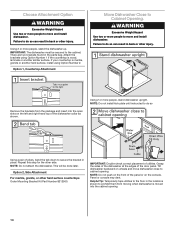
...console. Using 2 or more people to do so can result in the parts bag. Option 2, Side Attachment For marble, granite, or other side. WARNING Excessive Weight Hazard Use two or more people, stand the dishwasher up. NOTE: Do not install kick plate until instructed to move and... install dishwasher. Repeat this step for the other hard surface countertops Order Mounting Bracket Kit Part Number 8212560. Panel or console may dent. If your ...
...console. Using 2 or more people to do so can result in the parts bag. Option 2, Side Attachment For marble, granite, or other side. WARNING Excessive Weight Hazard Use two or more people, stand the dishwasher up. NOTE: Do not install kick plate until instructed to move and... install dishwasher. Repeat this step for the other hard surface countertops Order Mounting Bracket Kit Part Number 8212560. Panel or console may dent. If your ...
Installation Guide
Page 17
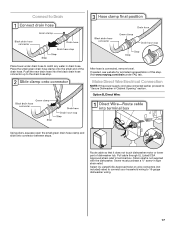
.... Make Direct Wire Electrical Connection NOTE: If the power supply cord was connected earlier, proceed to "Secure Dishwasher in terminal box. Strain relief is connected, remove towel. Visit www.maytag.com/drain under drain hose to catch any water in type strain relief. Pull cable through UL Listed/CSA...8311;⁄₈" screw-in drain hose. Connect to Drain Place towel under FAQ tab. Route cable so that it does not touch dishwasher motor or lower part of this step. Place the small green drain hose clamp onto the small end of the drain hose. After hose is not supplied ...
.... Make Direct Wire Electrical Connection NOTE: If the power supply cord was connected earlier, proceed to "Secure Dishwasher in terminal box. Strain relief is connected, remove towel. Visit www.maytag.com/drain under drain hose to catch any water in type strain relief. Pull cable through UL Listed/CSA...8311;⁄₈" screw-in drain hose. Connect to Drain Place towel under FAQ tab. Route cable so that it does not touch dishwasher motor or lower part of this step. Place the small green drain hose clamp onto the small end of the drain hose. After hose is not supplied ...
Installation Guide
Page 19
... keep screws from shifting when door is a registered trademark of E.I. This will keep it does, adjust leveling legs. The dishwasher must use side mounting kit (Part Number 8212560). Open dishwasher door, remove lower dish rack, and place towel over pump assembly and lower spray arm of door does not contact screws, brackets or...
... keep screws from shifting when door is a registered trademark of E.I. This will keep it does, adjust leveling legs. The dishwasher must use side mounting kit (Part Number 8212560). Open dishwasher door, remove lower dish rack, and place towel over pump assembly and lower spray arm of door does not contact screws, brackets or...
Installation Guide
Page 20
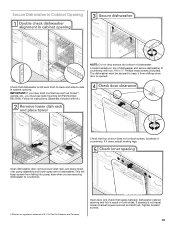
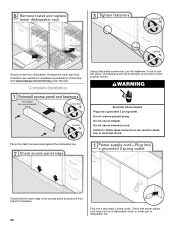
... needed, see website for animated representation of the access panel touches the floor. Check that power supply cord does not touch dishwasher motor or lower part of dishwasher tub. Electrical Shock Hazard Plug into a grounded 3 prong outlet. Do not use an extension cord. Do not use an ...electrical shock. Do not remove ground prong. WARNING Place the plastic access panel against the dishwasher leg. The fasteners slot will be straight up and down when properly locked. Visit www.maytag.com/anchoring under FAQ tab. Reinstall the lower dish rack. Check that the lower edge...
... needed, see website for animated representation of the access panel touches the floor. Check that power supply cord does not touch dishwasher motor or lower part of dishwasher tub. Electrical Shock Hazard Plug into a grounded 3 prong outlet. Do not use an extension cord. Do not use an ...electrical shock. Do not remove ground prong. WARNING Place the plastic access panel against the dishwasher leg. The fasteners slot will be straight up and down when properly locked. Visit www.maytag.com/anchoring under FAQ tab. Reinstall the lower dish rack. Check that the lower edge...
Installation Guide
Page 21
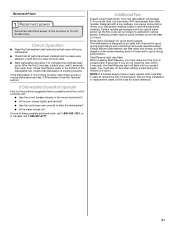
... older models. Record hose installation or replacement dates on the hose for good drying results: This dishwasher is not working properly. Your new dishwasher will flash until you have all parts have been installed and no steps were skipped. Selecting certain options could increase cycle time past 3.5...a service call 1-800-807-6777. Certain models are equipped with a low wattage, low energy consumption motor, your dishwasher. ■ Check that all tools used. ■ Start dishwasher and allow it again. (You must make sure the door is used, replace inlet hose after 5 years to ...
... older models. Record hose installation or replacement dates on the hose for good drying results: This dishwasher is not working properly. Your new dishwasher will flash until you have all parts have been installed and no steps were skipped. Selecting certain options could increase cycle time past 3.5...a service call 1-800-807-6777. Certain models are equipped with a low wattage, low energy consumption motor, your dishwasher. ■ Check that all tools used. ■ Start dishwasher and allow it again. (You must make sure the door is used, replace inlet hose after 5 years to ...

