

VP8600 RS232c Command Codes
Page 1
And with a fan noise of ownership as well. This projector is proud to introduce a new Home Theater projector, the VP8600. Not only have we have been only able to aspire to own a Marantz video projector in Black or Silver Finish ® Compatible VP8600BL / VP8600 DLP™ PROJECTOR Marantz is designed to reach a new low price point to open up...
And with a fan noise of ownership as well. This projector is proud to introduce a new Home Theater projector, the VP8600. Not only have we have been only able to aspire to own a Marantz video projector in Black or Silver Finish ® Compatible VP8600BL / VP8600 DLP™ PROJECTOR Marantz is designed to reach a new low price point to open up...
VP8600 User Manual
Page 3
...When disposing of the lamp breaking is turned on the equipment. - Unplug the projector from the equipment. - Your purchase receipt or invoice is mounted on the apparatus. EQUIPMENT MAINS WORKING SETTING Your Marantz product has been prepared to be used batteries, please comply with any way.... It should be placed on . Dramatic and Musical Performers Act 1958 - When the projector is adequate for Marantz authorized dealer. When the switch is extremely dangerous to replace the lamp. • If the lamp breaks, leave the area...
...When disposing of the lamp breaking is turned on the equipment. - Unplug the projector from the equipment. - Your purchase receipt or invoice is mounted on the apparatus. EQUIPMENT MAINS WORKING SETTING Your Marantz product has been prepared to be used batteries, please comply with any way.... It should be placed on . Dramatic and Musical Performers Act 1958 - When the projector is adequate for Marantz authorized dealer. When the switch is extremely dangerous to replace the lamp. • If the lamp breaks, leave the area...
VP8600 User Manual
Page 6
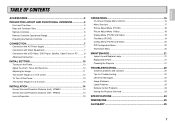
... the Power 13 The Screen Images in a 4:3 screen 13 INSTALLATION 14 Screen Size and Projection Distance (inch) VP8600 14 Screen Size and Projection Distance (mm) VP8600 14 Lens shift position 15 OPERATIONS 16 On-Screen Display Menu Controls 16 Menu Structure 17 Picture Adjust Menu (PC... Video 20 PIP Configuration Menu 20 Information Menu 20 MAINTENANCE 21 Lamp Life and Replace Lamp 21 Replacement Parts 21 Cleaning the Projector 21 TROUBLESHOOTING 22 Common problems and solutions 22 Tips for Troubleshooting 22 LED Error Messages 22 Image Problems 22 Lamp Problems 23 Remote...
... the Power 13 The Screen Images in a 4:3 screen 13 INSTALLATION 14 Screen Size and Projection Distance (inch) VP8600 14 Screen Size and Projection Distance (mm) VP8600 14 Lens shift position 15 OPERATIONS 16 On-Screen Display Menu Controls 16 Menu Structure 17 Picture Adjust Menu (PC... Video 20 PIP Configuration Menu 20 Information Menu 20 MAINTENANCE 21 Lamp Life and Replace Lamp 21 Replacement Parts 21 Cleaning the Projector 21 TROUBLESHOOTING 22 Common problems and solutions 22 Tips for Troubleshooting 22 LED Error Messages 22 Image Problems 22 Lamp Problems 23 Remote...

VP8600 User Manual
Page 8
Do not obstruct any of the lens. Blinking which keeps the projector lamp cool. w Vertical lens shift Adjusts the vertical position of the grill openings. 3 e Lens Remove cover before operation. Blinking which is fast Operational error code. ...Sharpens the projected image. t Zoom ring ( P.10) Enlarges the projected image. i Power LED (Blue) Lighting Unit is powered on the projector allow for IR signal from remote control is received. PROJECTOR LAYOUT AND FUNCTIONAL OVERVIEW ENGLISH Front and Top View r t u iy q we q IR receiver Front receiver for good air circulation, which ...
Do not obstruct any of the lens. Blinking which keeps the projector lamp cool. w Vertical lens shift Adjusts the vertical position of the grill openings. 3 e Lens Remove cover before operation. Blinking which is fast Operational error code. ...Sharpens the projected image. t Zoom ring ( P.10) Enlarges the projected image. i Power LED (Blue) Lighting Unit is powered on the projector allow for IR signal from remote control is received. PROJECTOR LAYOUT AND FUNCTIONAL OVERVIEW ENGLISH Front and Top View r t u iy q we q IR receiver Front receiver for good air circulation, which ...

VP8600 User Manual
Page 9
... ⁄2 v ⁄1 ⁄0 . ,m n b z S-VIDEO IN Connect an S-video enabled device. Notes: • Do not use TRIGGER 1 and TRIGGER 2, as a powered up /down screen,whenever the projector is turned on or off , no voltage is turned on or off. ⁄2 AC IN socket Connect to the screen. When the unit is output... mini-plug (mono) cable. . x VIDEO IN Connect a composite video enabled device. b RGB IN Connect to the S-video connector. If Normal (4:3) aspect ratio is selected by projector, 12V is turned off . Note: • If your video equipment has both S-
... ⁄2 v ⁄1 ⁄0 . ,m n b z S-VIDEO IN Connect an S-video enabled device. Notes: • Do not use TRIGGER 1 and TRIGGER 2, as a powered up /down screen,whenever the projector is turned on or off , no voltage is turned on or off. ⁄2 AC IN socket Connect to the screen. When the unit is output... mini-plug (mono) cable. . x VIDEO IN Connect a composite video enabled device. b RGB IN Connect to the S-video connector. If Normal (4:3) aspect ratio is selected by projector, 12V is turned off . Note: • If your video equipment has both S-
VP8600 User Manual
Page 10
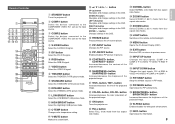
...ratio modes. Select the devices connected to previous menu. button Increases/decreases the contrast of the projected image. @3 ON button Turns the projector on. @4 FULL button Select FULL (16:9) mode from four aspect ratio modes. #5 BRIGHTNESS+ button, BRIGHTNESS- projected image. @0... INPUT UP button Changes the input signals. REMOTE CONTROLLER RC8600VP !5 3 / 4 / 1 / 2 / button @5 NORMAL button q STANDBY button Turns the projector off. ENTER ( ) button Select ZOOM2 (2.35:1) mode from four @3 w COMP.1 button LEFT (1) button Navigates and changes settings in the OSD. Enables/disables...
...ratio modes. Select the devices connected to previous menu. button Increases/decreases the contrast of the projected image. @3 ON button Turns the projector on. @4 FULL button Select FULL (16:9) mode from four aspect ratio modes. #5 BRIGHTNESS+ button, BRIGHTNESS- projected image. @0... INPUT UP button Changes the input signals. REMOTE CONTROLLER RC8600VP !5 3 / 4 / 1 / 2 / button @5 NORMAL button q STANDBY button Turns the projector off. ENTER ( ) button Select ZOOM2 (2.35:1) mode from four @3 w COMP.1 button LEFT (1) button Navigates and changes settings in the OSD. Enables/disables...

VP8600 User Manual
Page 11
...the batteries with an old one. - AAA size batteries Remote Controller 5m 60 60 5m Remote Controller 3. Replace the cover at the projector. CAUTIONS ON BATTERIES • Use "AAA" type batteries in this remote control unit. • If the remote control unit does... a year has passed. • The included battery is not necessary to the projector. 1. Replace it "clicks" closed. Provided you are not holding the remote perpendicular to control the projector. ENGLISH Remote Controller Operational Range Preparing the Remote Controller The remote control uses infrared ...
...the batteries with an old one. - AAA size batteries Remote Controller 5m 60 60 5m Remote Controller 3. Replace the cover at the projector. CAUTIONS ON BATTERIES • Use "AAA" type batteries in this remote control unit. • If the remote control unit does... a year has passed. • The included battery is not necessary to the projector. 1. Replace it "clicks" closed. Provided you are not holding the remote perpendicular to control the projector. ENGLISH Remote Controller Operational Range Preparing the Remote Controller The remote control uses infrared ...
VP8600 User Manual
Page 12
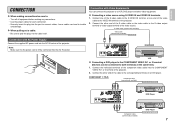
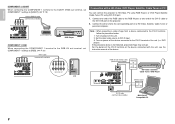
... of the S-video cable or the video cable to the VIDEO IN terminal on a DVD player. Connect the other end of the projector. COMPONENT 1: YPbPr Component cable (commercially available) COMPONENT VIDEO OUT STANDBY FL OFF DVD Player STANDBY FL OFF DVD Player Component cable (...1. Loose cables can lead to trouble and damage. ❖ When pulling out a cable: • Be sure to the corresponding terminals on the projector. 2. ENGLISH CONNECTION ❖ When making any connections. • Use the proper cables for each connection. • Securely insert the plug into the...
... of the S-video cable or the video cable to the VIDEO IN terminal on a DVD player. Connect the other end of the projector. COMPONENT 1: YPbPr Component cable (commercially available) COMPONENT VIDEO OUT STANDBY FL OFF DVD Player STANDBY FL OFF DVD Player Component cable (...1. Loose cables can lead to trouble and damage. ❖ When pulling out a cable: • Be sure to the corresponding terminals on the projector. 2. ENGLISH CONNECTION ❖ When making any connections. • Use the proper cables for each connection. • Securely insert the plug into the...
VP8600 User Manual
Page 13
...HV out terminal, set COMPONENT 1 settings to [SCART]. ( P.19) Scart to RGBCS cable (commercially available) Connection with the unit, see the instruction manual of this projector to HD-Video /PC using RGB IN port, or DVD Player/Satellite /Cable Tuner /PC using DVI-D IN port. 1. Set the input video source to... of the DVI-D terminal on power of the device connected to the DVI-D terminal of the DVI-D cable to the DVI-D IN port on the projector. 2. Turn on the device connected with a HD-Video, DVD Player, Satellite, Cable Tuner or PC You can connect this unit. 2. If the procedure above ...
...HV out terminal, set COMPONENT 1 settings to [SCART]. ( P.19) Scart to RGBCS cable (commercially available) Connection with the unit, see the instruction manual of this projector to HD-Video /PC using RGB IN port, or DVD Player/Satellite /Cable Tuner /PC using DVI-D IN port. 1. Set the input video source to... of the DVI-D terminal on power of the device connected to the DVI-D terminal of the DVI-D cable to the DVI-D IN port on the projector. 2. Turn on the device connected with a HD-Video, DVD Player, Satellite, Cable Tuner or PC You can connect this unit. 2. If the procedure above ...
VP8600 User Manual
Page 15
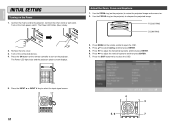
... INITIAL SETTING Turning on the remote control to open the OSD. 4. The Power LED lights blue and the projector splash screen displays. and then press ENTER. 5. Press 1 2 to a wall outlet. Turn on the connected devices. 4. Remove the lens cover. 3. STANDBY ON COMP.1 C1...and then press ENTER. 7. BRI+ Adjust the Zoom, Focus and Keystone 1. Press 1 2 to sharpen the projected image. Use the FOCUS ring (on the projector) to adjust the horizontal keystone and then press ENTER. 6. Press the INPUT 3 or INPUT 4 key to select Config. Press 34 to select the input ...
... INITIAL SETTING Turning on the remote control to open the OSD. 4. The Power LED lights blue and the projector splash screen displays. and then press ENTER. 5. Press 1 2 to a wall outlet. Turn on the connected devices. 4. Remove the lens cover. 3. STANDBY ON COMP.1 C1...and then press ENTER. 7. BRI+ Adjust the Zoom, Focus and Keystone 1. Press 1 2 to sharpen the projected image. Use the FOCUS ring (on the projector) to adjust the horizontal keystone and then press ENTER. 6. Press the INPUT 3 or INPUT 4 key to select Config. Press 34 to select the input ...
VP8600 User Manual
Page 17
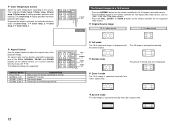
... 1.88:1 aspect ratio. ❖ Zoom 2 mode The 16:9 image is displayed with the correct aspect. The 4:3 image is displayed. The Color temp. 4 setting provides maximum projector light output. ASPECT RATIO FULL (16:9) NORMAL (4:3) ZOOM1 (1.88:1) ZOOM2 (2.35:1) DESCRIPTION Wide screen TV format (anamorphic format) Standard TV format Flat movie format Panavision...
... 1.88:1 aspect ratio. ❖ Zoom 2 mode The 16:9 image is displayed with the correct aspect. The 4:3 image is displayed. The Color temp. 4 setting provides maximum projector light output. ASPECT RATIO FULL (16:9) NORMAL (4:3) ZOOM1 (1.88:1) ZOOM2 (2.35:1) DESCRIPTION Wide screen TV format (anamorphic format) Standard TV format Flat movie format Panavision...

VP8600 User Manual
Page 18
... on if the ON button on the remote controller after turning off. Press the ON button on the remote controller is pressed immediately after the projector turns into standby mode. ❖ Zoom 2 mode 13 ENGLISH The Screen Images in normal ratio 4:3 is displayed. Turn off . 2. It can cause ...a breakdown. - The projector turns off the main power switch. ❖ Full mode The 16:9 squeezed image is displayed with the correct aspect. In the meantime, the Power LED...
... on if the ON button on the remote controller after turning off. Press the ON button on the remote controller is pressed immediately after the projector turns into standby mode. ❖ Zoom 2 mode 13 ENGLISH The Screen Images in normal ratio 4:3 is displayed. Turn off . 2. It can cause ...a breakdown. - The projector turns off the main power switch. ❖ Full mode The 16:9 squeezed image is displayed with the correct aspect. In the meantime, the Power LED...

VP8600 User Manual
Page 21
... in the Picture Adjust menu, and then navigate to the Horizontal Size setting in the Display menu. 1. ENGLISH OPERATIONS On-Screen Display Menu Controls The projector has an On-Screen Display (OSD) that lets you want to reference the OSD on your preference before continuing. (Available languages are English, Francais, Italiano...
... in the Picture Adjust menu, and then navigate to the Horizontal Size setting in the Display menu. 1. ENGLISH OPERATIONS On-Screen Display Menu Controls The projector has an On-Screen Display (OSD) that lets you want to reference the OSD on your preference before continuing. (Available languages are English, Francais, Italiano...
VP8600 User Manual
Page 25
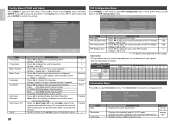
... 1 2 to select the menu screen position. (Range: 1 (upper left) - 9 (bottom right) Press 1 2 to select how long the menu is set to Enable, power to the projector automatically shuts off is displayed. (Range: Continue (OSD appears until manually closed) - 10 Sec. - 20 Sec.) Press 1 2 to move up and down in the PIP...
... 1 2 to select the menu screen position. (Range: 1 (upper left) - 9 (bottom right) Press 1 2 to select how long the menu is set to Enable, power to the projector automatically shuts off is displayed. (Range: Continue (OSD appears until manually closed) - 10 Sec. - 20 Sec.) Press 1 2 to move up and down in the PIP...
VP8600 User Manual
Page 26
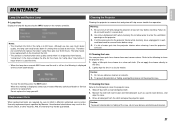
...: • The maximum life limit of the lamp is displayed, contact your nearest Marantz authorized dealer or Service center for this warning is 4,000 hours. Although we recommend to clean the projector lens. 1. So "Lamp Hour" may not be guaranteed. ❖ Cleaning the ...as used first time. - Failure to inform a Marantz authorized service center. Caution: 1. ENGLISH MAINTENANCE Lamp Life and Replace Lamp Cleaning the Projector ❖ Lamp Hour Display the lamp life by Marantz. Warning: 1. button on the projector case. The lamp needs to be sure to do...
...: • The maximum life limit of the lamp is displayed, contact your nearest Marantz authorized dealer or Service center for this warning is 4,000 hours. Although we recommend to clean the projector lens. 1. So "Lamp Hour" may not be guaranteed. ❖ Cleaning the ...as used first time. - Failure to inform a Marantz authorized service center. Caution: 1. ENGLISH MAINTENANCE Lamp Life and Replace Lamp Cleaning the Projector ❖ Lamp Hour Display the lamp life by Marantz. Warning: 1. button on the projector case. The lamp needs to be sure to do...
VP8600 User Manual
Page 27
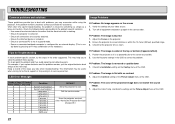
... of the OSD. Check the following before proceeding to the problem-specific solutions. • Use some other electrical device to confirm that the projector lens is within the 10-meter (33-feet) specified range. 3. LED Error Messages ❖ Problem: The image is blurred 1. TROUBLESHOOTING ...display. (This is reversed or upside down 1. For example, if you take when troubleshooting: The information may encounter while using the projector. Position the projector so it is configured for passing on . • Ensure a connected PC is not in the OSD to cool. Use the ...
... of the OSD. Check the following before proceeding to the problem-specific solutions. • Use some other electrical device to confirm that the projector lens is within the 10-meter (33-feet) specified range. 3. LED Error Messages ❖ Problem: The image is blurred 1. TROUBLESHOOTING ...display. (This is reversed or upside down 1. For example, if you take when troubleshooting: The information may encounter while using the projector. Position the projector so it is configured for passing on . • Ensure a connected PC is not in the OSD to cool. Use the ...
VP8600 User Manual
Page 28
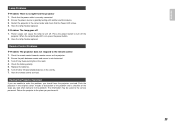
...and a checklist of the steps you purchased it. 23 Remote Control Problems ❖ Problem: The projector does not respond to fix the problem. Ensure the power source is on the projector. 2. Power surges can cause the lamp to the place you took when trying to the remote ... button to solve the problem, you are unable to turn off. Ensure the path between remote and sensor is no light from the projector 1. Pack the projector in the vicinity. 7. The information may be useful to the service personnel. ENGLISH Lamp Problems ❖ Problem: There is not obstructed...
...and a checklist of the steps you purchased it. 23 Remote Control Problems ❖ Problem: The projector does not respond to fix the problem. Ensure the power source is on the projector. 2. Power surges can cause the lamp to the place you took when trying to the remote ... button to solve the problem, you are unable to turn off. Ensure the path between remote and sensor is no light from the projector 1. Pack the projector in the vicinity. 7. The information may be useful to the service personnel. ENGLISH Lamp Problems ❖ Problem: There is not obstructed...


