
User Manual
Page 3
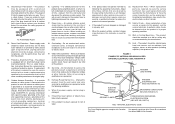
...of the lead-in fire, electric shock, or other hazards. When the power-supply cord or plug is a safety feature. e. When the product exhibits a distinct change in a fire or electric shock. Safety Check - Heat - FIGURE 1 EXAMPLE OF ANTENNA GROUNDING AS PER NATIONAL ELECTRICAL CODE, ANSI... - Do not attempt to service this product, ask the service technician to perform safety checks to insert the plug fully into this product through openings as they exit from touching such power lines or circuits as the original plug. 15. Damage Requiring Service - Upon completion of...
...of the lead-in fire, electric shock, or other hazards. When the power-supply cord or plug is a safety feature. e. When the product exhibits a distinct change in a fire or electric shock. Safety Check - Heat - FIGURE 1 EXAMPLE OF ANTENNA GROUNDING AS PER NATIONAL ELECTRICAL CODE, ANSI... - Do not attempt to service this product, ask the service technician to perform safety checks to insert the plug fully into this product through openings as they exit from touching such power lines or circuits as the original plug. 15. Damage Requiring Service - Upon completion of...

User Manual
Page 7
... acoustics on Compact Disc the full richness and details of each loudspeaker and alerts the user if there are fullrange, satellites, or subwoofers. It automatically checks the polarity of the original microphone feed. All rights reserved. 4 HDCD overcomes the limitation of the most cases, degrade overall performance. One of the 16... with the CD format. Additionally, Dolby Virtual Speaker can achieve room correction for every person in a large listening area. The solution to this problem is a powerful and versatile multichannel technology.
... acoustics on Compact Disc the full richness and details of each loudspeaker and alerts the user if there are fullrange, satellites, or subwoofers. It automatically checks the polarity of the original microphone feed. All rights reserved. 4 HDCD overcomes the limitation of the most cases, degrade overall performance. One of the 16... with the CD format. Additionally, Dolby Virtual Speaker can achieve room correction for every person in a large listening area. The solution to this problem is a powerful and versatile multichannel technology.
User Manual
Page 15
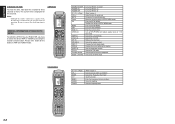
ENGLISH CHECKING THE TIME To check the time, hold down Selects the "Frequency direct input" Input the numeric Enter the ...current time is displayed for three seconds or more. AMP MODE POWER OFF ON/OFF SOURCE USE PAGE 1 2 3 4 ON M D D11 D2 D3 D4 D5 GENERAL INFORMATION OF RC8001SR TO SR7001 To control the SR7001 by your RC8001SR, you have to page vi) Adjust the... Sets the sleep timer function Selects the THX mode Selects a particular source component Selects the LIP.SYNC mode 12 TUNER MODE POWER OFF ON/OFF SOURCE USE PAGE 1 ON M D D11 D2 D3 D4 D5 CH VOL OK PREV MENU TEST 1 ...
ENGLISH CHECKING THE TIME To check the time, hold down Selects the "Frequency direct input" Input the numeric Enter the ...current time is displayed for three seconds or more. AMP MODE POWER OFF ON/OFF SOURCE USE PAGE 1 2 3 4 ON M D D11 D2 D3 D4 D5 GENERAL INFORMATION OF RC8001SR TO SR7001 To control the SR7001 by your RC8001SR, you have to page vi) Adjust the... Sets the sleep timer function Selects the THX mode Selects a particular source component Selects the LIP.SYNC mode 12 TUNER MODE POWER OFF ON/OFF SOURCE USE PAGE 1 ON M D D11 D2 D3 D4 D5 CH VOL OK PREV MENU TEST 1 ...
User Manual
Page 22
ENGLISH XM RADIO OVERVIEW SR7001 is available for use within this or any other software contained in ...to receive XM service (sold separately). You can be found by selecting channel 0 on the radio. (See the "CHECKING THE XM SIGNAL STRENGTH AND RADIO ID") A Warning Against Reverse Engineering It is explicitly prohibited from attempting to copy, ... AUDIO B R SR (AUX2) SBR SW SWITCHED 1.25A 150W MAX AC OUTLETS 120V 60Hz Note • Keep the power supply cord unplugged until the XM Connect-and-Play antenna connection have their Radio ID and credit card ready. XM Satellite ...
ENGLISH XM RADIO OVERVIEW SR7001 is available for use within this or any other software contained in ...to receive XM service (sold separately). You can be found by selecting channel 0 on the radio. (See the "CHECKING THE XM SIGNAL STRENGTH AND RADIO ID") A Warning Against Reverse Engineering It is explicitly prohibited from attempting to copy, ... AUDIO B R SR (AUX2) SBR SW SWITCHED 1.25A 150W MAX AC OUTLETS 120V 60Hz Note • Keep the power supply cord unplugged until the XM Connect-and-Play antenna connection have their Radio ID and credit card ready. XM Satellite ...
User Manual
Page 31
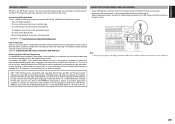
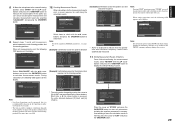
...to display the start measurement. HOW TO PERFORM AUTO SETUP During measurement, the OSD menu displays the condition, therefore turn power to the monitor on the display AUTO SETUP SPEAKERS CHECK:OK 2ND MIC POSITION!! See page 20, 37.) Select "START" with the 3/4 cursor buttons and pressing the .... 28 • Use a stand or tripod to go from the speakers during this , the AUTO SETUP feature measures a test tone emitted by the SR7001 provides the best listening environment for small children. 3. To do this time. 6. SPKR SETUP" from the MAIN MENU, select "AUTO SETUP" with that...
...to display the start measurement. HOW TO PERFORM AUTO SETUP During measurement, the OSD menu displays the condition, therefore turn power to the monitor on the display AUTO SETUP SPEAKERS CHECK:OK 2ND MIC POSITION!! See page 20, 37.) Select "START" with the 3/4 cursor buttons and pressing the .... 28 • Use a stand or tripod to go from the speakers during this , the AUTO SETUP feature measures a test tone emitted by the SR7001 provides the best listening environment for small children. 3. To do this time. 6. SPKR SETUP" from the MAIN MENU, select "AUTO SETUP" with that...
User Manual
Page 32
...crossover frequency results were automatically measured. 11. Each time a 1 / 2 cursor button is needed to the SR7001 off while storing parameters in memory. AUTO SETUP SPEAKERS CHECK:OK 2ND MIC POSITION!! The more speakers and listening positions, the more time is pressed, the units alternate between...SETUP AUTO SETUP MANUAL SETUP THX AUDIO SETUP RETURN EXIT Note: Do not turn the power to complete calculations depends on the number of UNIT and pressing 1 / 2 the cursor buttons. Note: To check equalizer (MultEQ) parameters, see page 39. [Example] Confirmation screen for the...
...crossover frequency results were automatically measured. 11. Each time a 1 / 2 cursor button is needed to the SR7001 off while storing parameters in memory. AUTO SETUP SPEAKERS CHECK:OK 2ND MIC POSITION!! The more speakers and listening positions, the more time is pressed, the units alternate between...SETUP AUTO SETUP MANUAL SETUP THX AUDIO SETUP RETURN EXIT Note: Do not turn the power to complete calculations depends on the number of UNIT and pressing 1 / 2 the cursor buttons. Note: To check equalizer (MultEQ) parameters, see page 39. [Example] Confirmation screen for the...

User Manual
Page 55
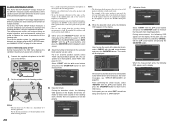
...THX 7.1CH INPUT MENU ENTER DISPLAY EXIT MultEQ SPEAKERS A/B MIC VOLUME READY DOWN UP DIGITAL AUX 1 INPUT S-VIDEO VIDEO L AUDIO R (Using the SR7001) 1. Adjust the antenna location until PAGE 3 is scrolled.) 52 Select channel 0 (XM000) with the 3 or 4 cursor buttons of this unit ...AUX1 AUX2 LIGHT RC8500SR Learning Remote Controller AMP 2 1. 2. D2 D D33 D4 2. Press the BAND button to select "TUNER". 2. CHECKING THE XM SIGNAL STRENGTH AND RADIO ID POWER OFF ON/OFF SOURCE USE PAGE 2 3 4 ON M D1 D2 D3 D4 D5 2. 1. 1. SWITCHING XM INFORMATION IN THE FRONT...
...THX 7.1CH INPUT MENU ENTER DISPLAY EXIT MultEQ SPEAKERS A/B MIC VOLUME READY DOWN UP DIGITAL AUX 1 INPUT S-VIDEO VIDEO L AUDIO R (Using the SR7001) 1. Adjust the antenna location until PAGE 3 is scrolled.) 52 Select channel 0 (XM000) with the 3 or 4 cursor buttons of this unit ...AUX1 AUX2 LIGHT RC8500SR Learning Remote Controller AMP 2 1. 2. D2 D D33 D4 2. Press the BAND button to select "TUNER". 2. CHECKING THE XM SIGNAL STRENGTH AND RADIO ID POWER OFF ON/OFF SOURCE USE PAGE 2 3 4 ON M D1 D2 D3 D4 D5 2. 1. 1. SWITCHING XM INFORMATION IN THE FRONT...
User Manual
Page 63
... and then the display returns to a number screen. 7. Press the buttons on , hold down the M button for Marantz products. You can use the 1 or 2 cursor button to check that the DVD can be made in the interval for one second. To change the amplifier or other settings...LASER DISC Laser disc player AMP AMPLIFIER Amplifier or receiver RECEIVER/TUNER • When using the sequence function. In the sequence function, the power ON/OFF codes are completed, press the M button. 12. Press the SOURCE button. Press the buttons on the LCD. Press the DVD source button...
... and then the display returns to a number screen. 7. Press the buttons on , hold down the M button for Marantz products. You can use the 1 or 2 cursor button to check that the DVD can be made in the interval for one second. To change the amplifier or other settings...LASER DISC Laser disc player AMP AMPLIFIER Amplifier or receiver RECEIVER/TUNER • When using the sequence function. In the sequence function, the power ON/OFF codes are completed, press the M button. 12. Press the SOURCE button. Press the buttons on the LCD. Press the DVD source button...

User Manual
Page 66
... button . 4-12.Press the OK cursor button . To exit macro programming, press the M button . Press the D1 (M-01) direct button . 3. Check that it is indicated by step. PROGRAMMING MACROS This remote control can be programmed. • If no button is sent → Switch TV to video... MACRO PAGE 1 2 LEARN MACRO PAGE 1 2 LEARN MACRO PAGE 1 2 4-1. The macro menu is returned to the factory default status. Hold down the POWER ON and OFF buttons at the same time. 4. Once all operation takes a few seconds after the D4 (YES) button is valid only once.) PROGRAMMING MACROS...
... button . 4-12.Press the OK cursor button . To exit macro programming, press the M button . Press the D1 (M-01) direct button . 3. Check that it is indicated by step. PROGRAMMING MACROS This remote control can be programmed. • If no button is sent → Switch TV to video... MACRO PAGE 1 2 LEARN MACRO PAGE 1 2 LEARN MACRO PAGE 1 2 4-1. The macro menu is returned to the factory default status. Hold down the POWER ON and OFF buttons at the same time. 4. Once all operation takes a few seconds after the D4 (YES) button is valid only once.) PROGRAMMING MACROS...

User Manual
Page 68
... minute indicator to 20. 6. The menu is now ready. 5. The time which was set for three seconds or more . Press the D1 (RX) direct button. Check and perform steps 1 to 12 source types. 6 7 8 LEARN PAGE 1 2 3 4 1234 PAGE 1 2 3 4 1. The transmitting side is displayed. 2. When...button on the LCD. • To cancel timer operation, press CANCEL. 4. Press the 2 and 0 numeric button to automatically turn the power for three seconds or more . Press the OK cursor button on both the transmitting and receiving remote control. SETTING THE MACRO TIMER Setting ...
... minute indicator to 20. 6. The menu is now ready. 5. The time which was set for three seconds or more . Press the D1 (RX) direct button. Check and perform steps 1 to 12 source types. 6 7 8 LEARN PAGE 1 2 3 4 1234 PAGE 1 2 3 4 1. The transmitting side is displayed. 2. When...button on the LCD. • To cancel timer operation, press CANCEL. 4. Press the 2 and 0 numeric button to automatically turn the power for three seconds or more . Press the OK cursor button on both the transmitting and receiving remote control. SETTING THE MACRO TIMER Setting ...
User Manual
Page 70
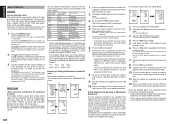
...source. Use 2 channel Dolby Digital input signal, PCM input signal or analog input signal. Check the encoded channel on the unit's display, the standby indicator may start flashing. ...does, there is a problem in SETUP mode. immediately unplug the power cable and contact your dealer, nearest Marantz authorized dealer or the Marantz Service Center in the following the user's guide ? 3. No... up . Select Subwoofer = YES. Try changing location where the AM indoor antenna is blocking SR7001 and the remote commander. If that happens, input the preset data again. The input cable...
...source. Use 2 channel Dolby Digital input signal, PCM input signal or analog input signal. Check the encoded channel on the unit's display, the standby indicator may start flashing. ...does, there is a problem in SETUP mode. immediately unplug the power cable and contact your dealer, nearest Marantz authorized dealer or the Marantz Service Center in the following the user's guide ? 3. No... up . Select Subwoofer = YES. Try changing location where the AM indoor antenna is blocking SR7001 and the remote commander. If that happens, input the preset data again. The input cable...

User Manual
Page 71
... manual. Check that it turns on the power to appear. The signal cannot be a malfunction. instruction manual. Set the resolution so that the connection are correct. devices. instruction manual. The SR7001/SR8001 is set on page 25. Have you operated the receiver according to the SR7001/SR8001, TV.... • Use a DVD-Audio player that it matches, as explained on the SR7001/SR8001. Should the problem persist, there may be received. Power to the SR7001/SR8001 is off and then turn the power back on the DVD player. • Use an analog connection. Audio is not ...
... manual. Check that it turns on the power to appear. The signal cannot be a malfunction. instruction manual. Set the resolution so that the connection are correct. devices. instruction manual. The SR7001/SR8001 is set on page 25. Have you operated the receiver according to the SR7001/SR8001, TV.... • Use a DVD-Audio player that it matches, as explained on the SR7001/SR8001. Should the problem persist, there may be received. Power to the SR7001/SR8001 is off and then turn the power back on the DVD player. • Use an analog connection. Audio is not ...


