HEOS CLI ProtocolSpecification Version
Page 5
... out other supported music sources through CLI, it is recommended to keep a idle connection to HEOS Speaker thus avoiding CLI module to set statically and manually programmed into the control system.
... out other supported music sources through CLI, it is recommended to keep a idle connection to HEOS Speaker thus avoiding CLI module to set statically and manually programmed into the control system.
Owners Manual English
Page 1
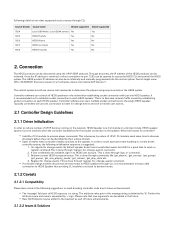
Contents . Connections Playback Settings Tips Appendix AV Surround Receiver SR6015 Front panel Display Rear panel 1 Remote Owner's Manual Index
Contents . Connections Playback Settings Tips Appendix AV Surround Receiver SR6015 Front panel Display Rear panel 1 Remote Owner's Manual Index
Owners Manual English
Page 5
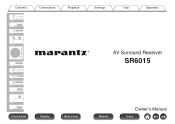
... Audyssey® Setup 204 166 Procedure for speaker settings (Audyssey® Setup) 206 170 Error messages 212 171 Retrieving Audyssey® Setup settings 214 171 Manual Setup 215 171 Amp Assign 215 172 Speaker Config. 221 177 Distances 225 178 Levels 227 179 Crossovers 228 180 Bass 229 183 Front Speaker...
... Audyssey® Setup 204 166 Procedure for speaker settings (Audyssey® Setup) 206 170 Error messages 212 171 Retrieving Audyssey® Setup settings 214 171 Manual Setup 215 171 Amp Assign 215 172 Speaker Config. 221 177 Distances 225 178 Levels 227 179 Crossovers 228 180 Bass 229 183 Front Speaker...
Owners Manual English
Page 8
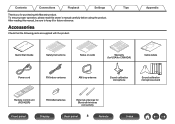
... product. Contents Connections Playback Settings Thank you for future reference. To ensure proper operation, please read this Marantz product. Tips Appendix . After reading this manual, be sure to keep it for purchasing this owner's manual carefully before using the product. Quick Start Guide Safety Instructions Notes on radio Warranty (for USA/for CANADA...
... product. Contents Connections Playback Settings Thank you for future reference. To ensure proper operation, please read this Marantz product. Tips Appendix . After reading this manual, be sure to keep it for purchasing this owner's manual carefully before using the product. Quick Start Guide Safety Instructions Notes on radio Warranty (for USA/for CANADA...
Owners Manual English
Page 15
...is not in all the zones at the same time. This helps reduce unnecessary power use . This unit needs to be enjoyed in use . "Marantz 2016 AVR Remote" App also gives you quick access to its setup menu for detailed adjustments from your phones or tablets. .. Contents Connections 0 ... Appz for performing basic operations of this unit as well as access to the receiver's status display, option menus, Marantz Blu-ray Disc player control, and online owner's manual for your convenience. Front panel Display Rear panel 15 Remote Index This is useful when you want to let the ...
...is not in all the zones at the same time. This helps reduce unnecessary power use . This unit needs to be enjoyed in use . "Marantz 2016 AVR Remote" App also gives you quick access to its setup menu for detailed adjustments from your phones or tablets. .. Contents Connections 0 ... Appz for performing basic operations of this unit as well as access to the receiver's status display, option menus, Marantz Blu-ray Disc player control, and online owner's manual for your convenience. Front panel Display Rear panel 15 Remote Index This is useful when you want to let the ...
Owners Manual English
Page 24
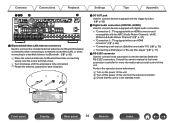
... unit. Front panel Display Rear panel 24 Remote Index C Rotate the antenna upwards for more information about serial control of this unit. Consult the owner's manual of the home automation controller for best reception. Perform the operation below beforehand. C Check that the unit is fully connected. B Turn clockwise until the antennas...
... unit. Front panel Display Rear panel 24 Remote Index C Rotate the antenna upwards for more information about serial control of this unit. Consult the owner's manual of the home automation controller for best reception. Perform the operation below beforehand. C Check that the unit is fully connected. B Turn clockwise until the antennas...
Owners Manual English
Page 66
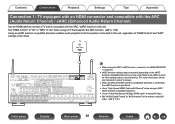
... the ARC function. (v p. 189) Using an eARC function-compatible television enables audio playback from the speaker connected to this setting exists on your television's owner's manual. 0 When an ARC and eARC function-compatible television is connected, the eARC function is compatible with Ethernet" when using an ARC / eARC function-compatible television...
... the ARC function. (v p. 189) Using an eARC function-compatible television enables audio playback from the speaker connected to this setting exists on your television's owner's manual. 0 When an ARC and eARC function-compatible television is connected, the eARC function is compatible with Ethernet" when using an ARC / eARC function-compatible television...
Owners Manual English
Page 99
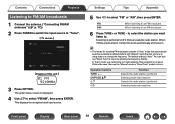
... screen H Tuner CH 1 FM 92.10MHz STEREO AUTO Now Playing Tune Preset OPTION Option G Display of "Auto" mode that automatically searches available broadcast stations and "Manual" mode that lets you want listen to tune in . The option menu screen is the case, then use "Direct Tune" to . Scanning is performed until... modes for receiving FM broadcasts consists of this is displayed. 4 Use ui to tune in by entering the frequency directly. You can also use the "Manual" mode or "Direct Tune" mode to select "FM/AM", then press ENTER.
... screen H Tuner CH 1 FM 92.10MHz STEREO AUTO Now Playing Tune Preset OPTION Option G Display of "Auto" mode that automatically searches available broadcast stations and "Manual" mode that lets you want listen to tune in . The option menu screen is the case, then use "Direct Tune" to . Scanning is performed until... modes for receiving FM broadcasts consists of this is displayed. 4 Use ui to tune in by entering the frequency directly. You can also use the "Manual" mode or "Direct Tune" mode to select "FM/AM", then press ENTER.
Owners Manual English
Page 101
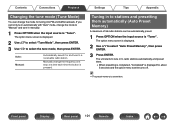
... input source is displayed for tuning into FM and AM broadcasts. If you cannot tune in automatically with "Auto" mode, change the mode to "Manual" and tune in manually. 1 Press OPTION when the input source is displayed. 2 Use ui to select "Tune Mode", then press ENTER. 3 Use o p to stations ..., "Completed" is "Tuner". The option menu screen is pressed. The unit starts to tune in to select the tune mode, then press ENTER. Manually change the mode for about 5 seconds and the option menu screen turns off. 0 The preset memory is overwritten. Front panel Display Rear panel 101 ...
... input source is displayed for tuning into FM and AM broadcasts. If you cannot tune in automatically with "Auto" mode, change the mode to "Manual" and tune in manually. 1 Press OPTION when the input source is displayed. 2 Use ui to select "Tune Mode", then press ENTER. 3 Use o p to stations ..., "Completed" is "Tuner". The option menu screen is pressed. The unit starts to tune in to select the tune mode, then press ENTER. Manually change the mode for about 5 seconds and the option menu screen turns off. 0 The preset memory is overwritten. Front panel Display Rear panel 101 ...
Owners Manual English
Page 122
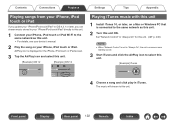
...", the unit consumes more standby power. 3 Start iTunes and click the AirPlay icon to the same network as this unit. 0 For details, see your device's manual. 2 Play the song on your iPhone, iPod touch or iPad Wi-Fi to this unit ON. Front panel Display Rear panel 122 Remote Index Set...
...", the unit consumes more standby power. 3 Start iTunes and click the AirPlay icon to the same network as this unit. 0 For details, see your device's manual. 2 Play the song on your iPhone, iPod touch or iPad Wi-Fi to this unit ON. Front panel Display Rear panel 122 Remote Index Set...
Owners Manual English
Page 131
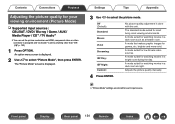
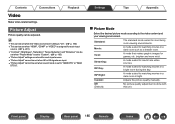
.... 2 Use ui to anything other than "Off". (v p. 193) 1 Press OPTION. A mode suited for watching movies in a bright room during the day. Adjusts the picture quality manually. 4 Press ENTER. 0 "Picture Mode" settings are stored for low bit rate video sources. Front panel Display Rear panel 131 Remote Index The "Picture Mode" screen...
.... 2 Use ui to anything other than "Off". (v p. 193) 1 Press OPTION. A mode suited for watching movies in a bright room during the day. Adjusts the picture quality manually. 4 Press ENTER. 0 "Picture Mode" settings are stored for low bit rate video sources. Front panel Display Rear panel 131 Remote Index The "Picture Mode" screen...
Owners Manual English
Page 133
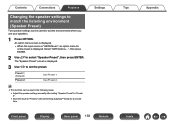
... menu screen is displayed. 0 When the input source is displayed. Use Preset 2. 0 This function can be used in the following cases. 0 Adjust the speaker settings manually after performing Audyssey® Setup for online music is "HEOS Music", an option menu for a second time. Settings Front panel Display Rear panel 133 Remote...
... menu screen is displayed. 0 When the input source is displayed. Use Preset 2. 0 This function can be used in the following cases. 0 Adjust the speaker settings manually after performing Audyssey® Setup for online music is "HEOS Music", an option menu for a second time. Settings Front panel Display Rear panel 133 Remote...
Owners Manual English
Page 148
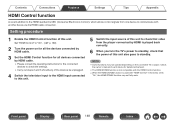
NOTE 0 Some functions may not fully work. Set "HDMI Control" to "On". (v p. 189) 2 Turn the power on the connected TV or player. Check the owner's manual of each device for details beforehand. 0 The HDMI ZONE2 function is not compatible with the HDMI Control function. 0 When the HDMI ZONE2 function is CEC (...
NOTE 0 Some functions may not fully work. Set "HDMI Control" to "On". (v p. 189) 2 Turn the power on the connected TV or player. Check the owner's manual of each device for details beforehand. 0 The HDMI ZONE2 function is not compatible with the HDMI Control function. 0 When the HDMI ZONE2 function is CEC (...
Owners Manual English
Page 167
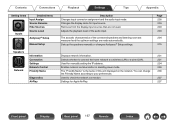
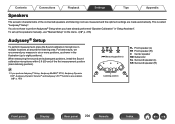
.... Adjusts the playback level of this unit displayed on the network. Used to your preferences. Sets up the speakers manually or changes Audyssey® Setup settings. Contents Connections Playback Settings Tips Appendix Setting items Inputs Detailed items Input Assign Source... Rename Hide Sources Source Level Audyssey® Setup Manual Setup ... The acoustic characteristics of the connected speakers and listening room are measured and the optimum settings are not used....
.... Adjusts the playback level of this unit displayed on the network. Used to your preferences. Sets up the speakers manually or changes Audyssey® Setup settings. Contents Connections Playback Settings Tips Appendix Setting items Inputs Detailed items Input Assign Source... Rename Hide Sources Source Level Audyssey® Setup Manual Setup ... The acoustic characteristics of the connected speakers and listening room are measured and the optimum settings are not used....
Owners Manual English
Page 169
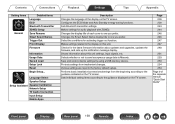
...according to the factory default values. Select the conditions for audio playback with ZONE2. Protects settings from the beginning according to Marantz. Changes the Smart Select Name display title to the display on the TV screen. Checks for the latest firmware information ... Setup Setup Assistant Speaker Calibration Network Setup TV Audio Connection Input Setup Mobile Apps Description Changes the language of the separate manual "Quick Start Guide" Front panel Display Rear panel 169 Remote Index Shows information about updates and upgrades, updates the firmware...
...according to the factory default values. Select the conditions for audio playback with ZONE2. Protects settings from the beginning according to Marantz. Changes the Smart Select Name display title to the display on the TV screen. Checks for the latest firmware information ... Setup Setup Assistant Speaker Calibration Network Setup TV Audio Connection Input Setup Mobile Apps Description Changes the language of the separate manual "Quick Start Guide" Front panel Display Rear panel 169 Remote Index Shows information about updates and upgrades, updates the firmware...
Owners Manual English
Page 174
... set this when the sound mode is "Dolby Atmos", "Dolby Surround" or sound mode that has "+Dolby Surround" in the menu is set to "On" manually. 0 This setting can enable IMAX mode by setting this parameter to "1 spkr". (v p. 223) o DTS Neural:X DTS Neural:X Expands the non-object based audio signals and...
... set this when the sound mode is "Dolby Atmos", "Dolby Surround" or sound mode that has "+Dolby Surround" in the menu is set to "On" manually. 0 This setting can enable IMAX mode by setting this parameter to "1 spkr". (v p. 223) o DTS Neural:X DTS Neural:X Expands the non-object based audio signals and...
Owners Manual English
Page 175
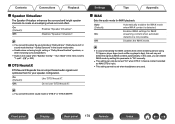
...90 Hz / 100 Hz / 110 Hz / 120 Hz / 150 Hz / 180 Hz / 200 Hz / 250 Hz (Default: 120 Hz) 0 You can set to "Manual". Manually adjusts the "High Pass Filter", "Low Pass Filter" and "Subwoofer Mode". 0 You can set this when "IMAX Audio Settings" is set this when "IMAX Audio... Settings" is played. On: Off (Default): The low range signal of an IMAX theater. "Crossovers", "Bass" - Auto (Default): Manual: Applies the optimized speaker settings to reproduce similar to the LFE signal output from the subwoofer. o High Pass Filter Set the high pass filter cutoff...
...90 Hz / 100 Hz / 110 Hz / 120 Hz / 150 Hz / 180 Hz / 200 Hz / 250 Hz (Default: 120 Hz) 0 You can set to "Manual". Manually adjusts the "High Pass Filter", "Low Pass Filter" and "Subwoofer Mode". 0 You can set this when "IMAX Audio Settings" is set this when "IMAX Audio... Settings" is played. On: Off (Default): The low range signal of an IMAX theater. "Crossovers", "Bass" - Auto (Default): Manual: Applies the optimized speaker settings to reproduce similar to the LFE signal output from the subwoofer. o High Pass Filter Set the high pass filter cutoff...

Owners Manual English
Page 178
Contents Connections Playback Audio Delay Compensates for incorrect timing between the picture and sound needs to be corrected manually. 0 ms - 500 ms (Default : 0 ms) 0 You can also finely adjust the delay correction value set by "Auto Lip Sync". 0 Adjust for game mode can be ...
Contents Connections Playback Audio Delay Compensates for incorrect timing between the picture and sound needs to be corrected manually. 0 ms - 500 ms (Default : 0 ms) 0 You can also finely adjust the delay correction value set by "Auto Lip Sync". 0 Adjust for game mode can be ...
Owners Manual English
Page 185
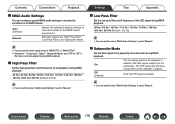
Settings Tips Appendix o Picture Mode Select the desired picture mode according to "IMAX DTS" or "IMAX DTS:X". brighter and more vivid. Adjusts the picture quality manually. Playback 0 This can be set when the "Video Conversion" setting is "On". (v p. 193) 0 This can be set when "HDMI", "COMP" or "VIDEO" is assigned for ...
Settings Tips Appendix o Picture Mode Select the desired picture mode according to "IMAX DTS" or "IMAX DTS:X". brighter and more vivid. Adjusts the picture quality manually. Playback 0 This can be set when the "Video Conversion" setting is "On". (v p. 193) 0 This can be set when "HDMI", "COMP" or "VIDEO" is assigned for ...
Owners Manual English
Page 204
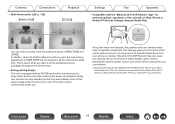
... Rear panel 204 Remote Index For best results, we recommend you measure in six or more positions, as shown in the illustration (up the speakers manually, use "Manual Setup" on the menu. (v p. 215) Audyssey® Setup To perform measurement, place the Sound calibration microphone in "Setup Assistant". To set up to perform...
... Rear panel 204 Remote Index For best results, we recommend you measure in six or more positions, as shown in the illustration (up the speakers manually, use "Manual Setup" on the menu. (v p. 215) Audyssey® Setup To perform measurement, place the Sound calibration microphone in "Setup Assistant". To set up to perform...


