

AV8003 User Manua
Page 8
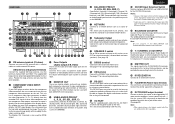
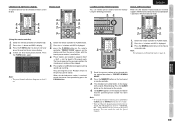
... for input source. @3 HEADPHONE jack for input source. (See page 40) !8 TOP button Press this button to return to the top screen of the main menu when configuring setup items. (See page 21) Also, press this button to select M-DAX processing for stereo headphones This jack may... ON/STANDBY INPUT SELECTOR PURE DIRECT M-DAX AV PRE TUNER AV8003 UP HDMI DOWN VOLUME SURROUND MODE AUTO PURE DIRECT PHONES ZONE THX ZONE SPEAKER 7.1CH INPUT SETUP MIC MENU EXIT ENTER BAND T-MODE MEMORY CLEAR TOP M-DAX DISPLAY i MENU button Press this switch is pressed once, the unit turns...
... for input source. @3 HEADPHONE jack for input source. (See page 40) !8 TOP button Press this button to return to the top screen of the main menu when configuring setup items. (See page 21) Also, press this button to select M-DAX processing for stereo headphones This jack may... ON/STANDBY INPUT SELECTOR PURE DIRECT M-DAX AV PRE TUNER AV8003 UP HDMI DOWN VOLUME SURROUND MODE AUTO PURE DIRECT PHONES ZONE THX ZONE SPEAKER 7.1CH INPUT SETUP MIC MENU EXIT ENTER BAND T-MODE MEMORY CLEAR TOP M-DAX DISPLAY i MENU button Press this switch is pressed once, the unit turns...
AV8003 User Manua
Page 10
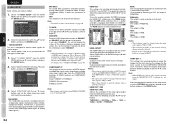
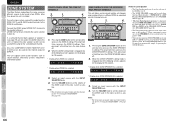
... component video outputs connector to output it will be triggered by DC under certain conditions (screen, power strip, etc...) Use the system OSD setup menu to determine the conditions by which these jacks to optional audio power amplifiers or.... By sending the pure DVD component video signal directly, the DVD signal forgoes the extra processing that has a multichannel port, you hear the best reception. AV8003 7.1CH IN R IN OUT IN OUT IN OUT IN OUT A AUDIO B R SR (AUX) SBR SW CONNECTION 1 GND 2 HOT(+) 1 2 3 COLD(-) 3 NETWORK @0 e @2 @1 !9!8 !7 !6 !5 !4 !3 ...
... component video outputs connector to output it will be triggered by DC under certain conditions (screen, power strip, etc...) Use the system OSD setup menu to determine the conditions by which these jacks to optional audio power amplifiers or.... By sending the pure DVD component video signal directly, the DVD signal forgoes the extra processing that has a multichannel port, you hear the best reception. AV8003 7.1CH IN R IN OUT IN OUT IN OUT IN OUT A AUDIO B R SR (AUX) SBR SW CONNECTION 1 GND 2 HOT(+) 1 2 3 COLD(-) 3 NETWORK @0 e @2 @1 !9!8 !7 !6 !5 !4 !3 ...

AV8003 User Manua
Page 12
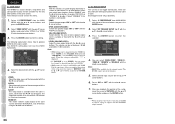
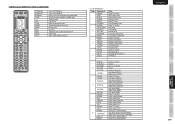
... selected) These buttons are used to the previous screen. SOURCE /Numeric buttons SOURCE buttons These buttons are used to tune a frequency station up and down . This remote controller can operate the unit through infrared receivers or the infrared receptor of Marantz products in multiple ZONEs. buttons (When Zone A/B... in main zone. Numeric buttons Use these buttons only for the unit are displayed on the TV monitor. ⁄4 MENU/INPUT button (When DVD mode is selected) Used to menu command. (When TV mode is selected) Used to select the TV video input. ⁄5 CH 3/4 buttons These ...
... selected) These buttons are used to the previous screen. SOURCE /Numeric buttons SOURCE buttons These buttons are used to tune a frequency station up and down . This remote controller can operate the unit through infrared receivers or the infrared receptor of Marantz products in multiple ZONEs. buttons (When Zone A/B... in main zone. Numeric buttons Use these buttons only for the unit are displayed on the TV monitor. ⁄4 MENU/INPUT button (When DVD mode is selected) Used to menu command. (When TV mode is selected) Used to select the TV video input. ⁄5 CH 3/4 buttons These ...

AV8003 User Manua
Page 24
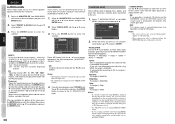
... rear panel to the composite, S-Video, component video or HDMI input of the OSD menu system is not needed when operating the setup menus from OSD menu system, press the EXITbutton, or move the cursor to the top screen of "LOCKED" with the 1 or 2 cursor buttons. 4. To exit from the unit.) ... is displayed. UP button RIGHT button DOWN button EXIT button Press this button to display the OSD menu system. AV8003 FRONT BUTTON CONTROL UP button MENU button Press this button to exit the OSD menu system. The display will change to "1. Press the HOME button on the unit or the remote ...
... rear panel to the composite, S-Video, component video or HDMI input of the OSD menu system is not needed when operating the setup menus from OSD menu system, press the EXITbutton, or move the cursor to the top screen of "LOCKED" with the 1 or 2 cursor buttons. 4. To exit from the unit.) ... is displayed. UP button RIGHT button DOWN button EXIT button Press this button to display the OSD menu system. AV8003 FRONT BUTTON CONTROL UP button MENU button Press this button to exit the OSD menu system. The display will change to "1. Press the HOME button on the unit or the remote ...

AV8003 User Manua
Page 25
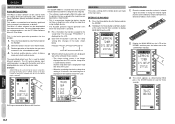
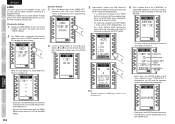
... and press the ENTER button. • Press the TOP button on this unit to return to the top screen of the main menu while setting setup items. MAIN MENU MAIN MENU 1.INPUT SETUP 2.SPKR SETUP 3.SURR SETUP 4.VIDEO SETUP 5.PREFERENCE 6.ACOUSTIC EQ 7.NETWORK LOCKED UNLOCK RETURN NEXT EXIT... SUB MENU 7.NETWORK SETUP VIDEO :NTSC RESOLUTION :AUTO SCREEN SAVER:ON RETURN NEXT EXIT "7. EQ.MODE : OFF PRESET...
... and press the ENTER button. • Press the TOP button on this unit to return to the top screen of the main menu while setting setup items. MAIN MENU MAIN MENU 1.INPUT SETUP 2.SPKR SETUP 3.SURR SETUP 4.VIDEO SETUP 5.PREFERENCE 6.ACOUSTIC EQ 7.NETWORK LOCKED UNLOCK RETURN NEXT EXIT... SUB MENU 7.NETWORK SETUP VIDEO :NTSC RESOLUTION :AUTO SCREEN SAVER:ON RETURN NEXT EXIT "7. EQ.MODE : OFF PRESET...

AV8003 User Manua
Page 30
STANDBY POWER ON/OFF INPUT SELECTOR PURE DIRECT M-DAX AV PRE TUNER AV8003 UP HDMI DOWN VOLUME SURROUND MODE AUTO ZONE ZONE SPEAKER PURE DIRECT THX 7.1CH INPUT PHONES SETUP MIC MENU EXIT ENTER BAND T-MODE MEMORY CLEAR TOP M-DAX DISPLAY 3. Select "2. AUTO SETUP SPEAKERS ... of speakers, and speaker polarity and measures the acoustical characteristics in the listening room, presence of all measurements end, the following screen is displayed as the unit checks background noise in the first position where the microphone is used or not. START CHECK...
STANDBY POWER ON/OFF INPUT SELECTOR PURE DIRECT M-DAX AV PRE TUNER AV8003 UP HDMI DOWN VOLUME SURROUND MODE AUTO ZONE ZONE SPEAKER PURE DIRECT THX 7.1CH INPUT PHONES SETUP MIC MENU EXIT ENTER BAND T-MODE MEMORY CLEAR TOP M-DAX DISPLAY 3. Select "2. AUTO SETUP SPEAKERS ... of speakers, and speaker polarity and measures the acoustical characteristics in the listening room, presence of all measurements end, the following screen is displayed as the unit checks background noise in the first position where the microphone is used or not. START CHECK...
AV8003 User Manua
Page 37
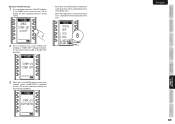
... in accordance with the 1 or 2 cursor buttons. Select the output destination between them. = • HDMI ASPECT Set HDMI ASPECT in the same screen size as the input. 16:9 NORM: Output includes black bands on the remote controller, press the HDMI 1 or HDMI 2 button to switch between ... with the 3, 4, 1 and 2 cursor buttons and press the ENTER button. After you complete this unit will display the status of the television screen. Select the desired menu with the 3 / 4 cursor buttons and press the ENTER button. This section explains how to set the video conversion mode with the 1 / ...
... in accordance with the 1 or 2 cursor buttons. Select the output destination between them. = • HDMI ASPECT Set HDMI ASPECT in the same screen size as the input. 16:9 NORM: Output includes black bands on the remote controller, press the HDMI 1 or HDMI 2 button to switch between ... with the 3, 4, 1 and 2 cursor buttons and press the ENTER button. After you complete this unit will display the status of the television screen. Select the desired menu with the 3 / 4 cursor buttons and press the ENTER button. This section explains how to set the video conversion mode with the 1 / ...
AV8003 User Manua
Page 39
... to disable it. NAMES AND FUNCTION CONNECTIONS SETUP BASIC OPERATION ENGLISH 5-1 ZONE SETUP The AV8003 has source selectors, sleep timers and zonespeaker output remote controller for both ZONE A and ... setup, move the cursor to "RETURN" with input functions for the external control. PREFERENCE" from MAIN MENU with the 1 or 2 cursor buttons. 7. Select "ZONE SETUP" with the 3 or 4 cursor ...With this function is shown on in 1 dB increments. Select "DISABLE" if this function, on-screen display information is not needed. ZONE: Switch the zone output "ON" or "OFF" with the ...
... to disable it. NAMES AND FUNCTION CONNECTIONS SETUP BASIC OPERATION ENGLISH 5-1 ZONE SETUP The AV8003 has source selectors, sleep timers and zonespeaker output remote controller for both ZONE A and ... setup, move the cursor to "RETURN" with input functions for the external control. PREFERENCE" from MAIN MENU with the 1 or 2 cursor buttons. 7. Select "ZONE SETUP" with the 3 or 4 cursor ...With this function is shown on in 1 dB increments. Select "DISABLE" if this function, on-screen display information is not needed. ZONE: Switch the zone output "ON" or "OFF" with the ...
AV8003 User Manua
Page 41
... SETUP" on a network device connected to the "6. Notes: • The screen saver is not activated during the AUTO setting, the screen returns automatically to the top menu and the resolution is appropriate for the screen saver from the video signal that this unit. 1. Press the ENTER button to...9-band graphic equalizer for 10 minutes on the NETWORK screen or SETTING screen, the screen saver is activated on the CHECK AUTO 2 menu. 4. EQ ADJ These modes allow you are not indicated on the monitor. (The screen goes dark) OFF: The screen saver is not activated even if no operation is ...
... SETUP" on a network device connected to the "6. Notes: • The screen saver is not activated during the AUTO setting, the screen returns automatically to the top menu and the resolution is appropriate for the screen saver from the video signal that this unit. 1. Press the ENTER button to...9-band graphic equalizer for 10 minutes on the NETWORK screen or SETTING screen, the screen saver is activated on the CHECK AUTO 2 menu. 4. EQ ADJ These modes allow you are not indicated on the monitor. (The screen goes dark) OFF: The screen saver is not activated even if no operation is ...

AV8003 User Manua
Page 53
...THX ZONE SPEAKER 7.1CH INPUT SETUP MIC MENU EXIT ENTER UP HDMI 4. Or enter the preset station number with the lowest preset number is still blinking (approx. 5 seconds) 4. "PRESET SCAN" appears on the display. 5. Press < / > on the screen of the broadcast channels stored in the speci... 10 seconds each. STANDBY POWER ON/OFF INPUT SELECTOR PURE DIRECT M-DAX AV PRE TUNER AV8003 UP HDMI DOWN VOLUME SURROUND MODE AUTO PURE DIRECT PHONES ZONE THX ZONE SPEAKER 7.1CH INPUT SETUP MIC MENU EXIT ENTER BAND T-MODE MEMORY CLEAR TOP M-DAX DISPLAY 2. 2. 3. 1. Up to ...
...THX ZONE SPEAKER 7.1CH INPUT SETUP MIC MENU EXIT ENTER UP HDMI 4. Or enter the preset station number with the lowest preset number is still blinking (approx. 5 seconds) 4. "PRESET SCAN" appears on the display. 5. Press < / > on the screen of the broadcast channels stored in the speci... 10 seconds each. STANDBY POWER ON/OFF INPUT SELECTOR PURE DIRECT M-DAX AV PRE TUNER AV8003 UP HDMI DOWN VOLUME SURROUND MODE AUTO PURE DIRECT PHONES ZONE THX ZONE SPEAKER 7.1CH INPUT SETUP MIC MENU EXIT ENTER BAND T-MODE MEMORY CLEAR TOP M-DAX DISPLAY 2. 2. 3. 1. Up to ...
AV8003 User Manua
Page 62
.... STANDBY POWER ON/OFF INPUT SELECTOR PURE DIRECT M-DAX AV PRE TUNER AV8003 UP HDMI DOWN VOLUME SURROUND MODE AUTO PURE DIRECT PHONES ZONE THX ZONE SPEAKER 7.1CH INPUT SETUP MIC MENU EXIT ENTER BAND T-MODE MEMORY CLEAR TOP M-DAX DISPLAY 3. 3. 2. ...MODE". 2. PRESET SCAN 3. 3. 3. 5. 4. 4. 2. 2. 2. 5. 3. 5. 2. 5. Each channel can be skipped. 5. "PRESET SCAN" appears on screen display. 4. You can remove preset stations from the memory using the following procedure. 2. 3. Press the NEURAL button to TUNER mode. 2. Switch the remote controller to...
.... STANDBY POWER ON/OFF INPUT SELECTOR PURE DIRECT M-DAX AV PRE TUNER AV8003 UP HDMI DOWN VOLUME SURROUND MODE AUTO PURE DIRECT PHONES ZONE THX ZONE SPEAKER 7.1CH INPUT SETUP MIC MENU EXIT ENTER BAND T-MODE MEMORY CLEAR TOP M-DAX DISPLAY 3. 3. 2. ...MODE". 2. PRESET SCAN 3. 3. 3. 5. 4. 4. 2. 2. 2. 5. 3. 5. 2. 5. Each channel can be skipped. 5. "PRESET SCAN" appears on screen display. 4. You can remove preset stations from the memory using the following procedure. 2. 3. Press the NEURAL button to TUNER mode. 2. Switch the remote controller to...

AV8003 User Manua
Page 66
...SCAN button. 3. STANDBY POWER ON/OFF INPUT SELECTOR PURE DIRECT M-DAX AV PRE TUNER AV8003 UP HDMI DOWN VOLUME SURROUND MODE AUTO PURE DIRECT PHONES ZONE THX ZONE SPEAKER 7.1CH INPUT SETUP MIC MENU EXIT ENTER BAND T-MODE MEMORY CLEAR TOP M-DAX DISPLAY 3. 3. 2. 2. 4. (Using...SCAN" appears on the dispIay. --SR040 4. No stored preset number will be checked on the on the remote controller. press the P-SCAN button on screen display. 3. 3. 4. 4. 2. 2. (Using the remote controller) 1. Preset stations are 10 or more preset channel, Press the P-lNFO button. ...
...SCAN button. 3. STANDBY POWER ON/OFF INPUT SELECTOR PURE DIRECT M-DAX AV PRE TUNER AV8003 UP HDMI DOWN VOLUME SURROUND MODE AUTO PURE DIRECT PHONES ZONE THX ZONE SPEAKER 7.1CH INPUT SETUP MIC MENU EXIT ENTER BAND T-MODE MEMORY CLEAR TOP M-DAX DISPLAY 3. 3. 2. 2. 4. (Using...SCAN" appears on the dispIay. --SR040 4. No stored preset number will be checked on the on the remote controller. press the P-SCAN button on screen display. 3. 3. 4. 4. 2. 2. (Using the remote controller) 1. Preset stations are 10 or more preset channel, Press the P-lNFO button. ...
AV8003 User Manua
Page 69
... ZONE B settings. STANDBY POWER ON/OFF INPUT SELECTOR PURE DIRECT M-DAX AV PRE TUNER AV8003 UP HDMI DOWN VOLUME SURROUND MODE AUTO PURE DIRECT PHONES ZONE THX ZONE SPEAKER 7.1CH INPUT SETUP MIC MENU EXIT ENTER BAND T-MODE MEMORY CLEAR TOP M-DAX DISPLAY 1. Note: • The sleep... Also, the COMPONENT VIDEO MONITOR OUT 2 terminal can be used in a different ZONE or separated area for the monitor output of the following screens appears on the display for 10 seconds. * Display when ZONE SPEAKER A is linked to set for only one time accesses the ZONE A settings...
... ZONE B settings. STANDBY POWER ON/OFF INPUT SELECTOR PURE DIRECT M-DAX AV PRE TUNER AV8003 UP HDMI DOWN VOLUME SURROUND MODE AUTO PURE DIRECT PHONES ZONE THX ZONE SPEAKER 7.1CH INPUT SETUP MIC MENU EXIT ENTER BAND T-MODE MEMORY CLEAR TOP M-DAX DISPLAY 1. Note: • The sleep... Also, the COMPONENT VIDEO MONITOR OUT 2 terminal can be used in a different ZONE or separated area for the monitor output of the following screens appears on the display for 10 seconds. * Display when ZONE SPEAKER A is linked to set for only one time accesses the ZONE A settings...

AV8003 User Manua
Page 76
...1 2 Command 2.DSS MEMO DISPLAY TV/VCR AUDIO EJECT 2.DSS FAV ALT FTCH ANT Note Select DSS function Enter a recording program On screen channel marker Select TV/ VCR Select Audio mode Eject Select DSS function Fatvorite user channel list Alternate audio channel language Brings up * Reset ...the play speed up on screen channel logo Select broadcast or antenna CONTROLLING A MARANTZ CD PLAYER (CD MODE) ENGLISH SOURCE ON/OFF POWER ON POWER OFF Soft button HOME < / > ENTER MENU 2 4 / ¢ 9 ; 0-9, +10 CLEAR Turns the CD player on...
...1 2 Command 2.DSS MEMO DISPLAY TV/VCR AUDIO EJECT 2.DSS FAV ALT FTCH ANT Note Select DSS function Enter a recording program On screen channel marker Select TV/ VCR Select Audio mode Eject Select DSS function Fatvorite user channel list Alternate audio channel language Brings up * Reset ...the play speed up on screen channel logo Select broadcast or antenna CONTROLLING A MARANTZ CD PLAYER (CD MODE) ENGLISH SOURCE ON/OFF POWER ON POWER OFF Soft button HOME < / > ENTER MENU 2 4 / ¢ 9 ; 0-9, +10 CLEAR Turns the CD player on...
AV8003 User Manua
Page 80
... menu Temporarily stop audio output and cancel Switch input Adjust the PLASMA sound level List of soft buttons in the table below. Confirm selection on Turns the PLASMA off PLASMA ID SELECT M SCREEN 5 ...7 FULL STADIUM ZOOM 14:9 PLASMA 2.35:1 NORMAL 8 1THEATER2 DEFAULT BRIGHT Select TV function ID select Multi screen display ID clear Active screen select (Left) Select VIDEO1* (Right) Select VIDEO2* Select TV function (Left) Select VIDEO3* (Left... the PLASMA on menus, etc. CONTROLLING A MARANTZ PLASMA (PLASMA MODE) POWER ON POWER OFF Soft button HOME < / > INFO Cursor ENTER...
... menu Temporarily stop audio output and cancel Switch input Adjust the PLASMA sound level List of soft buttons in the table below. Confirm selection on Turns the PLASMA off PLASMA ID SELECT M SCREEN 5 ...7 FULL STADIUM ZOOM 14:9 PLASMA 2.35:1 NORMAL 8 1THEATER2 DEFAULT BRIGHT Select TV function ID select Multi screen display ID clear Active screen select (Left) Select VIDEO1* (Right) Select VIDEO2* Select TV function (Left) Select VIDEO3* (Left... the PLASMA on menus, etc. CONTROLLING A MARANTZ PLASMA (PLASMA MODE) POWER ON POWER OFF Soft button HOME < / > INFO Cursor ENTER...

AV8003 User Manua
Page 82
...play ENGLISH 79 OTHERS TROUBLESHOOTING REMOTE CONTROLLER ADVANCED OPERATION BASIC OPERATION SETUP CONNECTIONS NAMES AND FUNCTION CONTROLLING A MARANTZ BLU-RAY PLAYER (BLU-RAY MODE) POWER ON POWER OFF Soft button HOME < / > GUIDE INFO Cursor ENTER MENU EXIT 2 4 / ¢ 9 ; 0-9 CLEAR BLUE, RED, GREEN, YELLOW Turns the Blu... Calls up the menu of disc RETURN TO MENU Play Skip forward or previous track Stop Pause Input the numeric Clears the inputting Select item on some BD menus Note: If the BLUE, RED, GREEN, and YELLOW buttons on the screen Select SETUP MENU Change various menus ...
...play ENGLISH 79 OTHERS TROUBLESHOOTING REMOTE CONTROLLER ADVANCED OPERATION BASIC OPERATION SETUP CONNECTIONS NAMES AND FUNCTION CONTROLLING A MARANTZ BLU-RAY PLAYER (BLU-RAY MODE) POWER ON POWER OFF Soft button HOME < / > GUIDE INFO Cursor ENTER MENU EXIT 2 4 / ¢ 9 ; 0-9 CLEAR BLUE, RED, GREEN, YELLOW Turns the Blu... Calls up the menu of disc RETURN TO MENU Play Skip forward or previous track Stop Pause Input the numeric Clears the inputting Select item on some BD menus Note: If the BLUE, RED, GREEN, and YELLOW buttons on the screen Select SETUP MENU Change various menus ...
AV8003 User Manua
Page 85
... elapsed. • The setting is selected in the LCD, transmits the AV receiver DVD input command. Each time the button is a convenient function for Marantz AV Receiver. 82 SLEEP TIMER icon When the time that you want to the sleep timer are set is displayed, wait at the same time...to control in the RC2001. The preinstalled default user file is facing the infrared signal receiver on the LCD. 2. is displayed in the main menu. LEARNING FUNCTION 1. The screen appears as shown below . SLEEP 30 SLEEP 60 SLEEP 90 SLEEP OFF SLEEP 120 3. Hold down the Home button and...
... elapsed. • The setting is selected in the LCD, transmits the AV receiver DVD input command. Each time the button is a convenient function for Marantz AV Receiver. 82 SLEEP TIMER icon When the time that you want to the sleep timer are set is displayed, wait at the same time...to control in the RC2001. The preinstalled default user file is facing the infrared signal receiver on the LCD. 2. is displayed in the main menu. LEARNING FUNCTION 1. The screen appears as shown below . SLEEP 30 SLEEP 60 SLEEP 90 SLEEP OFF SLEEP 120 3. Hold down the Home button and...

AV8003 User Manua
Page 86
This screen changes to 6 again. Hold down the button until "LEARN OK" is displayed on the LCD. • Pressing the ENTER button enables you to delete any ... due to learn . 6. NAMES AND FUNCTION CONNECTIONS SETUP 4. This enters the learning standby mode. Send the remote controller code that you want to the MAIN MENU. To perform further learning, use the Wizz.it 3 editor to learn . • The RC2001 can no longer be performed. After selecting the device name, press...
This screen changes to 6 again. Hold down the button until "LEARN OK" is displayed on the LCD. • Pressing the ENTER button enables you to delete any ... due to learn . 6. NAMES AND FUNCTION CONNECTIONS SETUP 4. This enters the learning standby mode. Send the remote controller code that you want to the MAIN MENU. To perform further learning, use the Wizz.it 3 editor to learn . • The RC2001 can no longer be performed. After selecting the device name, press...
AV8003 User Manua
Page 87
..., press the ENTER button. Press the button next to the "TIMER SET" indicator in the LCD in the TIMER menu screen to either everyday or one-time only operation. 2. The TIMER menu is shown in Home mode. • Either press the ENTER button or wait three seconds for the timer. OTHERS ...; Either press the ENTER button or wait three seconds for the LCD to automatically return to the MAIN menu. • Pressing the Home button from the TIMER MENU screen returns the LCD to the MAIN MENU. 84 Note: The timer setting for the commands that will be sent by timer programming. • If ...
..., press the ENTER button. Press the button next to the "TIMER SET" indicator in the LCD in the TIMER menu screen to either everyday or one-time only operation. 2. The TIMER menu is shown in Home mode. • Either press the ENTER button or wait three seconds for the timer. OTHERS ...; Either press the ENTER button or wait three seconds for the LCD to automatically return to the MAIN menu. • Pressing the Home button from the TIMER MENU screen returns the LCD to the MAIN MENU. 84 Note: The timer setting for the commands that will be sent by timer programming. • If ...
AV8003 User Manua
Page 88
... enable or disable timer operation. 24 TIMER icon 3. Press the button next to the "ON/OFF" indicator in the TIMER menu screen on the LCD to display the timer operation ON/OFF setting screen. • Either press the ENTER button or wait three seconds for the LCD to automatically return to the MAIN...
... enable or disable timer operation. 24 TIMER icon 3. Press the button next to the "ON/OFF" indicator in the TIMER menu screen on the LCD to display the timer operation ON/OFF setting screen. • Either press the ENTER button or wait three seconds for the LCD to automatically return to the MAIN...
