Owners Manual
Page 2
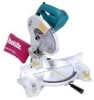
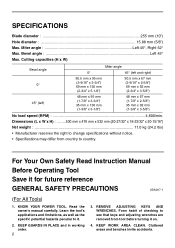
... Read Instruction Manual Before Operating Tool Save it . 2. Learn the tool's applications and limitations, as well as the specific potential hazards peculiar to country. KEEP GUARDS IN PLACE and in working order. 2 3. Form habit of checking to see that keys and adjusting wrenches are removed from country to it for future... SAFETY PRECAUTIONS USA007-1 (For All Tools) 1. KEEP WORK AREA CLEAN. Miter angle Left 45°, Right 52° Max. REMOVE ADJUSTING KEYS AND WRENCHES. SPECIFICATIONS Blade diameter 255 mm (10") Hole diameter 15.88 mm (5/8") Max.
... Read Instruction Manual Before Operating Tool Save it . 2. Learn the tool's applications and limitations, as well as the specific potential hazards peculiar to country. KEEP GUARDS IN PLACE and in working order. 2 3. Form habit of checking to see that keys and adjusting wrenches are removed from country to it for future... SAFETY PRECAUTIONS USA007-1 (For All Tools) 1. KEEP WORK AREA CLEAN. Miter angle Left 45°, Right 52° Max. REMOVE ADJUSTING KEYS AND WRENCHES. SPECIFICATIONS Blade diameter 255 mm (10") Hole diameter 15.88 mm (5/8") Max.
Owners Manual
Page 3
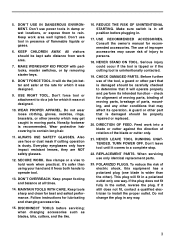
...17. 5. USE RIGHT TOOL. Everyday eyeglasses only have impact resistant lenses, they are NOT safety glasses. 12. when changing accessories such as blades, bits, cutters, and the like. 16. USE RECOMMENDED ACCESSORIES. Do not wear loose clothing, gloves, neckties, rings, bracelets, or other...changing accessories. 15. DON'T FORCE TOOL. Don't force tool or attachment to hold work into a blade or cutter against the direction of rotation of the tool, a guard or other conditions that is in off position before servicing; WEAR PROPER APPAREL. DON'T OVERREACH. CHECK ...
...17. 5. USE RIGHT TOOL. Everyday eyeglasses only have impact resistant lenses, they are NOT safety glasses. 12. when changing accessories such as blades, bits, cutters, and the like. 16. USE RECOMMENDED ACCESSORIES. Do not wear loose clothing, gloves, neckties, rings, bracelets, or other...changing accessories. 15. DON'T FORCE TOOL. Don't force tool or attachment to hold work into a blade or cutter against the direction of rotation of the tool, a guard or other conditions that is in off position before servicing; WEAR PROPER APPAREL. DON'T OVERREACH. CHECK ...
Owners Manual
Page 4
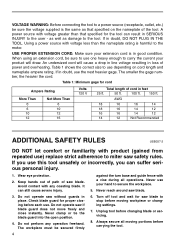
... to carry the current your product will cause a drop in line voltage resulting in good condition. Do not perform any coasting blade. Never reach around saw if blade guard does not move freely and close instantly. Wear eye protection. 2. Avoid contact with a vise during all moving workpiece or changing...cord length and nameplate ampere rating. Keep hands out of path of cord in SERIOUS INJURY to the user - Never clamp or tie the blade guard into the open position. 4. A power source with voltage greater than the nameplate rating is harmful to the motor. Table 1: Minimum gage ...
... to carry the current your product will cause a drop in line voltage resulting in good condition. Do not perform any coasting blade. Never reach around saw if blade guard does not move freely and close instantly. Wear eye protection. 2. Avoid contact with a vise during all moving workpiece or changing...cord length and nameplate ampere rating. Keep hands out of path of cord in SERIOUS INJURY to the user - Never clamp or tie the blade guard into the open position. 4. A power source with voltage greater than the nameplate rating is harmful to the motor. Table 1: Minimum gage ...
Owners Manual
Page 8
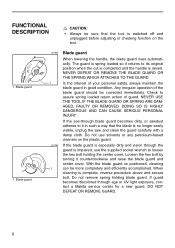
... completed and the handle is raised. In the interest of the blade guard should be more completely and efficiently accomplished. If the blade guard is especially dirty and vision through age or UV light exposure, contact a Makita service center for a new guard. Blade guard 1. DO NOT DEFEAT OR REMOVE GUARD. 8 FUNCTIONAL DESCRIPTION CAUTION: • Always be sure that the...
... completed and the handle is raised. In the interest of the blade guard should be more completely and efficiently accomplished. If the blade guard is especially dirty and vision through age or UV light exposure, contact a Makita service center for a new guard. Blade guard 1. DO NOT DEFEAT OR REMOVE GUARD. 8 FUNCTIONAL DESCRIPTION CAUTION: • Always be sure that the...
Owners Manual
Page 11
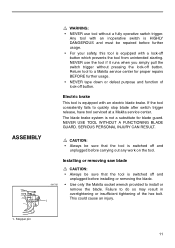
... function of the hex bolt. Failure to a Makita service center for blade guard. NEVER use tool without pressing the lock-off and unplugged before installing or removing the blade. • Use only the Makita socket wrench provided to quickly stop blade after switch trigger release, have tool serviced at a Makita service center. SERIOUS PERSONAL INJURY CAN RESULT...
... function of the hex bolt. Failure to a Makita service center for blade guard. NEVER use tool without pressing the lock-off and unplugged before installing or removing the blade. • Use only the Makita socket wrench provided to quickly stop blade after switch trigger release, have tool serviced at a Makita service center. SERIOUS PERSONAL INJURY CAN RESULT...
Owners Manual
Page 12
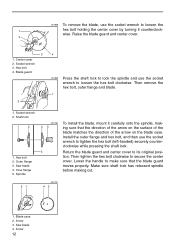
...to loosen the hex bolt clockwise. Raise the blade guard and center cover. 3 2 1. Hex bolt 2. Lower the handle to make sure that the direction of the arrow on the surface of the blade matches the direction of the arrow on the blade case. Arrow 3. Shaft lock 1 2 ...1. Arrow 12 Center cover 2. Outer flange 3. Saw blade 4. clockwise while pressing the shaft lock. 3 Return the blade guard and center cover to secure the center cover. Blade guard 2 4 001859 ...
...to loosen the hex bolt clockwise. Raise the blade guard and center cover. 3 2 1. Hex bolt 2. Lower the handle to make sure that the direction of the arrow on the surface of the blade matches the direction of the arrow on the blade case. Arrow 3. Shaft lock 1 2 ...1. Arrow 12 Center cover 2. Outer flange 3. Saw blade 4. clockwise while pressing the shaft lock. 3 Return the blade guard and center cover to secure the center cover. Blade guard 2 4 001859 ...
Owners Manual
Page 25
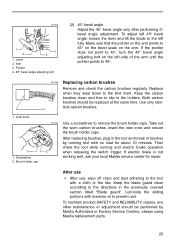
...Makita service center for about 10 minutes. To maintain product SAFETY and RELIABILITY, repairs, any other maintenance or adjustment should be performed by running and electric brake operation when releasing the switch trigger. Lubricate the sliding portions with no load for repair. Keep the blade guard... clean according to slip in the previously covered section titled "Blade guard". Limit mark 1 1. Keep the carbon brushes clean and free to the directions in ...
...Makita service center for about 10 minutes. To maintain product SAFETY and RELIABILITY, repairs, any other maintenance or adjustment should be performed by running and electric brake operation when releasing the switch trigger. Lubricate the sliding portions with no load for repair. Keep the blade guard... clean according to slip in the previously covered section titled "Blade guard". Limit mark 1 1. Keep the carbon brushes clean and free to the directions in ...
Parts Breakdown
Page 3
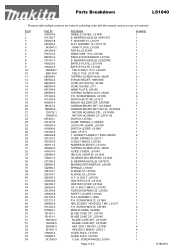
... GUIDE RULE, LS1040 GUIDE RULE, LS1040 C.S.H. BEARING 6202LLB, NHP1310 F. SPRING 3, HR2400 LOCK OFF LEVER, LS1040 SWITCH LEVER, LS1040 CAM, LS1011 T. WASHER 15, LS1211 FLAT WASHER 15, LS1011N SHAFT LOCK, LS1030 FAN 80, LS1030N ARMATURE 115V, LS1040 INSULATION WASHER, LS1040 B. SCREW FLANGE PT 5X65,JR3020 COMP. F. SCREW M5X16, 4301BV MAKITA MARK, 5402NA BLADE CASE CP., LS1040 BLADE CASE CP., LS1040 BLADE CASE SET...
... GUIDE RULE, LS1040 GUIDE RULE, LS1040 C.S.H. BEARING 6202LLB, NHP1310 F. SPRING 3, HR2400 LOCK OFF LEVER, LS1040 SWITCH LEVER, LS1040 CAM, LS1011 T. WASHER 15, LS1211 FLAT WASHER 15, LS1011N SHAFT LOCK, LS1030 FAN 80, LS1030N ARMATURE 115V, LS1040 INSULATION WASHER, LS1040 B. SCREW FLANGE PT 5X65,JR3020 COMP. F. SCREW M5X16, 4301BV MAKITA MARK, 5402NA BLADE CASE CP., LS1040 BLADE CASE CP., LS1040 BLADE CASE SET...


