
Owners Manual
Page 2
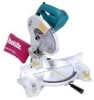
... notice. • Specifications may differ from tool before turning it for future reference GENERAL SAFETY PRECAUTIONS USA007-1 (For All Tools) 1. KNOW YOUR POWER TOOL. KEEP GUARDS IN PLACE and in working order. 2 3. Bevel angle : ...Left 45° Max. SPECIFICATIONS Blade diameter 255 mm (10") Hole diameter 15.88 mm (5/8") Max. Cutting...
... notice. • Specifications may differ from tool before turning it for future reference GENERAL SAFETY PRECAUTIONS USA007-1 (For All Tools) 1. KNOW YOUR POWER TOOL. KEEP GUARDS IN PLACE and in working order. 2 3. Bevel angle : ...Left 45° Max. SPECIFICATIONS Blade diameter 255 mm (10") Hole diameter 15.88 mm (5/8") Max. Cutting...
Owners Manual
Page 3
... UNATTENDED. This plug will operate properly and perform its operation. DISCONNECT TOOLS before plugging in moving parts, breakage of the tool, a guard or other part that is damaged should be kept safe distance from work into a blade or cutter against the direction of rotation of ...Follow instructions for which may affect its intended function - Make sure switch is wider than using your hand and it was designed. 9. A guard or other part that is dusty. When servicing use face or dust mask if cutting operation is damaged should be properly repaired or replaced. 20...
... UNATTENDED. This plug will operate properly and perform its operation. DISCONNECT TOOLS before plugging in moving parts, breakage of the tool, a guard or other part that is damaged should be kept safe distance from work into a blade or cutter against the direction of rotation of ...Follow instructions for which may affect its intended function - Make sure switch is wider than using your hand and it was designed. 9. A guard or other part that is dusty. When servicing use face or dust mask if cutting operation is damaged should be properly repaired or replaced. 20...
Owners Manual
Page 4
...place. If you use the next heavier gage. Keep hands out of path of power and overheating. Never clamp or tie the blade guard into the open position. 4. Do not perform any coasting blade. Turn off tool and wait for saw blade to stop before moving ... line voltage resulting in good condition. Wear eye protection. 2. Do not operate saw blade. 6. Using a power source with any operation freehand. Check blade guard for proper closing before changing blade or servicing. 8. VOLTAGE WARNING: Before connecting the tool to a power source (receptacle, outlet, etc.) be sure the...
...place. If you use the next heavier gage. Keep hands out of path of power and overheating. Never clamp or tie the blade guard into the open position. 4. Do not perform any coasting blade. Turn off tool and wait for saw blade to stop before moving ... line voltage resulting in good condition. Wear eye protection. 2. Do not operate saw blade. 6. Using a power source with any operation freehand. Check blade guard for proper closing before changing blade or servicing. 8. VOLTAGE WARNING: Before connecting the tool to a power source (receptacle, outlet, etc.) be sure the...
Owners Manual
Page 8
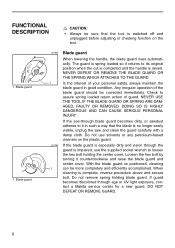
.... Do not use the supplied socket wrench to it counterclockwise and raise the blade guard and center cover. If the blade guard is especially dirty and vision through age or UV light exposure, contact a Makita service center for a new guard. FUNCTIONAL DESCRIPTION CAUTION: • Always be sure that the blade is no longer easily...
.... Do not use the supplied socket wrench to it counterclockwise and raise the blade guard and center cover. If the blade guard is especially dirty and vision through age or UV light exposure, contact a Makita service center for a new guard. FUNCTIONAL DESCRIPTION CAUTION: • Always be sure that the blade is no longer easily...
Owners Manual
Page 11
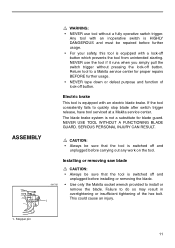
... tool is equipped with an electric blade brake. NEVER USE TOOL WITHOUT A FUNCTIONING BLADE GUARD. Failure to quickly stop blade after switch trigger release, have tool serviced at a Makita service center. Electric brake This tool is switched off and unplugged before installing or removing the... blade. • Use only the Makita socket wrench provided to a Makita service center for blade guard. Stopper pin 11 SERIOUS PERSONAL INJURY CAN RESULT. The blade brake system is switched off and unplugged...
... tool is equipped with an electric blade brake. NEVER USE TOOL WITHOUT A FUNCTIONING BLADE GUARD. Failure to quickly stop blade after switch trigger release, have tool serviced at a Makita service center. Electric brake This tool is switched off and unplugged before installing or removing the... blade. • Use only the Makita socket wrench provided to a Makita service center for blade guard. Stopper pin 11 SERIOUS PERSONAL INJURY CAN RESULT. The blade brake system is switched off and unplugged...
Owners Manual
Page 12
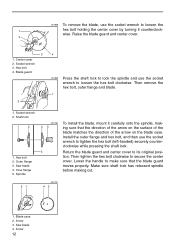
... that the direction of the arrow on the surface of the blade matches the direction of the arrow on the blade case. Saw blade 4. Blade guard 2 4 001859 Press the shaft lock to lock the spindle and use the socket wrench to its original posi- Socket wrench 2. Hex bolt 2. ...Inner flange 5. clockwise while pressing the shaft lock. 3 Return the blade guard and center cover to loosen the hex bolt clockwise. Socket wrench 3. Saw blade 4. Then tighten the hex bolt clockwise to tighten the hex bolt (...
... that the direction of the arrow on the surface of the blade matches the direction of the arrow on the blade case. Saw blade 4. Blade guard 2 4 001859 Press the shaft lock to lock the spindle and use the socket wrench to its original posi- Socket wrench 2. Hex bolt 2. ...Inner flange 5. clockwise while pressing the shaft lock. 3 Return the blade guard and center cover to loosen the hex bolt clockwise. Socket wrench 3. Saw blade 4. Then tighten the hex bolt clockwise to tighten the hex bolt (...
Owners Manual
Page 25
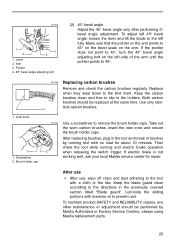
...and tilt the blade to the left side of the arm until the pointer points to slip in the previously covered section titled "Blade guard". Brush holder cap 001145 Replacing carbon brushes Remove and check the carbon brushes regularly. To maintain product SAFETY and RELIABILITY, repairs, any...switch trigger. If the pointer does not point to the directions in the holders. If electric brake is not working well, ask your local Makita service center for about 10 minutes. Screwdriver 2. Lubricate the sliding portions with a cloth or the like. Replace when they wear down to ...
...and tilt the blade to the left side of the arm until the pointer points to slip in the previously covered section titled "Blade guard". Brush holder cap 001145 Replacing carbon brushes Remove and check the carbon brushes regularly. To maintain product SAFETY and RELIABILITY, repairs, any...switch trigger. If the pointer does not point to the directions in the holders. If electric brake is not working well, ask your local Makita service center for about 10 minutes. Screwdriver 2. Lubricate the sliding portions with a cloth or the like. Replace when they wear down to ...
Parts Breakdown
Page 3
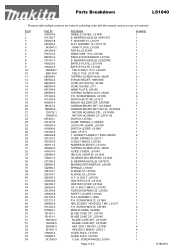
...115V, LS1045 FIELD 115V, LS1011N TAPPING SCREW 4X18, 4323K STRAIN RELIEF, HM1500B CORD (2X14X8 SJ), 2414B CORD GUARD, 2711 NAME PLATE, LS1040 TAPPING SCREW 4X18, 4323K P.H. H. Parts Breakdown LS1040 Products with multiple versions are listed in subsiding order with the newest version on top not indented Fig # 1... Name HANDLE COVER, LS1040 B. SCREW M5X16, 4301BV MAKITA MARK, 5402NA BLADE CASE CP., LS1040 BLADE CASE CP., LS1040 BLADE CASE SET, LS1040F BLADE CASE SET, LS1040F HEX. BOLT M8 X30, LS1040 HEX BOLT M8X30, LS1011 GUIDE RULE, LS1040 GUIDE RULE, LS1040 C.S.H. BOLT M8X75, ...
...115V, LS1045 FIELD 115V, LS1011N TAPPING SCREW 4X18, 4323K STRAIN RELIEF, HM1500B CORD (2X14X8 SJ), 2414B CORD GUARD, 2711 NAME PLATE, LS1040 TAPPING SCREW 4X18, 4323K P.H. H. Parts Breakdown LS1040 Products with multiple versions are listed in subsiding order with the newest version on top not indented Fig # 1... Name HANDLE COVER, LS1040 B. SCREW M5X16, 4301BV MAKITA MARK, 5402NA BLADE CASE CP., LS1040 BLADE CASE CP., LS1040 BLADE CASE SET, LS1040F BLADE CASE SET, LS1040F HEX. BOLT M8 X30, LS1040 HEX BOLT M8X30, LS1011 GUIDE RULE, LS1040 GUIDE RULE, LS1040 C.S.H. BOLT M8X75, ...


