

Owners Manual
Page 2
.... KEEP WORK AREA CLEAN. Learn the tool's applications and limitations, as well as the specific potential hazards peculiar to change specifications without notice. • Specifications may differ from tool before turning it for future reference GENERAL SAFETY PRECAUTIONS USA007-1 ...5-1/8") 48 mm x 67 mm (1-7/8" x 2-5/8") 35 mm x 92 mm (1-3/8" x 3-5/8") No load speed (RPM 4,600/min. KNOW YOUR POWER TOOL. SPECIFICATIONS Blade diameter 255 mm (10") Hole diameter 15.88 mm (5/8") Max. Bevel angle : ...Left 45° Max. KEEP GUARDS IN PLACE and in working order. 2...
.... KEEP WORK AREA CLEAN. Learn the tool's applications and limitations, as well as the specific potential hazards peculiar to change specifications without notice. • Specifications may differ from tool before turning it for future reference GENERAL SAFETY PRECAUTIONS USA007-1 ...5-1/8") 48 mm x 67 mm (1-7/8" x 2-5/8") 35 mm x 92 mm (1-3/8" x 3-5/8") No load speed (RPM 4,600/min. KNOW YOUR POWER TOOL. SPECIFICATIONS Blade diameter 255 mm (10") Hole diameter 15.88 mm (5/8") Max. Bevel angle : ...Left 45° Max. KEEP GUARDS IN PLACE and in working order. 2...
Owners Manual
Page 3
.... Nonslip footwear is damaged should be properly repaired or replaced. 20. Use clamps or a vise to contain long hair. 11. when changing accessories such as blades, bits, cutters, and the like. 16. check for which it was designed. 9. This plug will fit in moving parts, breakage of...damaged should be carefully checked to determine that it frees both hands to rain. Keep tools sharp and clean for lubricating and changing accessories. 15. Follow instructions for best and safest performance. CHECK DAMAGED PARTS. Before further use face or dust mask if cutting...
.... Nonslip footwear is damaged should be properly repaired or replaced. 20. Use clamps or a vise to contain long hair. 11. when changing accessories such as blades, bits, cutters, and the like. 16. check for which it was designed. 9. This plug will fit in moving parts, breakage of...damaged should be carefully checked to determine that it frees both hands to rain. Keep tools sharp and clean for lubricating and changing accessories. 15. Follow instructions for best and safest performance. CHECK DAMAGED PARTS. Before further use face or dust mask if cutting...

Owners Manual
Page 4
... product will cause a drop in line voltage resulting in loss of the tool. Turn off tool and wait for proper closing before changing blade or servicing. 8. USE PROPER EXTENSION CORD. An undersized cord will draw. Keep hands out of path of cord in place. Do not...voltage supplied is the same as damage to secure the workpiece. 5. A power source with a vise during all moving portions before moving workpiece or changing settings. 7. Using a power source with product (gained from repeated use) replace strict adherence to use this tool unsafely or incorrectly, you can ...
... product will cause a drop in line voltage resulting in loss of the tool. Turn off tool and wait for proper closing before changing blade or servicing. 8. USE PROPER EXTENSION CORD. An undersized cord will draw. Keep hands out of path of cord in place. Do not...voltage supplied is the same as damage to secure the workpiece. 5. A power source with a vise during all moving portions before moving workpiece or changing settings. 7. Using a power source with product (gained from repeated use) replace strict adherence to use this tool unsafely or incorrectly, you can ...
Owners Manual
Page 10
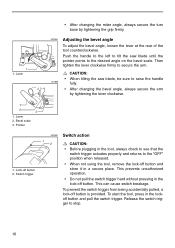
...to the desired angle on the bevel scale. Push the handle to the left to tilt the saw blade, be sure to raise the handle 001865 fully. • After changing the bevel angle, always secure the arm by tightening the grip firmly. 001864 Adjusting the bevel angle... button is provided. This prevents unauthorized operation. • Do not pull the switch trigger hard without pressing in a secure place. Lever • After changing the miter angle, always secure the turn base by tightening the lever clockwise. 1 2 3 1. Then tighten the lever clockwise firmly to stop. 10 ...
...to the desired angle on the bevel scale. Push the handle to the left to tilt the saw blade, be sure to raise the handle 001865 fully. • After changing the bevel angle, always secure the arm by tightening the grip firmly. 001864 Adjusting the bevel angle... button is provided. This prevents unauthorized operation. • Do not pull the switch trigger hard without pressing in a secure place. Lever • After changing the miter angle, always secure the turn base by tightening the lever clockwise. 1 2 3 1. Then tighten the lever clockwise firmly to stop. 10 ...


