
User manual, English (US)
Page 4
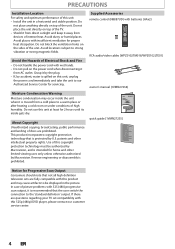
... by the plug. • If, by Macrovision. Do not place the unit directly on top of discs are prohibited. Do not use this 525p (480p) DVD player, please contact our customer service center. 4 EN If there are fully compatible with insufficient ventilation for home and other intellectual property rights. Use of...
... by the plug. • If, by Macrovision. Do not place the unit directly on top of discs are prohibited. Do not use this 525p (480p) DVD player, please contact our customer service center. 4 EN If there are fully compatible with insufficient ventilation for home and other intellectual property rights. Use of...
User manual, English (US)
Page 5
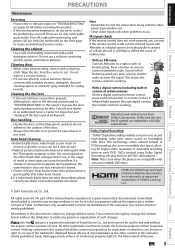
...inspection and cleaning of PCM recording, also saves recordable disc space, allowing for higher video resolution or extended recording time on each DVD. Note • Remember to read the instructions along with the video head cleaner before returning the product. • If this ...problem. Dolby and the double-D symbol are no broadcasting. The technology, when utilized instead of the laser optical pickup unit. DVDs created using Dolby Digital Recording will be construed as granting, by yourself. Playback Editing Function Setup VCR Functions Others © 2009 Funai...
...inspection and cleaning of PCM recording, also saves recordable disc space, allowing for higher video resolution or extended recording time on each DVD. Note • Remember to read the instructions along with the video head cleaner before returning the product. • If this ...problem. Dolby and the double-D symbol are no broadcasting. The technology, when utilized instead of the laser optical pickup unit. DVDs created using Dolby Digital Recording will be construed as granting, by yourself. Playback Editing Function Setup VCR Functions Others © 2009 Funai...
User manual, English (US)
Page 6
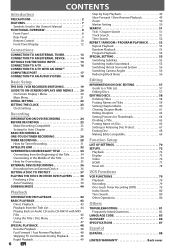
... . . 20 On-Screen Display / Menu 20 Main Menu 21 INITIAL SETTING 22 SETTING THE CLOCK 23 Clock Setting 23 Recording INFORMATION ON DVD RECORDING 24 BEFORE RECORDING 25 Make Recording Compatible 25 Setting for Auto Chapter 25 BASIC RECORDING & ONE-TOUCH TIMER RECORDING 26 TIMER RECORDING 28...34 Hints for Overwriting 35 EXTERNAL DEVICE RECORDING 36 Recording from an External Device 36 SETTING A DISC TO PROTECT 37 PLAYING THE DISCS IN OTHER DVD PLAYERS . . . . . 38 Finalizing a Disc 38 Auto Finalizing 39 DUBBING MODE 40 Playback INFORMATION ON PLAYBACK 42 BASIC PLAYBACK 43 ...
... . . 20 On-Screen Display / Menu 20 Main Menu 21 INITIAL SETTING 22 SETTING THE CLOCK 23 Clock Setting 23 Recording INFORMATION ON DVD RECORDING 24 BEFORE RECORDING 25 Make Recording Compatible 25 Setting for Auto Chapter 25 BASIC RECORDING & ONE-TOUCH TIMER RECORDING 26 TIMER RECORDING 28...34 Hints for Overwriting 35 EXTERNAL DEVICE RECORDING 36 Recording from an External Device 36 SETTING A DISC TO PROTECT 37 PLAYING THE DISCS IN OTHER DVD PLAYERS . . . . . 38 Finalizing a Disc 38 Auto Finalizing 39 DUBBING MODE 40 Playback INFORMATION ON PLAYBACK 42 BASIC PLAYBACK 43 ...
User manual, English (US)
Page 7
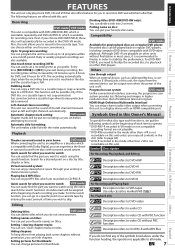
... input as you prefer. Symbol Description For Recording, Playing Back, and Editing Description refers to DVD+RW Description refers to DVD+R Description refers to DVD-RW Description refers to DVD-R Quick search for what you want to watch using the search function. Setting pictures for thumbnails.... HDMI (High-Definition Multimedia Interface) You can set a recording time as left and right channels automatically. Symbols Used in the DVD+VR mode. An index mark will automatically be output even when the power of each recording you make. Setting / clearing chapter marks...
... input as you prefer. Symbol Description For Recording, Playing Back, and Editing Description refers to DVD+RW Description refers to DVD+R Description refers to DVD-RW Description refers to DVD-R Quick search for what you want to watch using the search function. Setting pictures for thumbnails.... HDMI (High-Definition Multimedia Interface) You can set a recording time as left and right channels automatically. Symbols Used in the DVD+VR mode. An index mark will automatically be output even when the power of each recording you make. Setting / clearing chapter marks...
User manual, English (US)
Page 8
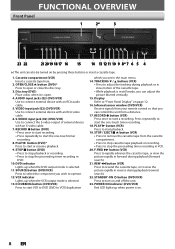
...stop cassette tape playback or recording. • Press to stop the proceeding timer recording in forward during playback (forward search). 21. STOP C button (DVD) • Press to stop playback or recording. • Press to stop the proceeding timer recording in reverse during playback or in the main menu. ...14. SOURCE button (DVD/VCR) Press to start playback. 19. RECORD I button (VCR) Press once to select the component you can also be turned on page 12....
...stop cassette tape playback or recording. • Press to stop the proceeding timer recording in forward during playback (forward search). 21. STOP C button (DVD) • Press to stop playback or recording. • Press to stop the proceeding timer recording in reverse during playback or in the main menu. ...14. SOURCE button (DVD/VCR) Press to start playback. 19. RECORD I button (VCR) Press once to select the component you can also be turned on page 12....
User manual, English (US)
Page 9
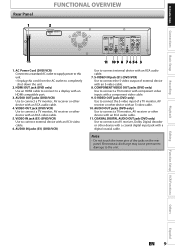
... cable to connect to connect a TV monitor, AV receiver or other device with a coaxial digital input jack with an S-video cable. 10. AUDIO OUT jacks (DVD only) Use to a display with an RCA video cable. 6. Note • Do not touch the inner pins of a TV monitor, AV receiver or other ...device with a digital coaxial cable. AC Power Cord (DVD/VCR) Connect to a standard AC outlet to supply power to this unit. • Unplug this cord from the AC outlet to the unit. Electrostatic discharge...
... cable to connect to connect a TV monitor, AV receiver or other device with a coaxial digital input jack with an S-video cable. 10. AUDIO OUT jacks (DVD only) Use to a display with an RCA video cable. 6. Note • Do not touch the inner pins of a TV monitor, AV receiver or other ...device with a digital coaxial cable. AC Power Cord (DVD/VCR) Connect to a standard AC outlet to supply power to this unit. • Unplug this cord from the AC outlet to the unit. Electrostatic discharge...
User manual, English (US)
Page 11
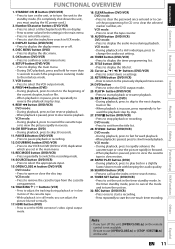
... to rapidly advance the cassette tape or view the picture rapidly in forward. • When playback is in the timer standby mode. DISC MENU button (DVD) • Press to exit from the cassette compartment. 16.TRACKING / buttons (VCR) • Press to VCR) duplication which you must unplug the AC power... • Press to start the index/time search in pause, press repeatedly to call up the index or time search menu. 31. CLEAR button (DVD/VCR) DVD mode: • Press to clear the password once entered or to cancel the programming for the settings in the main menu. • Press to enter...
... to rapidly advance the cassette tape or view the picture rapidly in forward. • When playback is in the timer standby mode. DISC MENU button (DVD) • Press to exit from the cassette compartment. 16.TRACKING / buttons (VCR) • Press to VCR) duplication which you must unplug the AC power... • Press to start the index/time search in pause, press repeatedly to call up the index or time search menu. 31. CLEAR button (DVD/VCR) DVD mode: • Press to clear the password once entered or to cancel the programming for the settings in the main menu. • Press to enter...
User manual, English (US)
Page 12
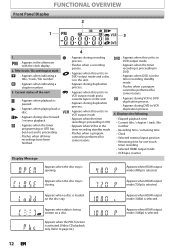
... : Flashes when all timer recordings have been finished. : Appears during recording process. : Flashes when a recording pauses. : Appears when this unit is in DVD output mode and a disc is in the unit. : Appears during duplication process. : Appears when this unit is in VCR output mode and a cassette tape...tray is in the afternoon with the clock display. 2. VCR : Appears when this unit is in DVD output mode. : Appears when the timer recording is proceeding in DVD. : Appears when DVD is opening. DVD : Appears when this unit is in VCR output mode. : Appears when the timer recording is ...
... : Flashes when all timer recordings have been finished. : Appears during recording process. : Flashes when a recording pauses. : Appears when this unit is in DVD output mode and a disc is in the unit. : Appears during duplication process. : Appears when this unit is in VCR output mode and a cassette tape...tray is in the afternoon with the clock display. 2. VCR : Appears when this unit is in DVD output mode. : Appears when the timer recording is proceeding in DVD. : Appears when DVD is opening. DVD : Appears when this unit is in VCR output mode. : Appears when the timer recording is ...
User manual, English (US)
Page 13
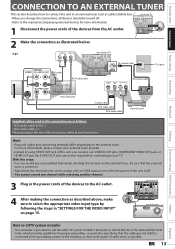
... record any unscrambled channel by selecting the channel on page 15. EN 13 RF coaxial cable ANT. IN Cable TV company rear of your TV DVD/VCR S-VIDEO IN ---AUDIO---OUT L RCA audio cable RCA video cable HDMI OUT IN R IN ---VIDEO---OUT DIGITAL AUDIO OUT... DVD AUDIO S-VIDEO COMPONENT S-VIDEO OUT VIDEO OUT Y DVD/VCR IN ---AUDIO---OUT L L PB /CB IN PR /CR R R IN ---VIDEO---OUT rear of this unit, you change the connections, all devices should banetentnuarned...
... record any unscrambled channel by selecting the channel on page 15. EN 13 RF coaxial cable ANT. IN Cable TV company rear of your TV DVD/VCR S-VIDEO IN ---AUDIO---OUT L RCA audio cable RCA video cable HDMI OUT IN R IN ---VIDEO---OUT DIGITAL AUDIO OUT... DVD AUDIO S-VIDEO COMPONENT S-VIDEO OUT VIDEO OUT Y DVD/VCR IN ---AUDIO---OUT L L PB /CB IN PR /CR R R IN ---VIDEO---OUT rear of this unit, you change the connections, all devices should banetentnuarned...
User manual, English (US)
Page 14
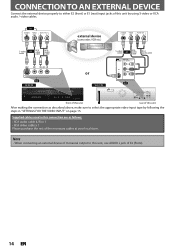
...(camcorder, VCR etc.) S-VIDEO VIDEO OUT OUT AUDIO OUT R L S-video cable or RCA video cable RCA audio cable or S-video cable or RCA video cable DVD/VCR S-VIDEO IN ---AUDIO---OUT L L IN R R IN ---VIDEO---OUT RCA audio cable E2 to E2 IN to E1 IN HDMI OUT E1 DIGITAL AUDIO ...OUT DVD DVD/VCR AUDIO S-VIDEO COMPONENT S-VIDEO IN ---AUDIO---OUT OUT VIDEO OUT Y L L COAXIAL R IN R R IN ---VIDEO---OUT front of this unit rear of this unit ...
...(camcorder, VCR etc.) S-VIDEO VIDEO OUT OUT AUDIO OUT R L S-video cable or RCA video cable RCA audio cable or S-video cable or RCA video cable DVD/VCR S-VIDEO IN ---AUDIO---OUT L L IN R R IN ---VIDEO---OUT RCA audio cable E2 to E2 IN to E1 IN HDMI OUT E1 DIGITAL AUDIO ...OUT DVD DVD/VCR AUDIO S-VIDEO COMPONENT S-VIDEO IN ---AUDIO---OUT OUT VIDEO OUT Y L L COAXIAL R IN R R IN ---VIDEO---OUT front of this unit rear of this unit ...
User manual, English (US)
Page 16
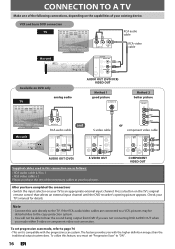
... to a VCR, pictures may be distorted due to the copy protection system. • You will not be able to hear the sound being output from DVD if you are as follows: • RCA audio cable (L/R) x 1 • RCA video cable x 1 Please purchase the rest of your TV's manual for ...video or component video out connection. Press a button on the TV's original remote control that selects an external input channel until the DVD recorder's opening picture appears. VCR and basic DVD connection TV RCA audio cable R L VIDEO AUDIO IN IN RCA video cable this unit HDMI OUT DIGITAL AUDIO OUT...
... to a VCR, pictures may be distorted due to the copy protection system. • You will not be able to hear the sound being output from DVD if you are as follows: • RCA audio cable (L/R) x 1 • RCA video cable x 1 Please purchase the rest of your TV's manual for ...video or component video out connection. Press a button on the TV's original remote control that selects an external input channel until the DVD recorder's opening picture appears. VCR and basic DVD connection TV RCA audio cable R L VIDEO AUDIO IN IN RCA video cable this unit HDMI OUT DIGITAL AUDIO OUT...
User manual, English (US)
Page 17
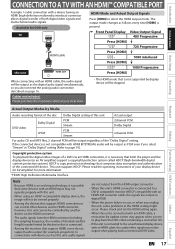
... unit, audio signals are output in digital RGB. • When the power failure occurs, or when you do not support audio output (for DVD only TV HDMI IN this unit HDMI cable HDMI OUT HDMI Mode and Actual Output Signals Press [HDMI] to a DVI-D compatible monitor (HDCP compatible... (or an AV amplifier) support a copyright protection system called HDCP (high-bandwidth digital content protection system). Copyright protection system To play back the DVD-video containing a revocation list. • If the unit is connected to page 70). Others Español EN 17 The output mode changes ...
... unit, audio signals are output in digital RGB. • When the power failure occurs, or when you do not support audio output (for DVD only TV HDMI IN this unit HDMI cable HDMI OUT HDMI Mode and Actual Output Signals Press [HDMI] to a DVI-D compatible monitor (HDCP compatible... (or an AV amplifier) support a copyright protection system called HDCP (high-bandwidth digital content protection system). Copyright protection system To play back the DVD-video containing a revocation list. • If the unit is connected to page 70). Others Español EN 17 The output mode changes ...
User manual, English (US)
Page 18
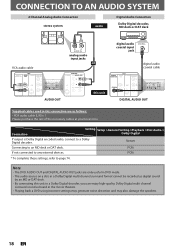
... S-VIDEO COMPONENT OUT VIDEO OUT Y HDMI OUT L OUT PB /CB COAXIAL R PR /CR digital audio coaxial cable DIGITAL AUDIO OUT DVD DVD/VCR AUDIO S-VIDEO COMPONENT S-VIDEO IN ---AUDIO---OUT OUT VIDEO OUT Y L L COAXIAL L OUT R PB /CB IN PR /CR R R IN ---VIDEO---OUT DIGITAL AUDIO OUT... Supplied cables used in this connection are only useful in DVD mode. • The audio source on a disc in a Dolby Digital multi channel surround format cannot be recorded as digital sound by an MD or DAT...
... S-VIDEO COMPONENT OUT VIDEO OUT Y HDMI OUT L OUT PB /CB COAXIAL R PR /CR digital audio coaxial cable DIGITAL AUDIO OUT DVD DVD/VCR AUDIO S-VIDEO COMPONENT S-VIDEO IN ---AUDIO---OUT OUT VIDEO OUT Y L L COAXIAL L OUT R PB /CB IN PR /CR R R IN ---VIDEO---OUT DIGITAL AUDIO OUT... Supplied cables used in this connection are only useful in DVD mode. • The audio source on a disc in a Dolby Digital multi channel surround format cannot be recorded as digital sound by an MD or DAT...
User manual, English (US)
Page 19
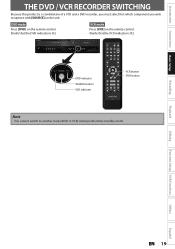
.... (Verify that the VCR indicator is lit.) VCR mode Press [VCR] on the unit. Introduction Connections Basic Setup THE DVD / VCR RECORDER SWITCHING Because this product is a combination of a VCR and a DVD recorder, you must select first which component you wish to operate with [SOURCE] on the remote control. (Verify that the...
.... (Verify that the VCR indicator is lit.) VCR mode Press [VCR] on the unit. Introduction Connections Basic Setup THE DVD / VCR RECORDER SWITCHING Because this product is a combination of a VCR and a DVD recorder, you must select first which component you wish to operate with [SOURCE] on the remote control. (Verify that the...
User manual, English (US)
Page 20
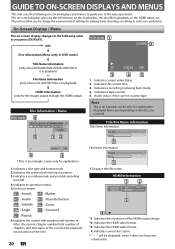
...: Angle : Surround : Repeat 6. Displays title/file name. OFF VCR mode 1 12:00AM 2 Disc Information/Menu (only in DVD mode) Title Name Information (only when DVD+RW/DVD+R/DVD-RW/DVD-R is in playback) or File Name Information (only when a CD with MP3 files is in playback, or the HDMI status, etc...loaded disc, the disc/file in playback) HDMI Information (only for the images output through the HDMI output) Disc Information / Menu DVD mode 6 1/ 5 1/ 5 0:01:00 / 1:23:45 DVD Video E1 (Rear) 5 12 SP(2Hr) 1:53 4 3 * This is an example screen only for playing back, recording,...
...: Angle : Surround : Repeat 6. Displays title/file name. OFF VCR mode 1 12:00AM 2 Disc Information/Menu (only in DVD mode) Title Name Information (only when DVD+RW/DVD+R/DVD-RW/DVD-R is in playback) or File Name Information (only when a CD with MP3 files is in playback, or the HDMI status, etc...loaded disc, the disc/file in playback) HDMI Information (only for the images output through the HDMI output) Disc Information / Menu DVD mode 6 1/ 5 1/ 5 0:01:00 / 1:23:45 DVD Video E1 (Rear) 5 12 SP(2Hr) 1:53 4 3 * This is an example screen only for playing back, recording,...
User manual, English (US)
Page 21
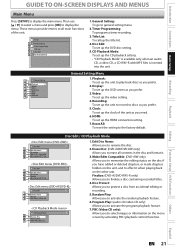
... To set up the clock of the unit. Edit Disc Name: Allows you to protect a disc from accidental editing or recording. 5. Finalize: (DVD+R/DVD-RW/-R only) Allows you to activate the random playback feature. 6. Disc Protect : Allows you to general setting menu. 2. Editing Function Setup VCR...the unit. 1 General Setting 2 Playback 3 Display 4 Video Recording 5 Clock 26 HDMI Reset All 37 General Setting Menu 1. Make Edits Compatible: (DVD+RW only) Allows you to memorize the editing status on the other unit. Program Play: (audio CD/video CD only) Allows you prefer. 5....
... To set up the clock of the unit. Edit Disc Name: Allows you to protect a disc from accidental editing or recording. 5. Finalize: (DVD+R/DVD-RW/-R only) Allows you to activate the random playback feature. 6. Disc Protect : Allows you to general setting menu. 2. Editing Function Setup VCR...the unit. 1 General Setting 2 Playback 3 Display 4 Video Recording 5 Clock 26 HDMI Reset All 37 General Setting Menu 1. Make Edits Compatible: (DVD+RW only) Allows you to memorize the editing status on the other unit. Program Play: (audio CD/video CD only) Allows you prefer. 5....
User manual, English (US)
Page 24
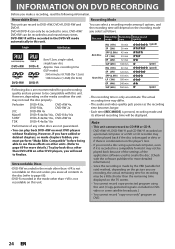
... Following discs are recommended for more details.) To play back DVD+RW on DVD. 24 EN Verbatim JVC Maxell SONY TDK DVD+R 8x, DVD+RW 4x, DVD-R 8x, DVD-RW 2x DVD-RW 4x DVD+R 4x/8x/16x, DVD-R 8x/16x DVD+R 4x/8x/16x, DVD+RW 4x DVD+R 4x/8x/16x Performance of the application software used to ...Compatible" before being able to see those effects on a personal computer or a DVD or CD recorder may be played back because of the settings of any other units. (Refer to DVD+RW, DVD+R, DVD-RW and DVD-R. DVD+R/DVD-R can record to page 69 for recording may not be played back if the ...
... Following discs are recommended for more details.) To play back DVD+RW on DVD. 24 EN Verbatim JVC Maxell SONY TDK DVD+R 8x, DVD+RW 4x, DVD-R 8x, DVD-RW 2x DVD-RW 4x DVD+R 4x/8x/16x, DVD-R 8x/16x DVD+R 4x/8x/16x, DVD+RW 4x DVD+R 4x/8x/16x Performance of the application software used to ...Compatible" before being able to see those effects on a personal computer or a DVD or CD recorder may be played back because of the settings of any other units. (Refer to DVD+RW, DVD+R, DVD-RW and DVD-R. DVD+R/DVD-R can record to page 69 for recording may not be played back if the ...
User manual, English (US)
Page 26
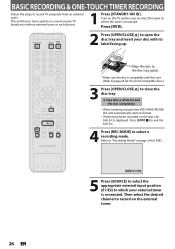
... tray. It may take a while to load the disc completely. • When inserting a brand-new DVD+RW/DVD-RW, the unit automatically starts to format. • If titles have been recorded on page 24 for the... receive TV broadcasts without external tuner or such devices. 1 Press [STANDBY-ON y]. Press [DVD]. 2 Press [OPEN/CLOSE A] to which the unit is compatible with its label facing up. Align the disc ...to page 24 for DVD. Press [STOP C] to exit the title list. 4 Press [REC MODE] to record TV programs...
... tray. It may take a while to load the disc completely. • When inserting a brand-new DVD+RW/DVD-RW, the unit automatically starts to format. • If titles have been recorded on page 24 for the... receive TV broadcasts without external tuner or such devices. 1 Press [STANDBY-ON y]. Press [DVD]. 2 Press [OPEN/CLOSE A] to which the unit is compatible with its label facing up. Align the disc ...to page 24 for DVD. Press [STOP C] to exit the title list. 4 Press [REC MODE] to record TV programs...
User manual, English (US)
Page 27
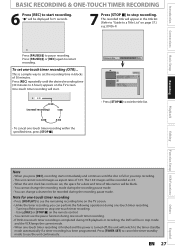
...title names will switch to the timer-standby mode automatically if a timer recording has been programmed. Using [REC] or [STOP C] on page 57.) e.g.) DVD+R I Press [PAUSE F] to pause recording. Writing to Disc 90% 1 SP(2Hr) NOV/21/08 11:00AM E1 SP NOV/21/08 0:20:44.... • You can perform the following operations during one -touch timer recording is completed during VCR playback or recording, the DVD will be recorded during one-touch timer recording. • If DVD one -touch timer recording. - "I 0:30 0:30 (normal recording) 1:00 6:00 5:30 • To cancel one ...
...title names will switch to the timer-standby mode automatically if a timer recording has been programmed. Using [REC] or [STOP C] on page 57.) e.g.) DVD+R I Press [PAUSE F] to pause recording. Writing to Disc 90% 1 SP(2Hr) NOV/21/08 11:00AM E1 SP NOV/21/08 0:20:44.... • You can perform the following operations during one -touch timer recording is completed during VCR playback or recording, the DVD will be recorded during one-touch timer recording. • If DVD one -touch timer recording. - "I 0:30 0:30 (normal recording) 1:00 6:00 5:30 • To cancel one ...

User manual, English (US)
Page 28
... watch one month in advance. Timer Programming Date Date JAN/02 E1/E2 E1 TUE JAN/01 11:00AM Start End NewSPtraorgt ram - - : - - REC To DVD E1/E2 End - - : - Before recording, make sure • Connect the external tuner to either E1 or E2 and set it to output audio/video signals...
... watch one month in advance. Timer Programming Date Date JAN/02 E1/E2 E1 TUE JAN/01 11:00AM Start End NewSPtraorgt ram - - : - - REC To DVD E1/E2 End - - : - Before recording, make sure • Connect the external tuner to either E1 or E2 and set it to output audio/video signals...


