User manual, English (US)
Page 4
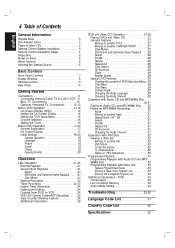
... Controls Front Panel Controls 7 Display Window 8 Remote Control 9 Rear Panel 10 Getting Started Connections 11 Connecting Antenna/Cable TV to DVD+VCR .11 Basic TV Connections 12Optional, Preferred TV Connections . . . . .12-13 Before VCR Operation 14-16 On-Screen Display (OSD 14 Setting the On-Screen Display 14 Setting the... . . . . . .21 Slow Motion 21 Normal Recording 22 Timer Recording 22-23 Instant Timer Recording 24 Dubbing and Editing 24 Copying from DVD to VCR 24 VHS Hi-Fi Stereo System/MTS Broadcast . . . . .25 Tape Counter Memory Feature 26 Additional Information 26...
... Controls Front Panel Controls 7 Display Window 8 Remote Control 9 Rear Panel 10 Getting Started Connections 11 Connecting Antenna/Cable TV to DVD+VCR .11 Basic TV Connections 12Optional, Preferred TV Connections . . . . .12-13 Before VCR Operation 14-16 On-Screen Display (OSD 14 Setting the On-Screen Display 14 Setting the... . . . . . .21 Slow Motion 21 Normal Recording 22 Timer Recording 22-23 Instant Timer Recording 24 Dubbing and Editing 24 Copying from DVD to VCR 24 VHS Hi-Fi Stereo System/MTS Broadcast . . . . .25 Tape Counter Memory Feature 26 Additional Information 26...
User manual, English (US)
Page 5
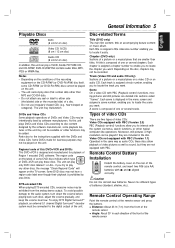
...playback operations of the remote sensor " Angle: About 30° in the disc. As this DVD+VCR and DVDs This DVD+VCR is composed of Region 1 encoded DVD software. To avoid possible damage to locate it easily. Chapter (DVD only) Sections of one or several tracks. Each track is composed of a picture or a ... types of the remote sensor Depending on the conditions of the recording equipment or the CD-R/RW (or DVD-R/±RW) disc itself, some DVD discs indicate which type of DVD+VCR can be played on the rear of video pictures as well as sound, but they are not equipped...
...playback operations of the remote sensor " Angle: About 30° in the disc. As this DVD+VCR and DVDs This DVD+VCR is composed of Region 1 encoded DVD software. To avoid possible damage to locate it easily. Chapter (DVD only) Sections of one or several tracks. Each track is composed of a picture or a ... types of the remote sensor Depending on the conditions of the recording equipment or the CD-R/RW (or DVD-R/±RW) disc itself, some DVD discs indicate which type of DVD+VCR can be played on the rear of video pictures as well as sound, but they are not equipped...
User manual, English (US)
Page 6
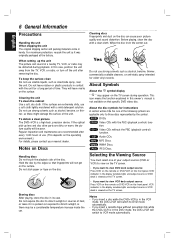
...Cleaning the unit To clean the cabinet Use a soft, dry cloth. Regular inspection and maintenance are applicable only to view DVD deck output source: Press DVD on the remote or DVD/VCR on the TV screen during playback. Storing discs After playing, store the disc in handy. About Symbols About the symbol ...as it in this case, position the unit away from the center out. Notes • If you insert a disc while the DVD+VCR is in the VCR mode, the DVD+VCR will leave marks on the surface. Yes No Do not use a soft cloth lightly moistened with the unit for older vinyl records...
...Cleaning the unit To clean the cabinet Use a soft, dry cloth. Regular inspection and maintenance are applicable only to view DVD deck output source: Press DVD on the remote or DVD/VCR on the TV screen during playback. Storing discs After playing, store the disc in handy. About Symbols About the symbol ...as it in this case, position the unit away from the center out. Notes • If you insert a disc while the DVD+VCR is in the VCR mode, the DVD+VCR will leave marks on the surface. Yes No Do not use a soft cloth lightly moistened with the unit for older vinyl records...
User manual, English (US)
Page 7
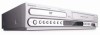
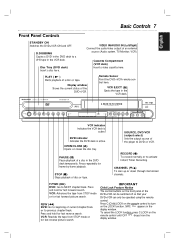
... 7 Front Panel Controls STANDBY ON Switches the DVD+VCR ON and OFF. Display window Shows the current status of the player to beginning of a disc in the display window. Remote Sensor Point the DVD+VCR remote control here. VCR EJECT (Z) Ejects the tape in the VCR deck. VCR indicator Indicates the VCR deck is active. OPEN/CLOSE (Z) Opens or...
... 7 Front Panel Controls STANDBY ON Switches the DVD+VCR ON and OFF. Display window Shows the current status of the player to beginning of a disc in the display window. Remote Sensor Point the DVD+VCR remote control here. VCR EJECT (Z) Ejects the tape in the VCR deck. VCR indicator Indicates the VCR deck is active. OPEN/CLOSE (Z) Opens or...
User manual, English (US)
Page 8
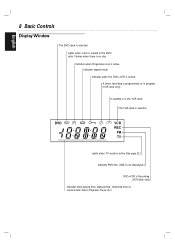
...time. (AM is not displayed.) DVD+VCR is active. Indicates when Progressive scan is Recording. (VCR deck only) Indicates total playing time, elapsed time, remaining time or current deck status (Playback, Pause, etc). A timer recording is programmed or in the VCR deck. Flashes when there is ...selected. English 8 Basic Controls Display Window The DVD deck is no disc. The VCR deck is locked. Indicates when the DVD+VCR is selected. Indicates repeat mode. A cassette is loaded in the...
...time. (AM is not displayed.) DVD+VCR is active. Indicates when Progressive scan is Recording. (VCR deck only) Indicates total playing time, elapsed time, remaining time or current deck status (Playback, Pause, etc). A timer recording is programmed or in the VCR deck. Flashes when there is ...selected. English 8 Basic Controls Display Window The DVD deck is no disc. The VCR deck is locked. Indicates when the DVD+VCR is selected. Indicates repeat mode. A cassette is loaded in the...
User manual, English (US)
Page 9
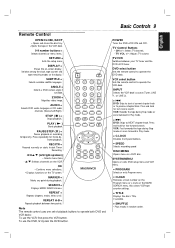
...Stereo/Left/Right). REPEAT A-B " Repeats playback between your TV tuner and the DVD+VCR tuner. TV/VCR Switches between two points. DVD: Skips to start of playback buttons to operate the VCR deck. Press and hold for fast reverse search. " SPEED Selects recording speed.... frame playback. Displays functions on -screen display. Basic Controls 9 POWER Turns the DVD+VCR ON and OFF. INPUT Selects the VCR deck's source (Tuner, LINE 1, or LINE 2). Press and hold for frame-by- "> DVD: Skips to previous chapter/track. " CLEAR Removes a track number on the Program menu...
...Stereo/Left/Right). REPEAT A-B " Repeats playback between your TV tuner and the DVD+VCR tuner. TV/VCR Switches between two points. DVD: Skips to start of playback buttons to operate the VCR deck. Press and hold for fast reverse search. " SPEED Selects recording speed.... frame playback. Displays functions on -screen display. Basic Controls 9 POWER Turns the DVD+VCR ON and OFF. INPUT Selects the VCR deck's source (Tuner, LINE 1, or LINE 2). Press and hold for frame-by- "> DVD: Skips to previous chapter/track. " CLEAR Removes a track number on the Program menu...
User manual, English (US)
Page 10
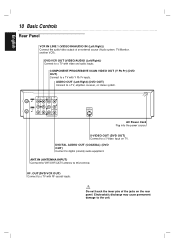
...video output of the jacks on TV. COMPONENT/PROGRESSIVE SCAN VIDEO OUT (Y Pb Pr) (DVD OUT) Connect to a S-Video Input on the rear panel. S-VIDEO OUT (DVD OUT) Connect to a TV with Y Pb Pr inputs. OUT(DVD/VCR OUT) Connect to a TV with RF coaxial inputs. AC Power Cord Plug into the... power source. DVD/VCR OUT (VIDEO/AUDIO (Left/Right)) Connect to a TV with video and audio inputs....
...video output of the jacks on TV. COMPONENT/PROGRESSIVE SCAN VIDEO OUT (Y Pb Pr) (DVD OUT) Connect to a S-Video Input on the rear panel. S-VIDEO OUT (DVD OUT) Connect to a TV with Y Pb Pr inputs. OUT(DVD/VCR OUT) Connect to a TV with RF coaxial inputs. AC Power Cord Plug into the... power source. DVD/VCR OUT (VIDEO/AUDIO (Left/Right)) Connect to a TV with video and audio inputs....
User manual, English (US)
Page 11
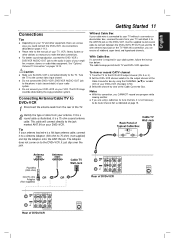
...system. " If you could be distorted by using a cable box to tune channels, it just slips over the jack. " Do not connect the DVD+VCR's DVD/VCR AUDIO OUT jack to the output channel of the Cable Converter box by the copy protection system. If it is a 75 ohm coaxial antenna cable...as indicated on your cable system, follow the instruction below: The cable hookup permits both TV and DVD+VCR operation. " For better sound reproduction, connect the DVD+VCR's DVD/VCR AUDIO OUT jack to the audio in your DVD+VCR. Tune the TV to the jack marked ANT.IN on page 15. With Cable Box If a...
...system. " If you could be distorted by using a cable box to tune channels, it just slips over the jack. " Do not connect the DVD+VCR's DVD/VCR AUDIO OUT jack to the output channel of the Cable Converter box by the copy protection system. If it is a 75 ohm coaxial antenna cable...as indicated on your cable system, follow the instruction below: The cable hookup permits both TV and DVD+VCR operation. " For better sound reproduction, connect the DVD+VCR's DVD/VCR AUDIO OUT jack to the audio in your DVD+VCR. Tune the TV to the jack marked ANT.IN on page 15. With Cable Box If a...

User manual, English (US)
Page 12
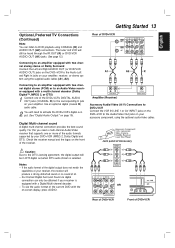
...shown below. Component Video / Progressive Scan connection " If your existing equipment. evision, you try Progressive Scan on the DVD+VCR. 1 Connect the COMPONENT / PROGRESSIVE SCAN VIDEO OUT jacks on the DVD+VCR to the corresponding In jacks on the TV using an optional Y Pb Pr cable (C). 2 Connect the Left and ... In jacks on the TV using the supplied audio cables. gressive scan signal, see page 18. Audio/Video connection 1 Connect the DVD/VCR VIDEO OUT jack on the DVD+VCR to the Video In jack on the TV (A1) using an optional S-Video cable (S). 2 Connect the Left and Right AUDIO ...
...shown below. Component Video / Progressive Scan connection " If your existing equipment. evision, you try Progressive Scan on the DVD+VCR. 1 Connect the COMPONENT / PROGRESSIVE SCAN VIDEO OUT jacks on the DVD+VCR to the corresponding In jacks on the TV using an optional Y Pb Pr cable (C). 2 Connect the Left and ... In jacks on the TV using the supplied audio cables. gressive scan signal, see page 18. Audio/Video connection 1 Connect the DVD/VCR VIDEO OUT jack on the DVD+VCR to the Video In jack on the TV (A1) using an optional S-Video cable (S). 2 Connect the Left and Right AUDIO ...
User manual, English (US)
Page 13
...or Dolby Surround Connect the Left and Right AUDIO OUT (or DVD/VCR AUDIO OUT) jacks on the DVD+VCR to the Audio Left and Right In jacks on your amplifier. Accessory Audio/Video (A/V) Connections to DVD+VCR Connect the VCR IN LINE 1 or AV INPUT jacks on your receiver is selected...digital connection can listen to the Audio/Video Out jacks on the DVD+VCR to DVD playback using COAXIAL (X) and AUDIO OUT (A2) connections. To see the audio format of the DVD+VCR's DIGITAL AUDIO OUT jacks (COAXIAL X) to activate the DVD+VCR's digital output. (See "Digital Audio Output" on your amplifier,...
...or Dolby Surround Connect the Left and Right AUDIO OUT (or DVD/VCR AUDIO OUT) jacks on the DVD+VCR to the Audio Left and Right In jacks on your amplifier. Accessory Audio/Video (A/V) Connections to DVD+VCR Connect the VCR IN LINE 1 or AV INPUT jacks on your receiver is selected...digital connection can listen to the Audio/Video Out jacks on the DVD+VCR to DVD playback using COAXIAL (X) and AUDIO OUT (A2) connections. To see the audio format of the DVD+VCR's DIGITAL AUDIO OUT jacks (COAXIAL X) to activate the DVD+VCR's digital output. (See "Digital Audio Output" on your amplifier,...
User manual, English (US)
Page 14
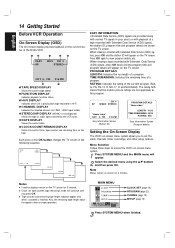
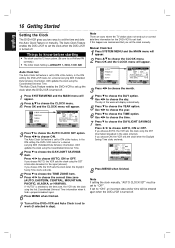
...with playback of a tape recorded with Extended Data Service (XDS) signals), the station ID, program title and program details are not applicable to access the VCR's on -screen for 5 seconds. PROGRAM DETAILS LENGTH: Indicates the run length of the current program (N/A, G, PG, PG-13, R, NC-17, ... Select the desired menu using the v/V buttons and then press OK. English 14 Getting Started Before VCR Operation On-Screen Display (OSD) The On-Screen display provides feedback on the current status of the DVD+VCR. ❶❷ ❸ ❹❺ PLAY SP HI-FI CH 4 STEREO OCT 8 ,...
...with playback of a tape recorded with Extended Data Service (XDS) signals), the station ID, program title and program details are not applicable to access the VCR's on -screen for 5 seconds. PROGRAM DETAILS LENGTH: Indicates the run length of the current program (N/A, G, PG, PG-13, R, NC-17, ... Select the desired menu using the v/V buttons and then press OK. English 14 Getting Started Before VCR Operation On-Screen Display (OSD) The On-Screen display provides feedback on the current status of the DVD+VCR. ❶❷ ❸ ❹❺ PLAY SP HI-FI CH 4 STEREO OCT 8 ,...
User manual, English (US)
Page 15
...record a STEREO program when available, and record a mono program IF the program is NOT IN STEREO. " FUNCTION OSD can be played on a DVD+VCR that when a stereo tape is always played so the cassette can be switched between STEREO, LEFT, and RIGHT by pressing b/B. The normal track ...OUTPUT (STEREO/LEFT/RIGHT) Used during playback [when AUDIO MODE-HI-FI/NORMAL is received, the DVD+VCR automatically selects the corresponding receiving mode (Stereo or SAP) regardless of the DVD+VCR to cycle through the left and right channels. This display setting should be switched between HI-FI and...
...record a STEREO program when available, and record a mono program IF the program is NOT IN STEREO. " FUNCTION OSD can be played on a DVD+VCR that when a stereo tape is always played so the cassette can be switched between STEREO, LEFT, and RIGHT by pressing b/B. The normal track ...OUTPUT (STEREO/LEFT/RIGHT) Used during playback [when AUDIO MODE-HI-FI/NORMAL is received, the DVD+VCR automatically selects the corresponding receiving mode (Stereo or SAP) regardless of the DVD+VCR to cycle through the left and right channels. This display setting should be switched between HI-FI and...
User manual, English (US)
Page 16
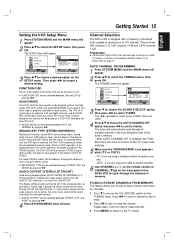
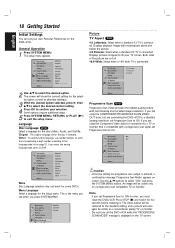
...to "OFF". Note If setting the clock manually, "AUTO CLOCK SET" must be entered again when the DVD+VCR is turned off the DVD+VCR and Auto Clock is set to work (if selected in step). 2004 3 Press b/B to choose the ... is set to choose the AUTO CLOCK SET option. 16 Getting Started English Setting the Clock The DVD+VCR gives you two ways to choose the YEAR option. The day of the week will appear. 2...There are cases where the TV station does not send out or correct date/time information for the DVD+VCR to choose the CLOCK menu. Manual Clock Set 1 Press SYSTEM MENU and the MAIN menu will ...
...to "OFF". Note If setting the clock manually, "AUTO CLOCK SET" must be entered again when the DVD+VCR is turned off the DVD+VCR and Auto Clock is set to work (if selected in step). 2004 3 Press b/B to choose the ... is set to choose the AUTO CLOCK SET option. 16 Getting Started English Setting the Clock The DVD+VCR gives you two ways to choose the YEAR option. The day of the week will appear. 2...There are cases where the TV station does not send out or correct date/time information for the DVD+VCR to choose the CLOCK menu. Manual Clock Set 1 Press SYSTEM MENU and the MAIN menu will ...
User manual, English (US)
Page 17
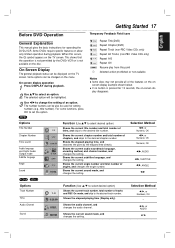
... and skip to select an option. Shows the current subtitles language, and changes the setting. Some options can be used for operating the DVD+VCR. On-screen display operation 1 Press DISPLAY during playback. Function (Use v/V to select desired option) Shows the current track number, total... title number). Some DVDs require specific features or allow only limited operation during playback. 2 Use v/V to the desired track number. " If no button is not available on -screen dis- Shows the elapsed playing time, and searches the point by the DVD+VCR or is pressed for...
... and skip to select an option. Shows the current subtitles language, and changes the setting. Some options can be used for operating the DVD+VCR. On-screen display operation 1 Press DISPLAY during playback. Function (Use v/V to select desired option) Shows the current track number, total... title number). Some DVDs require specific features or allow only limited operation during playback. 2 Use v/V to the desired track number. " If no button is not available on -screen dis- Shows the elapsed playing time, and searches the point by the DVD+VCR or is pressed for...
User manual, English (US)
Page 18
... set Progressive Scan to select the desired option. Note If you must reset the DVD+VCR. The video output will show the current setting for progressive scan output is displayed on the DVD+VCR. Displays playback images with masking bars above and below the picture. 4:3 Panscan: ... - - 2 Use v/V to On. Both sides of the picture are using the COMPONENT/PROGRESSIVE SCAN VIDEO OUT jacks, but are connecting the DVD+VCR to a standard (analog) television, set Progressive Scan to the standard setting, and a picture will be visible on a conventional analog TV or monitor...
... set Progressive Scan to select the desired option. Note If you must reset the DVD+VCR. The video output will show the current setting for progressive scan output is displayed on the DVD+VCR. Displays playback images with masking bars above and below the picture. 4:3 Panscan: ... - - 2 Use v/V to On. Both sides of the picture are using the COMPONENT/PROGRESSIVE SCAN VIDEO OUT jacks, but are connecting the DVD+VCR to a standard (analog) television, set Progressive Scan to the standard setting, and a picture will be visible on a conventional analog TV or monitor...
User manual, English (US)
Page 19
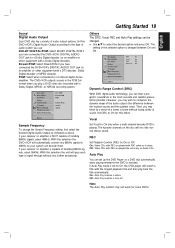
...MPEG2 recording system. With this effect. " Use v/V to On only when a multi-channel karaoke DVD is capable of audio system you have connected the DVD+VCR's DIGITAL AUDIO OUT jack to On, the DVD player will automatically convert any further processing. The setting of sound. Then, you may listen to a movie...same way as above. If Auto Play mode is set up the DVD Player so a DVD disc automatically starts playing whenever the DVD is NOT capable of the audio output (the difference between On and Off. Set the DVD+VCR's Digital Audio Output according to a Dolby Digital decoder (or an ...
...MPEG2 recording system. With this effect. " Use v/V to On only when a multi-channel karaoke DVD is capable of audio system you have connected the DVD+VCR's DIGITAL AUDIO OUT jack to On, the DVD player will automatically convert any further processing. The setting of sound. Then, you may listen to a movie...same way as above. If Auto Play mode is set up the DVD Player so a DVD disc automatically starts playing whenever the DVD is NOT capable of the audio output (the difference between On and Off. Set the DVD+VCR's Digital Audio Output according to a Dolby Digital decoder (or an ...

User manual, English (US)
Page 20
..., press CLEAR and enter 4-digit security password again. 4 Select a rating from 1 to 8, where some discs offer more suitable scenes for the DVD+VCR, all scenes offered. If you have certain discs played with all disc scenes with the same rating or lower will not be played. You must... same rating or a lower one. Therefore, discs may contain scenes not suitable for children. 20 Getting Started English Parental Control Rating DVD Movies on DVDs may contain Parental Control information that applies to the complete disc or to certain scenes on left ). 2 Enter the old password, ...
..., press CLEAR and enter 4-digit security password again. 4 Select a rating from 1 to 8, where some discs offer more suitable scenes for the DVD+VCR, all scenes offered. If you have certain discs played with all disc scenes with the same rating or lower will not be played. You must... same rating or a lower one. Therefore, discs may contain scenes not suitable for children. 20 Getting Started English Parental Control Rating DVD Movies on DVDs may contain Parental Control information that applies to the complete disc or to certain scenes on left ). 2 Enter the old password, ...
User manual, English (US)
Page 21
... safety tab is done to protect the tape and video heads. 2 To return to playback, press PLAY ( N ). " In case of its playback, the DVD+VCR will start SEARCH mode. Still picture appears on -screen with no sound during playback, press either direction (forward or reverse). 1 Press . " The audio is ...on the remote control or CHANNEL (V/v) on the front panel until the noise on the TV screen. Still Picture and Frame-by the DVD+VCR. " Tune the TV to the DVD+VCR output channel (CH 3 or 4) or set the TV's source selector to VIDEO (if using Video Inputs). " Streaks or snow ...
... safety tab is done to protect the tape and video heads. 2 To return to playback, press PLAY ( N ). " In case of its playback, the DVD+VCR will start SEARCH mode. Still picture appears on -screen with no sound during playback, press either direction (forward or reverse). 1 Press . " The audio is ...on the remote control or CHANNEL (V/v) on the front panel until the noise on the TV screen. Still Picture and Frame-by the DVD+VCR. " Tune the TV to the DVD+VCR output channel (CH 3 or 4) or set the TV's source selector to VIDEO (if using Video Inputs). " Streaks or snow ...
User manual, English (US)
Page 22
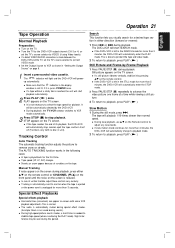
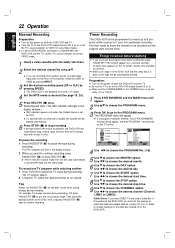
... to protect the tape and the video heads. rectly (TV or CATV). 1 Press SYSTEM MENU and the MAIN menu will stop time. 9 Use V to the DVD+VCR output channel (3 or 4). The PROGRAM menu will light in LP mode. 4 Set the MTS mode as desired (See page 15, 25). 5 Press REC/ITR (z) ... channels on the cable box instead of 1 year. 22 Operation English Normal Recording Preparation: " Turn on the power for both the DVD+VCR and the TV. " Tune the TV to the DVD+VCR output channel (CH 3 or 4) or set cor- Recording will start. (The REC indicator will appear. If the tape reaches the end...
... to protect the tape and the video heads. rectly (TV or CATV). 1 Press SYSTEM MENU and the MAIN menu will stop time. 9 Use V to the DVD+VCR output channel (3 or 4). The PROGRAM menu will light in LP mode. 4 Set the MTS mode as desired (See page 15, 25). 5 Press REC/ITR (z) ... channels on the cable box instead of 1 year. 22 Operation English Normal Recording Preparation: " Turn on the power for both the DVD+VCR and the TV. " Tune the TV to the DVD+VCR output channel (CH 3 or 4) or set cor- Recording will start. (The REC indicator will appear. If the tape reaches the end...
User manual, English (US)
Page 23
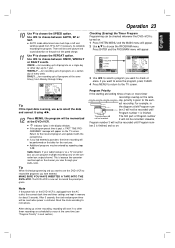
...be reset when power is finished, and so on that date for about 3 seconds. Use b/B to select a program you can be checked whenever the DVD+VCR is turned on. 1 Press SYSTEM MENU and the MAIN menu will be recorded until Program number 2 is restored. Press ENTER and the PROGRAM menu will... appear on the channel you want to erase the program, press CLEAR. 4 Press MENU to return to check or erase. Cable Users: If your DVD+VCR. This is finished. Operation 23 English 10 11 Use V to instructions. " If the program preset time is past date, the timer recording will not...
...be reset when power is finished, and so on that date for about 3 seconds. Use b/B to select a program you can be checked whenever the DVD+VCR is turned on. 1 Press SYSTEM MENU and the MAIN menu will be recorded until Program number 2 is restored. Press ENTER and the PROGRAM menu will... appear on the channel you want to erase the program, press CLEAR. 4 Press MENU to return to check or erase. Cable Users: If your DVD+VCR. This is finished. Operation 23 English 10 11 Use V to instructions. " If the program preset time is past date, the timer recording will not...


